S5850-24T16B Switch FSOS Software Upgrading Instructions

1. Introduction to Version Upgrade
When new features are added or the original performance needs to be optimized and the current running version is out of date, the device needs to be upgraded. In this case, you need to load a high version of the system software, upgrade through the CLI interface, WEB interface, and restart the device.
2. CLI Upgrade
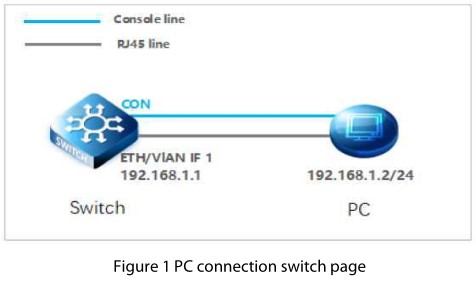
2.1 Network Topology
2.2 Configuration Steps
(1) connection Equipment
#Connect the PC and the switch to the network cable and the console port. Connect one end of the RJ-45 network cable to the network card interface of the PC and the other end to the network port of the SW. Connect one end of the console c able USB to the USB port of the PC. One end of the RJ-45 is connected to the console port on the front panel of the switch.
(2) Download Configuration Software
# After the connection is completed, there we recommend the super terminal, putty or Secure CRT tool to configure the switch.
(3) Switch on and Use Login Software
#Energizing the switch, then open the installed login software, select the serial port of login mode, port through the device manager to determine. Baud rate :115200, Data bits: 8, Parity: None, Stop bits: 1. (Reference below)
NOTE: COM Number can be viewed through device manager. (right click on my computer.>manage>device manager>port (COM and LPT) If it displays an unrecognized USB device, please download and install the corresponding driver.

(4) Login Switch
#After completing the above steps, hitting the Enter key of the keyboard will prompt you to enter the account password. At this time, enter the default username and password admin/admin to log in to the s witch.
(5) Upgrade Software
#After logging in to the switch, open the installed TFTP upload software, specify the server root directory in its options, and put the files to be uploaded into this directory.

NOTE: The file FSOS_S5800_8TF12S-V5.3.x.bin should be placed in the root directory of the server.
(6) Upgrade uImage
Console# copy mgmt-if tftp://192.168.1.2/FSOS_S5800_8TF12S-V5.3.x.bin flash:/boot/FSOS_S5800_8TF12S-V5.3.x.bin
NOTE: The 5.3.x in file FSOS_S5800_8TF12S-V5.3.x.bin indicates support for all versions of the 5.3 series.
(7) Application SystemFile
Console#boot system flash:/boot/FSOS_S5800_8TF12S-V5.3.x.bin
(8) Reboot the device
Console#reboot
(9) Upgrade webImage
#After completing the above steps, wait for the device to restart before continuing to upgrade the webImage.
Console# copy mgmt-if tftp://192.168.1.2/FSOS-webImage-v5.3.x.bin flash:/FSOS-webImage-v5.3.x.bin
(10) Enable web services
Console(config)# http server load flash:/FSOS-webImage-v5.3.x.bin
Console(config)# service http enable
Console(config)# service https enable
3. Web Upgrade
3.1 Network Topology
3.2 Configuration Steps
(1) Enable web services
Console(config)# http server load flash:/FSOS-webImage-v5.3.9.bin
Console(config)# service http enable
Console(config)# service https enable
NOTE: FSOS-webImage-v5.3.9.bin is the old web version.
(2) Login WEB
#Enter the IP address of the management interface in the URL field of the browser: 192.168.1.1, and then enter the default username and password: admin/admin

After successful login, the monitor page will appear , as shown in figure 3.

(3) Upgrade uImage
#After entering the WEB interface of the switch, click “System Management>File Management” to select the uImage file to be upgraded on web. During the upgrade process, do not close the upgrade page and power off the device.

(4) Application System File
#After uploading the uImage, click “Use Image”, you can apply the uImage file.

#After applying the uImage file, you can see that it is followed by a *.

(5) Reboot the device

Documents / Resources
 |
FS S5850-24T16B Switch FSOS Software Upgrading [pdf] Instructions S5850-24T16B, S5800, S8050, S5850-24T16B Switch FSOS Software Upgrading, S5850-24T16B Switch, Switch FSOS, Switch, FSOS Software, FSOS Software Upgrading |