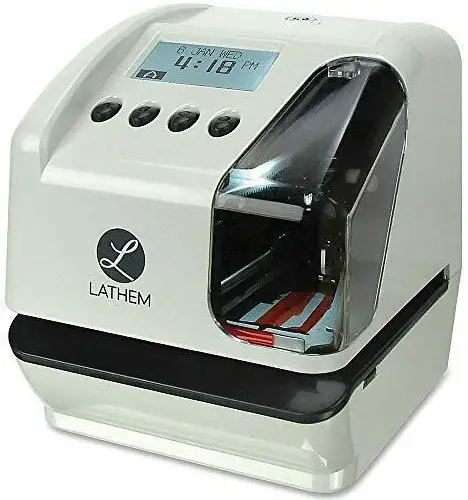
LATHEM LT5000 Electronic Multiline Time Date and Numbering Document Stamp User Guide
Packing Contents
- LT 5000

- User’s manual

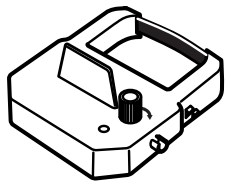
- Ink ribbon cassette
- Keys

- Wall mount screws

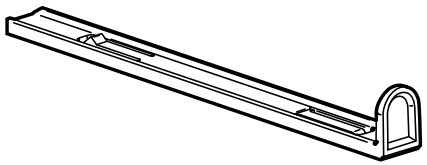
- Paper guide gauge
Overview


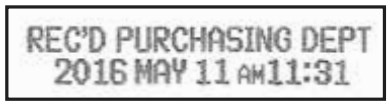
How to Punch
Insert a paper into the paper slot while the cover is on the device.
[Note] Printing may not start just by inserting a paper depending on the setting. (Refer to p. 10-11 Menu Tree.)
Installation of optional battery
- Unlock the key and remove the cover.
- Insert the battery connector into the compartment connector to install the battery. Be sure to connect the black cable to the display side.
- Replace the cover and lock.

[CAUTION] Replace the optional Ni-MH rechargeable battery with part number VIS6001 (HHR-06TH7W1) only. Use of another battery may be at risk of fire or explosion. Dispose of used batteries in accordance with applicable local regulations.
Wall mounting
[CAUTION] The supplied screws are intended for use on a thick wooden wall or wooden column. Do not use them on any other materials. The device may come off if used on other materials.

- Install the supplied wall mount screws into a wall by using the template located on the next page. Be sure to keep about 6mm (1/4″) of the screw head away from the wall.
- Unlock the key and remove the cover. And then hang it on the wall.
- Replace cover and lock.
Wall mount template
Please copy and use this template when needed.
Leave about 6mm (1/4″) gap between wall and screw head.
Level Line
(width 85mm (3-11/32″))
Replacing ink ribbon cassette
- Unlock the key and remove the cover.
- Hold the ink ribbon cassette by its tab and pull straight out to remove it.
- Turn the knob of the new cassette in the direction of the arrow (clockwise) to tighten the ribbon.

- Place the cassette inside the device as shown in the figure. Push the cassette until its naps into the position. Turning the knob on the cassette may make installation easier.
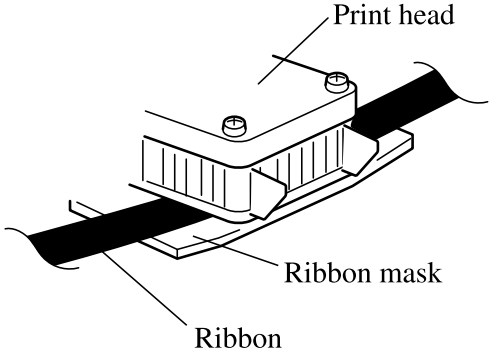
[Note]
Install the cassette so that the ribbon is between the print head and the ribbon mask. Printing will not come out properly if the ribbon is placed under the ribbon mask. - Turn the knob of the cassette in the direction of the arrow to tighten the ribbon.
- Replace the cover and lock.

Remote setup and additional functions
This device supports additional remote setup functionality. Additional print settings, counters, flexible content, and custom comments can be easily configured and applied to one or more devices via USB memory disk. Please see further in-box documentation for more details.
[CAUTION]
- The USB insertion slot is for USB memory device only, and will not support other devices. The provided USB interface is compatible with USB 2.0 full-speed (12Mbps) only.
- USB memory device protected physically can’t be used on the device.
- Do not remove the USB memory device and do not remove power to the LT5000 during use of the USB memory device. Interrupted communication to the USB memory device could result in loss or corruption of data and damage to the device.
- In no event shall we be liable for lost or damaged data, or recovery of lost or damaged data, on the LT5000 or USB memory device.
- Customize Print Set Formats (1 or 2 lines)
Personalize les formats d’impression (1 ou 2 lignes) /
- Assign Print Set to Buttons
Assignee les formats d’impression aux buttons

- Configure Settings and Transfer via USB Drive

Start setting
To stan setting, click down the setting button first. According to indicated icons, click down a corresponding key. (Refer to p.21 Menu tree.)

Display
Functions of operation keys (A – D) are displayed by the icons on LCD. You can operate flashing item by clicking down the corresponding keys.

Icons
| Icon | Function |
 |
Select able print set (A, B, C, and D) Selected print set (A, B, C, or D) Un select able print set [Note] The icon A, B, C, or D will not appear on the display when the corresponding print set is not installed. |
 |
Previous / Next menu Set / Cancel Change value Select next / previous option |
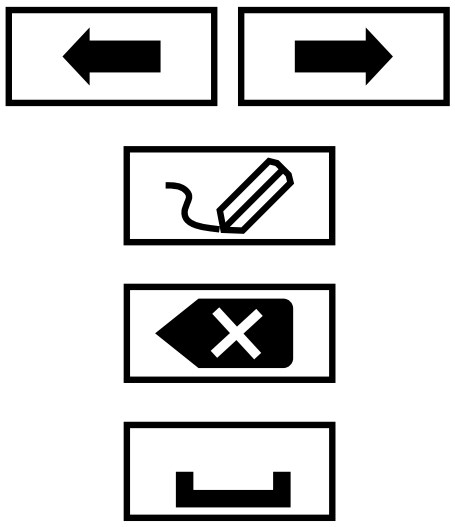 |
Move the cursor to Left / Right Input mode Delete mode Insert mode |
 |
Change Lock/Unlock of print set selection Change Lock/Unlock of punching Change ON/OFF of the light at print area Change ON/OFF of the light on the display |
| Select able options | Explanation | |||
| MENU | 1. CLOCK | Set the current date and time for calendar and clock. | ||
| TIME DATE DISP. HOURS DISP. ORDER |
YEAR MONTH DATE |
HH:MM 00 – 99 01 – 12 01 – 31 1. AM/PM, 2. 24 HOURS 1. DD MMM DOW, 2. MMM DD DOW 3. DOW DD MMM, 4. DOW MMM DD |
[Note]
|
|
| 2. PRINT SET | Set formats of each line, print position, time shift, and numbering counter. | |||
| LINE-I LINE-2 SIDE
ALIGNMENT TIME SHIFT COUNTER |
1 – 31 [Refer to p.25 Format list]
– 31 [Refer to p.25 Format list] LEFT, 2. RIGHT 1. LEFT, 3. RIGHT 1. SHIFT-1 |
[Note]
• You can select only ’COUNTER-I’ on the device. When the setting is installed via USB stick, the display may show other counter No., COUNTER-2, 3, or 4. |
||
| 3.CONTENTS | Set print style and comment. | |||
| YEAR HOURS MINUTE LEADING ZERO FIXED CMNT CI-FONT CUSTOM-1 C2-FONT CUSTOM-2 |
1. 2 DIGITS, 2. 4 DIGITS 1. AM/PM, 2. 24 HOURS 1. 1/60, 2. 1/100, 3. 1/20, 4. 1/10 1. WITHOUT 2. WITH l – 15 [Refer to p.25 Fixed comment list] 1. BOLD, 2. LARGE, 3. SMALL (characters for the first line) 1. BOLD, 2. LARGE, 3. SMALL (characters for the second line) |
Cl (or 2)-FONT is to select print font of CUSTOM-1 (or 2).
[Note]
|
||
| 4. COUNTER | Set rule of the numbering counter. | |||
| DIGIT MAXIMUM MINIMUM INITIAL REPEAT LOOP RESET | 1 – 8 1 – 99999999 0 – 99999998 0, l – 99999999 -9, .. . , -1, 0, 1, . .. , +9 1. STOP, 2. LOOP 1. PROHIBIT, 2. DAILY, 3. MANUAL |
[Note]
When you select ’2. LOOP’, the counter will start counting up (down) from the minimum (maximum) number again. |
||
| s. om sinrz | Set shifting days and time (to the future) to print instead of the current time. | |||
| SHIFT-1 | DAY TDWE | 00 – 14 HH:MM | ||
| 6. PROGRAM | Set programs to control print allowance and print set selection. | |||
| NO. 01 – 48 | DOW TIME ACTION | SUN, MON, TUE, WED, THU, FRI, SAT HH:MM
P-LOC, P-UNL S-LOC, S-UNL SEL-A, SEL-B, SEL-C, SEL-D |
You can specify the execution of the program by setting D.O.W, time, and actlon. There are three types of actlon as shown below. When the specified D.O.W. and time comes, the action (as programmed) will be executed. The program and action remains in effect until another program is executed which contains a different action of the same type. When you set to ‘—‘ on “DOW” of the weekly program, the program will be deleted. Types of action: P-LOC / P-UNL: Set to print lock / unlock. During the effective time of ’P-LOC’, punch is prohibited, and the light at print area is off.S-LOC / S-UNL: Set to print set selection lock / unlock. During the effective time of ‘S-LOC’, selecting a print set is prohibited. SEL-A, B, C, or D: Change a print set to the specified print set at the execution time on the D.O.W. (You can also change print set by key operation even during the effective time of the program. However, when 10 seconds pass, it will automatically go back to the print set specified by the program. If you want to fix print set, you also need to make another program with S-LOC.) |
|
| MENU | Select able options | Explanation | ||
| 7. PR.METHOD | Select a method of print activation. | |||
| ACTIVATION | 1. AUTO. 2. SEMI-AUTO, 3. MANUAL | AUTO: When the paper sensor on the device detects a paper, the device starts to print the selected print set. SEMI-AUTO: You can punch by clicking down a key corresponding to the print set which you want to print, while the paper sensor on the device detects a paper. MANUAL: You can punch anytime by clicking down a key corresponding to the print set which you want to print. While’MANUAL’ is selected, the paper sensor is temporarily off. |
||
| 8. LANGUAGE | Select a language. | |||
| LANGUAGE |
|
[Note]
|
||
| 9.D.S.T. | Set daylight saving time period. | |||
| START END CLEAR |
YEAR MONTH DATE YEAR MONTH DATE |
00 – 99 01 – 12 01 – 31 00 – 99 01 – 12 01 – 31 |
Once the start/end dates are set, the dates are calculated automatically every year. When the set date is in the last week of a month, the set date is regarded as the day of the week in the last week, even when the number of weeks in the month changes year after year. At 2:00AM on the first day of D.S.T. period, the device automatically gains one hour to show 3:00AM. When 3:00AM comes on the last day of D.S.T. period, the device automatically loses one hour and returns to 2:00AM. Printing hour and minute follows hour and minute shown on the device. | |
| 10. PASSWORD | Set a password to protect the settings and data. | |||
| NUMBER | (4 digits) | 0000 – 9999 | When you set to ‘0000’, the password will be deleted. | |
| 11. DATA | Functions about data and USB. | |||
| LOAD <USB:> OUTPUT <USB:> DELETE DEVICE NO. DATA FULL |
SETTING DATA PUNCH DATA PUNCH DATA 001 – 999 1. PUNCH ONLY, 2. STOP |
LOAD <USB>: Install the setting data from USB stick. If succeed, “END” appears on the display.
OUTPUT<USB>: Pick up the punch data to USB stick. If succeed, “END” appears on the display. DELETE: Delete the punch data from the device. DEVICE NO.: Set a device number of the device. DATA FULL: Set an action when the memory of the device is full. [Note]
|
||
| LOCK | Set LOCK/UNLOCK of print and print set selection. | |||
| PRINT SELECT | LOCK, UNLOCK LOCK, UNLOCK | Every time you click down the corresponding key, LOCK/UNLOCK is selected in turn. This setting priors to weekly program. However, in case that ’UNLOCK’ by this setting is selected while ‘P-LOC’ by weekly program is effective, the device will go back to ’LOCK’ once the device is left for 10 minutes without any operation. |
||
| LIGHT | Set ON/OFF of light on LCD and at print area. | |||
| PRINT LCD |
ON, OFF ON,OFF |
Every time you click down the corresponding key, ON/OFF is selected in turn. | ||
| COUNTER RESET | Reset value of the counter and go back to the initial number. | |||
| COUNTER-1 COUNTER-2 COUNTER-3 COUNTER-4 COUNTER-ALL |
(current value) (current value) (current value) (current value) |
This operation is not availatile to COUNTER-1 when ‘1. PROHIBIT’ on “RESET” of “4. COUNTER” is selected. The counter (which ‘1. PROHIBIT’ is selected) is excluded even if reset by COUNTER-ALL is executed. | ||
Format list
Y=Year, M=Month, D=Date, DOW=Day of the week, H=Hour, Min=Minute, S=Second C=Comment, N=Number of the counter
| No. | Format | PrintExample | No. | Format | Print Example |
| 1 | M.D.H.Min | JAN3110:00 | 17 | Y.M.D.C | ’16 JAN 31 SENT |
| 2 | D.M.H.Min | 31 JAN 10:00 | 18 | C.D.H.Min | SENT 31 10:00 |
| 3 | M.D.Y.H.Min | JAN 31 ’16 10:00 | 19 | N.M.D.Y | 000123 JAN 31 ’16 |
| 4 | D.M.Y.H.Min | 31JAN’16 10:00 | 20 | N.D.M.Y | 000123 31 JAN ’16 |
| 5 | Y.M.D.H.Min | ’16 JAN 31 10:00 | 21 | N.Y.M.D | 000123 ’16 JAN 31 |
| 6 | Y.M.D.H.Min.S | ’16 JAN 31 10:00:00 | 22 | M.D.Y.N | JAN 31 ’16 000123 |
| 7 | D.H.Min | 3110:00 | 23 | D.M.Y.N | 31 JAN ’16 000123 |
| 8 | DOW.D.H.Min | SU, 31 10:00 | 24 | Y.M.D.N | ’16 JAN 31 000123 |
| 9 | Y.M.D | ’16 JAN 31 | 25 | N.D.H.Min | 000123 31 10:00 |
| 10 | M.D | JAN 31 | 26 | N.M.D.H.Min | 123 JAN 31 10:00 |
| 11 | DOW.D.M.Y | SU, 31JAN’16 | 27 | N.Y.M.D.H.Min | 123 ’16 JAN 31 10:00 |
| 12 | C.M.D.Y | SENT JAN 31’16 | 28 | N.Y.M.D.H.Min.S | 123 ’16 JAN 31 10:00:00 |
| 13 | C.D.M.Y | SENT 31JAN’16 | 29 | N | 000123 |
| 14 | C.Y.M.D | SENT’16 JAN 31 | 30 | CUSTOM-1 | |
| 15 | M.D.Y.C | JAN 31’16 SENT | 31 | CUSTOM-2 | |
| 16 | D.M.Y.C | 31 JAN’16 SENT | |||
[Note] No. 32-37 of format numbers are allocated for the customized comments (CUSTOM 3-8). They are additional function by the setting file via USB stick.
Fixed comment list
| No. | Comment | No. | Comment | No. | Comment |
| 1 | RCVD (Received) | 6 | FILED | 11 | ORIGIN (Original) |
| 2 | SENT | 7 | PAID | 12 | APR’D (Approved) |
| 3 | IN | g | USED | 13 | CMPL’D (Completed) |
| 4 | OUT | 9 | FAXED | 14 | START |
| 5 | CFMD (Confirmed) | lo | VOID | 15 | END |
Character list
| Character | 0 | 1 | 2 | 3 | 4 | 5 | 6 | 7 | 8 | 9 | |
| Dots | Bold | 7 | 7 | 7 | 7 | 7 | 7 | 7 | 7 | 7 | 7 |
| Large | 6 | 6 | 6 | 6 | 6 | 6 | 6 | 6 | 6 | 6 | |
| Small | 5 | 5 | 5 | 5 | 5 | 5 | 5 | 5 | 5 | 5 | |
| Character | A | B | C | D | E | F | G | H | I | J | |
| Dots | Bold | 7 | 7 | 7 | 7 | 7 | 7 | 7 | 7 | 4 | 7 |
| Large | 6 | 6 | 6 | 6 | 6 | 6 | 6 | 6 | 3 | 6 | |
| Small | 5 | 5 | 5 | 5 | 5 | 5 | 5 | 5 | 3 | 5 | |
| Character | A | B | C | D | E | F | G | H | I | J | |
| Dots | Bold | 7 | 7 | 7 | 7 | 7 | 7 | 7 | 7 | 4 | 7 |
| Large | 6 | 6 | 6 | 6 | 6 | 6 | 6 | 6 | 3 | 6 | |
| Small | 5 | 5 | 5 | 5 | 5 | 5 | 5 | 5 | 3 | 5 | |
| Character | K | L | M | N | O | P | Q | R | S | T | |
| Dots | Bold | 7 | 7 | 7 | 7 | 7 | 7 | 7 | 7 | 7 | 6 |
| Large | 6 | 6 | 7 | 6 | 6 | 6 | 6 | 6 | 6 | 5 | |
| Small | 5 | 5 | 5 | 3 | 5 | 3 | 5 | 3 | 5 | 3 | |
| Character | U | V | W | X | Y | Z | |||||
| Dots | Bold | 7 | 7 | 7 | 7 | 6 | 7 | ||||
| Large | 6 | 6 | 7 | 6 | 5 | 6 | |||||
| Small | 5 | 5 | 5 | 5 | 5 | 5 | |||||
| Character | * | + | – | / | |||||||
| Dots | Bold | 2 | 6 | 6 | 4 | 6 | 4 | 7 | 4 | 4 | 5 |
| Large | 2 | 5 | 5 | 3 | 5 | 3 | 5 | 3 | 3 | 4 | |
| Small | 2 | 5 | 5 | 3 | 4 | 3 | 5 | 3 | 3 | 3 | |
| Character | & | # | $ | H | [ | \ | ] | ^ | ( | ||
| Dots | Bold | 9 | 8 | 8 | 8 | 6 | 7 | 6 | 7 | 4 | 6 |
| Large | 8 | 6 | 5 | 6 | 5 | 5 | 5 | 3 | 3 | 3 | |
| Small | 7 | 5 | 5 | 5 | 4 | 5 | 4 | 3 | 2 | 4 | |
| Character | | | ) | (EUR) | [ | (Space) | ||||||
| Dots | Bold | 4 | 6 | 6 | 7 | 10 | 3 | ||||
| Large | 3 | 5 | 5 | 6 | 7 | 2 | |||||
| Small | 3 | 4 | 5 | 5 | 7 | 1 | |||||
| Character | a | b | c | d | e | f | g | h | i | j | |
| Dots | Small | 4 | 4 | 4 | 4 | 4 | 3 | 4 | 4 | 1 | 2 |
| Character | a | b | c | d | e | f | g | h | i | j | |
| Dots | Small | 4 | 4 | 4 | 4 | 4 | 3 | 4 | 4 | 1 | 2 |
| Character | a | b | c | d | e | f | g | h | i | j | |
| Dots | Small | 4 | 4 | 4 | 4 | 4 | 3 | 4 | 4 | 1 | 2 |
| Character | k | 1 | m | n | o | p | q | r | s | t | |
| Dots | Small | 4 | 1 | 5 | 4 | 4 | 4 | 4 | 4 | 4 | 3 |
| Character | u | v | w | x | y | z | |||||
| Dots | Small | 4 | 4 | 5 | 5 | 4 | 5 | ||||
Language – Specific Character
| Character | ¡ | Ñ | ¿ | ii | S | Ä | Ö | Ü | |||
| Dots | Bold | 4 | 7 | 6 | 4 | 8 | 6 | 7 | 7 | 7 | 7 |
| Large | 3 | 6 | 5 | 3 | 6 | 6 | 6 | 6 | 6 | 6 | |
| Small | 3 | 5 | 5 | 2 | 6 | 5 | 5 | 5 | 5 | 5 | |
| Character | ä | ö | ü | E | ă | ç | é | it | è | ||
| Dots | Bold | 6 | 6 | 6 | 7 | 6 | 3 | 6 | 6 | 6 | 6 |
| Large | 6 | 5 | 5 | 6 | 6 | 3 | 5 | 5 | 5 | 5 | |
| Small | 4 | 4 | 4 | 5 | 4 | 3 | 4 | 4 | 4 | 4 | |
| Character | É | ò | ì | Am | Pm | (Clock) | |||||
| Dots | Bold | 7 | 6 | 4 | 11 | ll | 7 | ||||
| Large | 6 | 5 | 3 | 11 | 11 | 7 | |||||
| Small | 5 | 4 | 3 | 10 | 10 | 7 | |||||
[Note]
Printable characters depend on the selected language.
Control code list
By inserting these control characters in customized comments, the following are available.
- Date, time, value of the counter, and the device No. can be printed.
- Current time / shifted time can be switched.
- Printing font can be changed.
[Note]
- To print shifted time, you have to set on “5. TIME SHIFT”.
- Control characters for fonts are not select able on the device. (Just displayed.) On the device, you can select font on “C1 (or 2)-FONT” of “3. CONTENTS”. As far as you set contents of the customized comment on the device, you can use only one type of font for one customized comment.
- It is not possible to include several counters in one customized comment.
- It is not possible to include several time shifts in one customized comment
| Code | Action | Explanation |
|
|
Year | Expand year into customized comment. Actual number of dots depends on the setting. |
| Month | Expand month into customized comment. Actual number of dots depends on the setting. To print month by number, set ‘7. NUMERIC’ on “8. LANGUAGE”. |
|
 |
Expand day into customized comment. Actual number of dots depends on the setting. | |
|
|
D.O.W. | Expand D.O.W. into customized comment. Actual number of dots depends on the setting. |
|
|
HH:MM | Expand time (HH:MM) into customized comment. Actual number of dots depends on the setting. |
|
|
HH:MM:SS | Expand time (HH:MM:SS) into customized comment. Actual number of dots depends on the setting. |
|
|
Counter | Expand counter into customized comment. Actual number of dots depends on the setting. |
|
|
Time shift | Turn on/off time shift. (Default is off.) [Note] Once time shift is turned on by this code, it is effective until the same code is input again. |
|
|
.Device No. | Expand its device number into customized comment. |
|
|
Bold font | (Additional function via USB) Change characters to Bold font. [Note] You can not set this code on the device. |
|
|
Large font | (Additional function via USB) Change characters to Large font. [Note] You can not set this code on the device. |
|
|
Small font | (Additional function via USB) Change characters to Small font. [Note] You can not set this code on the device. |


Printing position

You can change “Print margin” by sliding the lever on the buttom of the device.
Error/ Warning code list
Warning
| No. | Display | Cause | Action |
| W05 | INSERT AGAIN ! | The paper is not inserted properly. | nsert the paper again during W05 is displayed (10 sec.). During the 10 sec. time for printing is kept at the time when W05 was indicated. |
| W07 | NO PRINT DATA |
|
Set a format on “LINE-1” of “2. PRINT SET”. Set “CUSTOM-1 (or 2)” of “3. CONTENTS”. |
| W08 | COUNTER LIMIT | The value of the counter reaches limit (maximum or minimum number). | Set ‘2. LOOP’ on “LOOP” of “4. COUNTER”, or reset the counter. |
| W09 | MEMORY FULL | Memory in the device is full | Set ‘1. PUNCH ONLY’ on “DATA FULL” of “11. DATA”, or delete punch data. |
| W40 | PASSWORD ERROR | Password is incorrect. | Input the correct password. |
| W41 | DST SETTING ERR | Start/end date of DST is incorrect. | Set the correct start/end date of D.S.T. |
| W49 | SETTING ERROR |
|
Make a customized comment less than 160 dots in total, referring to the character list. Set the correct value for maximum and minimum numbers. |
| W61 | NO PUNCH DATA | No data to be picked up is in the memory of the device | Check the format whether it includes counter first. After that, punch and try it again. |
| W62 | WRITING ERROR | Data can not be written in the USB stick. | Use another USB stick. |
| W63 | READING ERROR | Data can not be read out from the USB stick. | |
| W64 | FILE NOT FOUND | No setting file is found. | Store the correct setting file in the USB stick, and try it again. |
| W65 | USB STICK FULL | The USB stick does not have enough space. | Delete data in the USB stick, or use another USB stick which has enough space |
| W66 | CHECK ERR FILE ! | Setting file has error | Check error file in the USB stick. |
| W67 | USB PROTECTED | The USB stick is protected physically or by software. | Check the protection status of the USB stick, and try it again. |
| W68 | USB STICK ERROR | The USB stick can not be used on the device. | Use another USB stick. |
Error
| No. | Display | Cause | Action |
| E00 | PROGRAM ERROR | CPU error | Try reset first. If this error is still displayed after reset, contact the shop from whom you bought your device. |
| E01 | BACK UP ERROR | The remaining life of battery for memory back-up is short. | |
| E15 | SENSOR ERROR | Sensor error | |
| E16 E17 |
PROGRAM ERROR | Memory error | |
| E30 | H. POSITION ERROR | Printing can not be performed. | Make sure that debris are not inside E32 print area, and the ribbon cassette is E38 correctly installed in place. After that, try reset. If this error is still displayed after reset, contact the shop from whom you bought your device |
| MECHANICAL | A printer motor or sensor is no normal | ||
| E39 | |||
| E60 | USB ERROR | USB error | Try reset, or use another USB stick. If this error is still displayed after reset, contact the shop from whom you bought your device. |
| E69 | USB POWER FAIL |
Recovery from error / warning
Warning (Wxx): Automatically recover from the warning.
Error (Exx): Push the setting button for 3 seconds.
Reset
Initialization
Click down the reset button after removing the cover.
[Note] Any setting shall be kept.
All clear
Click down the reset button while pressing the key A and C after removing the cover.
[Note]
- All settings including date and time will be deleted, and the device will go back to the default settings.
- Punch data stored in the device is not deleted.
Troubleshooting
If your device does not work normally and no Error/Warning code is shown on the display, check the items listed below.
Before checking them, make sure to initialize the device first. (Refer to p.30 Reset.)
The device does not work. (Nothing is shown on the display).
- Check the power cord is properly plugged into the AC outlet.
The paper is jammed.
- Push the setting button for 3 seconds, and pull out the paper during initialization
Can not punch.
- Check the ink ribbon cassette is installed correctly. (Refer to p.8 Replacing ink ribbon cassette.)
- Check the device is on the standby mode which shows clock on the display.
- Check the setting on “AC TI VAT ION” of “7. PR. METHOD “. In case that’3.
MANUAL’ is selected, you have to click down the key corresponding to the print set to start punching. - Check the settings on “4. COUNTER”. The counter included in the print set may have reached the maximum (or minimum) number.
- Check the setting on “DATA FULL” of “11. DATA”. The memory of the device may be full.
- Check the setting on “PRINT” of “LOCK”.
- Check the programs on “6. PROGRAM”. P-LOC may be effective. Make another program with P-UNL in this case.
Printing direction is upside down. Printing position is different from what you want.
- Check the settings on “SIDE” and “ALIGNMENT” of “2. PRINT SET”. (Refer to p.9 Printing position.)
How to adjust print position.
- The paper guide gauge and the slide lever are available on the device. They will help you to position the paper.
How to print month by number.
- Set “8. LANGUAGE” to ‘7. NUMERIC’.
Can not select a print set.
- Check the setting on “PRINT” of “LOCK”.
- Check the programs on “6. PROGRAM”. S-LOC may be effective. Make another program with S-UNL in this case.
- The device has only one print set.
Light at print area is off.
- Check the setting on “PRINT” of “LIGHT”.
- Check the programs on “6. PROGRAM”. P-LOC may be effective. Make another program with P-UNL in this case.
Print set is automatically changed.
- Check the programs on “6. PROGRAM”. SEL-A (B, C, or D) may be effective.
Date and time is not printed correctly.
- Check the setting on “TIME SHIFT” of “2. PRINT SET”. Time shift (SHIFT-1 (2, 3, or 4)) may be effective on the print set.
Punch data is not recorded.
- Check whether the selected format includes the counter. Punch data without value of the counter is not stored in the memory of the device.
How can I delete password from the device
- Once you set to ‘0000’ as the password on “10. PASSWORD”, the password setting can be deleted.
How can I print the format, “CUSTOM-1 (or 2)” I made
- Check the format number on “LINE-1 (or 2)” of “2. PRINT SET”. (Refer to p.25 Format list.)
What means “—/160” on “CUSTOM-1 (or 2)”
- It shows total dots of the customized comment. 160 means maximum dots of one customized comment. In case that ‘CUSTOM-1 (or 2)’ is not selected on “LINE-1 (or 2)” of “2. PRINT SET”, —/160 is shown on the display.
If the trouble is not solved even though you checked the listed items, please contact the shop from whom you bought the device.
Specifications
| Clock accuracy | Monthly accuracy + 15 sec. (at ordinary temperature) |
| Calendar | Year up to 2099. Automatically adjusted to leap years, 31-day months and months with thirty or fewer days, and the days of the week. |
| Printing system | Dot matrix imprint |
| Power failure compensation |
Three years of cumulative power failure hours after the date of shipment |
| Print at power failure | Optional battery, 100 times printing or 24 hours (option) |
| Operating environment | Temperature: -5`C to + 45`C : + 23°F to + 113°F Humidity: 209a to 809cRH, no condensation The device operates normally at temperatures of 5`C or below, but the print density, reaction of the liquid crystal display, and the number of prints at power failure are inferior to those at normal temperature operation. |
| Dimensions | 156(W) x 179(D) x 181(H) mm 6-5/32″(W) x 7-1/16″(D) x 7-1/8″(H) |
| Weight | Approx. 1.9kg (4.21bs) |
| Power consumption | 120VAC 50/60Hz 0.6A 220-240VAC 50/60Hz 0.4A |
| Memory | 1,022 punch data or less |
- Optional battery (not included) for 1009c printer operation during power failures is available. Order part no. VIS6001
- Ni-MH Battery rated 8.4V, 500mAh. Caution: Replace only with the same type of battery specified by the manufacturer.
- Place the time recorder at the position close to the wall outlet so that it is easily accessible to disconnect.
- Lithium battery contains perchlorate material – special handling may apply.
Please go to the web site http://www.dtsc.ca.gov/hazardouswaste/perchlorate for information about proper methods of disposal.
Environmental conditions
Avoid placing the device in environments that are:
- humid or dusty
- exposed to direct sunshine
- subject to frequent or continuous vibrations
- outside the temperature range between -5°C and 45°C (+23°F and +113°F)
- affected by chemicals or ozone
Limited One-Year Warranty
Lathem warrants the hardware products described in this guide against defects in material and workmanship for a period of one year from date of original purchase from Lathem or from an authorized Lathem reseller. The conditions of this warranty and the extent of the responsibility of Lathem Time Corporation (“Lathem”) under this warranty are listed below.
- This warranty will become void when service performed by anyone other than an approved Lathem warranty service dealer results in damage to the product.
- This warranty does not apply to any product which has been subject to abuse, neglect, or accident, or which has had the serial number altered or removed, or which has been connected, installed, adjusted, or repaired other than in accordance with instructions furnished by Lathem.
- This warranty does not cover dealer labor cost for removing and reinstalling the machine for repair, or any expendable parts that are readily replaced due to normal use.
- The sole responsibility of Lathem under this warranty shall be limited to repair of this product, or replacement thereof, at the sole discretion of Lathem.
- If it becomes necessary to send the product or any defective part to Lathem or any authorized service dealer, the product must be shipped in its original carton or equivalent, fully insured with shipping charges prepaid. Lathem will not assume any responsibility for any loss or damage incurred in shipping.
- WARRANTY DISCLAIMER AND LIMITATION OF LIABILITY: Except only the limited express warranty set forth above, the products are sold with no expressed or implied warranties of any kind, and the implied warranties of merchant ability and fitness for a particular purpose are hereby expressly disclaimed. No warranties are given with respect to products purchased other than from Lathem or an authorized Latham reseller and any such products are purchased “as is, with all faults.” In no event will Lathem be liable for any direct, indirect, special, incidental or consequential damages arising out of or in connection with the delivery, use or inability to use, or performance of this product. In the event any limited remedy given herein shall be deemed to have failed of its essential purpose, Lathem’s maximum liability shall be to refund the purchase price upon return of the product.
- Proof of date of purchase from Lathem or an authorized Lathem reseller is required for warranty service on this product.
- This Warranty grants specific legal rights. Additional legal rights, which may vary by locale, may also apply.
- Should any difficulties arise with the performance of this product during warranty, or with any Lathem authorized service centers, contact Lathem Time at the address below.
Lathem Time 1 200 Selig Drive, SW, Atlanta, GA 30336 l 404-691-0405
Documents / Resources
 |
LATHEM LT5000 Electronic Multiline Time Date and Numbering Document Stamp [pdf] User Guide LT5000, Electronic Multiline Time Date and Numbering Document Stamp, Time Date and Numbering Document Stamp, Numbering Document Stamp, LT5000, Document Stamp |


