Logitech M185 Compact Wireless Mouse

User Manual
Comfortable, compact, and easy to use, the Wireless Mouse M185 enables you to work anywhere.
In the Box


Features

- Left and right mouse buttons
- Scroll wheel
- Press the wheel down for middle button
(function can vary by software application) - On/Off slider switch
- Battery door release
- USB Nano-receiver storage
Help with setup: Mouse is not working


- Is the mouse powered on?
- Is the Nano receiver securely plugged into a USB port? Try changing USB ports.
- If the Nano receiver is plugged into a USB hub, try plugging it directly into a USB port on your computer.
- Check the orientation of the battery inside the mouse.
- Try a different surface. Remove metallic objects between the mouse and the Nano receiver.
- Try moving the Nano receiver to a USB port closer to the mouse. If you are using a tower PC, go to www.logitech.com/usbextender for a USB extender.
- For Windows® operating systems, reconnect the mouse with the Nano receiver by launching the Connect utility from www.logitech.com/connect_utility.
Important ergonomic information. Long periods of repetitive motion using an improperly set-up workspace, incorrect body position, and poor work habits may be associated with physical discomfort and injury to nerves, tendons, and muscles. If you feel pain, numbness, weakness, swelling, burning, cramping, or stiffness in your hands, wrists, arms, shoulders, neck, or back, see a qualified health professional. For more information, please read the Comfort Guidelines located on the Logitech® web site at http://www.logitech.com/comfort, or on the Logitech® Software CD.
Do not immerse product in any liquid or expose it to heat or moisture. There are no serviceable parts.
Class 1 LED products. The product contains Class 1 LED. Operating temperature between 5° C (41° F) to 40° C (104° F).
Additional compliance information. To obtain additional information about other compliance-related matters, go to http://www.logitech.com/compliance.
Battery warning! Risk of explosion or personal injury if batteries are replaced by incorrect type, mutilated, or exposed to conducting materials, liquid, fire, or heat (above 54° C or 130° F). Do not use or recharge damaged rechargeable batteries. Do not mix battery types. Dispose of spent or damaged batteries according to manufacturer instructions and local laws.
UL statement. Your product is UL approved. Use only with UL listed ITE computers.
FCC – United States and Canada
This hardware device complies with Part 15 of the FCC Rules. Operation is subject to the following two conditions: 1) this device may not cause harmful interference, and 2) this device must accept any interference received, including interference that may cause undesired operation. Compliance Information Statements: This equipment has been tested and found to comply with the limits for a Class B digital device, pursuant to part 15 of the FCC Rules. These limits are designed to provide reasonable protection against harmful interference in a residential installation. This equipment generates, uses and can radiate radio frequency energy and, if not installed and used in accordance with the instructions, may cause harmful interference to radio communications. However, there is no guarantee that interference will not occur in a particular installation. If this equipment does cause harmful interference to radio or television reception, which can be determined by turning the equipment off and on, the user is encouraged to try to correct the interference by one or more of the following measures:
- Reorient or relocate the receiving antenna.
- Increase the separation between the equipment and receiver.
- Connect the equipment into an outlet on a circuit different from that to which the receiver is connected.
- Consult the dealer or an experienced radio/TV technician for help.
Modifications to this product not authorized by Logitech could void your right to use or operate this product by the FCC.
Where shielded interface cables or accessories have been provided with the product or specified additional components or accessories elsewhere defined to be used with the installation of the product, they must be used in order to ensure compliance with FCC regulations.
Canada (IC) Statements: Corded products: This Class B digital apparatus complies with Canadian ICES-003. Cordless (Radio Transmitter) products: Section A. RSS-310 (27 MHz transmitters and receivers): This Category II radio communication device complies with Industry Canada Standard RSS-310. Section B. RSS-210 (2.4 GHz transmitters or transceivers): This Category I radio communication device complies with RSS-210 of Industry Canada.
Logitech hardware product limited warranty
Logitech warrants to the original purchaser that your Logitech hardware product shall be free from defects in material and workmanship for the period of time, identified on your product package and/or contained in the user documentation, from the date of purchase. You may also find this information by selecting your product in the Online Support section of our website at www.logitech.com/support. Except where prohibited by applicable law, this warranty is nontransferable and is limited to the original purchaser. This warranty gives you specific legal rights, and you may also have other rights that vary under local laws.
Remedies. Logitech’s entire liability and your exclusive remedy for any breach of warranty shall be, at Logitech’s option, (1) to repair or replace the hardware, or (2) to refund the price paid, provided that the hardware is returned to the point of purchase or such other place as Logitech may direct with a copy of the sales receipt or dated itemized receipt. Shipping and handling charges may apply, except where prohibited by applicable law. Logitech may, at its option, use new or refurbished or used parts in good working condition to repair or replace any hardware product. Any replacement hardware product will be warranted for the remainder of the original warranty period or thirty (30) days, whichever is longer or for any additional period of time that may be applicable in your jurisdiction.
This warranty does not cover problems or damage resulting from (1) accident, abuse, misapplication, or any unauthorized repair, modification or disassembly; (2) improper operation or maintenance, usage not in accordance with product instructions or connection to improper voltage supply; or (3) use of consumables, such as replacement batteries, not supplied by Logitech except where such restriction is prohibited by applicable law.
How to obtain warranty support. Before submitting a warranty claim, we recommend you visit the support section at www.logitech.com/support for technical assistance. Valid warranty claims are generally processed through the point of purchase during the first thirty (30) days after purchase; however, this period of time may vary depending on where you purchased your product – please check with Logitech or the retailer where you purchased your product for details. Warranty claims that cannot be processed through the point of purchase and any other product related questions should be addressed directly to Logitech. The addresses and customer service contact information for Logitech can be found in the documentation accompanying your product and on the web at www.logitech.com/support.
Limitation of liability. LOGITECH SHALL NOT BE LIABLE FOR ANY SPECIAL, INDIRECT, INCIDENTAL OR CONSEQUENTIAL DAMAGES WHATSOEVER, INCLUDING BUT NOT LIMITED TO LOSS OF PROFITS, REVENUE OR DATA (WHETHER DIRECT OR INDIRECT) OR COMMERCIAL LOSS FOR BREACH OF ANY EXPRESS OR IMPLIED WARRANTY ON YOUR PRODUCT EVEN IF LOGITECH HAS BEEN ADVISED OF THE POSSIBILITY OF SUCH DAMAGES.
Duration of implied warranties. EXCEPT TO THE EXTENT PROHIBITED BY APPLICABLE LAW, ANY IMPLIED WARRANTY OR CONDITION OF MERCHANTABILITY OR FITNESS FOR A PARTICULAR PURPOSE OF THIS HARDWARE PRODUCT IS LIMITED IN DURATION TO THE DURATION OF THE APPLICABLE LIMITED WARRANTY PERIOD FOR YOUR PRODUCT.
Additional Rights. Some states do not allow limitations on how long an implied warranty lasts, or allow the exclusion or limitation of incidental or consequential damages, so the above limitations or exclusion may not apply to you. This warranty gives you specific legal rights, and you may also have other rights that vary from State to State or by country or other jurisdiction.
National Statutory Rights. Consumers have legal rights under applicable national legislation governing the sale of consumer goods. Such rights are not affected by the warranties in this Limited Warranty.
No Other Warranties. No Logitech dealer, agent, or employee is authorized to make any modification, extension, or addition to this warranty.
Warranty Periods. Please note that in the European Union, any warranty period less than two years shall be increased to two years.
Logitech address. Logitech, Inc. 6505 Kaiser Drive, Fremont, California 94555
www.logitech.com/support
Please take a minute to tell us. Thank you for purchasing our product.
United States: +1 646-454-3200
Argentina: +00800-555-3284
Canada: +1 866-934-5644
Brasil: +0 800-891-4173
Chile: 1230 020 5484
Latin America: +1 800-578-9619
Mexico: 001 800 578 9619

© 2011 Logitech. All rights reserved. Logitech, the Logitech logo, and other Logitech marks are owned by Logitech and may be registered. All other trademarks are the property of their respective owners. Logitech assumes no responsibility for any errors that may appear in this manual. Information contained herein is subject to change without notice.
Specs & Details
FAQ – Frequently Asked Questions
We’ve identified a few cases where devices aren’t detected in the Logitech Options software or where the device fails to recognize customizations made in the Options software (however, the devices do work in out-of-box mode with no customizations).
Most of the time this happens when macOS is upgraded from Mojave to Catalina/BigSur or when interim versions of macOS are released. To resolve the problem, you can enable permissions manually. Please follow the steps below to remove the existing permissions and then add the permissions. You should then restart the system to allow the changes to take effect.
– Remove existing permissions
– Add the permissions
Remove existing permissions
To remove the existing permissions:
- Close Logitech Options software.
- Go to System Preferences -> Security & Privacy. Click the Privacy tab, and then click Accessibility.
- Uncheck Logi Options and Logi Options Daemon.
- Click on Logi Options and then click on the minus sign ‘–’ .
- Click on Logi Options Daemon and then click on the minus sign ‘–’ .
- Click on Input Monitoring.
- Uncheck Logi Options and Logi Options Daemon.
- Click on Logi Options and then click on the minus sign ‘–’.
- Click on Logi Options Daemon and then click on the minus sign ‘–’.
- Click Quit and Reopen.
To add the permissions:
- Go to System Preferences > Security & Privacy. Click the Privacy tab and then click Accessibility.
- Open Finder and click on Applications or press Shift+Cmd+A from the desktop to open Applications on Finder.
- In Applications, click Logi Options. Drag and drop it to the Accessibility box in the right panel.
- In Security & Privacy, click on Input Monitoring.
- In Applications, click Logi Options. Drag and drop it to the Input Monitoring box.
- Right-click on Logi Options in Applications and click on Show Package Contents.
- Go to Contents, then Support.
- In Security & Privacy, click on Accessibility.
- In Support, click Logi Options Daemon. Drag and drop it to the Accessibility box in the right pane.
- In Security & Privacy, click on Input Monitoring.
- In Support, click Logi Options Daemon. Drag and drop it to the Input Monitoring box in the right pane.
- Click Quit and Reopen.
- Restart the system.
- Launch the Options software and then customize your device.
Apple has announced a forthcoming update macOS 11 (Big Sur) due to be released in the fall of 2020.
|
Logitech Options Fully Compatible
|
Logitech Control Center (LCC) Limited Full Compatibility Logitech Control Center will be fully compatible with macOS 11 (Big Sur), but only for a limited compatibility period. macOS 11 (Big Sur) support for Logitech Control Center will end early 2021. |
|
Logitech Presentation Software Fully Compatible |
Firmware Update Tool Fully Compatible Firmware Update Tool has been tested and is fully compatible with macOS 11 (Big Sur). |
|
Unifying Fully Compatible Unifying software has been tested and is fully compatible with macOS 11 (Big Sur). |
Solar App Fully Compatible Solar app has been tested and is fully compatible with macOS 11 (Big Sur). |


If you are using Logitech Options or Logitech Control Center (LCC) on macOS you may see a message that legacy system extensions signed by Logitech Inc. will be incompatible with future versions of macOS and recommending to contact the developer for support. Apple provides more information about this message here: About legacy system extensions.
Logitech is aware of this and we are working on updating Options and LCC software to ensure we comply with Apple’s guidelines and also to help Apple improve its security and reliability.
The Legacy System Extension message will be displayed the first time Logitech Options or LCC loads and again periodically while they remain installed and in use, and until we have released new versions of Options and LCC. We do not yet have a release date, but you can check for the latest downloads here.
NOTE: Logitech Options and LCC will continue to work as normal after you click OK.
Initial testing with Windows 8.1 Consumer Preview version reveals a scrolling issue with IE11 and Windows 8 apps, as well as on the Windows Start screen itself:
– Moderate to fast scrolling can become unresponsive until you stop scrolling. Then, the page will jump a long distance, usually to either the beginning or the end.
We’re working with Microsoft to resolve this issue.
As a workaround, you can modify your scrolling settings in IE11. Here’s how:
1. Launch IE11.
2. Open Internet Options and select the Advanced tab.
3. In the Browsing section, clear “Use smooth scrolling”.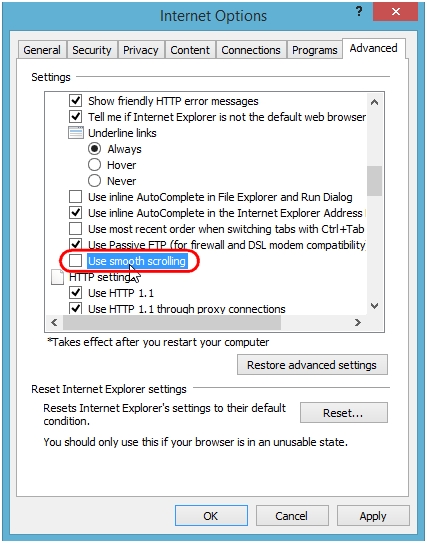
4. In the Security section, clear “Enable Enhanced Protected Mode”, and then click OK.
IMPORTANT: Disabling Enhanced Protected Mode degrades the security settings in IE11. Please consider this before you make this change.
5. Restart your computer.
In the event your Logitech device needs cleaning we have some recommendations:
Before You Clean
– If your device is cabled, please unplug your device from your computer first.
– If your device has user-replaceable batteries, please remove the batteries.
– Be sure to switch off your device and then wait 5-10 seconds before starting to clean.
– Don’t put cleaning liquids directly on your device.
– For devices that are not waterproof, please keep moisture to a minimum and avoid any liquid dripping or seeping into the device
– When using cleaning sprays, spray the cloth and wipe — do not spray the device directly. Never submerge the device in a liquid, cleaning or otherwise.
– Don’t use bleach, acetone/nail polish remover, strong solvents, or abrasives.
Cleaning Keyboards
– To clean the keys, use regular tap water to lightly moisten a soft, lint-free cloth and gently wipe down the keys.
– Use compressed air to remove any loose debris and dust between the keys. If you do not have compressed air available, you could also use cold-air from a hair-dryer.
– You can also use fragrance-free disinfecting wipes, fragrance-free anti-bacterial wet wipes, makeup removing tissue, or alcohol swabs containing less than 25% concentration of alcohol.
– Don’t use bleach, acetone/nail polish remover, strong solvents, or abrasives.
Cleaning Mice or Presentation Devices
– Use tap water to lightly moisten a soft, lint-free cloth and gently wipe down the device.
– Use lens cleaner to lightly moisten a soft, lint-free cloth and gently wipe down your device.
– You can also use fragrance-free disinfecting wipes, fragrance-free anti-bacterial wet wipes, makeup removing tissue, or alcohol swabs containing less than 25% concentration of alcohol.
– Don’t use bleach, acetone/nail polish remover, strong solvents, or abrasives.
Cleaning Headsets
– Plastic parts (headband, mic boom, etc.): it is recommended to use fragrance-free disinfecting wipes, fragrance-free anti-bacterial wet wipes, makeup-removing tissue, or alcohol swabs containing less than 25% concentration of alcohol.
– Leatherette earpads: it is recommended to use fragrance-free disinfecting wipes, fragrance-free anti-bacterial wet wipes, or make-up removal tissue. Alcohol wipes can be used on a limited basis.
– For the braided cable: it is recommended to use anti-bacterial wet wipes. When wiping cables and cords, grip the cord mid-way and pull towards the product. Don’t forcefully pull the cable away from the product or away from the computer.
– Don’t use bleach, acetone/nail polish remover, strong solvents, or abrasives.
Cleaning Webcams
– Use tap water to lightly moisten a soft, lint-free cloth and gently wipe down the device.
– Use lens cleaner to lightly moisten a soft, lint-free cloth and gently wipe down the webcam lens.
– Don’t use bleach, acetone/nail polish remover, strong solvents, or abrasives.
If Your Device Still Isn’t Clean
– In most cases, you can use isopropyl alcohol (rubbing alcohol) or fragrance-free anti-bacterial wipes and apply more pressure when cleaning. Before using rubbing alcohol or wipes, we suggest you test it first in an inconspicuous area to make sure it doesn’t cause discoloration or remove any printing on your device.
– If you’re still not able to get your device clean, please consider contacting us.
COVID-19
-Logitech encourages users to properly sanitize their products in accordance with guidelines put out by the World Health Organization and the Centers for Disease Control guidelines.
SetPoint versions 6.50 and later include a smooth scrolling plug-in for Google Chrome and Internet Explorer. If you’re having problems with erratic scrolling, please upgrade to SetPoint 6.52 or later, which improves scrolling for these browsers.
After upgrading to SetPoint version 6.52 or later, you may still experience erratic scrolling on individual web sites or pages that implement technologies differently. If you’re using Start screen apps in Windows 8, it’s also possible that the app you’re using can’t properly interpret the smooth scrolling function. In this case, you can also disable the SetPoint smooth scrolling plug-in.
– Google Chrome
– Internet Explorer
– Windows 8 Start screen apps
NOTE: You can disable the SetPoint plug-in for the Internet Explorer and Chrome browsers individually, but if you disable smooth scrolling in SetPoint, it will be disabled for everything: Chrome, Internet Explorer, and the Windows 8 Start screen apps.
To disable the Logitech SetPoint smooth scrolling plug-in for Google Chrome:
1. Launch Chrome.
2. Click the icon on the upper-right corner and select Settings.
3. Select Extensions > Logitech SetPoint and clear Enabled.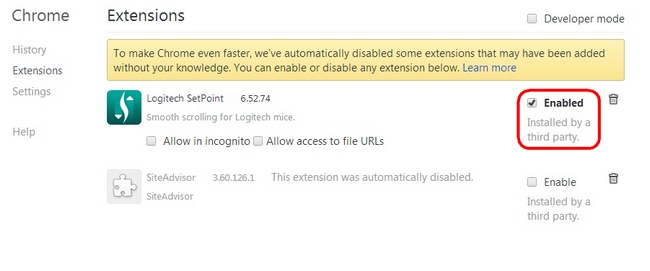
NOTE: To enable the smooth scrolling plug-in, follow the steps above, and in step 3, click Enable.
4. Close and re-open your browser for the settings to take effect.
To disable the Logitech SetPoint smooth scrolling plug-in for Internet Explorer:
1. Select Control Panel > Network and Internet > Internet Options.
2. On the Programs tab, click Manage add-ons.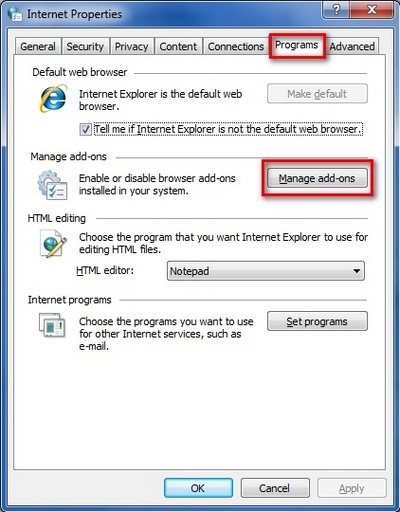
3. Select Logitech SetPoint and then click Disable.
NOTE: If the plug-in is currently disabled, the Enable button will appear instead.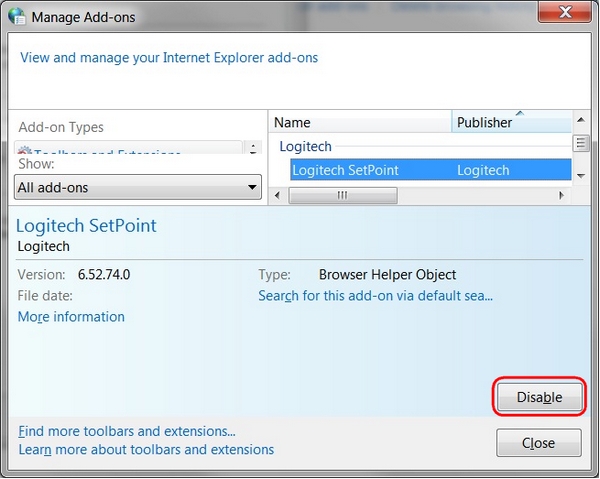
4. Click Close to close the dialog box.
NOTE: To enable the smooth scrolling plug-in, follow the steps above, and in step 4, click Enable.
5. Close and re-open your browser for the settings to take effect.
If scrolling is too fast or too slow with some of your Windows 8 Start screen apps, try the following:
– If your mouse has a Scroll Left and Scroll Right function, use that instead of the scroll wheel.
– Disable Smooth Scrolling in SetPoint:
1. Launch SetPoint by clicking the SetPoint icon  in the Notification area and select Mouse and Keyboard Settings.
2. Click on Pointer Settings, and clear Enable Smooth Scrolling.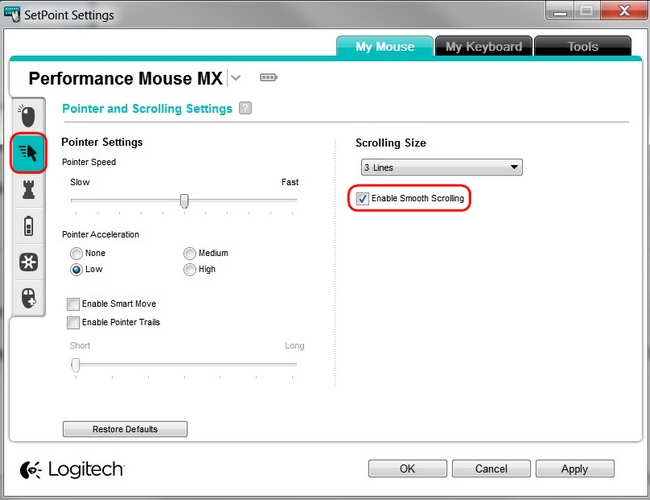
3. Click Apply and then OK to exit the SetPoint User Interface.
NOTE: When you disable smooth scrolling in SetPoint, it will be disabled for everything: Chrome, Internet Explorer, and the Windows 8 Start screen apps.
When using a USB 2.0 2.4GHz wireless peripheral device (such as a mouse, keyboard, or headphones) with a PC that also has a USB 3.0 peripheral device plugged in, you may experience erratic operation caused by interference. This is especially likely to happen when using USB 3.0 remote hard drives or flash drives.
This interference may result in:
– Delayed response to mouse or keyboard inputs
– Missing keyboard characters or mouse commands
– Decreased operating distance between the USB 2.0 wireless device and its receiver
There are some techniques that can help early adopters of USB 3.0 to mitigate potential problems with their existing 2.4GHz wireless devices:
– If your PC has multiple USB 2.0 connectors available, separate your USB 3.0 and USB 2.0 receivers by as much distance as possible. For example, if your PC has a choice of USB 2.0 connectors, use the one on the opposite side of the PC from the USB 3.0 connector.
– Position your USB 2.0 receiver as close as possible to your wireless peripheral (mouse, keyboard, headphones, etc.).
– Use a standard, USB-extender cable to position your USB 2.0 wireless receiver as far away as possible from your USB 3.0 connector.
A USB-extender cable is available for Logitech customers who are experiencing this problem (click here for more information).
NOTE: A USB 3.0 connector sometimes referred to as Super Speed USB or SS, normally has a blue plastic insert in the connector. Unlike a USB 2.0 connector which has 4 pins within the connector, a USB 3.0 connector has 9 pins.
Move your USB 2.0 wireless receiver to the opposite side of your computer: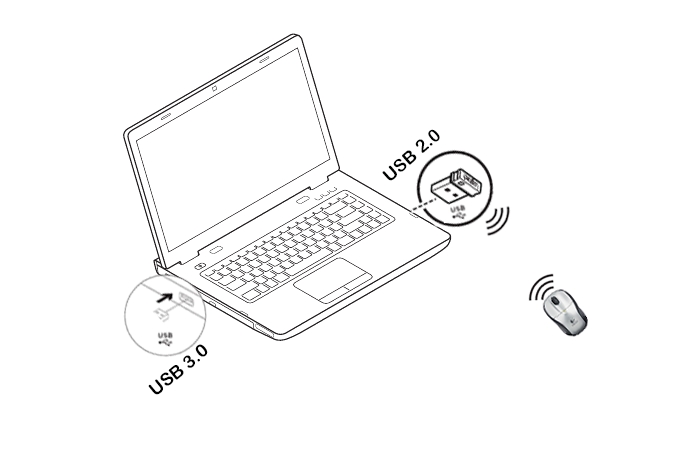
Make sure your USB 2.0 wireless receiver is in the USB 2.0 connector closest to your wireless peripheral:
Use a USB extended cable to position your wireless receiver as far away from your USB 3.0 peripheral as possible:
To check if your Logitech product works with Windows 8 or Windows 10, first select the appropriate product category from the list below.
– Mice and keyboards
– Tablet and laptop accessories
– Gaming products
– Harmony remotes
– Speakers
– Headphones and headsets
– Smart radios
– Squeezebox network music players
– Alert security cameras
– WiLife security cameras
– Webcams
+Operating distance for the M185 mouse
In an ideal environment, your mouse can operate up to 30 feet (10 meters) away from the receiver in a clear line of sight.
If you’re not getting this distance, try these suggestions:
– Replace the battery/batteries or make sure your mouse or keyboard is fully charged.
– Move devices that emit radio waves or could cause radio interference away from your work area. (Examples: cell phones, radios, wireless routers, and microwaves.)
To determine if something in your environment is shortening the operating range, try using your device in a different environment to see if the distance improves. If it does, look for other possible sources of interference that you can remove from your work area.
Follow these links to learn how you can customize your mouse using Logitech SetPoint mouse and keyboard software:
NOTE:
If you don’t already have the software installed, you can download SetPoint.
Customizing the mouse buttons (see answer 360023242214)
Adjusting your mouse movements (see answer 360023242214)
Customizing mouse settings for games (see answer 360023242214)
Advanced settings for specific applications (see answer 360023242214)
Turning the M185 mouse on and off
To turn the M185 mouse on and off:
1. Flip the mouse over.
2. Locate the power switch on the bottom.
3. Slide the switch to the right to turn it ON.
4. Slide the switch to the left to turn it OFF.
The M185 is supported by these operating systems:
– Windows 7
– Windows XP
– Windows Vista
– Macintosh 10.5 +
– Linux Kernel 2.6+
NOTE: The M185 is not supported on Windows 98, Windows ME, Windows 2000, and UNIX.
Your mouse was designed with a space where you can store the USB receiver. When you’re not using the mouse, you can store the receiver inside of it.
To locate the storage space for the USB receiver:
1. Flip the mouse over and slide the battery cover off.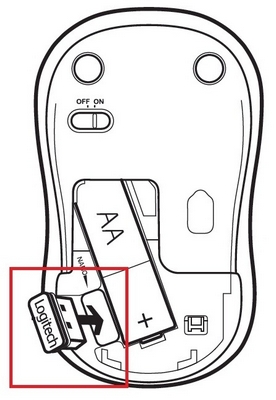
2. Locate the small rectangular slot next to the battery compartment.
3. Slide the receiver into the slot. It will fit facing either way.
4. Replace the battery cover.
NOTE: Information is for reference only and may be subject to change.
| General Product Information: | [Compliance Certification (CE) Link] |
| Warranty / Self Help | See product support page for warranty duration and frequently asked questions |
| Category | Mouse |
| Product type | Wireless |
| Wireless Protocol | 2.4 GHz (Unifying Ready) |
| Wireless Range | Up to 30 Feet or 10 Meters |
| Software Support (at release) | SetPoint 6.20, Connect Utility.exe, Mouse Programmable NOTE: Check website for latest software release |
| OS Support (at release) | Windows XP, Windows XP x64, Windows Vista, Windows Vista x64, Windows 7, Windows 7 x64, Mac OS X 10.5+, Linux Kernel 2.6 + |
| Mouse Specifications: | |
| Available Image(s) | Click for: [Top Image(s)] [Bottom Image(s)] |
| USB VID_PID | N/A |
| USB Protocol | N/A |
| USB Speed | N/A |
| Connector Type | N/A |
| DPI | 1000 Max |
| Sensor | Optical |
| Scroll Wheel | Vertical Scroll Type = Regular, Supports Horizontal = No |
| Indicator lights | N/A |
| Connect / Power | On/Off switch |
| Battery Type and Size | 1xAA Alkaline, Removable/ Replaceable |
| Battery Life | Up to 12 months |
| Receiver Specifications: | |
| Available Image(s) | Click for: [Link to available Image(s)] |
| USB VID_PID | 046D_C52F |
| USB Protocol | USB 2.0 |
| USB Speed | Full-speed |
| Receiver Size | Nano |
| Connector Type | USB |
| Connect Button | No |
| Indicator Lights | N/A |
| Bluetooth Feature | N/A |
| Package Contents: | |
| Available Image(s) | Click for: [Link to available Image(s)] |
| What is in the box | Mouse, Nano Receiver, Battery(s), User documentation |
| Product Dimensions: | ||||
| Product component | Width | Depth/Length | Height | Weight With battery |
| Mouse | 60 mm (2.36 inch) | 99 mm (3.89 inch) | 39 mm (1.54 inch) | 75g mm (2.65 ounces) |
| Receiver | 14 mm (0.55 inch) | 19 mm (0.75 inch) | 6 mm (0.24 inch) | 2g (0.07 ounces) |
Battery Requirements:
– Requires 1 AA alkaline battery
– Expected battery life is up to 12 months (1 year)
Checking battery status
– You can check the battery status for your mouse using the Logitech SetPoint mouse and keyboard software. See answer 360023241914 for instructions.
Installing New Battery
When you install the battery for your mouse, make sure it faces the correct direction, as shown in the following image: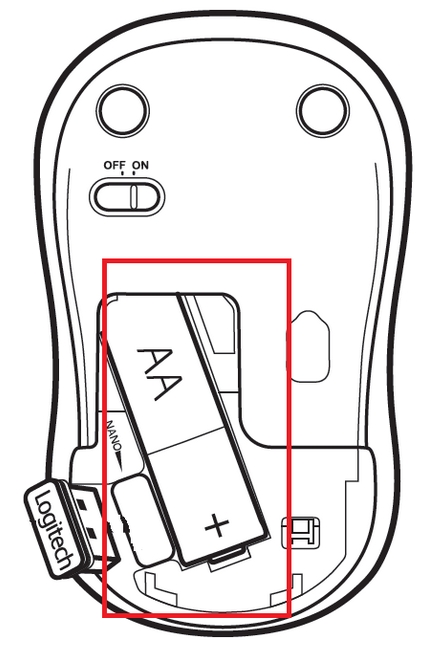
Extending battery life
Your mouse enters standby mode to conserve power when it’s not in use. Here are some other ways you can help extend the battery life:
– Use only alkaline batteries. Non-alkaline batteries (such as NiMH or NiCd) operate at a lower voltage and may affect the battery life.
– Avoid using your mouse on dark or transparent surfaces, such as glass. These surfaces cause the optical sensor to use more power.
– Make sure replacement batteries are new and within the manufacturer’s expiration date.
Your mouse uses an infrared (IR) optical LED that is invisible to the human eye.
If you’re not sure whether your mouse is turned on, check the ON/OFF switch located on the bottom of the mouse.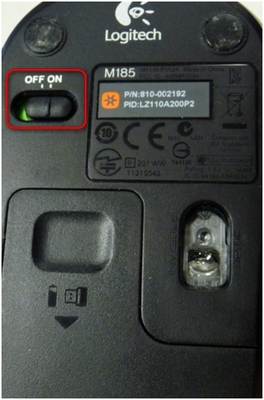
ON — The switch is pushed over to the right and you see green next to it.
OFF — The switch is pushed over to the left and you see red next to it.
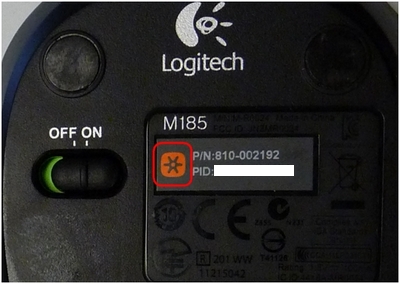
Your M185 mouse is a “Unifying ready” device that can be used with any Unifying USB receiver. If you’ve lost or damaged your receiver, you can purchase a replacement from the M185 Parts Store.
You can determine if your Logitech devices are Unifying by this logo that is printed on the bottom of your M185 mouse: .
.
Your M185 mouse ships with the receiver as shown below: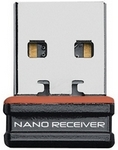
While this receiver is not Unifying, you can connect your mouse with any Unifying USB receiver. To determine if a receiver is Unifying, look for this logo:.
NOTE: Although this device is supported by the Unifying USB receiver, SetPoint and Logitech Control Center (LCC) support depend on the specific product.
Mouse is not working
If your mouse isn’t working, the problem is likely a lost connection. The connection between the mouse and the USB receiver can be lost for several reasons, such as:
– Low batteries
– Moving the receiver from one USB port to another.
– Moving the USB receiver to another computer.
– Plugging the receiver into a USB hub or other unsupported device such as a KVM switch (NOTE:
– Your receiver must be plugged directly into your computer).
– Using your wireless mouse on metal surfaces.
– Radio frequency (RF) interference from other sources, such as:
– Wireless speakers
– Computer power supplies
– Monitors
– Cell phones
– Garage door openers
Before connecting your M185:
1. Fix or rule out the potential problems listed above.
2. Turn your computer on.
3. Insert fresh batteries in your mouse. For instructions on changing your mouse battery, see answer null
4. Turn on your mouse.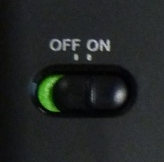 .
.
Reconnecting your M185
1. Download the correct version of the Logitech SetPoint mouse and keyboard software from the M185 Downloads Page.
2. Press the Windows key with the up arrow to Run.
3. Type C:\Program Files\Logitech\SetPointP\ConnectUtility.exe and press Enter.
4. Follow the on-screen instructions to turn your mouse off and then back on.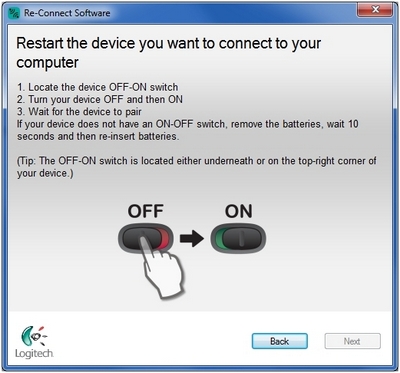
5. When your mouse is detected, you’ll see the confirmation message below. Click Yes and then Next.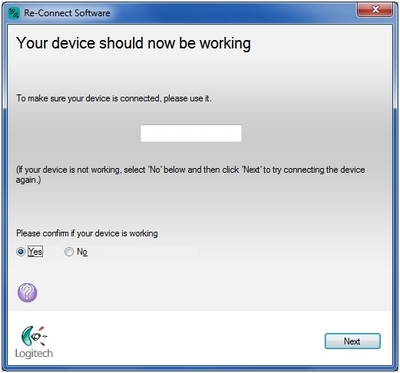
6. Click Finish to exit the Logitech Unifying Software. Your mouse should now be connected.
If this solution doesn’t work after a couple of attempts, restart your computer and try the reconnection process again.
Mouse frequently stops working
– If your mouse frequently stops working and you keep having to reconnect it with the USB receiver, try these suggestions:
– Keep other electrical devices at least 8 inches (20 cm) away from the USB receiver
– Move the mouse closer to the USB receiver
– Move the receiver to a different USB port on your computer
If the cursor isn’t following the movements of your mouse, we suggest you:
1. Use a mouse pad.
2. Avoid using your mouse on:
– Glass and other see-through surfaces
– Reflective surfaces, such as mirrors and metal desks
– Wood grains and grooved surfaces
3. Try the mouse on a piece of white paper to make sure it isn’t a tracking issue on the particular surface you’re using.
To uninstall Logitech SetPoint software, first select your operating system:
– Windows XP
– Windows 7 and Vista
– Windows 8
– Windows 10
————————–
Windows XP
1. Go to Add or Remove Programs:
– Default Start Menu: Start > Control Panel > Add or Remove Programs
– Classic Start Menu: Start > Settings > Control Panel > Add or Remove Programs
2. Select “Logitech SetPoint” from the list.
3. Click the Remove button.
4. Follow the on-screen instructions to remove SetPoint from your system.
NOTE: You may need to restart your computer to finish uninstalling SetPoint.
Windows 7 and Vista
1. Go to Uninstall a program:
– Default Start Menu: Start > Control Panel > Uninstall a program
– Classic Start Menu: Start > Settings > Control Panel > Programs and Features
2. Select “Logitech SetPoint” from the list.
3. Click Uninstall.
4. Follow the on-screen instructions to remove SetPoint from your system.
NOTE: You may need to restart your computer to finish uninstalling SetPoint.
Windows 8
1. Go to Uninstall a program:
– Start screen > Right-click on Mouse and Keyboard Settings > Uninstall
– Start screen > Right-click on empty space and select All apps > Control Panel > 2. Uninstall a program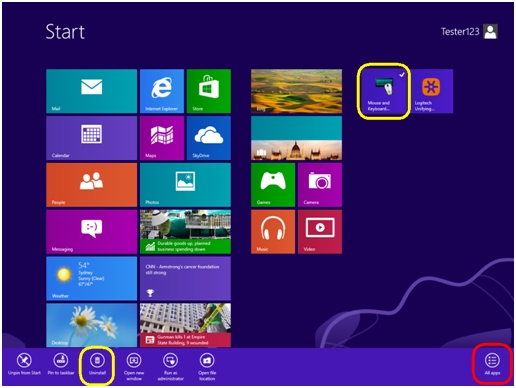
3. Select “Logitech SetPoint” from the list.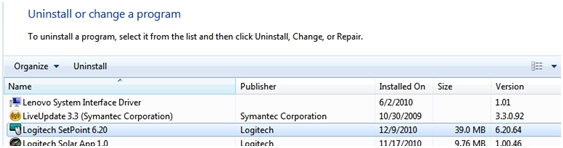
4. Click Uninstall.
5. Follow the on-screen instructions to remove SetPoint from your system.
NOTE: You may need to restart your computer to finish uninstalling SetPoint.
Windows 10
1. Go to Programs and Features:
– Right-click on the Windows logo on the bottom left of the window, then click Programs and Features
2. Select Logitech SetPoint from the list of programs.
3. Click on Uninstall and follow the on-screen instructions to uninstall Setpoint.
NOTE: You may need to restart your computer to finish uninstalling.
We do not support the use of third-party devices with our mice and keyboards. They can interfere with communication between a mouse or keyboard and the computer.
Unsupported third-party devices include:
– KVM switch boxes
– Port replicators
– Docking stations
– USB hubs
NOTE: The manufacturers of these third-party devices implement keyboard and mouse support in different ways. There is currently no industry standard.
When the mouse buttons aren’t working the way you programmed them to, the problem is usually with the configuration. You can check and change your mouse button settings in the Logitech SetPoint mouse and keyboard software. See Knowledge Base article 23057 for more information.
Normally, you should be able to customize your mouse or keyboard settings in the Logitech SetPoint mouse and keyboard software on the My Mouse / My Keyboard tab.
Without the My Mouse / My Keyboard tab in SetPoint, only the Tools tab will display, as shown here:
If the My Mouse / My Keyboard tab isn’t displayed, you’ll need to uninstall and re-install SetPoint following the instructions below.
To uninstall and re-install SetPoint:
– Windows XP
– Windows Vista and Windows 7
– Windows 8
————————–
Windows XP
1. Go to Add or Remove Programs.
– Default Start Menu view: Start > Control Panel > Add/Remove Programs
– Classic Start Menu view: Start > Settings > Control Panel > Add/Remove Programs
2. Select Logitech SetPoint from the list of programs displayed.
3. Click the Change / Remove button and follow the on-screen instructions to uninstall SetPoint.
4. Download and install the latest version of SetPoint from the Web Downloads Page.
NOTE: You may need to restart your system after SetPoint has been installed.
5. After your system restarts, open SetPoint to verify that the My Mouse / My Keyboard tab is available.
If the My Mouse / My Keyboard tab is still missing:
1. Right-click on the SetPoint icon in the system tray (at the bottom right of your screen) and select Exit.
2. Click the Windows Start button.
3. Choose Run.
4. Type %windir% in the Run dialog box.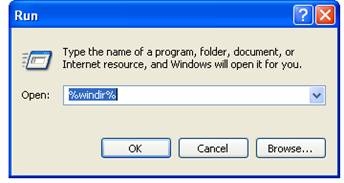
5. Double-click the System32 folder to open it.
6. Double-click the drivers folder.
7. Rename the file wdf01000.sys to wdf01000.bak.
8. Re-install SetPoint.
IMPORTANT: Before you restart your system, make sure the wdf01000.sys file is present in the drivers folders. If you restart without this file, it may prevent some of your hardware — including mice and keyboards — from working properly.
9. If the wdf01000.sys file isn’t in the drivers folder, change wdf01000.bak back to wdf01000.sys.
10. Restart the computer.
11. After your system restarts, open SetPoint to verify that the My Mouse / My Keyboard tab is present.
Windows Vista and Windows 7
1. Go to Uninstall a program.
– Default Start Menu view: Start > Control Panel > Uninstall a program
– Classic Start Menu view: Start > Settings > Control Panel > Programs and Features
2. Select Logitech SetPoint from the list of programs displayed.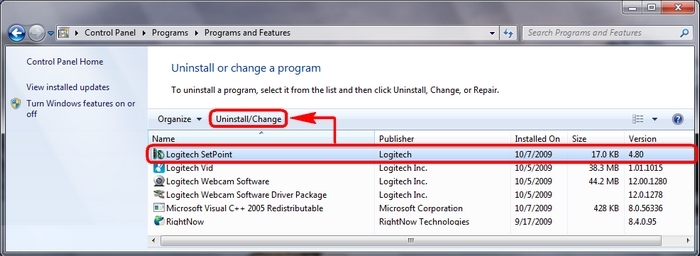
3. Click the Uninstall button highlighted above and follow the on-screen instructions to uninstall SetPoint.
4. Download and install the latest version of SetPoint from the Web Download page.
After your system restarts, open SetPoint to make sure the My Mouse / My Keyboard tab is available.
Windows 8
1. Go to Uninstall a program.
– Start screen > Right-click on Mouse and Keyboard Settings > Uninstall
– Start screen > Right-click on empty space and select All apps > Control Panel > Uninstall a program
3. Select “Logitech SetPoint” from the list.
4. Click Uninstall.
5. Follow the on-screen instructions to remove SetPoint from your system.
NOTE: You may need to restart your computer to finish uninstalling SetPoint.
This mouse model isn’t supported by the Logitech Control Center (LCC) for Macintosh, but might still work as a basic mouse on a Mac.
If a device is programmable, the LCC for Mac will display the image for that device. Because this mouse isn’t supported, the image won’t display in the LCC and you won’t be able to program it there.
If a device is not supported in the LCC, there won’t be an image for it.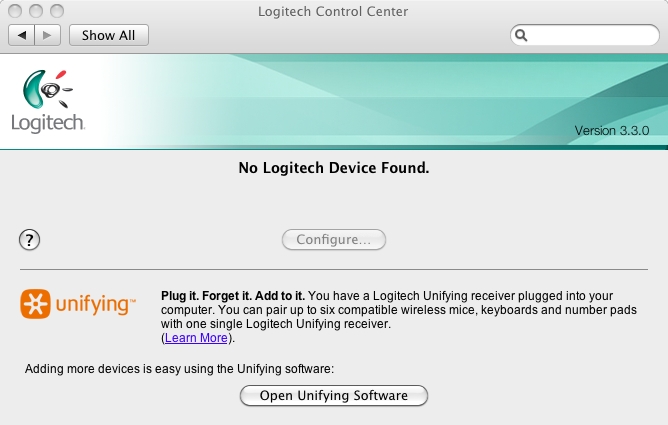
– My mouse has been double-clicking from the first day of usage
– My mouse has been working fine until recently and now it’s double-clicking
If your mouse double-clicked from the first day of usage, check the Windows setting called Single-click to open an item. This option makes a single mouse click act as a double click. Disable this setting to return the mouse to the standard one click option.
To disable, first select your operating system:
1. Click on the magnifying glass to bring up the Search menu, type ‘single-click’, and then select Specify single- or double-click to open.
2. Select the General tab, and under Click items as follows, make sure Double-click to open an item (single-click to select) is the selected option.
1. Open your computer window by clicking on Computer.
2. Click Folder and Search Options in the file menu under Organize.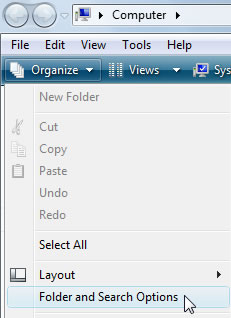
3. Under the General tab, make sure that the option ‘Double-click to open an item’ is selected.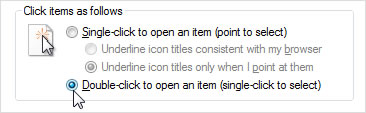
4. Click on OK to save the settings.
5. If the ‘Single-click to open an item’ option was not selected, try resetting the mouse by switching it off and on.
1. Open My Computer.
2. Click Folder Options in the file menu under Tools.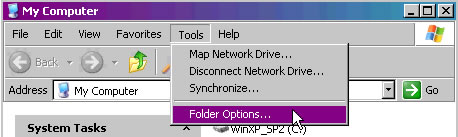
3. Under the General tab, make sure that the option ‘Double-click to open an item’ is selected.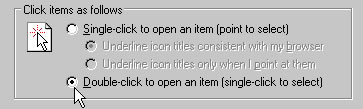
4. Click on OK to save the settings.
5. If the ‘Single-click to open an item’ option was not selected, try resetting the mouse by switching it off and on.
Additional help
If the steps above do not help, or if your mouse has only recently begun to double-click, please contact Logitech Customer Care.
INTRODUCTION
This feature on Logi Options+ allows you to backup the customization of your Options+ supported device automatically to the cloud after creating an account. If you are planning to use your device on a new computer or wish to go back to your old settings on the same computer, log into your Options+ account on that computer and fetch the settings you want from a backup to set up your device and get going.
HOW IT WORKS
When you are logged into Logi Options+ with a verified account, your device settings are automatically backed up to the cloud by default. You can manage the settings and the backups from the Backups tab under More settings of your device (as shown):
Manage settings and backups by clicking on More > Backups:
AUTOMATIC BACKUP OF SETTINGS — if the Automatically create backups of settings for all devices checkbox is enabled, any settings you have or modify for all of your devices on that computer are backed up to the cloud automatically. The checkbox is enabled by default. You can disable it if you don’t want the settings of your devices to be backed up automatically.
CREATE A BACKUP NOW — this button allows you to backup your current device settings now, if you need to fetch them later.
RESTORE SETTINGS FROM BACKUP — this button lets you view and restore all the available backups you have for that device that are compatible with that computer, as shown above.
The settings for a device are backed up for every computer that you have your device connected to and have Logi Options+ that you are logged into. Every time you make some modifications to your device settings, they get backed up with that computer name. The backups can be differentiated based on the following:
– Name of the computer. (Ex. John’s Work Laptop)
– Make and/or model of the computer. (Ex. Dell Inc., Macbook Pro (13-inch) and so on)
– The time when the backup was made
– The desired settings can then be selected and restored accordingly.
WHAT SETTINGS GET BACKED UP
– Configuration of all the buttons of your mouse
– Configuration of all the keys of your keyboard
– Point & Scroll settings of your mouse
– Any application-specific settings of your device
WHAT SETTINGS ARE NOT BACKED UP
– Flow settings
– Options+ app settings
Starting with macOS High Sierra (10.13), Apple has a new policy that requires user approval for all KEXT (driver) loading. You may see a “System Extension Blocked” prompt (shown below) during the installation of Logitech Options or Logitech Control Center (LCC). 
If you see this message, you’ll need to approve the loading of the KEXT manually so that your device drivers can be loaded and you can continue to use its functionality with our software. To allow KEXT loading, please open System Preferences and navigate to the Security & Privacy section. On the General tab, you should see a message and an Allow button, as shown below. In order to load the drivers, click Allow. You may need to reboot your system so the drivers are properly loaded and the functionality of your mouse is restored.
NOTE: As set by the system, the Allow button is only available for 30 minutes. If it has been longer than that since you installed LCC or Logitech Options, please restart your system to see the Allow button under the Security & Privacy section of System Preferences.

NOTE: If you don’t allow KEXT loading, all devices supported by LCC will not be detected by software. For Logitech Options, you need to perform this operation if you’re using following devices:T651 Rechargeable trackpad
– Solar Keyboard K760
– K811 Bluetooth keyboard
– T630/T631 Touch mouse
– Bluetooth Mouse M557/M558
We are aware that after updating from macOS 10.12 Sierra to macOS Sierra 10.12.1, Logitech Options software does not detect supported Unifying devices on some systems.
To fix this issue, unplug the Unifying receiver and then plug it back into the USB port. If Logitech Options still doesn’t detect the device, you may also need to reboot your system.


