KORG EFGSJ 1 Modwave Module Wavetable Synthesizer
Specifications:
- Maximum Polyphony: 60 stereo voices
- Sound generating system: modwave synthesis engine
- Inputs/outputs: Headphone (6.3 mm stereo phone jack), OUTPUT L/MONO and R (impedance-balanced 6.3 mm TRS phone jacks), DAMPER (6.3 mm phone jack), MIDI IN and OUT connectors, USB B port
- Power supply: AC adapter (DC12V)
- Power consumption: 5W
- Weight: 1.7 kg/3.75 lb
- Included items: AC adapter, Precautions, Quick Start Guide
- Accessories (sold separately): DS-1H damper pedal, PS-1 pedal switch, PS-3 pedal switch
Product Usage Instructions:
- Powering On the modwave Module:
Connect the AC adapter to the power supply and plug it into the module’s power input. Press the power switch to turn on the module. - Connecting External Devices:
Use the appropriate cables to connect headphones, output jacks, MIDI devices, and USB devices to their respective ports on the module. - Navigating the Front Panel:
Explore the different controls and buttons on the front panel for adjusting volume, selecting wavetable oscillators, applying effects, and more. - Sound Customization:
Utilize the various functions such as layers, arpeggiator, modulation effects, filters, and mixer to customize and shape the sound according to your preferences. - MIDI Integration:
If using MIDI devices, configure MIDI channels, filters, key zones, and other settings to integrate external MIDI controllers seamlessly with the modwave module.
Introduction
Thank you for purchasing the Korg modwave module wavetable synthesizer. To help you get the most out of your new instrument, please read this manual carefully.
About the modwave module manuals
The documentation for this product consists of the following:
- Precautions
- Quick Start Guide (what you’re reading)
- Owner’s Manual (PDF download from www.korg.com)
Main Features
- Inspired by Korg’s classic DW synths, the modwave module offers a powerful new wavetable synthesis architecture. Each oscillator can play two 64-step wavetables at once, dynamically blending between the two. Or, oscillators can play samples from the onboard libraries. Programs include two wavetable oscillators, sub osc/noise generator, a selection of modeled filter types, and three insert effects. Performances layer two Programs at once, adding master reverb & EQ.
- Massively flexible modulation system with four triggerable envelopes,five LFOs, dual mod processors and two key-track generators–plus multi-lane Motion Sequencing and Kaoss Physics.
- Motion Sequencing is evolved from the wavestate’s Wave Sequencing 2.0. Sequences run individually for each voice. Easily record knob movements in real-time. Enter Pitch sequences from the keyboard, and constrain playback to a scale and key. Timing, Pitch, Shape, and four sets of Step Sequence values are separated into “lanes.” Each lane can have a different number of steps, and its own loop start and loop end. Modulate loop points, step probabilities, and more on a per-note basis.
- Kaoss Physics combines hands-on modulation control with interactive game-style physics including gravity, reflection, absorption, and friction.
- Mod Knobs make it easy to control sounds and make them your own.
- The modwave module has over 200 factory sounds, and can store thousands more. Set Lists offer easy organization and instant access to sounds.
- Smooth Sound Transitions let previously-played voices and effects ring out naturally when you change sounds.
Specifications
- Maximum Polyphony: 60 stereo voices
- Sound generating system: modwave synthesis engine
- Inputs/outputs: Headphone (6.3 mm stereo phone jack), OUTPUT L/ MONO and R (impedance-balanced 6.3 mm TRS phone jacks), DAMPER (6.3 mm phone jack), MIDI IN and OUT connectors, USB B port
- Power supply: AC adapter (DC12V, )
- Power consumption: 5W
- Dimensions (W × D × H): 483 × 172 × 107 mm/19.02” × 6.77” × 4.21”
- Weight: 1.7 kg/3.75 lb
- Included items: AC adapter, Precautions, Quick Start Guide
Accessories (sold separately): DS-1H damper pedal, PS-1 pedal switch, PS-3 pedal switch
- Specifications and appearance are subject to change without notice for improvement.
- All product names and company names are the trademarks or registered trademarks of their respective owners.
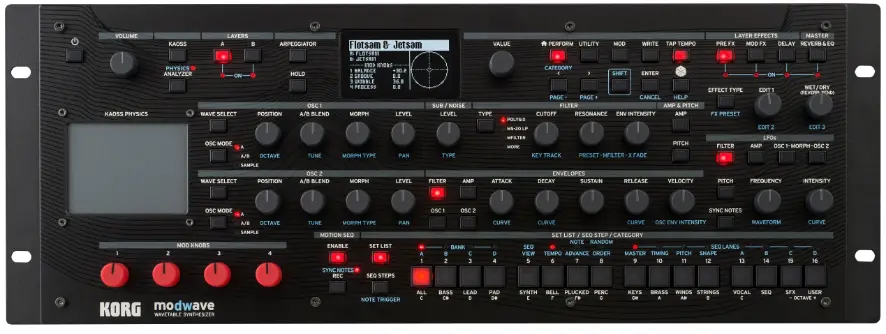
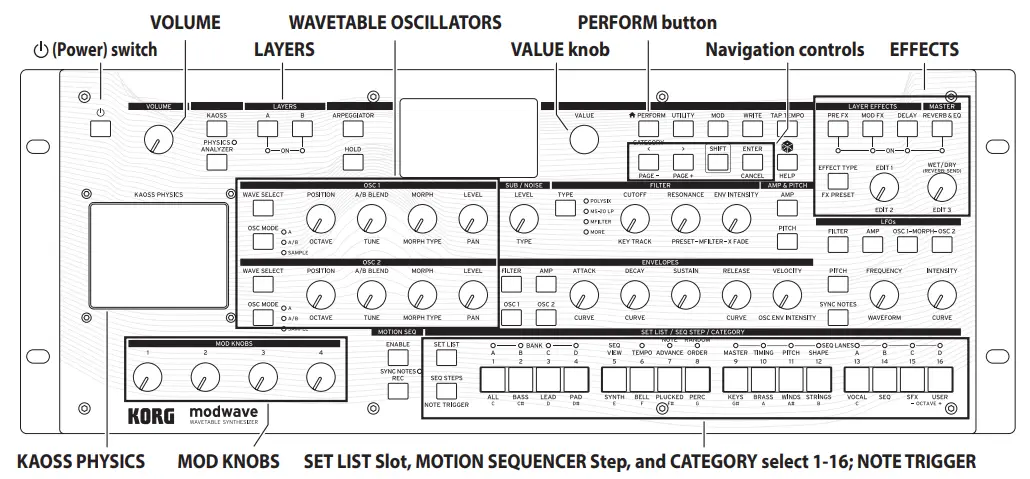
Front panel
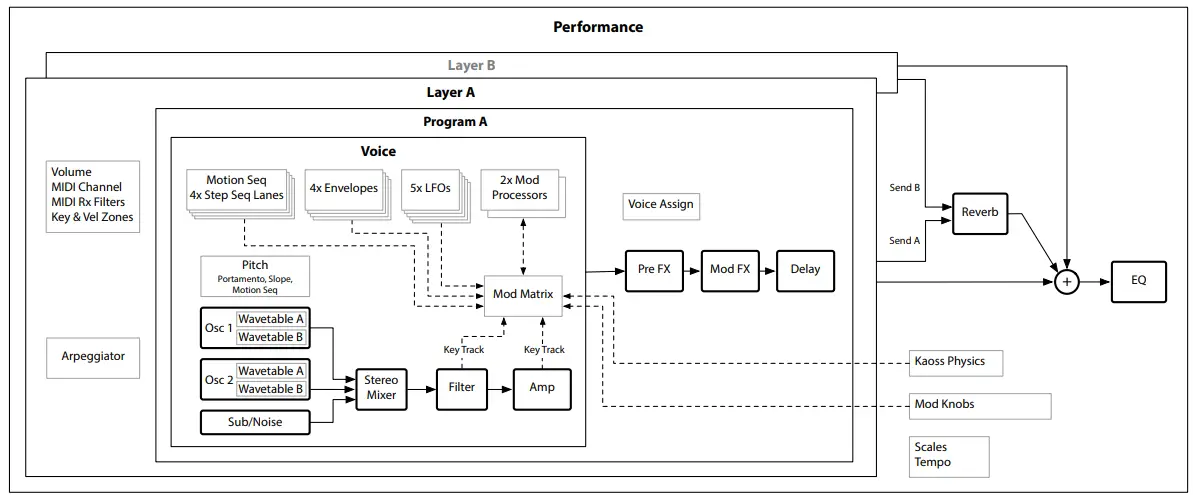
Block Diagram

Making connections
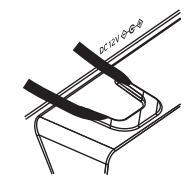
Connecting the AC adapter
- Connect the DC plug of the included AC adapter to the DC 12V jack on the rear panel of the modwave module. Be sure to use only the included AC adapter. Using any other AC adapter may cause malfunctions.
- After connecting the DC plug, loop the AC adapter cord onto the Cord Hook. Do not use excessive force when pulling the cord off the hook. Doing so may damage the plug.
- Connect the plug of the AC adapter to an AC outlet.
Be sure to use an AC outlet of the correct voltage for your AC adapter.
Other connections
- Connect the modwave module as appropriate for your audio system.
- Be sure that the power on all of your devices is turned off before you make connections. Leaving the power on when you make connections may cause malfunctions, or damage your speaker system and other components.
- For the following terminals, use a cable of 3 m or less to prevent malfunction.
Headphones jack, DAMPER jack, USB-B port
- OUTPUT L/MONO, R jacks: Connect these TRS jacks to a mixer, audio interface, monitor system, etc. Adjust the volume level using the VOLUME knob.
- Headphone jack: Connect the headphones here. This carries the same signal as that of OUTPUT L/MONO and R.
- DAMPER jack: Connect a Korg DS-1H damper pedal or a PS-1/PS-3 pedal switch (sold separately) to control the damper function. Pedal polarity is detected automatically; to allow this, make sure that the pedal is not held down when connected, or while turning on power. MIDI IN, OUT connectors: Use these connectors to connect the modwave module to an external MIDI device for exchanging MIDI messages. Make sure that the MIDI channels are set appropriately.
- USB B port: Connect this to a computer to exchange MIDI messages and data.
Turning the power on/off
Turning the modwave module On
Make sure that both the modwave module and any amplification devices such as powered monitor speakers are turned off, and turn the volume of all devices all the way down.
- Hold down the front-panel Power switch. Once the “modwave module” logo appears in the display, release the Power switch.
- Turn on any amplification devices such as powered monitor speakers, and then adjust their volume. Adjust the modwave module’s volume using the VOLUME knob.
Turning the modwave module Off
- Lower the volume of your powered monitors or other amplification devices, and turn them off.
- Hold down the modwave module Power switch until the display shows “Shutting Down,” and then release the power switch.
Auto Power-Off
By default, the modwave module will automatically turn off after about four hours have elapsed without use of the front panel or MIDI input. You can disable this feature, if desired. To do so:
- Press UTILITY, and then hold SHIFT and press > (for PAGE+) until the Preferences page appears in the display.
- Use the VALUE knob to set Auto Power-Off to Disabled.
Selecting and Playing Sounds
- Press the PERFORM button, and if necessary press it again. Wherever you are in the system, the second press will always bring you to the main Performance page with the large Performance name selected.
- Turn the VALUE knob or press ENTER. The Performance Select popup appears, showing a list of sounds.
- Turn the VALUE knob or use < and > to select Performances. Hold ENTER and press < or > to jump by 5. You can play the sounds as you scroll through the list.
- While the popup is onscreen, press CATEGORY buttons 2 (BASS) to 16 (USER) to show only a specific category of sounds. To show all sounds again, press button 1 (ALL). The category names on the front panel apply to Performances, Programs, and Multisamples; for all other types of data (Wavetables, Motion Sequences, etc.), the buttons select the first 15 Categories in the list.
- When you find a sound that you like, press ENTER again (or SHIFTENTER to cancel).
You can also show the list of categories on the display. To do so:
- While the popup is onscreen, hold SHIFT and press PERFORM. The Category Select popup appears.
- Select the desired Category, and press ENTER.
The display returns to the Performance Select popup, showing only sounds in the selected Category. Play notes with buttons 1–16
Buttons 1–16 can be used to play notes directly from the front panel:
- Hold SHIFT and press SEQ STEPS. The Note Trigger page appears, and buttons 1–13 light to show a keyboard with white and black keys.
- Use 1–13 to play notes, and 15/16 to shift the octave up and down. The keyboard persists as you edit parameters, move to other pages, etc
- To cancel Note Trigger, press SET LIST or SEQ STEPS.
Set Lists
Set Lists let you group and order Performances for gigs or projects. A Set List has 64 Slots, arranged into four banks A–D, corresponding to MIDI Program Change messages 0–63. Note that Set Lists don’t contain separate copies of their sounds; they just point to Performances stored in the database.
To select sounds in the current Set List:
- Press the SET LIST button, so that it is lit.
- To select sounds in the current bank, press buttons 1–16. To select from a different bank, first hold either SHIFT or SET LIST and then press 1/2/3/4 (A/B/C/D) to select the bank.
Buttons 1–16 will then blink; press one to select a sound in the new bank. If you select a sound using the display, buttons 1–16 will go dark. To return to the Set List, just press one of the buttons again. You can store many different Set Lists, and switch between them as desired.
To select a different Set List:
- Press UTILITY twice, to go to the System Setup page.
- At the top of the page is the Set List selection. Select this and press ENTER or turn the VALUE knob. From this point, selecting Set Lists works just like selecting Performances.
Assigning a Performance to a Set List Slot
- Select the Performance that you’d like to assign.
- Press the SET LIST button, so that it is lit.
- Hold WRITE and press the Slot to which you’d like to save. (To select a Slot in a different bank, adjust the Slot number on the display.)
- Press WRITE, and then ENTER to confirm. The Set List will be saved as well. If the Performance has been edited, you’ll be prompted to save it too.
Press a button or turn a knob, and the display will show the related page. Hold ENTER and move a front-panel knob or press a button to show its page in the display without changing its value.
- SHIFT: Hold down SHIFT to use alternative functions for knobs and buttons, labeled in blue text. For one-handed operation, double-press SHIFT to turn on SHIFT Hold; press again to turn off.
- ENTER: This lets you respond to on-screen prompts, issue commands, and more. Hold ENTER while moving VALUE for larger value changes. < > and PAGE-/PAGE+: These are the basic controls for moving around in the display. < and > cursor through parameters, and can also select items in lists. Hold SHIFT to use PAGE- and PAGE+, which select pages in the display (shown by the circles in the upper right).
- LAYER A/B: Layers contain a Program, and Arpeggiator, and a handful of other settings. The front panel edits one Layer at a time, as selected by these buttons. To turn a Layer on or off, hold SHIFT and press the Layer’s button, or just double-press the button.
- (Randomize): You can randomize the whole Performance, or hold
 and select a section (e.g. press LAYER A or move CUTOFF) to randomize a specific part of the sound. Press again to execute, and ENTER to confirm.
 - HELP: Hold SHIFT and press the (Randomize) button to show a set of pages containing shortcuts and usage tips.
- EFFECTS: Each Layer has its own PRE FX, MOD FX, and DELAY. SHIFT-press or double-press the buttons to turn effects on and off. The Performance has a master REVERB and EQ; to edit the EQ, press REVERB and then PAGE-. Press EFFECT TYPE and use VALUE to select different algorithms; cursor to Preset to choose variations of the selected Type. “All” types (Delay All, Chorus All, etc.) let you select Presets from all related algorithms.
Modulation
Kaoss Physics
Hold SHIFT and press KAOSS to turn PHYSICS on and off. When PHYSICS is Off, the pad works as a normal x/y controller. Like other modulation sources, it can modulate any number of parameters at once. When PHYSICS is On, the Kaoss Physics virtual environment is enabled. Move your finger on the pad to “throw” the ball on a simulated surface with a concave or convex “bump,” which can be tilted on both axes. The walls can either actively increase energy (like pinball machines) or absorb it, or be removed altogether like a vintage arcade game. Select presets for different environments, or create your own. Many aspects of the environment can be modulated in real-time.
Using Modulation
Most front-panel controls and on-screen parameters can be modulated. To add a new Modulation routing:
- In the display, select the parameter that you’d like to modulate. (If you want to modulate a knob, you can skip this step.)
- Hold MOD and press >. The Add New Modulation popup appears.
- To select the modulation destination, move its front-panel control (e.g., CUTOFF), or press ENTER to select the parameter from step 1.
- To select the modulation source, move a controller or a MOD KNOB, play a note (for Velocity), press a button for one of the LFOs, Envelopes, or the Step Sequencer, or send a MIDI CC. Or, just press ENTER and manually select a mod source in the following screen.
- Press ENTER to create the mod routing, or SHIFT-ENTER to cancel.
- The Mods page appears, showing the new routing. Set the Intensity as desired. You can also assign an Int Mod Source, whose value multiplies that of the main Source.
Viewing and Editing Modulations
- Press MOD. The screen will display all modulation routings in the current Program, one per page.
- Hold ENTER and press < or > to scroll through the different routings.
- When you see the modulation routing that you’d like to edit, use < and > to select the intensity, source, and intensity mod source fields. Edit as desired using the VALUE knob.
The list of modulations can be long. To view only modulation routings related to a specific controller or section of the synth:
- Hold MOD and press <. The Show In Mod List dialog appears.
- Press the button for AMP, PITCH, or the desired Envelope, LFO, Lane, or Effect; move a Mod Knob; hold ENTER and move a controller, play a note (for Velocity), or send a MIDI message; press WAVE SELECT for Osc 1/2, or TYPE for Filter.
Use the on-screen list for other selections, such as key tracking or mod processors. Press ENTER to confirm. The list will be filtered to show only the matching items. To clear the Show setting and show all modulations, press MOD in the dialog above, or set Show to All.
Motion Sequence
Motion Sequences run individually for each voice. To hear the sequence, you need to play at least one note on the keyboard. Use the HOLD button to hold notes or chords, leaving your hands free for knobs and modulation.
- ENABLE: When this button is on, the Motion Sequence will play as long as notes are held; when it’s off, the Motion Sequence pauses. SYNC NOTES (SHIFT-ENABLE) makes all the notes play in time with one another– though there may still be variations due to per-note modulation.
- SEQ STEPS: Press this button to go to the main Motion Sequence page, where you can select Motion Sequence presets. Timing, Pitch, Shape, and four sets of Step Sequence values are separated into “Lanes;” see the LEDs above buttons 9–16. To select a different Lane, hold SHIFT and press its button. You can also select and save presets for individual Lanes. To see an animated overview of the Lanes, hold SHIFT and press 5 (SEQ VIEW). When the SEQ STEPS button is lit, buttons 1–16 select steps in the current Motion Sequence Lane. There are up to 64 Steps per Lane. Since there are only 16 buttons, the 64 Steps are accessed via four banks: A1–A16, B1–B16, C1–C16, and D1–D16. To select from a different bank, first hold either SHIFT or SEQ STEPS and then press 1/2/3/4 (A/B/C/D) to select the bank. Buttons 1–16 will then blink; press one to select a Step in the new bank.
- TIMING: This Lane controls the duration of each Step. Durations can use either time or rhythmic values, controlled by TEMPO On/Off. The default is regular 16th notes, but you can enter complex rhythms or time sequences.
- SHAPE: The Shape Lane creates a contour over the Timing step length. It can affect the Pitch Lane or any of the Step Sequencer Lanes (“Use Shape”).
- NOTE ADVANCE: When this is on, each note played will increment the initial Step by one. Try using this with the Arpeggiator!
- RANDOM ORDER: When this is on, the Steps will play in a different order every time the loop repeats.
Recording
To record knob movements into a Seq Lane, press REC, select Seq Lane A–D (buttons 13–16), and follow the on-screen instructions. Only one knob can be recorded per Lane.
To record a pitch sequence, press REC, select the Pitch Lane (button 11), and follow the on-screen instructions. Note that this uses step recording, not real-time recording.
Editor/Librarian
The modwave Editor/Librarian lets you edit and organize data on a Mac or Windows computer, and transfer sound data back and forth between the modwave module and the computer. You can also import your own wavetables. For more information, download the Editor/Librarian and its documentation from www.korg.com.
Saving Sounds
The Performance, with its two Layers, is the main way of selecting, editing, and saving sounds. While you can save Programs, Motion Sequences, and Motion Sequence Lane and Kaoss Physics Presets, you don’t have to do so: all data is contained in the Performance. Similarly, when you load any of these data types into a Performance, a new copy of the data is created in the Performance. Any edits affect only the local copy inside the Performance, and not the original data. This lets you edit freely without worrying about affecting other sounds. To compare the edited and saved versions of a Performance, hold ENTER and press WRITE. To save:
- Press the WRITE button. The type of data to write is shown at the top of the Write page. By default, this is set to Performance. To choose a different data type, hold WRITE and press a button such as LAYER A/B or SEQ STEPS, or select the type in the display.
- Optionally, cursor to the name and press ENTER. This brings up the text edit page. Use < or > to move back and forth, and VALUE to change the selected character. SHIFT changes character sets. Press ENTER when you’re done.
- To overwrite the existing sound, press WRITE. Note that changing the name does not automatically make a new copy! To make a new copy and leave the existing sound unchanged, press SHIFT-WRITE. Either way, press ENTER to confirm, or SHIFT-ENTER to cancel.
Factory sounds may be write-protected, in which case only “save new” is available. Never turn off the power while data is being saved. Doing so may destroy the internal data.
FAQ
Q: Can I use third-party pedals with the modwave module?
A: Yes, you can use compatible third-party pedals such as damper pedals or pedal switches with the modwave module for enhanced control and expression.
Q: Is it possible to update the firmware of the modwave module?
A: Firmware updates may be available for the modwave module to introduce new features or improvements. Check the official Korg website for firmware update instructions.
Documents / Resources
 |
KORG EFGSJ 1 Modwave Module Wavetable Synthesizer [pdf] Instruction Manual EFGSJ 1 Modwave Module Wavetable Synthesizer, EFGSJ 1, Modwave Module Wavetable Synthesizer, Module Wavetable Synthesizer, Wavetable Synthesizer, Synthesizer |