assets ctfassets Smartposti Woocommerce Plugin
Functionality
- Parcel delivery service to Smartposti parcel shop pickup points (hereinafter referred to as “parcel shop“) located in Finland, Lithuania, Latvia, Estonia.
- Parcel delivery by a courier within the European Union;
- Parcel collection from the Smartposti parcel shops in Lithuania.
- It is possible to print out either parcel labels or manifests from the e-shop’s administrative environment.
- It is possible, from the administrative e-shop environment, to call a courier for parcel collection;
- COD (cash on delivery service).
Server requirements
The plugin is compatible with PHP 7.2 and higher PHP versions. Before installing the plugin, it is important to find out whether a 7.2 or higher PHP version is installed on the server.
Smartposti shipping plugin
Before installing the Smartposti plugin,, make sure you have the login credentials (username and password) for the Smartposti API.
Installation
In the preinstallation stage,, to install the Smartposti shipping plugin,, download the latest Smartposti Shipping plugin version. This can be done on the plugin version download page by clicking on the Assets section. When the dropdown of assets extends ,click itella-shipping.zip to download.

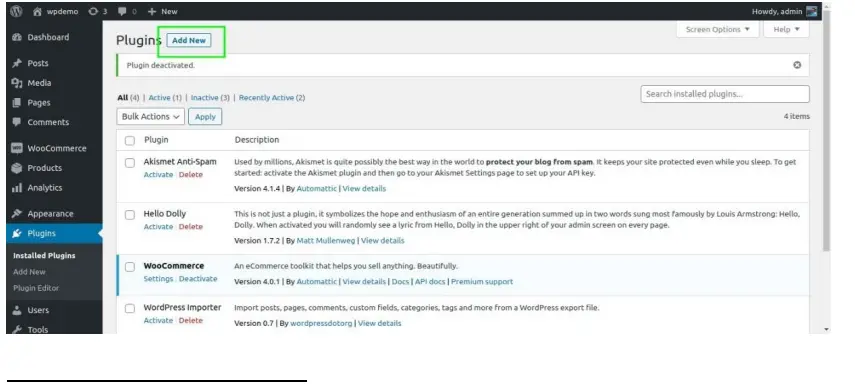
Then log in to the WordPress admin area (dashboard) and click the Plugins section from the menu.
In an open window,, click the button Add New located at the top of the page.
1 https://github.com/ItellaPlugins/itella-shipping-woocommerce/releases
Then click the Upload Plugin button.
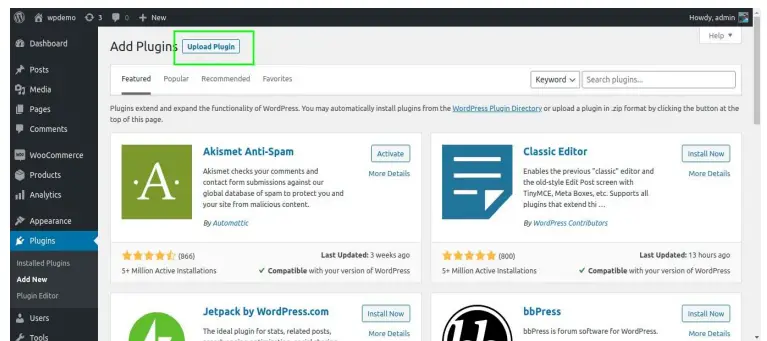
Will see the field intended for file upload. Click the Choose file button.

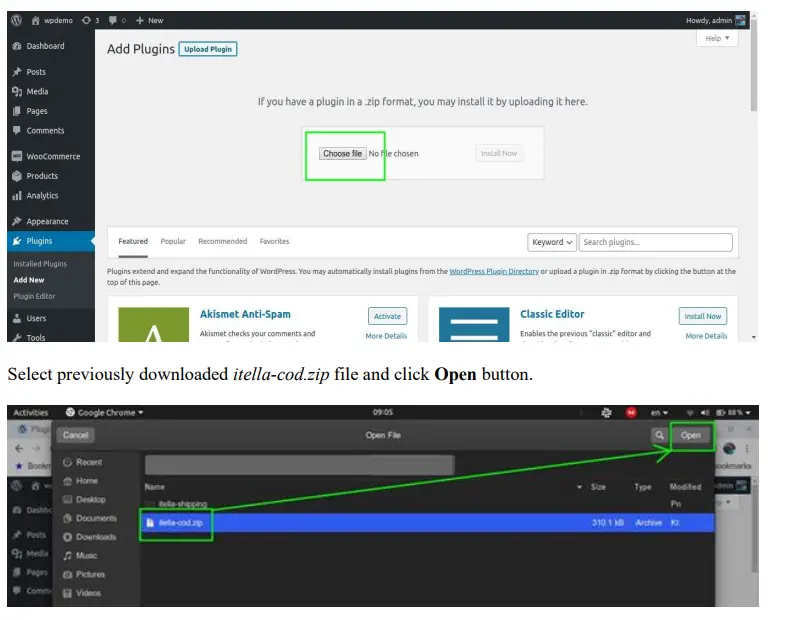
Select the previously downloaded itella-shipping.zip file and click the Open button.

To finish the installation procedure,, click button Install N buttonow button.

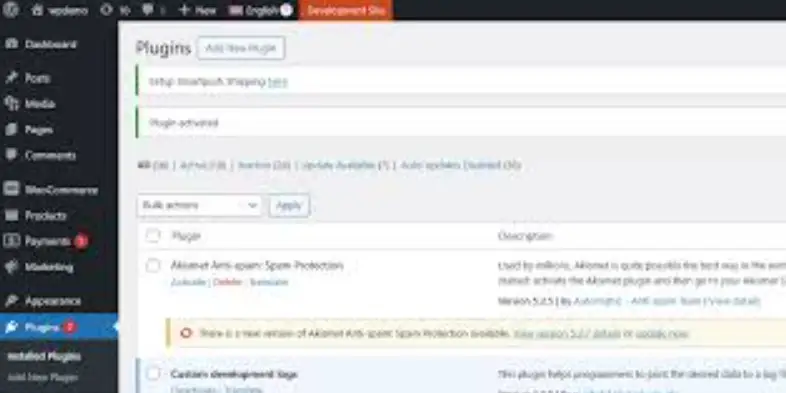
The Smartposti Shipping plugin should now be installed. The message of the successful installation will be visible in the window.

The plugin must be activated. Too do that need to click the Activate Plugin button immediately after installation.

Now Smartposti Shipping requires setup. Click on the link “Setup Smartposti Shipping here”.

Configuration
The plugin settings are available in the admin by going to “Woocommerce” → “Settings” → “Shipping” → “Smartposti shipping”.
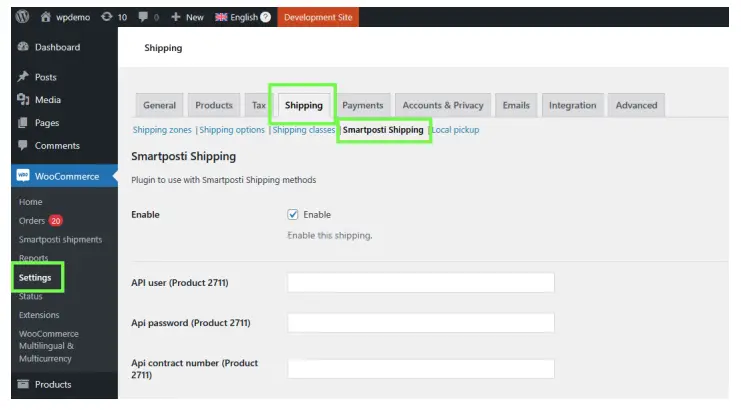
In an opened window will see Enable/Disable option, leave checkbox checked to enable plugin.
Will see API inputs with separate Product credentials (2711 product is related with parcel shops/ pickup points, whereas 2317 product with the courier). Enter the username, password,d, and contract number for both product sections.

Below are the shop’s information input fields. Enter Company name, Bank account, BIC (bank identifier code), the name of the shop, city, and address where the shop is located. Also, will need to addinformationn related to the shop’s postal and country codes as well as the phone number of the store and email.

Enable Pickup Point, Enable Courier. Check to show shipping methods in checkout.

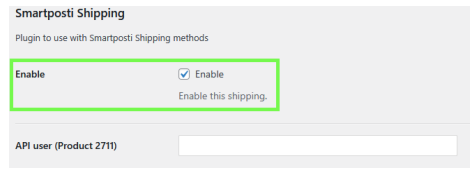
Below are the delivery methods settings for each country.

Each country block has blocks of possible delivery methods, which have the following parameters:
Price type – it indicates how the price of the delivery method is calculated;
Prices – delivery prices are determined according to the selected type;
Prices by class – allows to specify a different price if the products in the cart have a certain shipping class;
Free from – the amount of the cart from which the delivery method becomes free,, regardless of the prices indicated;
Custom name – allowschanging the name of the delivery method;
Description – shows additional text next to the delivery method.
The next parameters are for displaying delivery methods and parcel locker selection.

There are also parameters for registering shipments and downloading labels.
In the “… label comment” fields, you can use variables that are written below the field on a darker background. After the dash, it is explained what will be inserted in place of the variable. This text will be displayed on the label.

And finally, the parameters for calling a courier.
The “Smartposti XX email” fields must contain the Smartposti email address to which the courier invitation is sent.
Smartposti email subject – the title of the email sent to Smartposti when calling a courier.

Editing othe rder’s shipping settings
When receiving the order, go to “Woocommerce” → “Orders” and click on the concrete order that needs editing or simply wants to view order-related information. Below is an example of the order in edit mode. Only orders made with the Smartposti Shipping method can be edited as well and theorder-relatedd information/details can be seen.

Will see a block containing order information named Smartposti Shipping Options. Click the edit button located on the top right corner of the previously mentioned order information block.

Will see the following information:
Packets – select how many packages are per order.
Multi Parcel – if in the Packets section selected value is more than one, then the order is automatically assigned to the multi parcel category. In this case, this field will appear,, which cannot be unchecked.
Weight – the weight of the packages. In the case of multmulti-parcelel, this value is divided by the number of parcels.
COD – selected if the cash on delivery service will be used.
COD amount – the amount of C.O.D. in euross.
Carrier – allows selection of the shipping type of the order.
Parcel locker – if a parcel locker is selected,, then the specific address of the parcel locker is selected as well. In the example,, the Parcel locker input cannot be edited because in the Carrier secti,on the courier was selected.
Extra Services – in the Carrier sect,,ion selecting the Courier as value opensadditional optional service fieldsl (all additional services have their prices): Oversized; Call before delivery; Fragile.

Register shipment and download the label To view all Smartposti orders,go to “Woocommerce” → “Smartposti Shipments”. On this page can be seen the tracking numbers of registered shipments for each order.
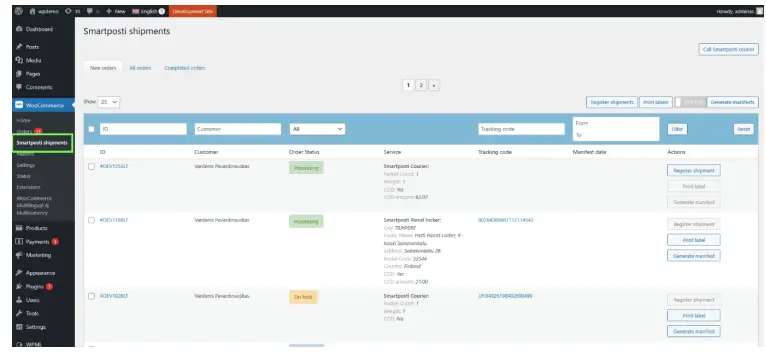
The Smartposti orders table contains the following information:
ID – the unique order number that is assigned when the new order is saved for the first time. Customer – the ordering customer who formed the order.
Order Status – Woocommerce order status.
Service – method of shipment,nt nototeliv, and delivery-related information. In the case of a parcel locker, the name and address of the parcel locker are indicated.
Tracking code – tracking number received after registration of the shipment (obtained when the Register shipment button was pressed in the order part).
Manifest date – the date when the manifest was generated.
Actions – actions required for shipment registration and sending.

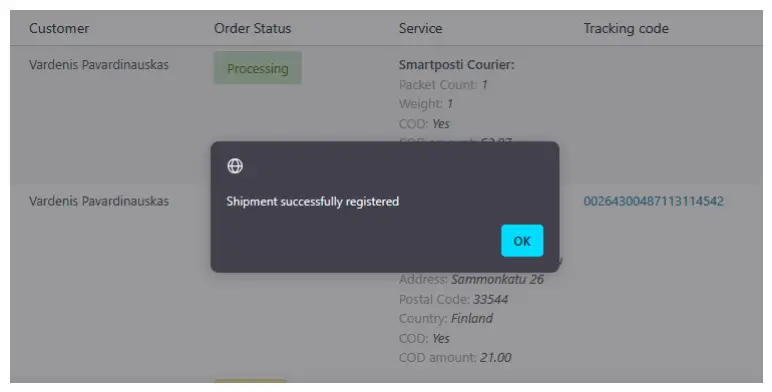
If you want to register the shipment, press the Register shipment button located on the right side of the table.

Once the shipment has been successfully registered, a confirmation message is displayed.
Label printing action can be performed as well. Make sure that the concrete order has its registered tracking number. Press the Print label button on the right side of the table.
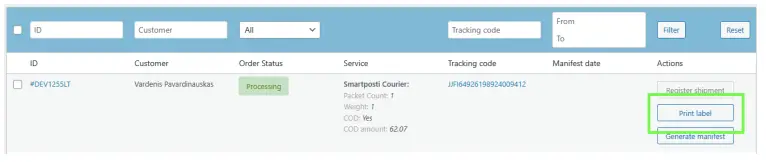
A label will be downloaded after clicking (how and where it is downloaded depends on the browser used and its settings).

Can also register shipments and print labels for multiple orders. Need to mark the desired orders and click the bulk button above the table.

Generate manifest
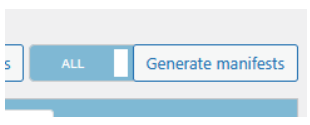
On the “Woocommerce” → “Smartposti Shipments” in the orders table, click the Generate manifest button.

Can also generate a manifest for multiple orders. Need to mark the desired orders and click the bulk button above the table.

Alternatively, a manifest can be generated at once for all orders visible on the page that have registered shipments. Next to the Generate manifests button above the table, need to toggle the switch to the All state and click the Generate manifests button.
Call courier
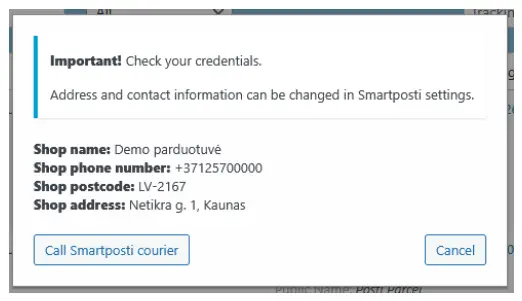
When everything related to the label and manifest generation is done, call Smartposti courier.

Make sure that all necessary credentials are corre,ct and simply press the Call Smartposti courier button for shipment collection.
Smartposti COD plugin
The plugin is designed to be used together with the Smartposti Shipping plugin when you want to have the Card On Delivery (COD) payment method.
Installation
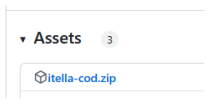
In the pre-installation stage, to install the Smartposti COD plugin, download the latest Smartposti COD plugin version. This can be done on the plugin version download page 222 by clicking on the Assets section. When the dropdown of assets extends, click itella-cod.zip to download.
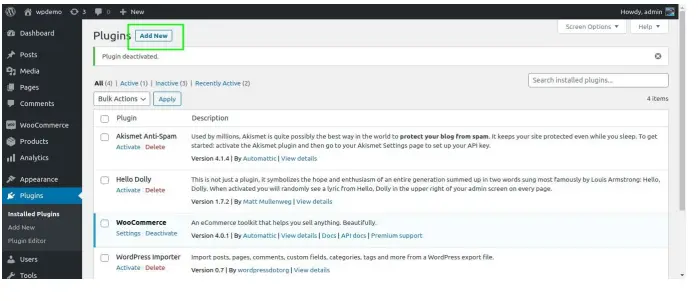
Then log in to the WordPress admin area (dashboard) and click the Plugins section from the menu.

In an open drawerclick Add New.
2 https://github.com/ItellaPlugins/itella-cod-woocommerce/releases
Then clicthe k the Upload Plugin button.

Will see the field intended for file upload. Click the Choose file button.
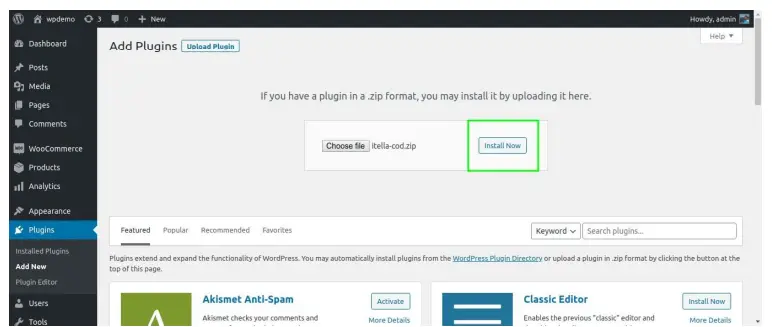
To finish the installation procedure, click button Install Now button.
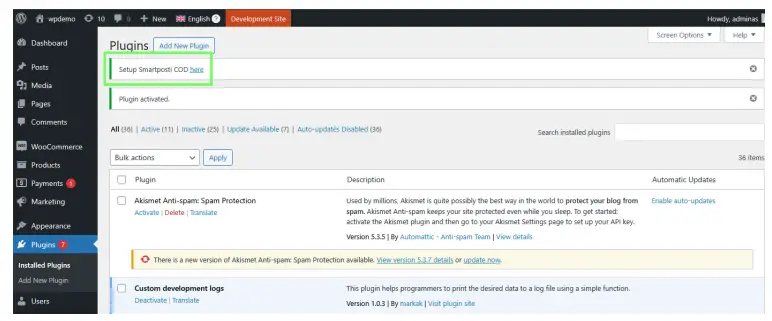
The Smartposti COD plugin should now be installed. The message of the successful installation will be visible in the window.

Now Smartposti COD requires setup. Click on the link “Setup Smartposti COD here”.
Configuration
The plugin settings are available in the admin by going to “Woocommerce” → “Settings” → “Payments” → “Smartposti Card on Delivery” → “Manage”.

In an open window will see the Enable/Disable option; leave the checkbox checked to enable the plugin.
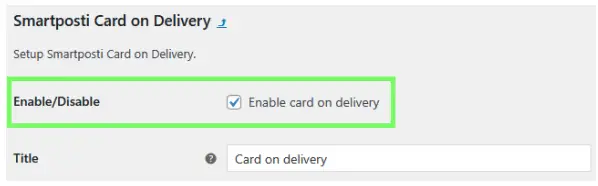
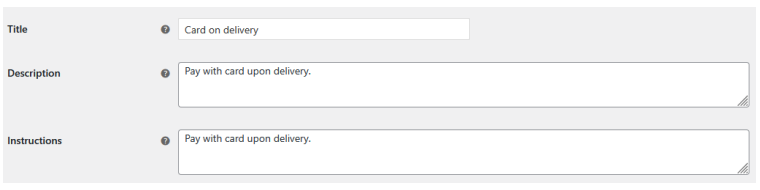
The title field is intended to show a customer the title of the payment method on the checkout.
The description field is intended to show the customer the description of the payment method, which is visible on checkout.
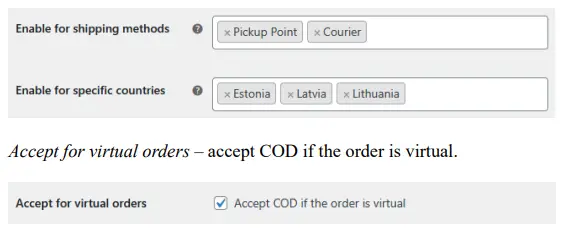
Enable for shipping methods field is for Smartposti methods selection,n, which are eligible for Smartposti COD.The The
Enable for specific countries field is for country selection in which the Itella COD method will be enabled.
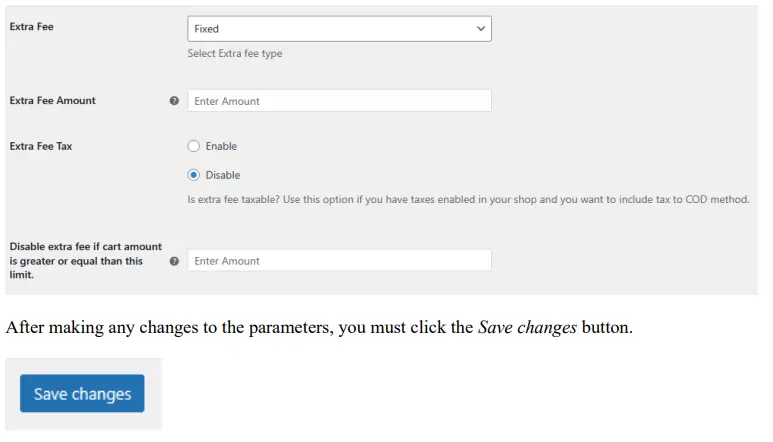
In the Extra Fee field have to choose whether it is Disabled, Fixed, or Percentage. In the Fee Amount field can charge for cash-on-delivery service. The same principle is either for both the Fixed and Percentage extra fees types.
Extra Fee Tax –to make the extra fee taxable, the option to enable taxes in the shop. The tax will also be included in the COD method.
Disable extra fee if the cart amount is greater than lit Leave blank or zero if you want to charge for any amount.
Documents / Resources
 |
assets ctfassets Smartposti Woocommerce Plugin [pdf] Installation Guide Smartposti Woocommerce Plugin, Woocommerce Plugin, Plugin |