KRAMER FC-102NET 2-Channel Dante Encoder
This guide helps you install and use your FC-102NET for the first time.
 Go to www.kramerav.com/downloads/FC-102NET to download the latest user manual and check if firmware upgrades are available.
Step 1: Check what’s in the box
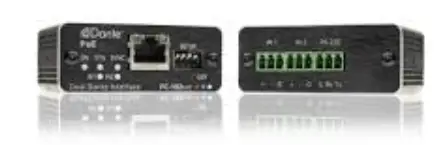
- FC-102NET Dual Dante Interface
- 1 Bracket set
- 1 Quick start guide
- Double-sided adhesive dual lock tape
Step 2: Get to know your FC-102NET
| # | Feature | Function |
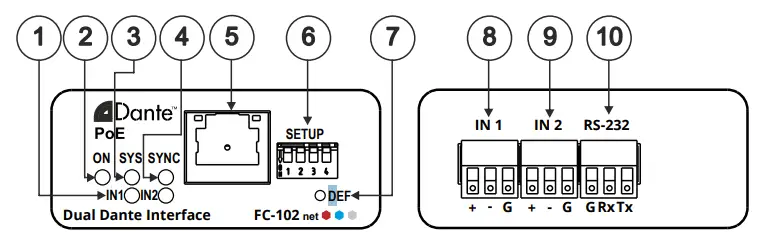
| 1 | IN LEDs (1 and 2) | Lights white when a microphone is selected to the input (IN 1/IN 2); lights green when a line level source is selected; lights red to indicate clipping on the input. |
| 2 | ON LED | Lights green when the device receives power. |
| 3 | SYS LED | Lights green when Dante network is available; lights red if an error has occurred. |
| 4 | SYNC LED | Lights green for digital audio normal operation; flashes green when this unit is the Master clock; lights red if an error has occurred. |
|
5 |
Dante PoE RJ-45 Port |
Connect to the Dante audio sink via the Network and provide Power over Ethernet (PoE) to the device.
By default, DHCP is enabled. |
| 6 | SETUP 4-way DIP switches | Set the operation DIP switches (see Step 4: Connect the inputs and outputs). |
| 7 | DEF Recessed button | To reset/reboot the device, press and release the button.
To reset to factory settings, press and hold the button for at least 5 seconds. |
| 8 | IN 1 3-pin Terminal Block Connector | Connect to a balanced mono mic or line level source (+, –, G). |
| 9 | IN 2 3-pin Terminal Block Connector | Connect to a balanced mono mic or line level source (+, –, G). |
| 10 | RS-232 3-pin Terminal Block Connector | Connect to a serial controller to control this device. |
Step 3: Mount FC-102NET
Install FC-102NET using one of the following methods:
- Attach the rubber feet and place the unit on a flat surface.
- Fasten a bracket (included) on each side of the unit and attach it to a flat surface (see www.kramerav.com/downloads/FC-102NET).
- Mount the unit in a rack using the recommended rack adapter (see WWW.KRAMERAV.COM/PRODUCT/FC-102NET).

- Ensure that the environment (e.g., maximum ambient temperature & air flow) is compatible for the device.
- Avoid uneven mechanical loading.
- Appropriate consideration of equipment nameplate ratings should be used for avoiding overloading of the circuits.
- Reliable earthing of rack-mounted equipment should be maintained.
FC-102NET Quick Start

Step 4: Connect the inputs and outputs
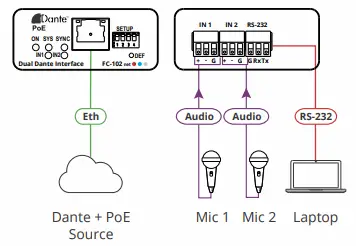
Always switch OFF the power on each device before connecting it to your FC-102NET. For best results, we recommend that you always use Kramer high-performance cables to connect AV equipment to the FC-102NET.
DIP-Switch Settings
All DIP-switches are set to OFF (up) by default except DIP-switch 1 which is set to ON (down) by default.

| # | Feature | Dip-switch Settings |
| 1 | IN 1 Connection Type | UP (off) – when connecting IN 1 to a microphone.
DOWN (on) – when connecting IN 1 to a line level source. |
| 2 | MIC 1 Phantom Mode | Use when IN 1 is connected to a microphone.
UP (off) – phantom power is on (set for condenser microphones). DOWN (on) – phantom power is off (set for dynamic microphones). |
| 3 | IN 2 Connection Type | UP (off) – when connecting IN 2 to a microphone.
DOWN (on) – when connecting IN 2 to a line level source. |
| 4 | MIC 2 Phantom Mode | Use when IN 2 is connected to a microphone.
UP (off) – phantom power is on (set for condenser microphones). DOWN (on) – phantom power is off (set for dynamic microphones). |
Step 5: Connect the power
The device is PoE powered via Dante port.
Safety Instructions
Caution:
There are no operator serviceable parts inside the unit.
Warning:
Do not open the unit. High voltages can cause electrical shock! Servicing by qualified personnel only.
See www.KramerAV.com for updated safety information.
Step 6: Operate the FC-102NET
Operate FC-102NET:
Remotely, by RS-232 serial commands transmitted by a touch screen system, PC, or other serial controller.
| RS-232 Control / Protocol 3000 | |||
| Baud Rate: | 115,200 | Parity: | None |
| Data Bits: | 8 | Command Format: | ASCII |
| Stop Bits: | 1 | ||
| Example (Set channel #1 input volume to -6dB): #AUD-LVL 1,1,-6<CR> | |||
Technical Specifications
| Inputs | 2 balanced inputs | On 3-pin terminal block connectors |
| Output | Dante | On an RJ-45 female connector |
| Port | RS-232 | On a 3-pin terminal block connector |
| Controls | Dante IP control matrix and Kramer Protocol 3000 | |
| Power | Source | 48V DC (PoE) |
| Consumption | 48V DC, 100mA | |
| Environmental Conditions | Operating Temperature | 0° to +40°C (32° to 104°F) |
| Storage Temperature | -40° to +70°C (-40° to 158°F) | |
| Humidity | 10% to 90%, RHL non-condensing | |
| Regulatory Compliance | Safety | CE |
| Environmental | RoHs, WEEE | |
| Enclosure | Size | Pico TOOL |
| Type | Aluminum | |
| General | Net Dimensions (W, D, H) | 6.2cm x 5.2cm x 2.4cm (2.4” x 2” x 1”) W, D, H |
| Shipping Dimensions (W, D, H) | 15.7 cm x 12cm x 8.7cm (6.2” x 4.7” x 3.4”) W, D, H | |
| Net Weight | 0.08kg (0.2lb) | |
| Shipping Weight | 0.23kg (0.5lb) |
Documents / Resources
 |
KRAMER FC-102NET 2-Channel Dante Encoder [pdf] User Guide FC-102NET, FC-102NET 2 Channel Dante Encoder, 2 Channel Dante Encoder, Dante Encoder, Encoder |