1. 서론
This manual provides comprehensive instructions for the setup, operation, and maintenance of your ieGeek 5.5'' Split-Screen Baby Monitor. This device is designed to offer reliable monitoring of your baby with advanced features for peace of mind.
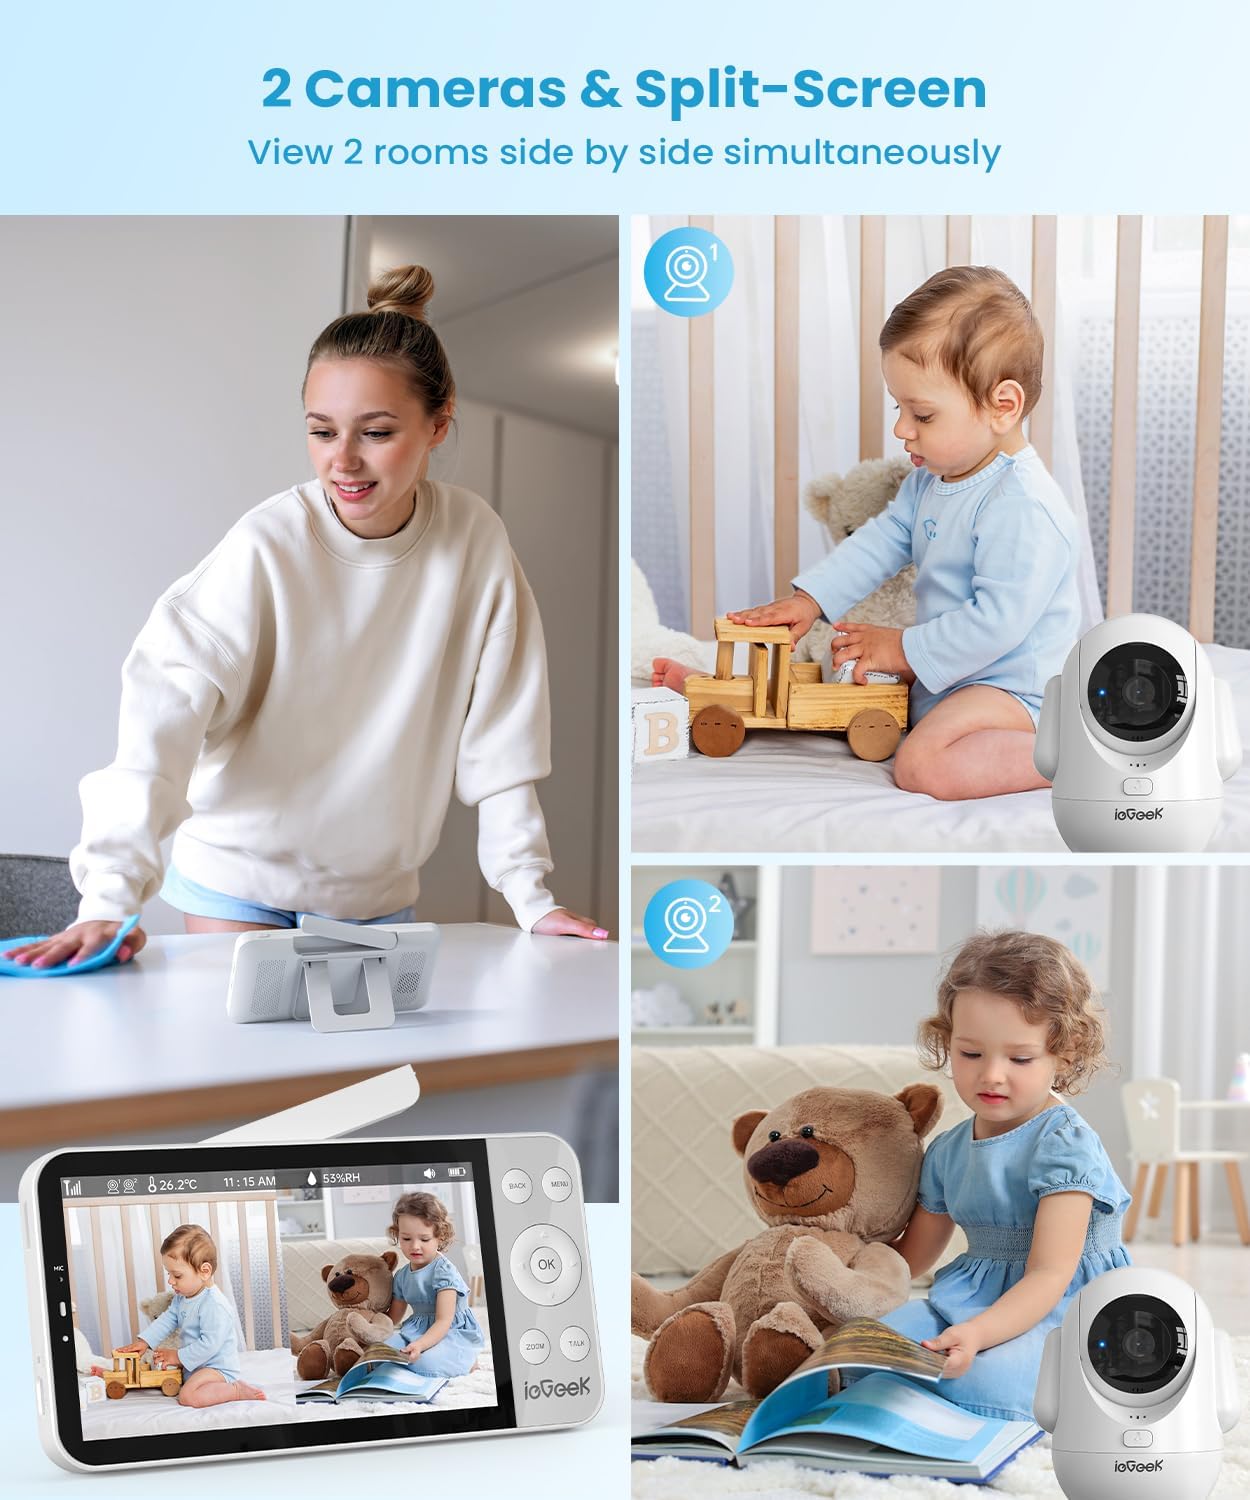
Key features include a 5.5-inch 2.5K UHD display, dual camera support with split-screen viewing, two-way audio communication, night vision, and intelligent AI detection for prone sleeping, face covering, and crying.
2. 안전 정보
- 목졸림 위험: Keep all cords and cables out of reach of children. Ensure the camera is mounted at least 3 feet (1 meter) away from the crib.
- 질식 위험: Small parts may be present. Keep all components and packaging materials away from infants and children.
- 전기 안전: Use only the provided power adapters. Do not expose the device to water or moisture. Discontinue use if any damage occurs.
- 배터리 안전: The monitor unit contains a rechargeable battery. Do not attempt to replace the battery yourself. Dispose of batteries according to local regulations.
- 열 노출: Do not place the monitor or cameras near heat sources or in direct sunlight.
3. 패키지 내용
아래 나열된 모든 품목이 패키지에 포함되어 있는지 확인하세요.
- ieGeek 5.5'' Monitor Unit
- ieGeek 2.5K UHD Camera Unit (x2)
- 전원 어댑터(x3)
- USB 충전 케이블 (3개)
- Wall Mounting Kits (x2)
- 사용자 설명서

4. 제품 오버view
4.1 모니터 유닛
- 5.5-inch 2.5K UHD LCD Screen
- Control Buttons (Menu, OK, Back, Zoom, Talk)
- 내장 마이크 및 스피커
- Antenna for enhanced signal range
- 통합형 킥스탠드
4.2 카메라 유닛
- 2.5K UHD Camera Lens
- Pan (355°) and Tilt (100°) functionality
- 야간 투시용 적외선 LED
- Built-in Microphone and Speaker for Two-Way Talk
- Night Light with adjustable colors
- 재설정 버튼

5. 설정
5.1 초기 설정
- 모니터 충전: Connect the monitor unit to a power outlet using the provided USB cable and power adapter. Fully charge the monitor before first use.
- 카메라 전원 켜기: Connect each camera unit to a power outlet using their respective USB cables and power adapters. The cameras will power on automatically.
- 모니터 전원 켜기: Press and hold the power button on the monitor unit until the screen illuminates.
5.2 카메라 배치
Position the camera(s) in a location that provides a clear view of your baby. Ensure the camera is placed at a safe distance from the crib to prevent accidental contact or entanglement with cables.
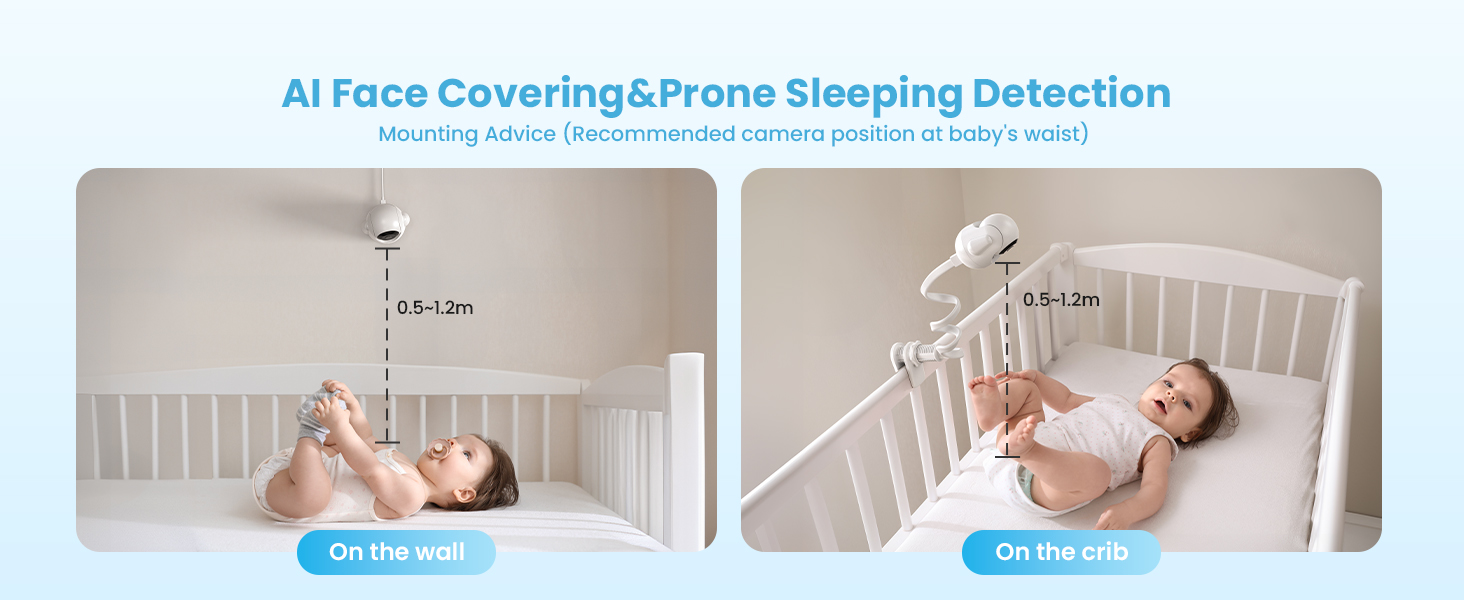
- For optimal AI detection (Face Covering & Prone Sleeping), the recommended camera position is at the baby's waist level, approximately 0.5-1.2 meters (1.6-4 feet) from the crib.
- The camera can be placed on a flat surface, mounted on a wall, or attached to the crib using the provided mounting kits.

5.3 앱 설치 및 페어링
The ieGeek baby monitor supports both Bluetooth and Wi-Fi connections for smartphone app control. Follow the steps below to connect your camera(s) to the app.
블루투스 연결(권장)
- 카메라를 전원에 연결합니다.
- Long press the 'Reset' button on the camera until you hear a 'BOOGU' beep.
- After 20-30 seconds, the camera will automatically rotate once. Connection starts after another beep and the red light flashes.
- On your smartphone, ensure Bluetooth, Wi-Fi (2.4GHz or 5GHz), and GPS location are enabled.
- Open the ieGeek app, click the '+' icon, and select the 'baby 5' device from the automatically popped-up list.
- Enter your Wi-Fi password and click 'Next'.
- Wait for the Wi-Fi connection to complete. Device addition is successful.
- To connect a second camera, repeat steps 1-7.
Wi-Fi 연결
- Open the ieGeek app, click the '+' icon, and select 'Baby Monitor (2.4G or 5G Wi-Fi)'.
- Connect the camera to a power source and click 'Next' in the app.
- Long press the 'Reset' button on the camera until you hear a 'BOOGU' beep. After 20-30 seconds, the camera will automatically rotate once. Connection starts after another beep and the red light flashes. Click 'Next' in the app.
- Enter your Wi-Fi password and click 'Next'.
- Scan the QR code displayed on your phone with the camera lens (distance 5-8 inches). A tone will be heard when successfully scanned. Click 'Next'.
- Wait for the Wi-Fi connection to complete. Device addition is successful.
- To connect a second camera, repeat steps 1-6.
6. 사용 설명서
6.1 모니터 기능
- 분할 화면 Viewing: When two cameras are connected, the monitor can display both camera feeds simultaneously on a single screen.
- 팬 및 틸트 : Use the directional buttons on the monitor to remotely adjust the camera's 355° horizontal pan and 100° vertical tilt.
- 디지털 줌: Press the 'ZOOM' button to digitally zoom in up to 4 times for a closer view 아기의.
- 양방향 대화: Press and hold the 'TALK' button on the monitor to speak to your baby through the camera's speaker. Release the button to listen.
- 야간 조명 및 자장가: Access the menu to control the camera's integrated night light (with various colors) and play soothing lullabies to help your baby sleep.


6.2 AI 감지 기능
The ieGeek baby monitor incorporates advanced AI functions to provide smart care and alerts.
- Face Covering Detection: The monitor can detect if your baby's face is covered while sleeping and send an alert.
- Prone Sleeping Detection: Alerts you if your baby rolls into a prone (face-down) sleeping position.
- Cry & Sound Detection: Notifies you when your baby cries or makes significant sounds.
- 동작 추적 : The camera can automatically track movement within its field of view.
- 온도 및 습도 감지: Monitors the nursery's temperature and humidity levels, providing alerts if they fall outside a set range.
- Danger Zone Detection: Allows you to define specific areas in the room as 'danger zones' and receive alerts if your baby enters them.

7. 유지관리
7.1 청소
- Wipe the monitor and camera surfaces with a soft, dry cloth.
- 연마성 세척제나 용제를 사용하지 마십시오.
- 청소하기 전에 기기의 전원 플러그를 뽑으십시오.
7.2 배터리 관리
- The monitor unit has a 4000mAh battery, providing 11-15 hours in bright mode and up to 7.5 days in sleep mode.
- To prolong battery life, avoid extreme temperatures and fully charge the device regularly.

8. 문제 해결
- No Image/Sound: 카메라와 모니터 모두 전원이 켜져 있고 통신 범위 내에 있는지 확인하십시오. 전원 연결 상태를 점검하십시오.
- 신호가 약함: Reposition the camera and monitor closer to each other. Ensure no large obstructions (e.g., thick walls) are between them. Extend the monitor's antenna.
- 앱 연결 문제: Verify your smartphone's Bluetooth, Wi-Fi, and GPS are enabled. Ensure you are connected to a 2.4GHz or 5GHz Wi-Fi network. Try resetting the camera and re-pairing.
- AI Detection Not Working: Ensure the camera is positioned correctly according to the mounting advice (Figure 5.1). Check app settings to confirm detection features are enabled.
- Monitor Not Charging: Use the original power adapter and cable. Check for any damage to the cable or charging port.
9. 사양
| 특징 | 사양 |
|---|---|
| 모델 번호 | baby 5 |
| 화면 크기 | 5.5인치 |
| 비디오 캡처 해상도 | 1920p (2.5K UHD) |
| 카메라 팬 각도 | 355도 |
| 카메라 틸트 각도 | 100도 |
| 광학 줌 | 4배 디지털 줌 |
| 나이트 비전 범위 | 32.81 피트 |
| 연결 기술 | 2.4G & 5G Wireless, FHSS |
| 배터리 용량 모니터링 | 4000mAh |
| 호환 장치 | iOS/안드로이드 |
| 품목 치수(L x W x H) | 2.56 x 2.56 x 5.12 인치 |
| 품목 무게 | 1.54파운드 |
10. 보증 및 지원
ieGeek is committed to providing high-quality products and customer service.
- 보증: 이 제품은 2년 보증이 제공됩니다.
- 보고: 90일 무료 반품 정책을 이용해 보세요.
- 품질 문제: Replacements are available for quality-related issues.
지원팀에 문의:
- 핸드폰: +1(202)656-9955 (Mon-Fri 9:00 am-6:00 pm ET)
- 이메일: service@iegeek.com