1. 서론
This manual provides detailed instructions for the installation, operation, and maintenance of your STINGER Audio MT20001 Monoblock Class D Car Amplifier. The MT20001 is designed to deliver high-efficiency power for subwoofer systems in car audio applications, ensuring optimal sound quality. Please read this manual thoroughly before installation and use to ensure proper function and safety.
2. 안전 정보
부상이나 손상을 방지하기 위해 항상 다음 안전 예방 조치를 준수하십시오. amp증폭기 또는 차량:
- 차량 배터리 분리: 설치를 시작하기 전에 전기 합선을 방지하기 위해 차량 배터리의 음극 단자를 분리하십시오.
- 전문 설치 권장: If you are unsure about the installation process, consult a qualified car audio professional.
- 적절한 배선: Use appropriate gauge wiring as specified in this manual. Incorrect wiring can lead to overheating, fire, or damage to components.
- 통풍: 확인하십시오 amplifier is mounted in a location with adequate airflow to prevent overheating. Do not block cooling fins.
- 안전한 장착: 마운트하다 amp차량 운행 중 풀리지 않도록 증폭기를 단단히 고정하십시오. 풀리면 부상이나 손상이 발생할 수 있습니다.
- 습기를 피하세요: 노출시키지 마십시오 amplifier to moisture or water. This product is not waterproof.
- 퓨즈 보호: Always use the correct fuse rating as specified. Never replace a fuse with one of a higher rating.
3. 패키지 내용
패키지에 모든 품목이 들어 있는지 확인하세요.
- STINGER Audio MT20001 Monoblock Class D Amp리퍼
- Remote Subwoofer Level Control with cable
- STINGER 4-Gauge Copper Amplifier Wiring Kit, including:
- 17FT Translucent Blue Power Wire
- 3FT Translucent Silver Ground Wire
- 17FT Translucent Blue Twisted Pair RCA interconnects
- 16FT Blue Remote Turn-on Wire
- 20FT Translucent Speaker Wire
- 3FT Black flex loom tubing
- 1pc Mini-ANL/AFS Fuseholder & Fuse
- 장착 하드웨어(나사)
- 사용 설명서 (본 문서)

Image: STINGER 1200W Amplifier Wiring Kit packaging, showing the various cables and fuse holder included.
4. 제품 특징
The STINGER Audio MT20001 amplifier incorporates advanced design and technology for superior performance:
- Digital Class-D Monoblock Design: High efficiency with a compact footprint, optimized for subwoofer applications.
- Robust Unregulated Power Supplies: Utilizes advanced pulse width modulator integrated circuits for improved performance and efficiency.
- Direct Insert Terminals: Features 0/1 Gauge Power and 8 Gauge Speaker direct insert terminals for secure connections.
- 넓은 주파수 응답: 10Hz-180Hz, suitable for deep bass reproduction.
- 원격 서브우퍼 레벨 조절: Included for convenient bass level adjustments.
- Precision Metal Potentiometers: For accurate tuning of audio settings.
- Designed for 1 Ohm Load: Capable of driving demanding subwoofer configurations.

이미지: 상단 view of the STINGER MT-2000.1 amplifier, with text overlays indicating features such as small footprint, 2000W @ 1 Ohm, direct insert terminals, 0/1 gauge power, 8 gauge speaker, 10Hz-180Hz frequency response, and included bass knob.

Image: STINGER MT-2000.1 amplifier, labeled as Class-D Mono Block, with icons and text indicating it's designed for 1 Ohm load, has a small and compact design, features 0/1 Gauge Power Terminal, has a Bridged RMS Rating of 3,800W / 2 Ohm Minimum, and an Operating voltage는 9V ~ 16V입니다.
5. 설정 및 설치
Careful installation is crucial for optimal performance and safety. Follow these steps for proper setup.
5.1 구성 요소 식별
익숙해지세요 amplifier's input and output terminals and control panel:

이미지: 후면 view of the STINGER MT-2000.1 amplifier showing the control panel. Labels include PRT (Protection Indicator), PWR (Power Indicator), REMOTE port (for bass knob), INPUT RCA (L/R), BRIDGE IN RCA, GAIN knob (Min/Max), LPF knob (40Hz-180Hz), SUBSONIC knob (OFF/50Hz), FREQ knob (30Hz/80Hz), BOOST knob (0dB/12dB), and INPUT BRIDGE OUT RCA.
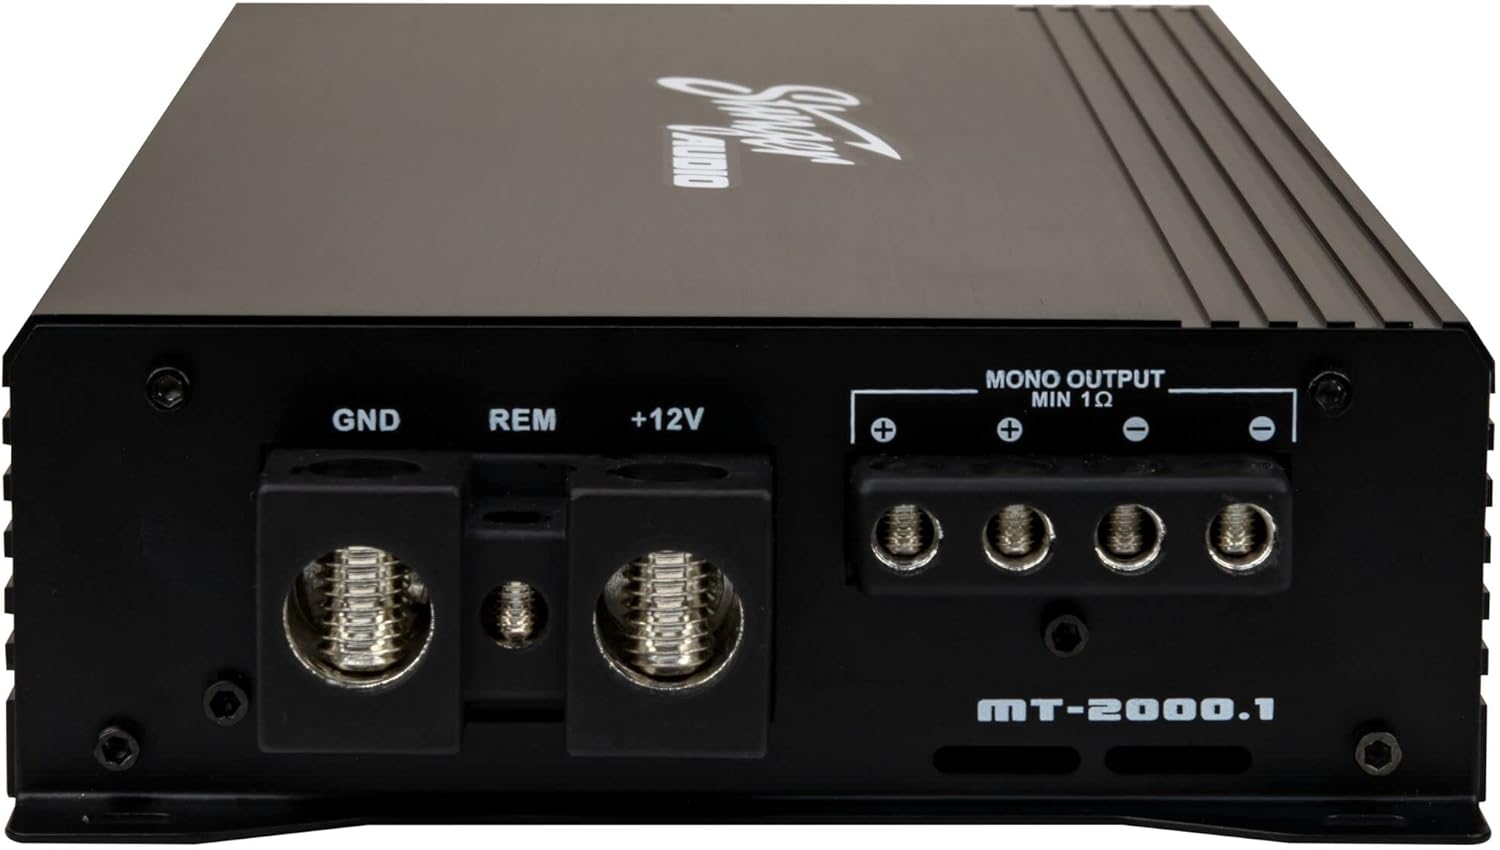
이미지: 후면 view of the STINGER MT-2000.1 amplifier showing the power and speaker terminals. Labels include GND (Ground), REM (Remote Turn-on), +12V (Power), and MONO OUTPUT MIN 1 Ohm speaker terminals (+ and -).
5.2 배선 연결
Follow these steps for secure and correct wiring:
- 전원선(+12V): Connect the 17FT Translucent Blue Power Wire from the vehicle's positive battery terminal (via the Mini-ANL/AFS Fuseholder & Fuse, installed within 18 inches of the battery) to the +12V terminal on the amplifier. Ensure a secure, crimped connection.
- 접지선(GND): Connect the 3FT Translucent Silver Ground Wire from the GND terminal on the amp앰프를 차량 섀시의 깨끗하고 도색되지 않은 금속 표면에 부착하십시오. 견고하고 저항이 낮은 연결이 되도록 하십시오.
- Remote Turn-on Wire (REM): Connect the 16FT Blue Remote Turn-on Wire from the REM terminal on the amplifier to the remote output of your head unit or other switched 12V source. This wire turns the amp헤드 유닛으로 라이터를 켜고 끌 수 있습니다.
- RCA 입력: Connect the 17FT Translucent Blue Twisted Pair RCA interconnects from the RCA output of your head unit to the INPUT RCA terminals (L/R) on the amplifier. For bridged input, use the BRIDGE IN RCA terminal.
- 스피커 출력: Connect your subwoofer(s) to the MONO OUTPUT MIN 1 Ohm terminals on the amplifier using the 20FT Translucent Speaker Wire. Observe correct polarity (+ to + and - to -). Ensure the total impedance of your subwoofer(s) is 1 Ohm or higher.
- 원격 서브우퍼 레벨 조절: Plug the included remote bass knob into the REMOTE port on the amp리퍼.
5.3 장착
Choose a mounting location that provides adequate ventilation and is secure. Avoid mounting the amplifier directly to carpet or in enclosed spaces without airflow. Use the provided mounting hardware to firmly attach the amp차량 내부의 단단한 표면에 증폭기를 고정하십시오.
6. 사용 설명서
설치 후 조정하세요 amp최적의 사운드 성능을 위한 리파이어 설정.
6.1 컨트롤 조정
- GAIN(입력 레벨): 이 컨트롤은 다음과 일치합니다. amplifier's input sensitivity to the output of your head unit. Start with the gain at minimum (fully counter-clockwise). Play a familiar track at about 75% of your head unit's maximum volume. Slowly increase the gain until you hear distortion, then back off slightly.
- LPF(저역 통과 필터): This filter allows only frequencies below the set point to pass through to the subwoofer. Adjust this knob (40Hz-180Hz) to blend the subwoofer's output with your main speakers. A common starting point is 80Hz.
- 아음속: This high-pass filter removes extremely low frequencies that are below the audible range or harmful to your subwoofer. Set it to OFF or 50Hz, depending on your subwoofer's capabilities and enclosure tuning.
- FREQ (Bass EQ Frequency): This knob (30Hz/80Hz) selects the center frequency for the Bass BOOST.
- BOOST (Bass EQ Level): This control (0dB/12dB) increases the output at the selected FREQ. Use sparingly to avoid distortion and potential damage to your subwoofer.
6.2 Remote Subwoofer Level Control
The included remote level control allows you to conveniently adjust the subwoofer output level from your driving position. This control only adjusts the output level and does not affect the amp리파이어의 게인 설정.

Image: The STINGER remote subwoofer level control, a small black box with a rotary knob labeled 'MIN' to 'MAX', connected by a cable.
7. 유지관리
The STINGER MT20001 amp증폭기는 장기간 성능을 보장하기 위해 최소한의 유지 보수만 필요합니다.
- 청소: 주기적으로 닦아주세요 amp부드럽고 마른 천으로 기기 외부를 닦으세요. 강한 화학 물질이나 연마성 세척제는 사용하지 마세요.
- 연결 확인: Annually, inspect all power, ground, remote, RCA, and speaker connections to ensure they are secure and free from corrosion. Loose connections can cause performance issues or damage.
- 통풍: 다음을 확인하세요. amplifier's cooling fins remain clear of obstructions to maintain proper heat dissipation.
8. 문제 해결
문제가 발생하면 amplifier, refer to the following table for common issues and solutions:
| 문제 | 가능한 원인 | 해결책 |
|---|---|---|
| 전원 없음(PWR LED 꺼짐) | Blown fuse, loose power/ground/remote wire, no 12V at battery. | Check fuse, verify all power connections, test battery voltage. |
| 보호 모드 (PRT LED 켜짐) | Overheating, speaker short circuit, low impedance load. | Ensure proper ventilation, check speaker wiring for shorts, verify speaker impedance is 1 Ohm or higher. Allow amp냉각시키는 lifier. |
| 소리가 출력되지 않음 | No RCA signal, gain too low, speaker wires disconnected, head unit off. | Check RCA connections, adjust gain, verify speaker wiring, ensure head unit is on and playing audio. |
| 왜곡된 소리 | Gain set too high, poor ground connection, damaged speaker, incorrect LPF/BOOST settings. | Reduce gain, check ground connection, inspect speaker, adjust LPF/BOOST settings. |
| Amp리파이어 과열 | Insufficient ventilation, impedance too low, gain too high. | 고쳐 놓다 amplifier for better airflow, verify speaker impedance, reduce gain. |
9. 사양
Detailed technical specifications for the STINGER Audio MT20001 Monoblock Class D Car Amp정수기:
| 사양 | 값 |
|---|---|
| 모델명 | MT20001 |
| 재료 | 금속 |
| 스피커 유형 | 서브우퍼 |
| 스피커 최대 출력 전력 | 2000 와트 |
| 오디오 출력 모드 | 단핵증 |
| 연결 기술 | (주)알에이씨에이 |
| 서브우퍼 연결 기술 | 열광한 |
| 제어 방법 | 원격 |
| 전원 | 코드식 전기 |
| 운영 볼륨tage | 9V ~ 16V |
| 최소 임피던스 | 1옴 |
| 장착 유형 | 플러시 마운트 |
| 방수 | 거짓 |
| 품목 모델 번호 | MT20001 |
| 첫 번째 이용 가능 날짜 | 20년 2024월 XNUMX일 |

Image: STINGER MT-2000.1 amplifier with dimensions indicated: 12.16 inches (309 mm) length, 6.1 inches (155 mm) width, and 2.09 inches (53 mm) height.
10. 보증 및 지원
STINGER products are designed for reliability and performance. For specific warranty information, please refer to the warranty card included with your product or visit the official STINGER website. If you encounter any issues not covered in this manual or require technical assistance, please contact STINGER customer support through their official channels.
STINGER Customer Support: Refer to your product packaging or the official STINGER web최신 연락처 정보는 사이트에서 확인하세요.


