소개
Thank you for choosing the Auronic Electric Air Dehumidifier. This appliance is designed to effectively remove excess moisture from the air, creating a more comfortable and healthier indoor environment. It is ideal for use in various spaces such as bathrooms, basements, and living areas, helping to prevent issues like mold, mildew, and dampness. Please read this manual thoroughly before operation to ensure proper use, maintenance, and safety.

Figure 1: Auronic Electric Air Dehumidifier (Model AU3129 12L)
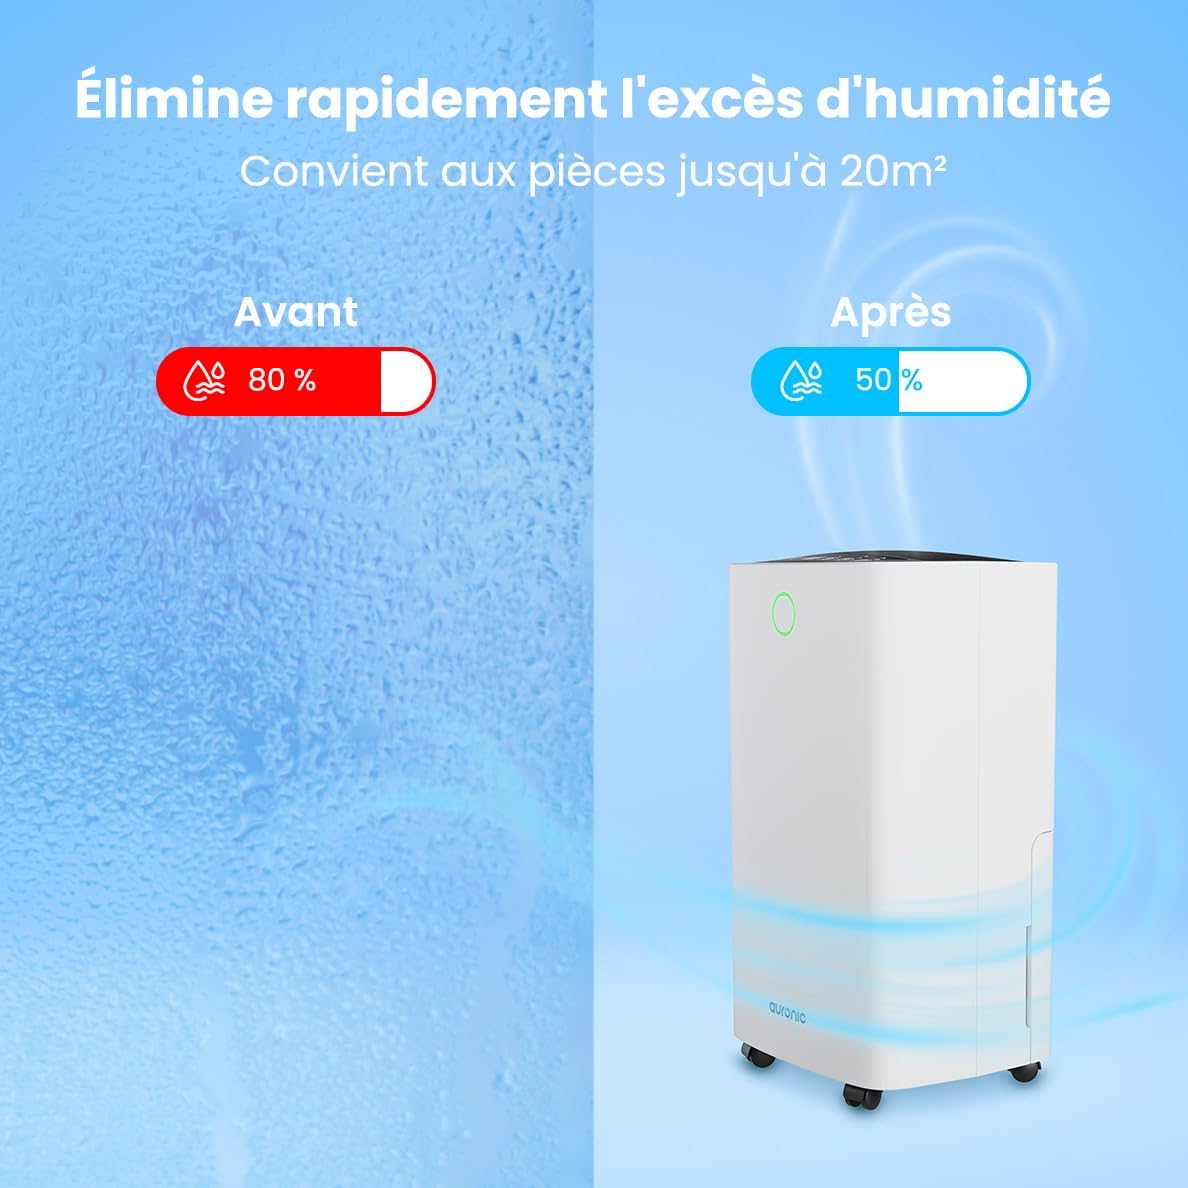
Figure 2: Humidity Reduction Effectiveness
안전 정보
화재, 감전 또는 부상의 위험을 줄이려면 항상 다음 기본 안전 예방 조치를 따르세요.
- 기기를 사용하기 전에 모든 지침을 읽으세요.
- 전원 공급 장치가 볼륨과 일치하는지 확인하십시오.tag등급 라벨에 지정되어 있습니다.
- 전원 코드나 플러그가 손상된 경우 제습기를 작동하지 마십시오.
- 제품은 항상 안정적이고 평평한 표면에 놓으십시오.
- 적절한 공기 흐름을 위해 기기를 벽이나 기타 물체에서 최소 20cm 이상 떨어뜨려 놓으십시오.
- 공기 흡입구 또는 배출구에 손가락이나 이물질을 넣지 마십시오.
- 청소, 이동 또는 유지관리 작업을 하기 전에 제습기의 플러그를 뽑으세요.
- 젖은 상태 또는 d에서 기기를 사용하지 마십시오.amp environments where water may splash.
- 어린이의 손이 닿지 않는 곳에 보관하세요.
- If the unit has been tilted, allow it to stand upright for at least 24 hours before plugging it in.
제품 끝view
Familiarize yourself with the components of your Auronic Dehumidifier.

Figure 3: Dehumidifier Dimensions and Included Accessories

Figure 4: Easy Portability with Wheels and Handle
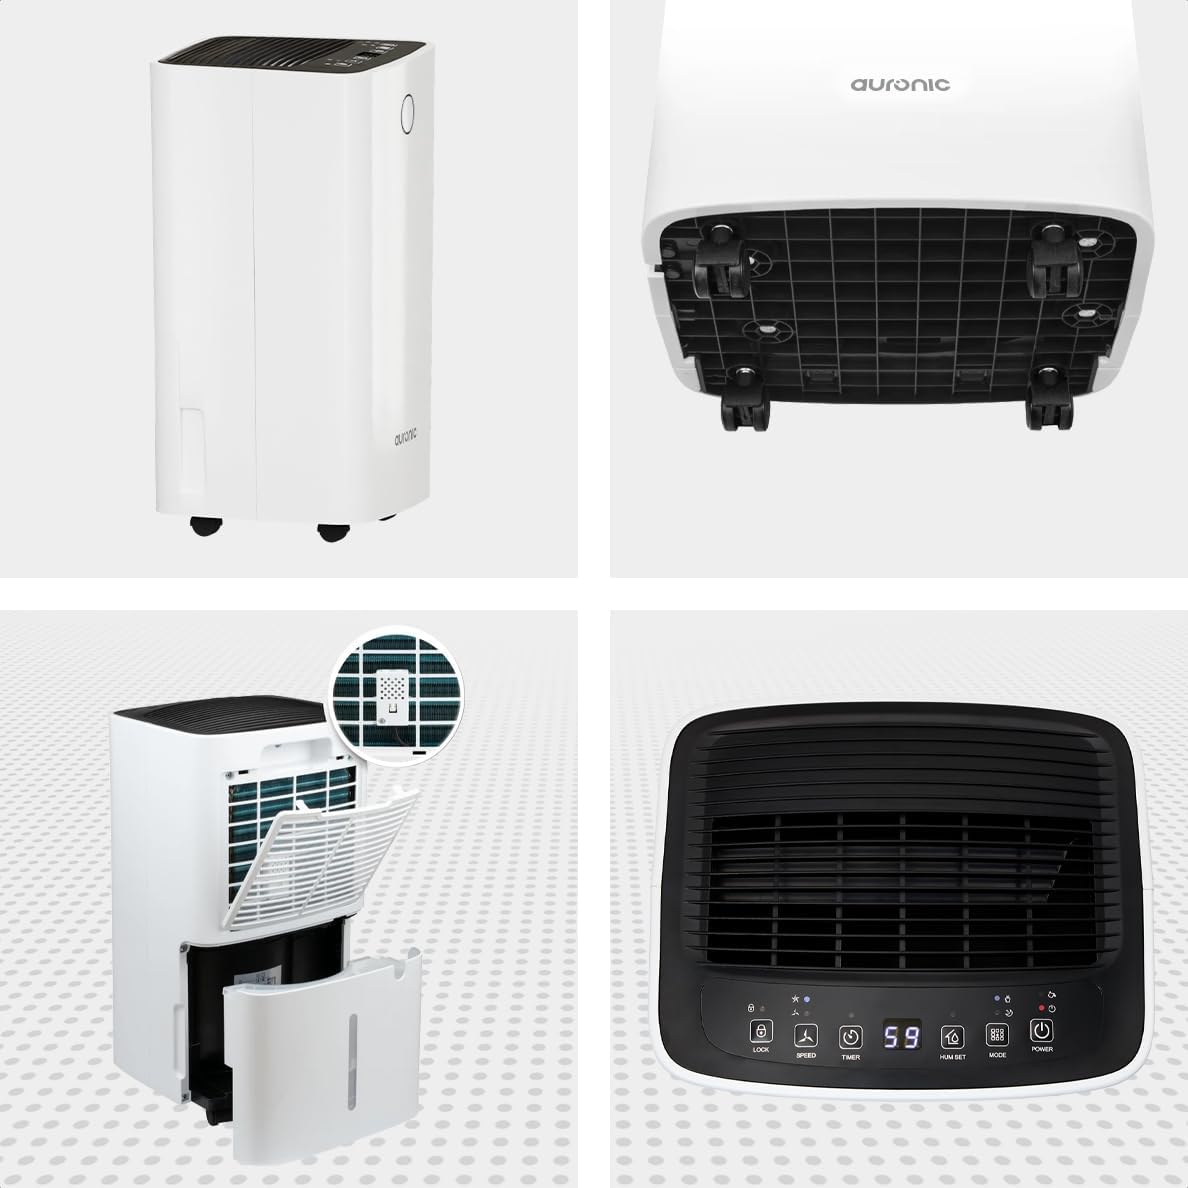
그림 5: 다각도 View 제습기의

그림 6: 제어판view
주요 구성 요소:
- 제어판: Intuitive interface for setting modes, humidity levels, and timer.
- 공기 흡입구/배출구: Where air enters and exits the unit. Ensure these are not obstructed.
- 수조: 응축수를 모으는 2리터 용량의 탈착식 탱크가 있습니다.
- 연속 배수구: Port for attaching a hose for continuous drainage.
- 바퀴와 손잡이: 간편한 휴대를 위해.
- 에어 필터: Located at the back, helps filter dust from the air.
설정
- 짐 풀기: 제습기를 포장에서 조심스럽게 꺼내세요. 나중에 보관하거나 운반할 수 있도록 포장을 보관하세요.
- 놓기: Place the unit upright on a firm, level surface in the desired location. Ensure there is at least 20 cm of clear space around all sides for proper air circulation.
- 초기 대기: If the unit was tilted during transport, let it stand upright for a minimum of 24 hours before plugging it in. This allows the refrigerant to settle.
- 전원 연결: 전원 코드를 접지된 콘센트에 꽂으세요.
- 수조: 물탱크가 본체에 올바르게 장착되었는지 확인하십시오. 물탱크가 가득 찼거나 제대로 장착되지 않으면 제습기가 작동하지 않습니다.
작동 지침
제어판 기능:
| 버튼/표시등 | 기능 |
|---|---|
| 전원 버튼 | 장치를 켜거나 끕니다. |
| 모드 버튼 | Cycles through operating modes (e.g., Dehumidify, Laundry Drying, Sleep). |
| Hum Set Button | Adjusts the desired humidity level (e.g., 40% - 80% RH). |
| 타이머 버튼 | 자동 켜짐 또는 자동 꺼짐 타이머를 설정합니다(최대 12시간). |
| 속도 버튼 | Adjusts fan speed (e.g., High, Low). |
| 잠금 버튼 | 실수로 변경되는 것을 방지하기 위해 제어판을 잠급니다. |
| Humidity Indicator LED | Changes color based on current humidity level (e.g., Blue: <45%, Green: 45-65%, Red: >65%). Figure 7: Humidity Indicator LED Explained |
일반 작업:
- 켜기: 를 누르세요 힘 button. The display will show the current room humidity.
- 원하는 습도 설정: 를 누르세요 Hum Set button repeatedly to select your desired humidity level. The unit will operate until this level is reached, then cycle on and off to maintain it.
- 모드 선택: 를 누르세요 방법 button to choose between different operating modes.
- 제습 모드: 주변 습도를 낮추기 위한 표준 작동 방식입니다.
- 세탁물 건조 모드: Increases fan speed and continuous operation to assist in drying clothes.

Figure 8: Using the Dehumidifier for Laundry Drying
- 수면 모드 : Operates at a lower fan speed and reduced noise level for quiet nighttime use.

Figure 9: Silent Operation for Nighttime Use
- 타이머 설정 : 를 누르세요 시간제 노동자 button to set an auto-off time (when the unit is on) or an auto-on time (when the unit is off).

Figure 10: Integrated Timer Function
- 팬 속도: 사용하세요 속도 button to adjust the fan speed as desired.
- 아동 잠금: 를 누르고 계세요 잠그다 button for 3 seconds to activate/deactivate the child lock function.
연속 배수:
For continuous operation without emptying the water tank, you can connect the included drain hose to the continuous drain outlet. Ensure the hose is sloped downwards to allow gravity drainage into a suitable receptacle or drain.

Figure 11: Continuous Drainage Setup
유지
정기적인 유지관리를 통해 최적의 성능을 보장하고 제습기의 수명을 연장할 수 있습니다.
물탱크 비우기:
When the water tank is full, the unit will automatically stop operating and an indicator light will illuminate. Carefully remove the tank, empty the collected water, and reinsert it firmly until it clicks into place.

Figure 12: Removing the 2-Liter Water Tank
공기 필터 청소:
공기 필터는 사용량과 공기 질에 따라 2주에 한 번 또는 그 이상 자주 청소해야 합니다.
- 제습기를 끄고 플러그를 뽑으세요.
- 장치 뒷면에서 공기 필터를 찾아 제거하세요.
- Clean the filter with warm, soapy water or use a vacuum cleaner to remove dust.
- 필터를 깨끗이 헹구고 완전히 말린 후 다시 삽입하세요.
장치 외부 청소:
부드러운 천으로 제습기의 외부를 닦고 damp 옷감. 강한 화학 물질이나 연마성 세제를 사용하지 마십시오.
문제 해결
고객 지원팀에 문의하기 전에 다음의 일반적인 문제와 해결책을 참조하세요.
| 문제 | 가능한 원인 | 해결책 |
|---|---|---|
| 제습기가 켜지지 않습니다. | No power, power cord loose, water tank full or improperly seated. | Check power connection, empty and reinsert water tank correctly. |
| 물이 수집되지 않았습니다. | Room humidity too low, temperature too low, air filter clogged, continuous drain hose connected. | Check room humidity/temperature, clean air filter, ensure continuous drain hose is not connected if tank collection is desired. |
| 이 장치는 시끄럽습니다. | 제품이 수평면에 놓여 있지 않거나, 공기 필터가 막혔거나, 내부 부품에 문제가 있을 수 있습니다. | Place on a level surface, clean air filter. If noise persists, contact support. |
| Dehumidification is slow or ineffective. | Room size too large, doors/windows open, air inlets/outlets blocked, air filter dirty. | Ensure room is sealed, clear obstructions, clean air filter. |
명세서
| 특징 | 세부 사항 |
|---|---|
| 상표 | 오로닉 |
| 모델명 | Auronic Silent Low Consumption Dehumidifier |
| 제품 크기(L x W x H) | 21.5 x 47 x 25.5cm |
| 품목 무게 | 11 킬로그램 |
| 용량(제습) | 12 리터/일 |
| 물탱크 용량 | 2리터 |
| 힘 | 185 와트 |
| 색상 | 하얀색 |
| 특별 기능 | Easy to use, Laundry Drying function, Prevents and effectively eliminates humidity, 2-liter tank, Automatic shut-off. |
| 권장 사용 | 국내의 |
보증 및 지원
Auronic products are manufactured to the highest quality standards. For warranty information, technical support, or service inquiries, please refer to the contact details provided on your purchase receipt or visit the official Auronic website. Please have your model number (AU3129 12L) and purchase date ready when contacting support.


