1. 서론
This manual provides comprehensive instructions for the installation, operation, and maintenance of the Comelit 2638 Basic Interphone. Designed for use within Simplebus 2 mixed audio/video systems, this interphone offers essential communication functionalities. Please read this manual thoroughly before installation and use to ensure proper function and safety.
2. 안전 정보
전기 안전: Installation and wiring should only be performed by qualified personnel. Always disconnect power to the system before performing any installation, maintenance, or repair work. Failure to do so may result in electric shock or damage to the device.
일반적인 예방 조치:
- Do not expose the interphone to water or excessive humidity.
- 기기를 직접 열거나 수리하지 마십시오. 모든 정비는 자격을 갖춘 기술자에게 맡기십시오.
- 장치를 열원이나 직사광선으로부터 멀리 두십시오.
3. 패키지 내용
The Comelit 2638 Basic Interphone package includes:
- Comelit 2638 Basic Interphone unit.
- Note: No additional components such as batteries or mounting hardware are included unless specified by your supplier.
4. 제품 오버view
The Comelit 2638 Basic Interphone is designed for straightforward communication within a Simplebus 2 system. It features an electronic call function, a conversation button on the base, and adjustable call volume. It also includes a door opening button and an additional button for central or free call (C/N.O.).
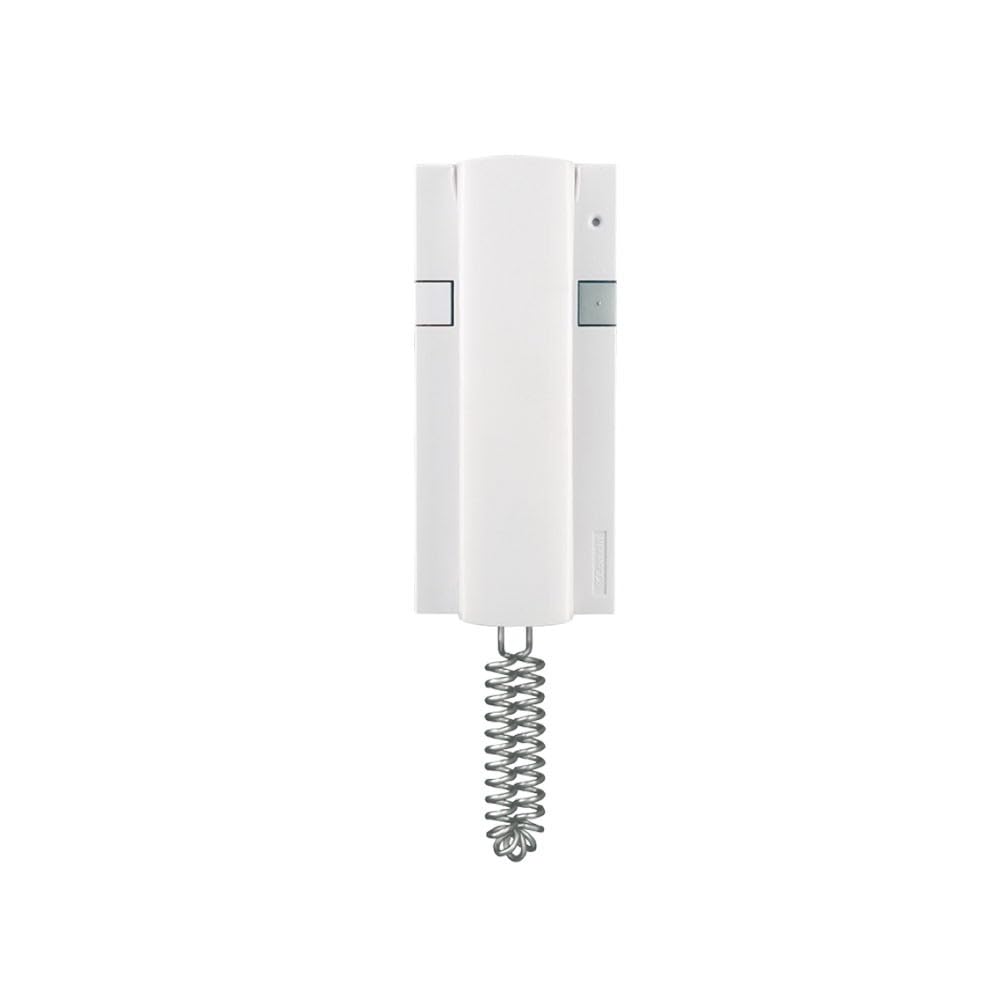
그림 1: 앞쪽 view of the Comelit 2638 Basic Interphone. This image shows the handset resting on the base unit, with visible buttons for operation.
Note: This model does not support the addition of extra buttons or LEDs.
5. 설치 및 설정
Before beginning installation, ensure the power to the Simplebus 2 system is disconnected. It is highly recommended to take a photograph of the existing wiring connections before disconnecting any wires, as this will aid in replicating the setup.
5.1 배선 연결
For Simplebus 2 systems, connect the two system wires to the terminals labeled L 그리고 L on the interphone. Polarity does not matter for these connections. If replacing an old intercom, you may replicate the color coding of the wires from the previous unit.
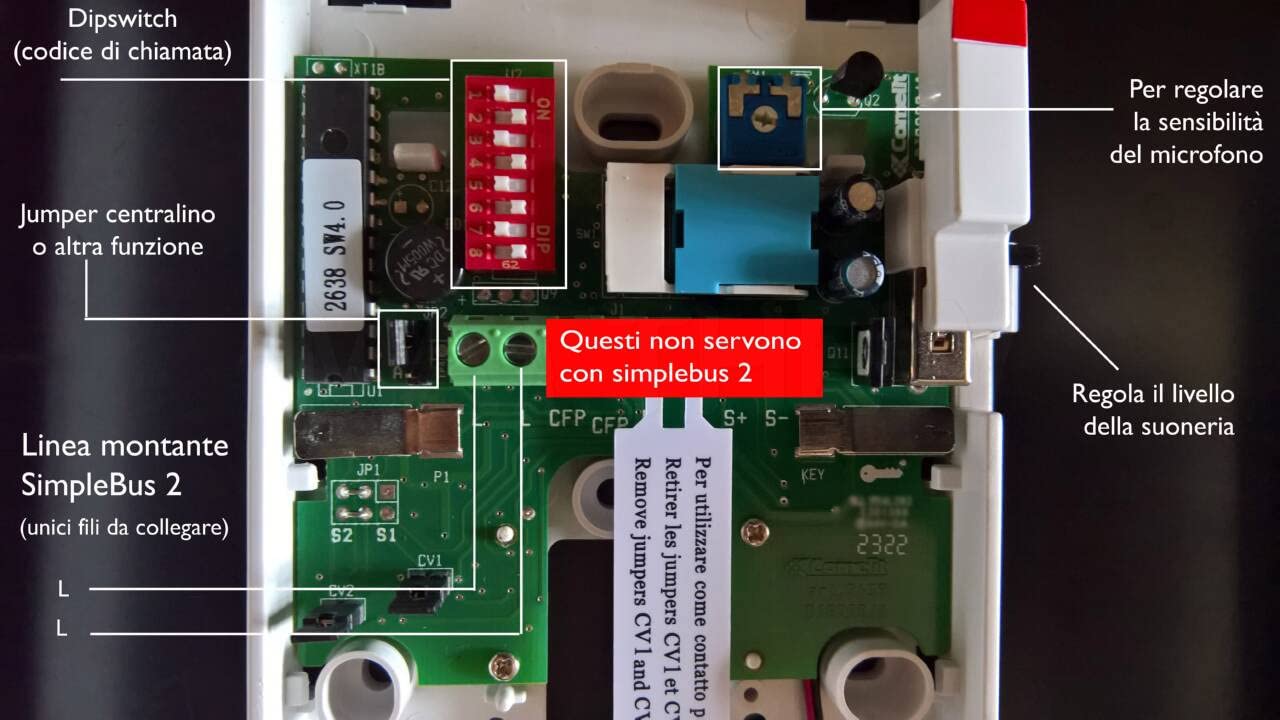
그림 2: 내부 view of the Comelit 2638 Interphone with the cover removed, illustrating the wiring terminals.
The terminal block Art. 1214/2C (if supplied separately) should be connected to the main riser of the system. If you are replacing an existing intercom, the necessary terminal block may already be present in the wall box; in this case, the supplied one can be kept as a spare.
5.2 Dipswitch Configuration
Before finalizing the connection, configure the 8 dipswitches located on the red socket of the interphone. These dipswitches determine the unit's address within the Simplebus 2 system.
그림 3: 상세한 view of the dipswitches on the red socket, crucial for addressing the interphone.
Each dipswitch can be set to either ON (up position) or 끄다 (down position). Refer to the system's addressing table (usually provided with the main Simplebus 2 system documentation) to determine the correct configuration for your specific unit number.
Examp르 : To set the interphone address to 25, configure the dipswitches as follows:
- Dipswitch 1: ON (UP)
- Dipswitch 2: OFF (DOWN)
- Dipswitch 3: OFF (DOWN)
- Dipswitch 4: ON (UP)
- Dipswitch 5: ON (UP)
- Dipswitch 6: OFF (DOWN)
- Dipswitch 7: OFF (DOWN)
- Dipswitch 8: OFF (DOWN)
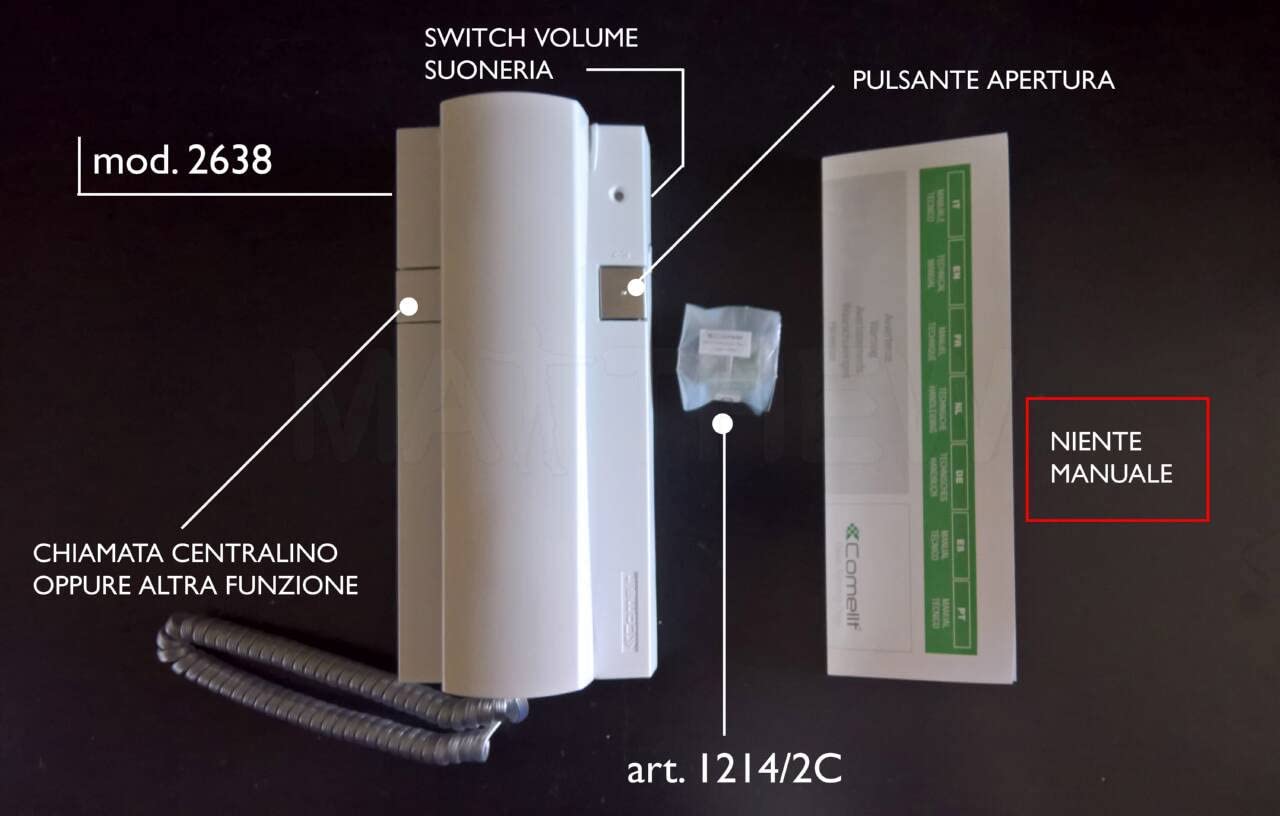
그림 4: 전ample of a dipswitch configuration table, illustrating how to set specific addresses.
After configuring the dipswitches and connecting the wiring, carefully reattach the interphone cover and mount the unit securely to the wall.
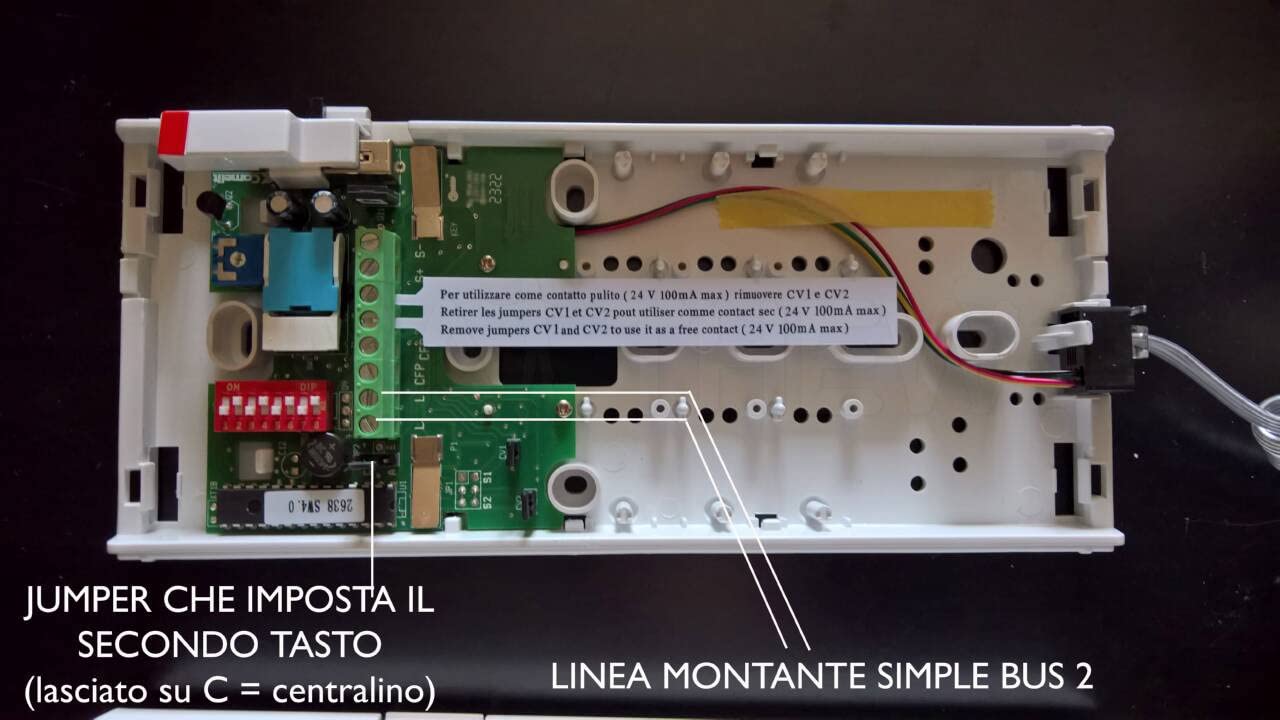
그림 5: The Comelit 2638 Interphone securely mounted on a wall after installation.
6. 운영
Once installed and powered, the Comelit 2638 Interphone is ready for use.
- 전화 받기: When an incoming call is detected, the interphone will produce an electronic call tone. Lift the handset to answer the call.
- 대화: Speak into the handset and listen through the earpiece. The conversation button is integrated into the base; simply lifting the handset initiates the conversation.
- Adjusting Call Volume: The call volume can be adjusted using the dedicated control on the interphone base.
- 문 열기: Press the door opening button to release the electric lock.
- Auxiliary Button (C/N.O.): Use the additional button for central call or other free contact functions as configured in your Simplebus 2 system.
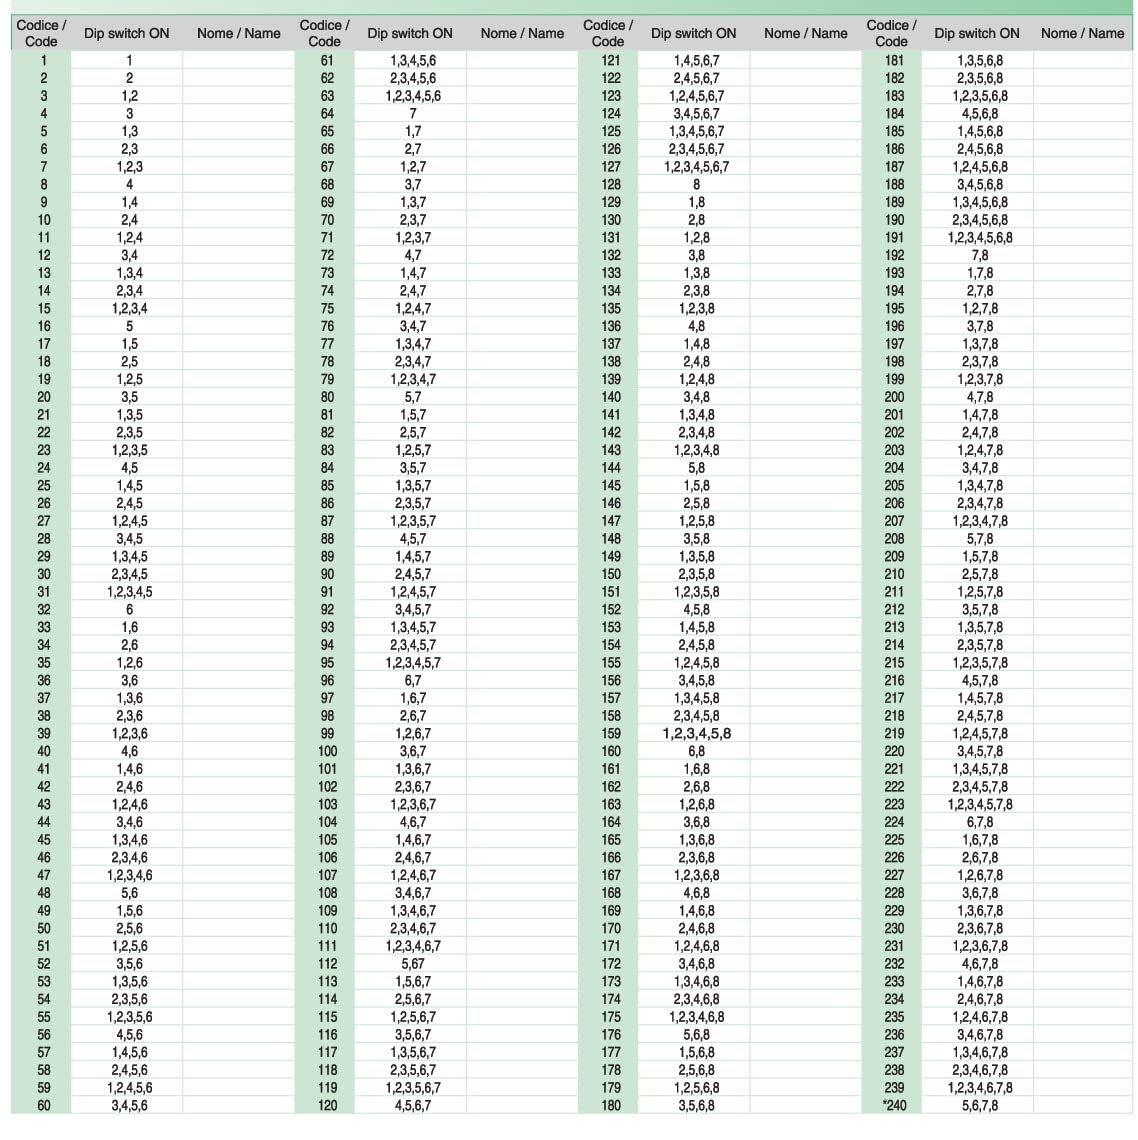
그림 6: The Comelit 2638 Interphone with the handset lifted, ready for conversation.
7. 유지관리
The Comelit 2638 Interphone requires minimal maintenance.
- 청소: Wipe the exterior of the interphone with a soft, dry cloth. Do not use abrasive cleaners, solvents, or strong detergents, as these can damage the finish.
- 점검: Periodically check for any visible damage to the unit or its wiring. If damage is found, disconnect power and contact a qualified technician for repair.
8. 문제 해결
If you experience issues with your Comelit 2638 Interphone, consider the following:
- 전원 없음/소리 없음:
- Ensure the main power supply to the Simplebus 2 system is active.
- Verify all wiring connections are secure and correctly terminated (refer to Section 5.1).
- Cannot Hear or Be Heard:
- Check the call volume setting.
- Ensure the handset is properly seated and lifted during a call.
- 도어 잠금 해제 기능이 작동하지 않습니다.
- Confirm the door release button is functioning correctly.
- Verify the wiring to the electric lock is intact and correctly connected to the Simplebus 2 system.
- Incorrect Addressing:
- Recheck the dipswitch configuration against your system's addressing table (refer to Section 5.2).
For persistent issues, contact a qualified technician or Comelit customer support.
9. 사양
| 제조업체 | 코릿 |
| 모델 번호 | 2638 |
| 제품 크기(L x W x H) | 0.03 x 0.03 x 0.03cm; 9.07그램 |
| 스타일 | 하얀색 |
| 포함된 구성 요소 | Interphone only |
| 필요한 배터리 | 아니요 |
| 예비 부품 가용성 | 정보를 사용할 수 없습니다 |
10. 보증 및 지원
For warranty information, please refer to the documentation provided with your Simplebus 2 system or contact your Comelit supplier. Information regarding the availability of spare parts for the Comelit 2638 Interphone is currently unavailable. For technical support, please contact Comelit customer service or a certified Comelit installer.


