ಪರಿಚಯ
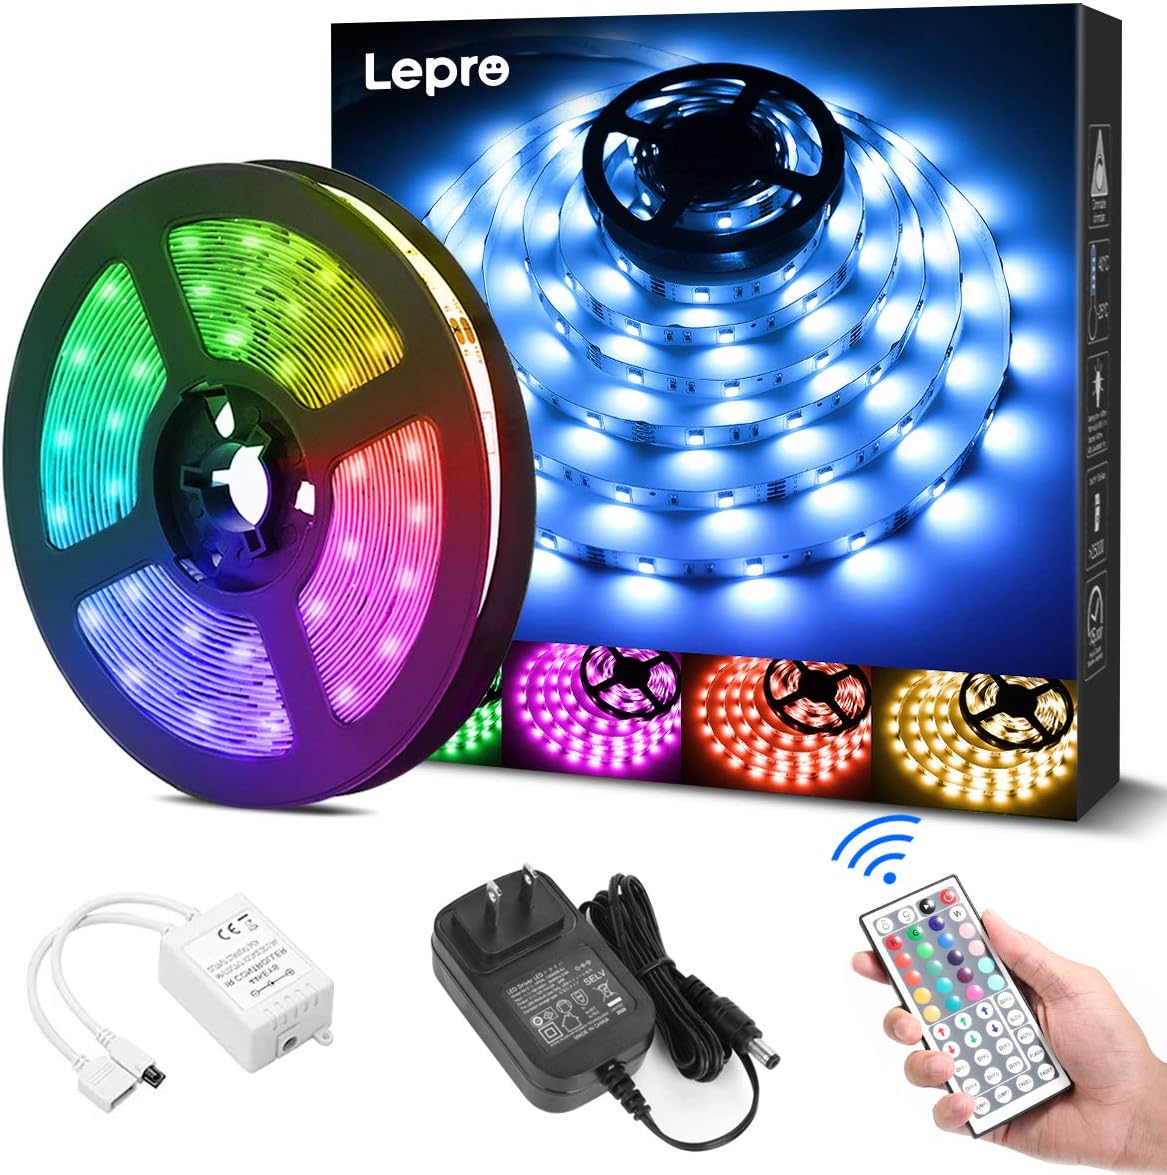
Thank you for choosing the Lepro 5m RGB LED Strip Light. This product is designed to provide versatile and vibrant lighting for various indoor applications. Featuring high-brightness SMD5050 LEDs, a wide range of colors, and easy installation, it enhances the ambiance of any space. Please read this manual carefully before installation and use to ensure proper operation and safety.
ಬಾಕ್ಸ್ನಲ್ಲಿ ಏನಿದೆ
ಅನುಸ್ಥಾಪನೆಯನ್ನು ಪ್ರಾರಂಭಿಸುವ ಮೊದಲು ಎಲ್ಲಾ ಘಟಕಗಳು ಇವೆಯೇ ಎಂದು ಪರಿಶೀಲಿಸಿ:
- LED Strip Light (5 meters) x 1
- DC12V Power Adapter x 1
- Connection Receiver x 1
- ರಿಮೋಟ್ ಕಂಟ್ರೋಲ್ x 1
- Instruction Manual (Japanese) x 1
ಸುರಕ್ಷತಾ ಮಾಹಿತಿ
- ಈ ಉತ್ಪನ್ನವನ್ನು ವಿನ್ಯಾಸಗೊಳಿಸಲಾಗಿದೆ ಒಳಾಂಗಣ ಬಳಕೆ ಮಾತ್ರ. Do not expose to water or high humidity.
- ಅನುಸ್ಥಾಪನೆ ಅಥವಾ ನಿರ್ವಹಣೆಯ ಮೊದಲು ವಿದ್ಯುತ್ ಸರಬರಾಜು ಸಂಪರ್ಕ ಕಡಿತಗೊಂಡಿದೆ ಎಂದು ಖಚಿತಪಡಿಸಿಕೊಳ್ಳಿ.
- Use only the provided DC12V power adapter. Using an incompatible power supply may damage the product or pose a fire hazard.
- Do not bend the LED strip sharply or apply excessive force, as this may damage the circuit.
- ಮಕ್ಕಳ ವ್ಯಾಪ್ತಿಯಿಂದ ದೂರವಿಡಿ.
- If any part of the product is damaged, discontinue use immediately and contact support.
ಸೆಟಪ್
Follow these steps for proper installation of your LED strip light:
- ಮೇಲ್ಮೈಯನ್ನು ತಯಾರಿಸಿ: Clean the desired installation surface thoroughly. Ensure it is dry, smooth, and free of dust or oil for optimal adhesive performance.
- Measure and Cut (Optional): If a shorter length is required, cut the LED strip along the designated cut marks (indicated by a scissor icon) using scissors. ಗಮನಿಸಿ: Only cut at these specific marks. Cutting elsewhere will damage the strip. Cut sections cannot be reconnected without additional connectors (sold separately).
- Apply the Strip: Peel off the backing from the 3M adhesive tape on the back of the LED strip. Carefully press the strip onto the cleaned surface, ensuring firm contact along its entire length.
- ಘಟಕಗಳನ್ನು ಸಂಪರ್ಕಿಸಿ: Connect the LED strip to the connection receiver, ensuring the arrows on both components align. Then, connect the DC12V power adapter to the receiver.
- ಪವರ್ ಆನ್: Plug the power adapter into a suitable power outlet. Remove the insulation sheet from the remote control before first use. Point the remote control towards the receiver and press the power button to turn on the lights.


ಆಪರೇಟಿಂಗ್ ಸೂಚನೆಗಳು
The LED strip light is controlled using the included 44-key remote control. Ensure the remote is pointed towards the receiver for effective operation.
ರಿಮೋಟ್ ಕಂಟ್ರೋಲ್ ಕಾರ್ಯಗಳು:
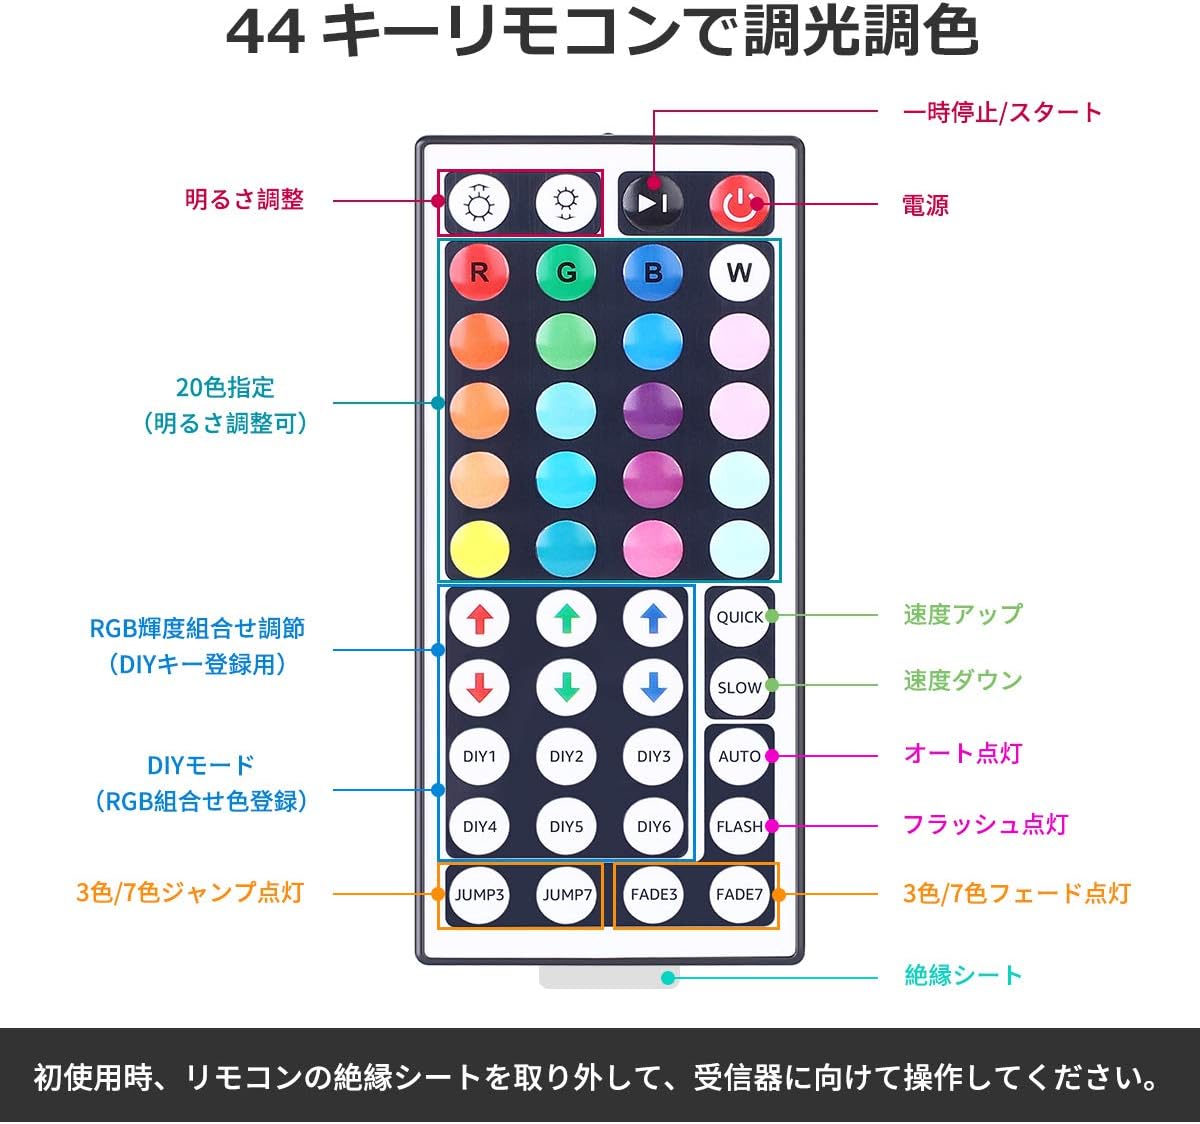
- ಪವರ್ ಆನ್/ಆಫ್: ಒತ್ತಿರಿ ಕೆಂಪು ಪವರ್ ಬಟನ್ to turn the lights on or off.
- ಹೊಳಪಿನ ಹೊಂದಾಣಿಕೆ: ಬಳಸಿ ಮೇಲಿನ ಮತ್ತು ಕೆಳಗಿನ ಬಾಣದ ಗುಂಡಿಗಳು (labeled 'Brightness Adjust') to increase or decrease the light intensity.
- ಬಣ್ಣದ ಆಯ್ಕೆ: ನಿಂದ ಆರಿಸಿ 20 ಮೊದಲೇ ಬಣ್ಣಗಳು by pressing the corresponding color buttons.
- DIY ಮೋಡ್ಗಳು: ದಿ DIY1-DIY6 buttons allow you to create and save custom colors by adjusting the Red, Green, and Blue intensity using the RGB arrow buttons.
- ಡೈನಾಮಿಕ್ ಮೋಡ್ಗಳು:
- ತ್ವರಿತ/ನಿಧಾನ: Adjust the speed of dynamic modes.
- ಸ್ವಯಂ: ಎಲ್ಲಾ ಡೈನಾಮಿಕ್ ಮೋಡ್ಗಳ ಮೂಲಕ ಸ್ವಯಂಚಾಲಿತವಾಗಿ ಸೈಕಲ್ ಮಾಡುತ್ತದೆ.
- ಫ್ಲ್ಯಾಶ್: Flashes through colors.
- JUMP3/JUMP7: 3 ಅಥವಾ 7 ಬಣ್ಣಗಳ ನಡುವೆ ಜಿಗಿಯುತ್ತದೆ.
- FADE3/FADE7: Fades between 3 or 7 colors.
ನಿರ್ವಹಣೆ
- ಸ್ವಚ್ಛಗೊಳಿಸುವಿಕೆ: Ensure the power is off and unplugged before cleaning. Gently wipe the LED strip with a dry, soft cloth. Do not use harsh chemicals or abrasive cleaners.
- ಸಂಗ್ರಹಣೆ: If storing the strip for an extended period, ensure it is clean and dry. Roll it loosely to prevent damage to the LEDs or circuit. Store in a cool, dry place away from direct sunlight.
- ಅಂಟಿಕೊಳ್ಳುವ ಆರೈಕೆ: The 3M adhesive is strong, but repeated removal and reapplication may reduce its effectiveness.
ದೋಷನಿವಾರಣೆ
| ಸಮಸ್ಯೆ | ಸಂಭವನೀಯ ಕಾರಣ | ಪರಿಹಾರ |
|---|---|---|
| ಎಲ್ಇಡಿ ಸ್ಟ್ರಿಪ್ ಬೆಳಗುವುದಿಲ್ಲ. | 1. Power adapter not plugged in. 2. Remote control insulation sheet not removed. 3. Connections are loose or incorrect. 4. Remote control battery is dead. | 1. Ensure power adapter is securely plugged into an outlet. 2. Remove the clear plastic insulation sheet from the remote control battery compartment. 3. Check all connections, ensuring arrows align between the strip and receiver. 4. Replace the remote control battery (CR2025 or equivalent). |
| ರಿಮೋಟ್ ಕಂಟ್ರೋಲ್ ಪ್ರತಿಕ್ರಿಯಿಸುತ್ತಿಲ್ಲ. | 1. Remote not pointed at receiver. 2. Obstruction between remote and receiver. 3. Remote control battery is dead. | 1. Point the remote directly at the receiver. 2. Remove any objects blocking the line of sight. 3. ರಿಮೋಟ್ ಕಂಟ್ರೋಲ್ ಬ್ಯಾಟರಿಯನ್ನು ಬದಲಾಯಿಸಿ. |
| Some sections of the strip are not lighting up. | 1. Damage to the LED strip. 2. Incorrect cutting. | 1. Inspect the strip for physical damage. If damaged, contact support. 2. Ensure cuts were made only at designated marks. |
ವಿಶೇಷಣಗಳು
- ಮಾದರಿ ಸಂಖ್ಯೆ: PR410082-RGB-JP
- ಬ್ರ್ಯಾಂಡ್: ಕುಷ್ಠರೋಗ
- ಬೆಳಕಿನ ಮೂಲ ಪ್ರಕಾರ: LED (SMD5050)
- ಎಲ್ಇಡಿ ಪ್ರಮಾಣ: 150 LEDs (30 LEDs per meter)
- ಪಟ್ಟಿಯ ಉದ್ದ: 5 ಮೀಟರ್
- ವಿದ್ಯುತ್ ಬಳಕೆ: 18W
- ಇನ್ಪುಟ್ ಸಂಪುಟtage: DC12V 1.5A
- ಬಣ್ಣದ ಆಯ್ಕೆಗಳು: RGB (20 preset colors + DIY modes)
- ನಿಯಂತ್ರಣ ವಿಧಾನ: 44-ಕೀ ಐಆರ್ ರಿಮೋಟ್ ಕಂಟ್ರೋಲ್
- ಒಳಾಂಗಣ/ಹೊರಾಂಗಣ ಬಳಕೆ: ಒಳಾಂಗಣ
- ವಿಶೇಷ ವೈಶಿಷ್ಟ್ಯಗಳು: Dimmable, Cuttable, 3M Adhesive, PSE Certified
- ಪ್ಯಾಕೇಜ್ ಗಾತ್ರ: 13.1 x 10.7 x 6.7 ಸೆಂ; 230 ಗ್ರಾಂ

ಖಾತರಿ ಮತ್ತು ಬೆಂಬಲ
This Lepro LED Strip Light comes with a 2 ವರ್ಷದ ಖಾತರಿ. If you encounter any issues or have questions regarding the product, please contact Lepro JP customer support through the retailer's platform. Provide your order details and a description of the issue for prompt assistance.
For further assistance, you can visit the official Lepro store on Amazon: Lepro Amazon Store


