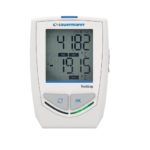
TraceableLive 6525 ឧបករណ៍កត់ត្រាទិន្នន័យ WIFI សីតុណ្ហភាព CO2 កម្រិតខ្ពស់

សៀវភៅណែនាំណែនាំ
ការគ្រប់គ្រង
វ៉ាយហ្វាយ៖ បើកសមត្ថភាពវ៉ាយហ្វាយ។

SET: ប្រើដើម្បីកំណត់៖ កាលបរិច្ឆេទ/ពេលវេលាការកំណត់ការជូនដំណឹង (ប្រសិនបើវ៉ាយហ្វាយមិនត្រូវបានកំណត់រចនាសម្ព័ន្ធ)

UP: លៃតម្រូវការដំឡើងនៅក្នុងម៉ឺនុយ SET ។

ចុះក្រោម៖ កែតម្រូវការកំណត់ចុះក្រោមក្នុងម៉ឺនុយ SET

CHANNEL SELECT៖ ជ្រើសរើសឆានែលណាដែលត្រូវបង្ហាញ ឬជ្រើសរើសឆានែលទាំងអស់។ view របៀបទៅ view ឆានែលទាំងអស់។

PLAY/PAUSE៖ នៅក្នុងឆានែលតែមួយ view របៀប ជ្រើសរើសការបង្ហាញបន្ទាត់ទីពីរ៖ ពេលបច្ចុប្បន្ន អប្បបរមាបច្ចុប្បន្ន អតិបរមាបច្ចុប្បន្ន ការកំណត់ការជូនដំណឹងទាប ការកំណត់ម៉ោងរោទ៍ខ្ពស់ជាង។

C/F: ជ្រើសរើសឯកតាសីតុណ្ហភាព

សម្អាត៖ ចុចដើម្បីជម្រះតម្លៃអប្បបរមា/អតិបរមាបច្ចុប្បន្ន។

ចំណាំ៖ “WiFi enabled” ត្រូវបានបង្ហាញដោយនិមិត្តសញ្ញា WiFi ដែលកំពុងឆេះ។ វាក៏បង្ហាញផងដែរថាបណ្តាញវ៉ាយហ្វាយចាំបាច់ត្រូវកំណត់រចនាសម្ព័ន្ធ។

បង្ហាញពីការជូនដំណឹងអំពីការបញ្ជូនទិន្នន័យមិនជោគជ័យទៅម៉ាស៊ីនមេពពក។
ចុច  ប៊ូតុងដើម្បីលុបសំឡេងរោទិ៍ ឬការជូនដំណឹងនឹងជម្រះដោយស្វ័យប្រវត្តិនៅពេលបញ្ជូនជោគជ័យបន្ទាប់។
លក្ខណៈពិសេសឧបករណ៍៖
- ជួរសីតុណ្ហភាព៖ 0 ដល់ 50°C (32 ទៅ 122°F)
- ជួរសំណើម: 0 ទៅ 95% (មិន condensing)
- សីតុណ្ហភាព/សំណើម Sampអត្រាលីង៖ ២ វិនាទី
- 18000-31 (6525): ជួរ CO2: 0 ទៅ 10,000 ppm (1%)
- 18000-32 (6526): ជួរ CO2: 0 ទៅ 20%
- ឧស្ម័ន CO2 Sampអត្រា៖ លំនាំដើម 5 នាទី អ្នកប្រើប្រាស់អាចលៃតម្រូវបាន។
- ប្រេកង់បញ្ជូនវ៉ាយហ្វាយលំនាំដើម៖ ១៥ នាទី។
- ចំនួនអតិបរមានៃកំណត់ត្រាដែលបានរក្សាទុក៖ 672 (7 ថ្ងៃប្រសិនបើកំណត់ទៅចន្លោះពេល 15 នាទី)
- អតិបរមា។ ការជូនដំណឹងដែលបានរក្សាទុក៖ 100
- ថ្ម៖ 4 AAA Alkaline DISPLAY MODES—របៀបឆានែលតែមួយ
- អេក្រង់ LCD បង្ហាញព័ត៌មាននៅលើឆានែល 1, 2 ឬ 3 ។ រមូរតាមរយៈ៖ ពេលវេលាបច្ចុប្បន្ន -> អប្បបរមាបច្ចុប្បន្ន / អតិបរមាបច្ចុប្បន្ន -> ការកំណត់ម៉ោងរោទិ៍អប្បបរមា / ការកំណត់អតិបរមា -> ពេលបច្ចុប្បន្ន។
- ចន្លោះពេលរមូរ៖ ៣ វិនាទី។
- ចុចប៊ូតុង CHANNEL SELECT ដើម្បីជ្រើសរើសប៉ុស្តិ៍ដែលចង់បាន ឬគ្រប់ប៉ុស្តិ៍ទាំងអស់។
- ឆានែល 1 បង្ហាញសំណើម; ឆានែលទី 2 បង្ហាញសីតុណ្ហភាព; ឆានែលទី 3 បង្ហាញសម្ពាធ។
- ដើម្បីផ្អាកការរមូរ សូមចុច PLAY/PAUSE។ ដើម្បីបន្តការរមូរ សូមចុច PLAY/PAUSE ម្តងទៀត។ ដើម្បីបន្តទៅមុខលឿន ចុច PLAY/PAUSE ដើម្បីផ្លាស់ទីទៅធាតុបន្ទាប់។
- នៅពេលដែលព័ត៌មានដែលចង់បានត្រូវបានបង្ហាញ សូមចុចប៊ូតុង Play/Pause ម្តងទៀត ដើម្បីផ្អាកការរមូរ បើមិនដូច្នេះទេ បន្ទាត់ទីពីរនឹងបន្តរមូរ។
របៀបឆានែលទាំងអស់។
- ទៅ view គ្រប់ Channel 1, 2, និង 3. ចុចប៊ូតុង CHANNEL SELECT ដើម្បីជ្រើសរើសប៉ុស្តិ៍ទាំងអស់។
- និមិត្តសញ្ញា CH123 នឹងបង្ហាញនៅលើអេក្រង់
ជ្រើសរើសឆានែល
- ខណៈពេលដែលឧបករណ៍មិនស្ថិតនៅក្នុងរបៀប SETUP សូមចុចប៊ូតុង Channel/Select ដើម្បីជ្រើសរើសឆានែល។
- ប្រសិនបើ Channel 1 (HUMIDITY) ត្រូវបានជ្រើសរើស និមិត្តសញ្ញា CH1 នឹងបង្ហាញនៅលើអេក្រង់។
- ប្រសិនបើប៉ុស្តិ៍ 2 (TEMPERATURE) ត្រូវបានជ្រើសរើស និមិត្តសញ្ញា CH2 នឹងបង្ហាញនៅលើអេក្រង់។
- ប្រសិនបើប៉ុស្តិ៍លេខ 3 (CO2) ត្រូវបានជ្រើសរើស និមិត្តសញ្ញា CH3 នឹងបង្ហាញនៅលើអេក្រង់។
- ប្រសិនបើនៅក្នុងឆានែលទាំងអស់។ view របៀប បន្ទាត់ទីមួយបង្ហាញឆានែល 1 បន្ទាត់ទីពីរ ឆានែល 2 និងបន្ទាត់ទីបី ឆានែល 3 ។ និមិត្តសញ្ញា CH123 នឹងបង្ហាញនៅលើការបង្ហាញ។
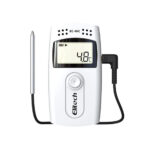
ឧបករណ៍ចាប់សញ្ញា
18000-31 (6525): ឧបករណ៍ចាប់សញ្ញាសីតុណ្ហភាព សំណើម និងកាបូនឌីអុកស៊ីតត្រូវបានផ្តល់ជូនជាមួយឯកតា។ ប្រើដើម្បីវាស់ និងតាមដានសីតុណ្ហភាពបរិយាកាស សំណើមបរិយាកាស និងកម្រិត CO2 ជុំវិញ។
សំខាន់៖ ដោត DONGLE ទៅក្នុងឧបករណ៍ មុនពេលបញ្ចូលថ្ម ព្រោះនេះនឹងបណ្តាលឱ្យមានការអានមិនត្រឹមត្រូវ។
ប្រសិនបើឧបករណ៍ចាប់សញ្ញា dongle ត្រូវបានដោតចូលទៅក្នុងឧបករណ៍ បន្ទាប់ពីថ្មត្រូវបានដំឡើងរួច សូមដកឧបករណ៍ចាប់សញ្ញា dongle ចេញ រហូតទាល់តែ LCD អានថា "- -.- -" នៅលើ CH1 និង CH2 (ប្រហែល 10 វិនាទី) ហើយបន្ទាប់មកដោត dongle ចូលទៅក្នុងឧបករណ៍វិញ។
18000-32 (6526): ឧបករណ៍ចាប់សញ្ញាខាងក្រៅដែលមានខ្សែបន្ថែមត្រូវបានផ្តល់ជាមួយឯកតា។ ប្រើដើម្បីវាស់ និងត្រួតពិនិត្យសីតុណ្ហភាព សំណើម និងកាបូនឌីអុកស៊ីតក្នុងបន្ទប់ ឬបរិយាកាសដែលព័ទ្ធជុំវិញផ្សេងទៀត។
សម្អាតអង្គចងចាំបច្ចុប្បន្នអប្បបរមា/អតិបរមា
1. ចុច CHANNEL SELECT ដើម្បីជ្រើសរើសប៉ុស្តិ៍ស៊ើបអង្កេតដែលត្រូវសម្អាត។
2. CH1 នឹងជម្រះ Channel 1; CH2 នឹងជម្រះ Channel 2; CH3 នឹងជម្រះ Channel 3 ហើយនៅក្នុងរបៀបឆានែលទាំងអស់ CH123 នឹងជម្រះ Channels 1, 2, 3។
3. ចុចប៊ូតុង CLEAR ដើម្បីសម្អាតការអានអប្បបរមា និងអតិបរមាបច្ចុប្បន្ន។
4. រាល់ការជម្រះនៃអង្គចងចាំអប្បបរមា/អតិបរមាក៏នឹងបង្កឱ្យមានការបញ្ជូនការអានបច្ចុប្បន្នទៅកាន់សេវាកម្ម TraceableLIVE ប្រសិនបើភ្ជាប់។ វានឹងបង្ហាញនៅក្នុងប្រវត្តិព្រឹត្តិការណ៍ដោយមានស្លាក "ពិនិត្យឧបករណ៍"។
ការដំឡើងឧបករណ៍
សេណារីយ៉ូ ២៖ វ៉ាយហ្វាយត្រូវបានបិទ។ ការកំណត់ទាំងអស់អាចកំណត់បាន។
1. ចុចប៊ូតុង SET ឱ្យជាប់រយៈពេល 3 វិនាទី ដើម្បីបញ្ចូលម៉ឺនុយដំឡើង។
2. លេខចាំងទីមួយគឺការកំណត់កាលបរិច្ឆេទឆ្នាំ។ ចុចព្រួញឡើងលើ ឬចុះក្រោម ដើម្បីកំណត់ឆ្នាំបច្ចុប្បន្ន។ ចុចប៊ូតុង PLAY/PAUSE ដើម្បីរក្សាទុក ហើយបន្តទៅការកំណត់បន្ទាប់។
3. បន្តកំណត់ប៉ារ៉ាម៉ែត្រដែលនៅសល់ (ខែ-
> ថ្ងៃ-> ម៉ោង-> នាទី-> ទម្រង់ពេលវេលា (12H/24H) -> ប៉ុស្តិ៍ 1 ការជូនដំណឹងអប្បបរមា-> ប៉ុស្តិ៍ 1 ការជូនដំណឹងអតិបរមា-> ប៉ុស្តិ៍ 2 ការជូនដំណឹងអប្បបរមា-> ឆានែល
2 ការជូនដំណឹងអតិបរមា -> ប៉ុស្តិ៍ទី 3 ការជូនដំណឹងអប្បបរមា -> ប៉ុស្តិ៍ទី 3 ការជូនដំណឹងអតិបរមា -> CO2 Sampling Rate -> Alarm Repost បើក/បិទ -> Alarm Repost
ការកំណត់ចន្លោះពេល (ប្រសិនបើការជូនដំណឹងឡើងវិញត្រូវបានបើក)។ ចុច PLAY/PAUSE ដើម្បីបន្តទៅប៉ារ៉ាម៉ែត្របន្ទាប់។ ការចុច PLAY/PAUSE បន្ទាប់ពីប៉ារ៉ាម៉ែត្រចុងក្រោយត្រូវបានកំណត់នឹងចេញពីរបៀបដំឡើង។
សេណារីយ៉ូ ២៖ វ៉ាយហ្វាយត្រូវបានបើក។ ការកំណត់សំឡេងរោទិ៍មិនអាចកំណត់បាននៅលើឧបករណ៍ទេ ហើយអាចកំណត់បានតែតាមរយៈចំណុចប្រទាក់សេវាពពក TraceableLIVE ប៉ុណ្ណោះ។
1. ចុចប៊ូតុង SET ឱ្យជាប់រយៈពេល 3 វិនាទី ដើម្បីបញ្ចូលម៉ឺនុយដំឡើង។
2. លេខចាំងទីមួយគឺការកំណត់កាលបរិច្ឆេទឆ្នាំ។ ចុចព្រួញឡើងលើ ឬចុះក្រោម ដើម្បីកំណត់ឆ្នាំបច្ចុប្បន្ន។ ចុចប៊ូតុង PLAY/PAUSE ដើម្បីរក្សាទុក ហើយបន្តទៅការកំណត់បន្ទាប់។
3. បន្តកំណត់ប៉ារ៉ាម៉ែត្រដែលនៅសល់ (ខែ-
> ថ្ងៃ-> ម៉ោង-> នាទី-> ទម្រង់ពេលវេលា (12H/24H)-> CO2 sampling rate -> Alarm Repost បើក/បិទ -> Alarm Repost Internal Setting (ប្រសិនបើ Alarm Repost ត្រូវបានបើក)។ ចុច PLAY/PAUSE ដើម្បីបន្តទៅប៉ារ៉ាម៉ែត្របន្ទាប់។ ការចុច PLAY/PAUSE បន្ទាប់ពីប៉ារ៉ាម៉ែត្រចុងក្រោយត្រូវបានកំណត់នឹងចេញពីរបៀបដំឡើង។
ចំណាំ៖ ការកំណត់ពេលវេលាខណៈពេលដែលវ៉ាយហ្វាយត្រូវបានបើកគឺមានបំណងសម្រាប់តែការដំឡើងឧបករណ៍ដំបូងប៉ុណ្ណោះ។ នៅពេលដែលបានភ្ជាប់ទៅសេវាកម្ម TraceableLIVE នោះ ពេលវេលាឧបករណ៍នឹងត្រូវបានធ្វើសមកាលកម្មប្រចាំថ្ងៃសម្រាប់តំបន់ពេលវេលាដែលបានជ្រើសរើសនៅក្នុង TraceableLIVE។
សំឡេងរោទិ៍
1. ប្រសិនបើសំឡេងរោទិ៍កើតឡើង អេក្រង់ LCD នឹងបង្ហាញឆានែលជូនដំណឹងដោយស្វ័យប្រវត្តិ ហើយការអានសីតុណ្ហភាព និមិត្តសញ្ញា HI ALM ឬ LO ALM បញ្ចេញពន្លឺ។ ប្រសិនបើសីតុណ្ហភាពទាបជាងការកំណត់សំឡេងរោទិ៍ទាប និមិត្តសញ្ញា MIN នឹងភ្លឺ។ ប្រសិនបើសីតុណ្ហភាពលើសពីការកំណត់សំឡេងរោទិ៍ខ្ពស់ និមិត្តសញ្ញា MAX នឹងភ្លឺ។ ការជូនដំណឹងដែលអាចស្ដាប់បាននឹងបន្តប៊ីបរយៈពេល 30 វិនាទី ហើយនឹងប៊ីបម្តងរៀងរាល់ 15 វិនាទីរហូតដល់ម៉ោងរោទ៍ត្រូវបានទទួលស្គាល់ដោយចុចប៊ូតុង ជម្រះ។
2. ប្រសិនបើសំឡេងរោទិ៍ចាប់ផ្តើមនៅលើប៉ុស្តិ៍ទាំងពីរ នោះ LCD នឹងបង្ហាញ Channel 1។
3. ប្រើ CHANNEL SELECT ដើម្បីជ្រើសរើសឆានែលណាដែលត្រូវបង្ហាញ។ ប្រសិនបើឆានែលដែលបង្ហាញមិនរោទិ៍ អេក្រង់ LCD នឹងមិនបញ្ចេញពន្លឺទេ ប៉ុន្តែ buzzer នឹងនៅតែសកម្ម។
4. ប្រសិនបើសំឡេងរោទិ៍ត្រូវបានកេះ បន្ទាត់ទីពីរនៃ LCD នឹងមិនរមូរទៀតទេ ហើយប្រសិនបើឧបករណ៍ស្ថិតនៅក្នុងរបៀបបង្ហាញឆានែលតែមួយ ចំណុចកំណត់ការជូនដំណឹងនឹងបង្ហាញនៅលើបន្ទាត់ទីពីរ។
5. ដើម្បីលុបសំឡេងរោទិ៍ ចុចប៊ូតុង CLEAR ។ អេក្រង់ LCD នឹងឈប់បញ្ចេញពន្លឺ សំឡេងរោទិ៍នឹងឈប់បញ្ចេញសំឡេង ហើយខ្សែទីពីរ LCD នឹងបន្តរមូរឡើងវិញ។
6. នៅពេលដែលការជូនដំណឹងត្រូវបានកេះ ឧបករណ៍នឹងប្រកាសការជូនដំណឹងទៅកាន់សេវាកម្ម TraceableLIVE ភ្លាមៗ។ ប្រសិនបើការតភ្ជាប់ត្រូវបានបាត់បង់នាពេលបច្ចុប្បន្ន ឧបករណ៍នឹងរក្សាទុកសំឡេងរោទិ៍រហូតដល់វាភ្ជាប់ឡើងវិញ។ ឧបករណ៍អាចផ្ទុកព្រឹត្តិការណ៍រោទិ៍រហូតដល់ 100 នៅក្នុងអង្គចងចាំខាងក្នុង។
បង្ហាញ° F ឬ° C
- ដើម្បីបង្ហាញការអានសីតុណ្ហភាពក្នុង Fahrenheit (°F) ឬ អង្សាសេ (°C) នៅលើឧបករណ៍ សូមចុចប៊ូតុង C/F ។
- ចំណាំ៖ ការផ្លាស់ប្តូរពី°C ទៅ°F នៅក្នុង TraceableLIVE® Cloud នឹងមិនផ្លាស់ប្តូរការអាននៅលើឧបករណ៍ទេ (សូមមើលការណែនាំ TraceableLIVE® Cloud)។
- ចំណាំ៖ ការផ្លាស់ប្តូរពី°C ទៅ°F នៅលើឧបករណ៍ នឹងមិនផ្លាស់ប្តូរការអាននៅក្នុង TraceableLIVE® cloud ទេ។
កំណត់រចនាសម្ព័ន្ធបណ្តាញវ៉ាយហ្វាយ៖ ការផ្តល់ AP
- ចុចប៊ូតុង WiFi ដើម្បីបើកមុខងារ WiFi ។ ប្រសិនបើវាត្រូវបានបើកជាលើកដំបូង និមិត្តសញ្ញា WiFi នឹងបញ្ចេញពន្លឺ។
- ចុចប៊ូតុង WiFi ឱ្យជាប់រយៈពេល 3 វិនាទីរហូតដល់ឧបករណ៍បង្ហាញ "AP" ។ ដើម្បីបោះបង់ សូមចុចប៊ូតុង WiFi ឱ្យជាប់។
- ចុចប៊ូតុង WiFi ម្តងទៀត ឧបករណ៍នឹងបង្ហាញ “AP UAIT” (AP WAIT)។
- បន្ទាប់ពី 5 ទៅ 10 វិនាទី “AP rEAdy” (AP ready) នឹងបង្ហាញនៅលើអេក្រង់។ ដើម្បីបោះបង់ សូមចុចប៊ូតុង CLEAR ឱ្យជាប់រហូតទាល់តែឧបករណ៍ចាប់ផ្តើមឡើងវិញ។
ចំណាំ៖ ការកំណត់រចនាសម្ព័ន្ធវ៉ាយហ្វាយនឹងត្រូវបានសម្អាតប្រសិនបើត្រូវបានលុបចោលនៅ stage. - ប្រើទូរសព្ទចល័ត ឬកុំព្យូទ័រយួរដៃដែលមានសមត្ថភាពឥតខ្សែ ភ្ជាប់ទៅលេខសម្គាល់បណ្តាញ “CC6525-XXXX” ឬ “CC6526-XXXX” ដែល xxxx ជាលេខ 4 ខ្ទង់ចុងក្រោយនៃលេខសៀរៀលរបស់ឧបករណ៍ (S/N)។
- បើក ក web browser, វាយបញ្ចូល 192.168.1.1, ការតំឡើង webទំព័រនឹងលេចឡើង៖

- វាយលេខសម្គាល់បណ្តាញក្នុងប្រអប់ ហើយបន្ទាប់មកជ្រើសរើសប្រភេទសុវត្ថិភាព និងវាយពាក្យសម្ងាត់។
- ចុចប៊ូតុងបន្ថែម។
- ប្រសិនបើបណ្តាញត្រូវបានកំណត់រចនាសម្ព័ន្ធដោយជោគជ័យ ឧបករណ៍ចាប់ផ្តើមឡើងវិញ ហើយរួចរាល់ក្នុងការប្រើប្រាស់។
- ប្រសិនបើការកំណត់រចនាសម្ព័ន្ធបណ្តាញបរាជ័យ ឧបករណ៍នឹងបង្ហាញ "Err" ហើយបន្ទាប់មកចុចប៊ូតុង CLEAR ឧបករណ៍ចាប់ផ្តើមឡើងវិញ។ សូមប្រាកដថាលេខសម្គាល់បណ្តាញ ពាក្យសម្ងាត់ និងប្រភេទសុវត្ថិភាពត្រូវបានជ្រើសរើសត្រឹមត្រូវ ហើយព្យាយាមកំណត់រចនាសម្ព័ន្ធបណ្តាញម្តងទៀត។
ចំណាំ៖ កាលបរិច្ឆេទ/ពេលវេលារបស់ឧបករណ៍ត្រូវបានធ្វើសមកាលកម្មដោយស្វ័យប្រវត្តិទៅទូរសព្ទដៃ ឬកុំព្យូទ័រយួរដៃនៅពេលដំឡើងរួច webទំព័រត្រូវបានបង្ហាញ។
ចំណាំ៖ សូមប្រាកដថា លេខសម្គាល់បណ្តាញ និងពាក្យសម្ងាត់ត្រឹមត្រូវ; បើមិនដូច្នោះទេឧបករណ៍នឹងរង់ចាំដើម្បីភ្ជាប់ទៅរ៉ោតទ័ររហូតដល់អស់ពេល ហើយបន្ទាប់មក "Err" ត្រូវបានបង្ហាញនៅលើ LCD ។
កំណត់រចនាសម្ព័ន្ធបណ្តាញវ៉ាយហ្វាយ៖ ការផ្តល់ WPS
- ចុចប៊ូតុង WiFi ដើម្បីបើកមុខងារ WiFi ។ ប្រសិនបើវាត្រូវបានបើកជាលើកដំបូង និមិត្តសញ្ញាវ៉ាយហ្វាយ fl ashes ។
- ចុចប៊ូតុង WiFi ឱ្យជាប់រយៈពេល 3 វិនាទី រហូតដល់ឧបករណ៍បង្ហាញ "AP" ។
- ចុចប៊ូតុងឡើងលើ ឬចុះក្រោម ដើម្បីរំកិលទៅ WPS ។ "UPS" ត្រូវបានបង្ហាញនៅលើអេក្រង់ LCD ។
- ចុចហើយលែងប៊ូតុង WiFi ឧបករណ៍បង្ហាញ “AP UAIT”។
រង់ចាំរហូតដល់ LCD បង្ហាញ "UPS rEAdy" (WPS រួចរាល់) ។ ចុចប៊ូតុង WPS នៅលើរ៉ោតទ័រដែលឧបករណ៍មានបំណងភ្ជាប់ទៅ។ សូមមើលសៀវភៅណែនាំរបស់រ៉ោតទ័រសម្រាប់មុខងារ WPS ។
- ប្រសិនបើបណ្តាញត្រូវបានតំឡើងដោយជោគជ័យ ឧបករណ៍ចាប់ផ្តើមឡើងវិញ ហើយរួចរាល់ក្នុងការប្រើប្រាស់។
ចំណាំ៖ រ៉ោតទ័រត្រូវតែគាំទ្រ WPS ហើយមុខងារ WPS ត្រូវតែបើក។ ឧបករណ៍នេះគាំទ្រតែវិធីសាស្ត្រ PUSH BUTTON ប៉ុណ្ណោះ។ វិធីសាស្ត្រកូដ PIN មិនត្រូវបានគាំទ្រទេ។
ចំណាំ៖ ការប្រើប្រាស់ការផ្តល់ WPS នឹងមិនធ្វើបច្ចុប្បន្នភាពកាលបរិច្ឆេទ/ពេលវេលារបស់ឧបករណ៍នោះទេ។
របៀបកំណត់បណ្តាញ WiFi៖ ការផ្តល់សេវា SMARTCONFIG
- ចុចប៊ូតុង WiFi ដើម្បីបើកមុខងារ WiFi ។ ប្រសិនបើវាត្រូវបានបើកជាលើកដំបូង និមិត្តសញ្ញាវ៉ាយហ្វាយ fl ashes;
- ចុចប៊ូតុង WiFi ឱ្យជាប់រយៈពេល 3 វិនាទី រហូតដល់ឧបករណ៍បង្ហាញ "AP" ។
- ចុចប៊ូតុងឡើងលើ ឬចុះក្រោម ដើម្បីរំកិលទៅ SmartConfi g. "SnArT" ត្រូវបានបង្ហាញនៅលើអេក្រង់ LCD;
- ចុចនិងលែងប៊ូតុង WiFi ឧបករណ៍បង្ហាញ “AP UAIT”;
- រង់ចាំរហូតដល់អេក្រង់ LCD បង្ហាញ “SnArT rEAdy” (SMART ready);
- នៅលើកម្មវិធី WiFi Starter App របស់ TI សូមបញ្ចូលលេខសម្គាល់បណ្តាញ និងពាក្យសម្ងាត់ ហើយចុចប៊ូតុងចាប់ផ្តើម។
- ប្រសិនបើបណ្តាញត្រូវបានតំឡើងដោយជោគជ័យ ឧបករណ៍ចាប់ផ្តើមឡើងវិញ ហើយរួចរាល់ក្នុងការប្រើប្រាស់។
ចំណាំ៖ វិធីសាស្ត្រនេះតម្រូវឱ្យអ្នកប្រើប្រាស់ដំឡើងកម្មវិធី TI WiFi Starter សម្រាប់ iOS ឬ Android នៅលើឧបករណ៍ចល័ត។
ចំណាំ៖ ការប្រើប្រាស់ SmartConfi g ការផ្តល់នឹងមិនធ្វើបច្ចុប្បន្នភាពកាលបរិច្ឆេទ/ពេលវេលារបស់ឧបករណ៍នោះទេ។
អង្គចងចាំទិន្នន័យ
1. ឧបករណ៍មានសមត្ថភាពរក្សាទុកទិន្នន័យរយៈពេល 7 ថ្ងៃ ប្រសិនបើចន្លោះពេលកត់ត្រា 15 នាទីត្រូវបានកំណត់។
2. ប្រសិនបើការបញ្ជូនទិន្នន័យបរាជ័យ ទិន្នន័យនឹងត្រូវបានរក្សាទុកក្នុងអង្គចងចាំទិន្នន័យ។ ទិន្នន័យដែលបានរក្សាទុកនឹងត្រូវបានបញ្ជូនដោយស្វ័យប្រវត្តិនៅពេលបញ្ជូនជោគជ័យបន្ទាប់។
3. ប្រសិនបើបណ្តាញវ៉ាយហ្វាយត្រូវបានកំណត់រចនាសម្ព័ន្ធ ហើយការភ្ជាប់វ៉ាយហ្វាយត្រូវបានបាត់បង់ ទិន្នន័យនឹងត្រូវបានរក្សាទុកក្នុងអង្គចងចាំទិន្នន័យនៅចន្លោះពេលចូលដែលកំណត់ដោយអ្នកប្រើប្រាស់។
4. ប្រសិនបើបណ្តាញ WiFi មិនត្រូវបានកំណត់រចនាសម្ព័ន្ធទេ ទិន្នន័យនឹងមិនត្រូវបានរក្សាទុកក្នុងអង្គចងចាំទិន្នន័យទេ។
5. ទិន្នន័យដែលបានរក្សាទុកក្នុងអង្គចងចាំទិន្នន័យមិនអាចសម្អាតដោយអ្នកប្រើប្រាស់បានទេ។ វាអាចត្រូវបានសម្អាតដោយការបញ្ជូនទិន្នន័យដោយជោគជ័យប៉ុណ្ណោះ។
កំណត់ម៉ោងរោទិ៍ឡើងវិញ
- ប្រសិនបើសំឡេងរោទិ៍កេះ និងស្ថិតក្នុងស្ថានភាពកេះ បន្ទាប់ពីរយៈពេលកំណត់ដោយអ្នកប្រើប្រាស់ នោះឧបករណ៍នឹងប្រកាសការជូនដំណឹងឡើងវិញទៅកាន់ម៉ាស៊ីនមេពពក ទោះបីជាអ្នកប្រើប្រាស់បានទទួលស្គាល់ការជូនដំណឹងក៏ដោយ។
- មុខងារប្រកាសឡើងវិញការជូនដំណឹងត្រូវបានបិទតាមលំនាំដើម ដើម្បីបើកមើលការកំណត់ឧបករណ៍។
- រយៈពេលនៃការប្រកាសសារជូនដំណឹងត្រូវបានកំណត់ទៅ 60 នាទីតាមលំនាំដើម អ្នកប្រើប្រាស់អាចផ្លាស់ប្តូរចន្លោះពេលពី 5 នាទីទៅ 8 ម៉ោង (បង្កើន 5 នាទី)។
បង្ហាញសារ
ប្រសិនបើគ្មានប៊ូតុងណាមួយត្រូវបានចុច ហើយ – – –.- – លេចឡើងនៅលើអេក្រង់ នេះបង្ហាញថាសីតុណ្ហភាពដែលត្រូវបានធានាគឺនៅក្រៅជួរសីតុណ្ហភាពរបស់អង្គភាព ឬថាការស៊ើបអង្កេតត្រូវបានផ្តាច់ ឬខូច។
ប៊នឆេន
អង្គភាពនេះត្រូវបានផ្គត់ផ្គង់ជាមួយនឹងកៅអីអង្គុយដែលមានទីតាំងនៅខាងក្រោយ។ ដើម្បីប្រើកៅអីអង្គុយ កំណត់ទីតាំងបើកតូចនៅផ្នែកខាងក្រោយនៃអង្គភាព។ ដាក់ក្រចកដៃរបស់អ្នកចូលទៅក្នុងកន្លែងបើក ហើយបិទចំណុចលេចធ្លោ។ ដើម្បីបិទកន្លែងឈរ គ្រាន់តែខ្ទាស់វាបិទ។
សូចនាករថាមពលថ្មទាប
អង្គភាពត្រូវបានផ្គត់ផ្គង់ជាមួយថ្មអាល់កាឡាំង AAA ចំនួន 4 ។ ប្រសិនបើថាមពលថ្មធ្លាក់ចុះដល់ 20% ឬទាបជាងនេះ និមិត្តសញ្ញាថ្មទាបនឹងបង្ហាញនៅលើអេក្រង់ឧបករណ៍ ហើយការជូនដំណឹងនឹងត្រូវបានផ្ញើតាមរយៈ TraceableLIVE។
រាល់ការលំបាកក្នុងប្រតិបត្តិការ
ប្រសិនបើទែម៉ូម៉ែត្រនេះមិនដំណើរការត្រឹមត្រូវសម្រាប់ហេតុផលណាមួយ សូមជំនួសថ្មដោយថ្មដែលមានគុណភាពខ្ពស់ថ្មី (សូមមើលផ្នែក "ការជំនួសថ្ម")។ ថាមពលថ្មទាប ម្តងម្កាលអាចបណ្តាលឱ្យមានភាពខុសគ្នានៃប្រតិបត្តិការ "ជាក់ស្តែង" ណាមួយ។ ការជំនួសថ្មដោយថ្មថ្មីនឹងដោះស្រាយការលំបាកភាគច្រើន។ ប្រសិនបើវ៉ុលtage នៃថ្មក្លាយជា°C ទាប ហើយនិមិត្តសញ្ញា°F នឹងឆេះ។
ការជំនួសថ្ម
ការអានខុស អេក្រង់ខ្សោយ ឬគ្មានការបង្ហាញ គឺជាសញ្ញាទាំងអស់ដែលថាថ្មត្រូវតែត្រូវបានជំនួស។ រុញគម្របថ្មទៅខាងចុងនៃគ្រឿង។ ដកថ្មដែលអស់ហើយជំនួសដោយថ្មអាល់កាឡាំង AAA ។ ជំនួសគម្របថ្ម។
ព័ត៌មាននិយតកម្ម
ឧបករណ៍នេះត្រូវបានសាកល្បង និងរកឃើញថាអនុលោមតាមដែនកំណត់សម្រាប់ឧបករណ៍ឌីជីថលថ្នាក់ B ដោយអនុលោមតាមផ្នែកទី 15 នៃច្បាប់ FCC ។ ដែនកំណត់ទាំងនេះត្រូវបានរចនាឡើងដើម្បីផ្តល់ការការពារសមហេតុផលប្រឆាំងនឹងការជ្រៀតជ្រែកដែលបង្កគ្រោះថ្នាក់នៅក្នុងការដំឡើងលំនៅដ្ឋាន។ ឧបករណ៍នេះបង្កើត ប្រើប្រាស់ និងអាចបញ្ចេញថាមពលប្រេកង់វិទ្យុ ហើយប្រសិនបើមិនបានដំឡើង និងប្រើប្រាស់ដោយអនុលោមតាមការណែនាំ អាចបណ្តាលឱ្យមានការរំខានដល់ការទំនាក់ទំនងវិទ្យុ។
ទោះជាយ៉ាងណាក៏ដោយមិនមានការធានាថាការជ្រៀតជ្រែកនឹងមិនកើតឡើងនៅក្នុងការដំឡើងជាក់លាក់នោះទេ។ ប្រសិនបើឧបករណ៍នេះបង្កការរំខានប្រកបដោយគ្រោះថ្នាក់ដល់ការទទួលវិទ្យុ ឬទូរទស្សន៍ ដែលអាចត្រូវបានកំណត់ដោយការបិទ និងបើកឧបករណ៍ អ្នកប្រើប្រាស់ត្រូវបានលើកទឹកចិត្តឱ្យព្យាយាមកែតម្រូវការជ្រៀតជ្រែកដោយវិធានការមួយ ឬច្រើនដូចខាងក្រោម៖
- តំរង់ទិស ឬផ្លាស់ប្តូរទីតាំងអង់តែនទទួល។
- បង្កើនការបំបែករវាងឧបករណ៍និងអ្នកទទួល។
- ភ្ជាប់ឧបករណ៍ចូលទៅក្នុងព្រីមួយនៅលើសៀគ្វីដែលខុសពីឧបករណ៍ទទួលត្រូវបានភ្ជាប់។
- ពិគ្រោះជាមួយអ្នកចែកបៀ ឬអ្នកបច្ចេកទេសវិទ្យុ/ទូរទស្សន៍ដែលមានបទពិសោធន៍ ដើម្បីទទួលបានជំនួយ។
ឧបករណ៍នេះអនុលោមតាមផ្នែកទី 15 នៃច្បាប់ FCC ។ ប្រតិបត្តិការគឺស្ថិតនៅក្រោមលក្ខខណ្ឌពីរដូចខាងក្រោម៖ (1) ឧបករណ៍នេះប្រហែលជាមិនបង្កឱ្យមានការជ្រៀតជ្រែកដែលបង្កគ្រោះថ្នាក់ទេ ហើយ (2) ឧបករណ៍នេះត្រូវតែទទួលយកការជ្រៀតជ្រែកណាមួយដែលទទួលបាន រួមទាំងការរំខានដែលអាចបណ្តាលឱ្យប្រតិបត្តិការដែលមិនចង់បាន។
អាស្រ័យហេតុនេះ ផលិតផល Traceable® ប្រកាសថាទែម៉ូម៉ែត្រឌីជីថលនេះអនុលោមតាមតម្រូវការចាំបាច់ និងបទប្បញ្ញត្តិពាក់ព័ន្ធផ្សេងទៀតនៃសេចក្តីបង្គាប់ 1999/5/EC ។
ឧបករណ៍នេះអនុលោមតាមស្តង់ដារ RSS ដែលលើកលែងអាជ្ញាប័ណ្ណឧស្សាហកម្មកាណាដា។ ប្រតិបត្តិការគឺស្ថិតនៅក្រោមលក្ខខណ្ឌពីរដូចខាងក្រោម៖ (1) ឧបករណ៍នេះប្រហែលជាមិនបង្កការរំខាន ហើយ (2) ឧបករណ៍នេះត្រូវតែទទួលយកការជ្រៀតជ្រែកណាមួយ រួមទាំងការជ្រៀតជ្រែកដែលអាចបណ្តាលឱ្យប្រតិបត្តិការដែលមិនចង់បានរបស់ឧបករណ៍។
Le présent appareil est conforme aux CNR d'Industrie Canada applicables aux appareils radio exempts de licence ។ L'exploitation est autorisée aux deux លក្ខខណ្ឌ suivantes : (1) l'appareil ne doit pas produire de brouillage, et (2) l'utilisateur de l'appareil doit accepter tout brouillage radioélectrique subi, même si le brouillage d'sensceptible compromettre le fonctionnement ។
ចំណាំ៖ ជំនួយឥតសំណងមិនទទួលខុសត្រូវចំពោះការផ្លាស់ប្តូរ ឬការកែប្រែណាមួយឡើយ
មិនត្រូវបានអនុម័តយ៉ាងច្បាស់លាស់ដោយភាគីដែលទទួលខុសត្រូវចំពោះការអនុលោមតាមច្បាប់។ ការកែប្រែបែបនេះអាចបាត់បង់សិទ្ធិអំណាចរបស់អ្នកប្រើប្រាស់ក្នុងប្រតិបត្តិការឧបករណ៍។
ឧបករណ៍នេះអនុលោមតាមដែនកំណត់នៃការប៉ះពាល់វិទ្យុសកម្មអេហ្វអេហ្វស៊ីអេហ្វដែលបានកំណត់សម្រាប់បរិយាកាសដែលមិនអាចគ្រប់គ្រងបាន។ ឧបករណ៍នេះគួរតែត្រូវបានតំឡើងនិងដំណើរការដោយមានចំងាយយ៉ាងតិច ២០ សង្ទីម៉ែត្ររវាងកាំរស្មីនិងរាងកាយរបស់អ្នក។
ការធានា សេវាកម្ម ឬការបញ្ជាក់ឡើងវិញ
១២៥៥៤ ចាស់ហ្គេតស្តុនអរ។ ឈុត B២៣០ Webster, Texas 77598 សហរដ្ឋអាមេរិក
ភី. ៨៦៦-៤៤៧-២១៩៤ • ទូរសារ ៨៦៦-៤៤៧-២១៩៤ support@traceable.com
traceable.com
ផលិតផលTraceable®គឺ ISO 9001:2018 Quality-Certified by DNV និង ISO/IEC 17025:2017 ដែលត្រូវបានទទួលស្គាល់ជាមន្ទីរពិសោធន៍ Calibration ដោយ A2LA។
លក្ខណៈពិសេស៖
- បានបើកវ៉ាយហ្វាយ
- ឧបករណ៍ចាប់សញ្ញាសីតុណ្ហភាព សំណើម និងឧស្ម័នកាបូនិក
- ឧបករណ៍ចាប់សញ្ញាខាងក្រៅជាមួយខ្សែបន្ថែម
- សម្អាតការអានអប្បបរមា/អតិបរមាបច្ចុប្បន្ន
សំណួរដែលសួរញឹកញាប់ (FAQ):
សំណួរ៖ តើខ្ញុំអាចដឹងដោយរបៀបណាប្រសិនបើវ៉ាយហ្វាយត្រូវបានបើក?
ចម្លើយ៖ ការបើកវ៉ាយហ្វាយត្រូវបានចង្អុលបង្ហាញដោយនិមិត្តសញ្ញាវ៉ាយហ្វាយដែលកំពុងឆេះ។ ប្រសិនបើវាភ្លឺ បណ្តាញត្រូវតែកំណត់រចនាសម្ព័ន្ធ។
សំណួរ៖ តើខ្ញុំគួរធ្វើដូចម្តេចប្រសិនបើមានការបញ្ជូនទិន្នន័យមិនជោគជ័យទៅម៉ាស៊ីនមេពពក?
ចម្លើយ៖ ចុចប៊ូតុងដើម្បីលុបសំឡេងរោទិ៍។ វាក៏នឹងជម្រះដោយស្វ័យប្រវត្តិនៅពេលបញ្ជូនជោគជ័យបន្ទាប់។
ឯកសារ/ធនធាន
 |
TraceableLive 6525 ឧបករណ៍កត់ត្រាទិន្នន័យ WIFI សីតុណ្ហភាព CO2 កម្រិតខ្ពស់ [pdf] សៀវភៅណែនាំ 6525, 6525 អ្នកកត់ត្រាទិន្នន័យ WIFI សីតុណ្ហភាព CO2 កម្រិតខ្ពស់, ឧបករណ៍កត់ត្រាទិន្នន័យ WIFI សីតុណ្ហភាព CO2 កម្រិតខ្ពស់, ឧបករណ៍កត់ត្រាទិន្នន័យ WIFI សីតុណ្ហភាព CO2, ឧបករណ៍កត់ត្រាទិន្នន័យ WIFI សំណើម, ឧបករណ៍កត់ត្រាទិន្នន័យ WIFI សំណើម, ឧបករណ៍កត់ត្រាទិន្នន័យ WIFI |