
Multilog WW
សៀវភៅណែនាំអ្នកប្រើប្រាស់

សៀវភៅណែនាំនេះមានព័ត៌មានសុវត្ថិភាព និងប្រតិបត្តិការសំខាន់ៗ។ សូមអាន យល់ និងធ្វើតាមការណែនាំនៅក្នុងសៀវភៅណែនាំ និងឯកសារទាំងឡាយដែលភ្ជាប់មកជាមួយឧបករណ៍។
MAN-147-0004-D ខែមីនា ឆ្នាំ 2024

សេចក្តីផ្តើម
ឧបករណ៍ "Multilog2WW" គឺជាឧបករណ៍កត់ត្រាទិន្នន័យពហុគោលបំណងដែលអាចត្រូវបានសាងសង់ និងកំណត់រចនាសម្ព័ន្ធឱ្យសមនឹងកម្មវិធីជាក់លាក់នៃឧបករណ៍។ កំណែជាច្រើនមាននៅក្នុងគ្រួសារអ្នកកាប់ឈើ។ សូមទាក់ទងអ្នកតំណាងផ្នែកលក់របស់អ្នក ដើម្បីទទួលបានជំនួយក្នុងការជ្រើសរើសគំរូសមរម្យសម្រាប់កម្មវិធីរបស់អ្នក។
HWM ក៏ផ្តល់នូវឧបករណ៍សូហ្វវែរដែលត្រូវបានគេស្គាល់ថាជា "IDT" ("ការដំឡើង និងឧបករណ៍វិនិច្ឆ័យ") សម្រាប់ការដំឡើង និងការធ្វើតេស្តអ្នកកាប់ឈើ។ (សូមមើលផ្នែក 1.6 ។ )
ម៉ូដែលគ្របដណ្តប់ ឯកសារ និងការគាំទ្រផលិតផល
មគ្គុទ្ទេសក៍អ្នកប្រើប្រាស់នេះគ្របដណ្តប់គ្រួសារគំរូខាងក្រោម៖
| លេខម៉ូដែល | ការពិពណ៌នាឧបករណ៍ |
|---|---|
| MP/*/*/* | ឧបករណ៍កាប់ឈើ Multilog2WW ។ |
មគ្គុទ្ទេសក៍អ្នកប្រើប្រាស់នេះគួរតែត្រូវបានអានដោយភ្ជាប់ជាមួយ៖
| លេខឯកសារ | ការពិពណ៌នាឯកសារ |
|---|---|
| MAN-147-0003 | ការព្រមានអំពីសុវត្ថិភាព និងការអនុម័តព័ត៌មាន (សម្រាប់ Multilog2WW) ។ |
| MAN-130-0017 | មគ្គុទ្ទេសក៍អ្នកប្រើប្រាស់ IDT (កំណែកុំព្យូទ័រ) ។ |
| MAN-2000-0001 | IDT (កម្មវិធីសម្រាប់ឧបករណ៍ចល័ត) ការណែនាំអ្នកប្រើប្រាស់។ |
មគ្គុទ្ទេសក៍អ្នកប្រើប្រាស់នេះផ្តល់នូវព័ត៌មានលម្អិតនៃប្រតិបត្តិការអ្នកកាប់ឈើ និងរបៀបដំឡើងផលិតផល។ សូមមើលផងដែរនូវមគ្គុទ្ទេសក៍អ្នកប្រើប្រាស់ ឬសន្លឹកទិន្នន័យសម្រាប់ឧបករណ៍ចាប់សញ្ញាដែលកំពុងត្រូវបានប្រើប្រាស់ជាមួយអ្នកកាប់ឈើ។
សូមអានផ្នែកដែលពាក់ព័ន្ធនៃការណែនាំអំពីអ្នកប្រើប្រាស់ IDT សម្រាប់ការណែនាំអំពីរបៀបបញ្ជាក់ការកំណត់ ឬកែប្រែការរៀបចំអ្នកកាប់ឈើរបស់អ្នក។ នេះរួមមាន៖
- ព័ត៌មានលម្អិតនៃការដំឡើងបណ្តាញឧបករណ៍ចាប់សញ្ញា និងការកត់ត្រាទិន្នន័យ។
- ការកំណត់អ្នកកាប់ឈើសម្រាប់ការបញ្ជូនទិន្នន័យរង្វាស់ទៅម៉ាស៊ីនមេ។
- ការដំឡើងកម្មវិធីកត់ត្រាសម្រាប់មុខងារផ្ញើសារបន្ថែម ដូចជាម៉ោងរោទិ៍ជាដើម។
ចំណាំ៖ ប្រព័ន្ធមានលក្ខណៈពិសេស និងការផ្លាស់ប្តូរថ្មីៗដែលបានចេញផ្សាយជាទៀងទាត់ ដូច្នេះអ្នកអាចសង្កេតមើលការផ្លាស់ប្តូរបន្តិចបន្តួចពីដ្យាក្រាម និងលក្ខណៈពិសេសដែលបង្ហាញនៅក្នុងសៀវភៅណែនាំនេះ។ មុខងារ និងមុខងារដែលបានដំឡើងអាចប្រែប្រួលពីឧបករណ៍មួយទៅឧបករណ៍មួយ ដូច្នេះតែងតែយោងទៅលើម៉ឺនុយ និងអេក្រង់នៃឧបករណ៍ដំឡើងណាមួយ ដើម្បីកំណត់ថាលក្ខណៈពិសេសណាមួយដែលមាននៅលើឧបករណ៍កាប់ឈើរបស់អ្នក។
HWM ផ្តល់ការគាំទ្រសម្រាប់ឧបករណ៍កាប់ឈើដោយមធ្យោបាយនៃការគាំទ្រអតិថិជនរបស់យើង។ webទំព័រ៖ https://www.hwmglobal.com/help-and-downloads/
ប្រសិនបើអ្នកមានសំណួរណាមួយដែលមិនត្រូវបានគ្របដណ្តប់ដោយសៀវភៅណែនាំនេះ ឬជំនួយតាមអ៊ីនធឺណិត សូមទាក់ទងក្រុមជំនួយបច្ចេកទេស HWM តាមរយៈ +44 (0) 1633 489479 ឬអ៊ីមែល cservice@hwm-water.com
ការពិចារណាអំពីសុវត្ថិភាព
មុននឹងបន្ត សូមអានដោយប្រុងប្រយ័ត្ន និងធ្វើតាមព័ត៌មាននៅក្នុងឯកសារ "ការព្រមានអំពីសុវត្ថិភាព និងព័ត៌មានការយល់ព្រម" ដែលផ្តល់ជាមួយផលិតផល។ នេះផ្តល់ព័ត៌មានសុវត្ថិភាពទូទៅ។
រក្សាទុកឯកសារទាំងអស់សម្រាប់ជាឯកសារយោងនាពេលអនាគត។
មុនពេលប្រើផលិតផលនេះ ធ្វើការវាយតម្លៃហានិភ័យនៃកន្លែងដំឡើង និងសកម្មភាពការងារដែលរំពឹងទុក។ ត្រូវប្រាកដថាពាក់សម្លៀកបំពាក់ការពារសមរម្យ ហើយការអនុវត្តការងារត្រូវបានអនុវត្តក្នុងអំឡុងពេលដំឡើង និងការថែទាំណាមួយ។
ព្រមាន៖ នៅពេលដែលឧបករណ៍នេះកំពុងត្រូវបានប្រើប្រាស់ ដំឡើង កែសម្រួល ឬផ្តល់សេវា នេះត្រូវតែធ្វើឡើងដោយបុគ្គលិកដែលមានលក្ខណៈសម្បត្តិគ្រប់គ្រាន់ដែលស្គាល់ពីការសាងសង់ និងប្រតិបត្តិការឧបករណ៍ និងគ្រោះថ្នាក់នៃបណ្តាញឧបករណ៍ប្រើប្រាស់ណាមួយ។
សីតុណ្ហភាពប្រតិបត្តិការ
ការប្រើប្រាស់បណ្តាញកោសិកា - កំណត់ចំណាំសំខាន់ៗ
ភាពអាចរកបាននៃសារ SMS
ម៉ូដែល Multilog2WW ភាគច្រើនរួមមានសមត្ថភាពក្នុងការទំនាក់ទំនងទៅកាន់ម៉ាស៊ីនមេ តាមរយៈការប្រើប្រាស់បណ្តាញទិន្នន័យកោសិកា។ នេះជាធម្មតាតាមរយៈបណ្តាញទិន្នន័យធម្មតា (ដែលផ្តល់ការចូលប្រើអ៊ីនធឺណិត)។ ជាជម្រើស ការផ្ញើសារ SMS (សេវាសារខ្លី) អាចត្រូវបានប្រើ។ ក្នុងករណីភាគច្រើន វានឹងក្លាយជាការថយក្រោយ ប្រសិនបើអ្នកកាប់ឈើមិនអាចចូលប្រើបណ្តាញទិន្នន័យធម្មតាជាបណ្តោះអាសន្ន។ ប្រសិនបើកំណត់រចនាសម្ព័ន្ធសម្រាប់ការប្រើប្រាស់សារ SMS អ្នកកាប់ឈើប្រើបណ្តាញ 2G ដែលមាន។
សំខាន់៖ សេវា 2G (GPRS) ដែលផ្ទុកប្រព័ន្ធផ្ញើសារ SMS កំពុងត្រូវបានបិទបន្តិចម្តងៗនៅជុំវិញពិភពលោក។ នៅពេលដែល 2G ត្រូវបានបិទ សេវាផ្ញើសារ SMS ដែលមាននៅក្នុងឧបករណ៍កាប់ឈើនឹងមិនអាចដំណើរការបានទៀតទេ។ លុះត្រាតែអសកម្មនៅក្នុងការកំណត់អ្នកកាប់ឈើ អ្នកកាប់ឈើនឹងបន្តព្យាយាម ដោយខ្ជះខ្ជាយថាមពលថ្ម។ ដូច្នេះ សូមពិនិត្យមើលជាមួយប្រតិបត្តិករបណ្តាញទូរស័ព្ទរបស់អ្នកសម្រាប់កាលបរិច្ឆេទបិទរបស់ពួកគេ មុនពេលកំណត់អ្នកកាប់ឈើដើម្បីប្រើប្រាស់សេវាកម្មបម្រុងទុកសារ SMS ឬមុខងារផ្សេងទៀតដែលតម្រូវឱ្យមានការប្រើប្រាស់សារ SMS ។
ដើម្បីបិទការប្រើប្រាស់ប្រព័ន្ធ SMS ការកំណត់សារ SMS ដែលពាក់ព័ន្ធត្រូវតែដកចេញ (បិទ ឬលុប)។ សូមមើលការណែនាំអ្នកប្រើប្រាស់ IDT សម្រាប់ព័ត៌មានលម្អិតនៃការកំណត់សារ SMS ។ រាល់ការកំណត់ដែលបានកែប្រែត្រូវតែរក្សាទុកទៅអ្នកកាប់ឈើ។
ចំណាំ៖ សម្រាប់ការប្រើប្រាស់សេវាកម្ម SMS ទាំងអ្នកកាប់ឈើ និងអ្នកផ្តល់បណ្តាញទូរស័ព្ទត្រូវតែគាំទ្រសារ SMS ។ លើសពីនេះ ស៊ីមកាតដែលបំពាក់នៅខាងក្នុងអ្នកកាប់ឈើត្រូវតែគាំទ្រការប្រើប្រាស់សារ SMS ។ (សូមពិនិត្យជាមួយអ្នកផ្គត់ផ្គង់ស៊ីមរបស់អ្នកប្រសិនបើចាំបាច់)។
កំណត់អត្តសញ្ញាណអត្តសញ្ញាណនៅពេលប្រើសារ SMS
នៅពេលប្រើបណ្តាញទិន្នន័យចល័ត អត្តសញ្ញាណអ្នកកាប់ឈើត្រូវបានរួមបញ្ចូលជាមួយទិន្នន័យនៅក្នុងសារ។ ទោះយ៉ាងណាក៏ដោយនៅពេលប្រើប្រព័ន្ធ SMS អត្តសញ្ញាណគឺជាលេខហៅ (ពីស៊ីមកាត) ។ ដូច្នេះ នៅពេលប្រើប្រាស់សេវាកម្ម SMS ណាមួយ លេខទាំងពីរនេះ (ការកំណត់ IDT នៃលេខទូរស័ព្ទអ្នកកាប់ឈើ និងលេខទូរសព្ទស៊ីម) ត្រូវតែផ្គូផ្គង។
Viewទិន្នន័យ
ទៅ view អ្នកកាប់ទិន្នន័យពីចម្ងាយ ក viewឧបករណ៍ (webគេហទំព័រ) ត្រូវបានប្រើប្រាស់។ ផ្សេងៗ webគេហទំព័រអាចរកបាន។ គ្នា។ webគេហទំព័របង្ហាញទិន្នន័យដែលពាក់ព័ន្ធជាមួយគេហទំព័រដំឡើងអ្នកកាប់ឈើ។ ជម្រើសនៃ webគេហទំព័រនឹងអាស្រ័យលើប្រភេទឧបករណ៍ចាប់សញ្ញាដែលបានប្រើ និងកម្មវិធីរបស់វា។
ទិន្នន័យពីអ្នកកាប់ឈើរបស់អ្នកក៏អាចជា viewed ក្នុងមូលដ្ឋានដោយប្រើ IDT កំឡុងពេលចូលមើលគេហទំព័រ។
សូមមើលឯកសារបណ្តុះបណ្តាលដែលមានសម្រាប់អ្នក viewឧបករណ៍ ing និងក៏ជាមគ្គុទ្ទេសក៍អ្នកប្រើប្រាស់ IDT សម្រាប់ព័ត៌មានបន្ថែម។
IDT - ឧបករណ៍កម្មវិធី (សម្រាប់ការសរសេរកម្មវិធី និងការធ្វើតេស្តអ្នកកាប់ឈើ)
ឧបករណ៍សូហ្វវែរ ដែលត្រូវបានគេស្គាល់ថាជា “IDT” (ឧបករណ៍ដំឡើង និងវិភាគ) មានសម្រាប់ពិនិត្យ ឬធ្វើការកែតម្រូវចំពោះការដំឡើងអ្នកកាប់ឈើ និងសម្រាប់សាកល្បងប្រតិបត្តិការអ្នកកាប់ឈើនៅលើគេហទំព័រផងដែរ។
ការជ្រើសរើសកំណែដែលត្រូវប្រើ
ឧបករណ៍កម្មវិធី IDT ផ្តល់នូវចំណុចប្រទាក់អ្នកប្រើប្រាស់ទៅកាន់អ្នកកាប់ឈើ។ វាអាចត្រូវបានប្រើសម្រាប់ការត្រួតពិនិត្យ ឬធ្វើការកែតម្រូវចំពោះការកំណត់អ្នកកាប់ឈើ និងសម្រាប់សាកល្បងប្រតិបត្តិការអ្នកកាប់ឈើនៅក្នុងគេហទំព័រដែលបានដំឡើងរបស់វា។ មុនពេល IDT អាចអនុវត្តមុខងារទាំងនេះ វាបាន 'តភ្ជាប់ទៅ' អ្នកកាប់ឈើ។ នេះមានន័យយ៉ាងសាមញ្ញថា ឧបករណ៍ចុងទាំងពីរ (កម្មវិធី logger និងកម្មវិធី IDT) អាចទំនាក់ទំនងគ្នាទៅវិញទៅមកតាមផ្លូវទំនាក់ទំនងការងារ។
IDT មានបីកំណែ៖
- IDT សម្រាប់កុំព្យូទ័រដែលមានប្រព័ន្ធប្រតិបត្តិការ Windows ។
- IDT សម្រាប់ឧបករណ៍ចល័ត (ទូរស័ព្ទ និងថេប្លេត) ដែលមានប្រព័ន្ធប្រតិបត្តិការ Android ។
- IDT សម្រាប់ឧបករណ៍ចល័ត (ទូរស័ព្ទ និងថេប្លេត) ដែលមានប្រព័ន្ធ (Apple) iOS ។
ពីរក្រោយគេត្រូវបានគេហៅថាជា 'IDT app' ចំណែកឯកម្មវិធីដំបូងគេហៅថា 'IDT (PC)' ឬ 'IDT (Windows)'។
វាត្រូវបានណែនាំឱ្យដំឡើង និងប្រើកំណែកម្មវិធី IDT នៅពេលណាដែលអាចធ្វើទៅបាន។ វាគ្របដណ្តប់ប្រភេទភាគច្រើននៃអ្នកកាប់ឈើ HWM ។ ទោះយ៉ាងណាក៏ដោយ មានស្ថានភាពមួយចំនួនតូចដែលអ្នកកាប់ឈើ ឬអ្នកកាប់ឈើ/ឧបករណ៍ចាប់សញ្ញារួមបញ្ចូលគ្នា ដែល (នៅពេលសរសេរ) តម្រូវឱ្យប្រើឧបករណ៍ IDT (PC) ។ សូមមើលផ្នែកទី 8 សម្រាប់ព័ត៌មានលម្អិតបន្ថែមអំពីឧបករណ៍ចាប់សញ្ញា ឬមុខងារណាមួយដែលត្រូវការ IDT (PC)
IDT (កំណែកុំព្យូទ័រ)
សូមមើល IDT (PC version) មគ្គុទ្ទេសក៍អ្នកប្រើប្រាស់ (MAN-130-0017) សម្រាប់ព័ត៌មានលម្អិតអំពីរបៀបរៀបចំកុំព្យូទ័ររបស់អ្នកសម្រាប់ការទំនាក់ទំនងជាមួយអ្នកកាប់ឈើ។ មគ្គុទ្ទេសក៍អ្នកប្រើប្រាស់ក៏ផ្តល់ព័ត៌មានលម្អិតអំពីរបៀបប្រើ IDT ជាមួយនឹងការកំណត់អ្នកកាប់ឈើផ្សេងៗ។
កម្មវិធី IDT (កំណែឧបករណ៍ចល័ត)
ជាងview
អ្នកកាប់ឈើ - ឧបករណ៍លើសview
លក្ខណៈរូបវន្ត និងការកំណត់អត្តសញ្ញាណឧបករណ៍ភ្ជាប់
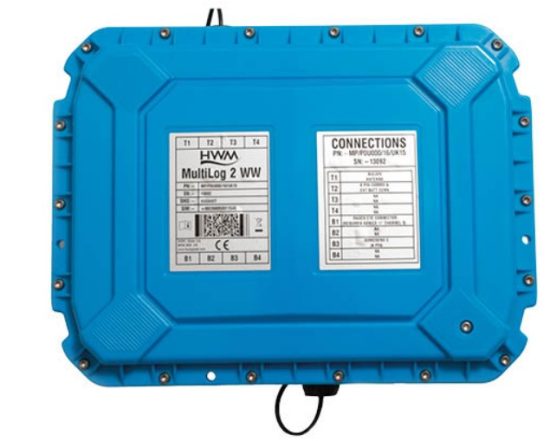
គ្រួសារអ្នកកាប់ឈើ Multilog2WW មានភាពបត់បែនក្នុងការរចនា និងអាចត្រូវបានសាងសង់ឡើងដើម្បីឱ្យសមស្របនឹងការប្រើប្រាស់ផ្សេងៗ។ អតីតampឡេត្រូវបានបង្ហាញផ្ទុយ។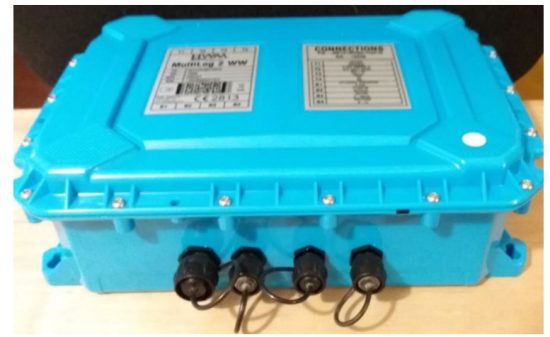
អ្នកកាប់ឈើរបស់អ្នកអាចខុសពីរូបភាពដែលបានបង្ហាញ។ ម៉ូដែលជាច្រើនមាននៅក្នុងគ្រួសារ Multilog2WW ។
អ្នកកាប់ឈើមានសំណង់មិនជ្រាបទឹក និងមានឧបករណ៍ភ្ជាប់ទឹកសម្រាប់ភ្ជាប់ឧបករណ៍ចាប់សញ្ញា និងអង់តែន។ ឧបករណ៍ភ្ជាប់អាចចេញពីឯកតាតាមរយៈផ្នែកខាងលើ ឬខាងក្រោមនៃករណី។
អ្នកកាប់ឈើមានរន្ធដោតជាប់រាងជារន្ធចំនួន 4 (គម្លាតពីគ្នា 300mm x 157mm)។ អ្នកកាប់ឈើអាចត្រូវបានជួសជុលទៅនឹងជញ្ជាំងដោយប្រើវីសក្បាលសំប៉ែតដោយប្រើរន្ធ។
មានរន្ធបន្ថែមចំនួន 3 ឆ្លងកាត់ផ្នែកទាំងពីរនៃករណី; ទាំងនេះអាចត្រូវបានប្រើសម្រាប់កម្មវិធីដែលតម្រូវឱ្យមានការប្រឆាំងនឹង tamper seals ដែលត្រូវអនុវត្ត។
ផ្ទៃខាងលើនៃអង្គភាពអាចត្រូវបានកំណត់អត្តសញ្ញាណដោយប្រើរូបរាងនៃរន្ធគន្លឹះ។
វាក៏អាចត្រូវបានសម្គាល់ពីស្លាកមួយនៅផ្នែកខាងមុខនៃអង្គភាព។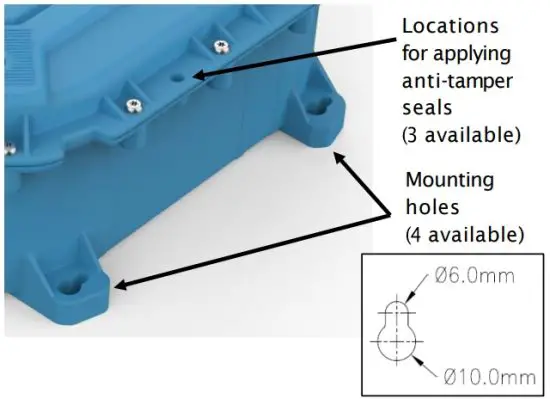
ទីតាំងឧបករណ៍ភ្ជាប់ត្រូវបានកំណត់ដូចជា៖
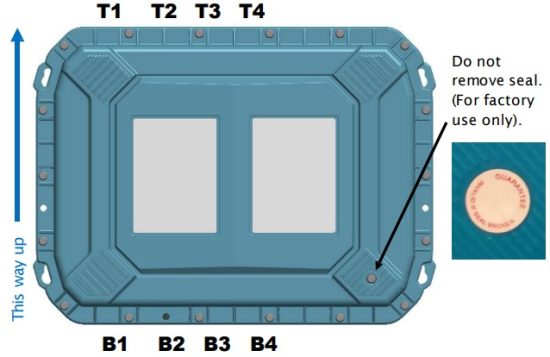
- T1, T2, T3, T4 (នៅលើផ្ទៃខាងលើ) និង
- B1, B2, B3, B4 (នៅលើផ្ទៃខាងក្រោម) ។
ដ្យាក្រាមបង្ហាញអ្នកកាប់ឈើ Multilog2WW ។ កំពូល view រំលេចចំណុចភ្ជាប់រន្ធគន្លឹះ និងផ្ទៃ "កំពូល" ។ ចំហៀង view បង្ហាញ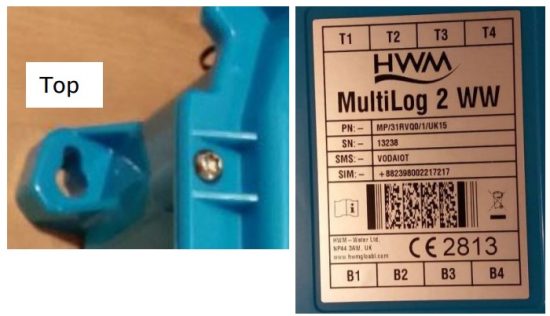 រន្ធបីសម្រាប់ការប្រឆាំងនឹង tampការផ្សាភ្ជាប់ er និងរន្ធដោតគន្លឹះចំនួនបួន។ ដ្យាក្រាមលម្អិតនៃវិមាត្ររន្ធគន្លឹះបង្ហាញពីរន្ធអង្កត់ផ្ចិត 6.0 មីលីម៉ែត្រ ដែលនាំទៅដល់ផ្នែកដែលមានអង្កត់ផ្ចិត 10.0 មីលីម៉ែត្រ។ ស្លាកនៅផ្នែកខាងមុខនៃអង្គភាពបង្ហាញ "HWM MultiLog 2 WW" ជាមួយ PN: MP/31RVQ0/1/UK15, SN: -13238, SMS, SIM, និង CE2813 marks រួមជាមួយនឹងស្លាកឧបករណ៍ភ្ជាប់ T1, T2, T3, T4, B1, B2, B3, B4។
ពួកវាលេចឡើងក្នុងលំដាប់ដែលបង្ហាញនៅលើស្លាក ហើយត្រូវបានពិភាក្សាបន្ថែម (ខាងក្រោម)។
ស្លាកមួយទៀតនៅខាងមុខអ្នកកាប់ឈើបង្ហាញលេខម៉ូដែល (លេខផ្នែក) នៃអង្គភាព។ ឧទាហរណ៍ MP/31RVQ0/1/UK15 (បង្ហាញទល់មុខ)។ វាក៏បង្ហាញលេខស៊េរីផងដែរ។ ឧទាហរណ៍ 13238 (បង្ហាញផ្ទុយ)។
បន្ទាប់មកស្លាកបង្ហាញតារាងដែលបញ្ជាក់ពីប្រភេទនៃចំណុចប្រទាក់ដែលត្រូវបានបំពាក់នៅមុខតំណែងនីមួយៗ។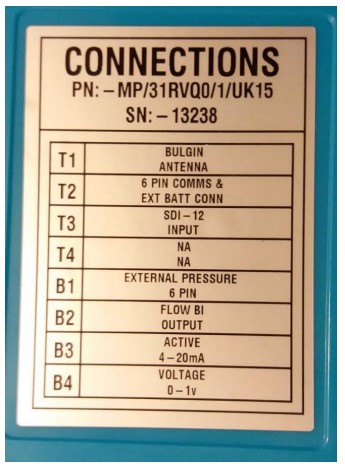
តារាងបង្ហាញ៖
- អង់តែន (ប្រភេទឧបករណ៍ភ្ជាប់)
- ការទំនាក់ទំនង និងការបញ្ចូលថ្មខាងក្រៅ
- ទីតាំងដែលមិនប្រើ (ដាក់ស្លាក "NA" ឬទទេ)
- ប្រភេទឧបករណ៍ចាប់សញ្ញាដែលគួរភ្ជាប់។
(ឬប្រភេទចំណុចប្រទាក់អគ្គិសនីប្រសិនបើវាជាចំណុចប្រទាក់ពហុគោលបំណង) ។
ចំណាំ៖ មាតិកាតារាងនឹងប្រែប្រួលទៅតាមគំរូ (លេខផ្នែក) ដែលបានផ្តល់ឱ្យ។
ទីតាំងឧបករណ៍ភ្ជាប់ទាំងអស់ត្រូវបានបង្ហាញផ្ទុយគ្នា ទោះបីជាជាធម្មតាមិនប្រើទាំងអស់ក៏ដោយ អាស្រ័យលើលេខផ្នែកគំរូដែលបានបញ្ជា។ សម្រាប់អាយុកាលថ្មដ៏ល្អប្រសើរ សូមដំឡើង "វិធីនេះឡើង" ដូចដែលបានបង្ហាញដោយទិសដៅនៃព្រួញនៅក្នុងដ្យាក្រាម។
ថ្មខាងក្រៅ (ជម្រើស)
ម៉ូដែល Multilog2WW ភាគច្រើនមានឧបករណ៍ភ្ជាប់ដែលអនុញ្ញាតឱ្យភ្ជាប់ថ្មខាងក្រៅ។ ទាំងនេះផ្តល់ឱ្យអ្នកកាប់ឈើនូវសមត្ថភាពថាមពលបន្ថែម។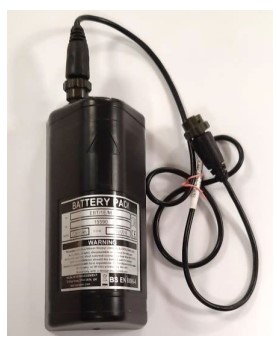
អតីតមួយampឡេត្រូវបានបង្ហាញផ្ទុយ។
សមត្ថភាពថ្មផ្សេងៗគ្នាអាចរកបាន។
ប្រើថ្មដែលផ្គត់ផ្គង់ HWM ជានិច្ច ដើម្បីធានាភាពត្រូវគ្នា និងសុវត្ថិភាព។ ត្រូវប្រាកដថាខ្សែដែលផ្គត់ផ្គង់ជាមួយថ្មគឺសមរម្យសម្រាប់ឧបករណ៍ភ្ជាប់ថាមពលខាងក្រៅដែលបំពាក់ជាមួយអ្នកកាប់ឈើរបស់អ្នក។
(សម្រាប់ស្ថានភាពដែលតម្រូវឱ្យប្រើថ្មខាងក្រៅ សូមស្វែងរកការណែនាំពីតំណាង HWM របស់អ្នក)។
ប្រតិបត្តិការអ្នកកាប់ឈើ
ឧបករណ៍កាប់ឈើត្រូវបានបំពាក់ដោយថ្មលីចូមដែលមិនអាចបញ្ចូលថ្មបាន។ កម្មវិធីនេះត្រូវបានរចនាឡើងដើម្បីកាត់បន្ថយការប្រើប្រាស់ថ្ម និងដោយហេតុនេះពន្យារអាយុកាលថ្មដែលបានរំពឹងទុក។ ទោះជាយ៉ាងណាក៏ដោយ អាយុកាលថ្មក៏រងផលប៉ះពាល់ផងដែរដោយការកំណត់កម្មវិធីដែលអ្នកប្រើប្រាស់បានកំណត់។ អ្នកប្រើត្រូវបានណែនាំឱ្យកំណត់អ្នកកាប់ឈើដើម្បីរក្សាភារកិច្ចនិង sampប្រេកង់ le ទៅនឹងតម្រូវការអប្បបរមានៃការប្រើប្រាស់ដែលបានគ្រោងទុក ដើម្បីគ្រប់គ្រងថាមពលថ្មប្រកបដោយប្រសិទ្ធភាព។
នៅកន្លែងដែលបានផ្គត់ផ្គង់ ថាមពលថ្មខាងក្រៅត្រូវបានប្រើ ដើម្បីពង្រីកអាយុកាលថ្មរបស់ប្រព័ន្ធ ឬសម្រាប់ការទំនាក់ទំនងញឹកញាប់ជាងមុនជាមួយម៉ាស៊ីនមេ។ អ្នកកាប់ឈើជាធម្មតាត្រូវបានដឹកជញ្ជូនពីរោងចក្រក្នុងស្ថានភាពអសកម្ម (ហៅថា "របៀបដឹកជញ្ជូន") ដើម្បីការពារអាយុជីវិតរបស់ថ្ម។
នៅពេលដែលបានធ្វើឱ្យសកម្ម (សូមមើលផ្នែកទី 3) អ្នកកាប់ឈើនឹងចូលទៅក្នុងស្ថានភាព "រង់ចាំ" (ក្នុងរយៈពេលខ្លី) ។ បន្ទាប់មកវានឹងចូលទៅក្នុងស្ថានភាពនៃ "ការកត់ត្រា" ហើយចាប់ផ្តើមការកត់ត្រាម្តងហើយម្តងទៀតនៃការវាស់វែងពីឧបករណ៍ចាប់សញ្ញាផ្សេងៗដែលសមនឹងអង្គភាពនេះបើយោងតាមការកំណត់រចនាសម្ព័ន្ធនិងការកំណត់របស់វា។
អ្នកកាប់ឈើដំណើរការដោយប្រើរយៈពេលពីរ ដែលគេស្គាល់ថាជា “sample period” និង “កំណត់កាលកំណត់”។ វានឹង sample ឧបករណ៍ចាប់សញ្ញានៅ sample អត្រាដើម្បីបង្កើតការវាស់វែងបណ្តោះអាសន្ន samples; នេះគឺជាកិច្ចការផ្ទៃខាងក្រោយដដែលៗ។ បន្ទាប់ពីធ្វើការវាស់វែងជាច្រើន samples, មុខងារស្ថិតិមួយចំនួនអាចត្រូវបានអនុវត្តជាជម្រើសដើម្បីផលិតចំណុចទិន្នន័យដែលត្រូវបានកត់ត្រា (រក្សាទុក) នៅអត្រាកំណត់ហេតុ។ ទាំងនេះបង្កើតជារង្វាស់ដែលបានកត់ត្រា (ចូល) ហើយត្រូវបានរក្សាទុកទៅក្នុងផ្នែកនៃអង្គចងចាំដែលត្រូវបានគេហៅថា "ការកត់ត្រាបឋម" ។
រយៈពេលកំណត់ហេតុគឺតែងតែជាពហុគុណនៃ sampរយៈពេលឡ
ប្រសិនបើអ្នកកាប់ឈើបានបើកមុខងារនេះ វាក៏អាចកំណត់ឱ្យរក្សាទុកទិន្នន័យបន្ថែមម្តងម្កាលទៅក្នុងកន្លែងសតិ "ការថតបន្ទាប់បន្សំ" (សូមមើលផ្នែក 2.4) (ឧទាហរណ៍ ទិន្នន័យ sampដឹកនាំនៅប្រេកង់ខ្ពស់ដូចជាដោយប្រើ "sample period” ជាជាង “កំណត់កាលកំណត់”)។
ចំណាំ៖ វាមិនមាននៅលើគ្រឿងដែលបានផ្គត់ផ្គង់ទាំងអស់ទេ ហើយត្រូវតែរៀបចំតាមរយៈអ្នកតំណាងផ្នែកលក់របស់អ្នក មុនពេលធ្វើការបញ្ជាទិញ។ វាមានផលប៉ះពាល់ទាក់ទងនឹងអាយុកាលថ្មដែលរំពឹងទុករបស់អង្គភាព។
អ្នកកាប់ឈើក៏នឹងមានកិច្ចការប្រចាំថ្ងៃតាមពេលវេលាកំណត់ផងដែរ ដូចជាការបង្ហោះទិន្នន័យដែលមិនបានផ្ញើរបស់ខ្លួនតាមអ៊ីនធឺណិត។ នៅពេលផ្ញើទិន្នន័យ អ្នកកាប់ឈើរង់ចាំទទួលការបញ្ជាក់ពីម៉ាស៊ីនមេថាទិន្នន័យត្រូវបានទទួលដោយគ្មានកំហុស។ ប្រសិនបើការបញ្ជាក់មិនត្រូវបានទទួល វានឹងបញ្ជូនទិន្នន័យឡើងវិញនៅពេលហៅចូលលើកក្រោយ។
អ្នកកាប់ឈើអាចត្រូវបានកម្មវិធីដើម្បីត្រួតពិនិត្យទិន្នន័យសម្រាប់លំនាំ ឬលក្ខខណ្ឌជាក់លាក់ ហើយអាចផ្ញើសារប្រសិនបើវាគួរតែរកឃើញការផ្គូផ្គង។ ជាទូទៅ វាត្រូវបានប្រើសម្រាប់ការកំណត់លក្ខខណ្ឌមួយដែលអាចជាការចង្អុលបង្ហាញនៃ "ការជូនដំណឹង"។ សារអាចត្រូវបានផ្ញើទៅកាន់ម៉ាស៊ីនមេ (ទិសដៅធម្មតា) ឬឧបករណ៍ផ្សេងទៀត។
ការកត់ត្រាដែលបានកែលម្អ (ជម្រើស)
ផ្នែកទី 2.3 បានផ្តល់ការពិពណ៌នាអំពីប្រតិបត្តិការអ្នកកាប់ឈើដែលមានជាស្តង់ដារនៅលើម៉ូដែលអ្នកកាប់ឈើ Multilog2WW ភាគច្រើន។ អ្នកកាប់ឈើជាធម្មតា សamples ទិន្នន័យនៅសំណុំ sample period និងកត់ត្រាចំណុចទិន្នន័យនៅកំឡុងពេលកំណត់។ ទោះយ៉ាងណាក៏ដោយ ម៉ូដែលមួយចំនួនផ្តល់នូវជម្រើសសម្រាប់ការថតបន្ថែម (ទិន្នន័យដែលបានកត់ត្រា) នៅកម្រិតខ្ពស់ជាងធម្មតា។ampអត្រាលីង។ ទិន្នន័យបន្ថែមត្រូវបានកត់ត្រាក្នុងតំបន់សតិ "ការថតបន្ទាប់បន្សំ"។
លក្ខណៈពិសេសទាំងនេះជួនកាលត្រូវបានគេហៅថាការកត់ត្រា "បណ្តាញប្រសើរឡើង" និងការកត់ត្រា "សម្ពាធបណ្តោះអាសន្ន" ។ ពួកគេត្រូវបានគេហៅថា "ការចូលរហ័ស" ។
ចំណាំ៖ មុខងារនេះអាចត្រូវបានដំឡើងដោយរោងចក្រតែនៅពេលសាងសង់ប៉ុណ្ណោះ។ ដូច្នេះជម្រើសត្រូវតែបញ្ជាក់នៅពេលបញ្ជាទិញ រួមជាមួយនឹងចំនួនអតិបរមាដែលត្រូវការampអត្រាលីង
សampលីងមានផលប៉ះពាល់សម្រាប់ការប្រើប្រាស់ថាមពល ហើយអាចតម្រូវឱ្យប្រើប្រាស់ថ្មខាងក្រៅដើម្បីបំពេញតាមតម្រូវការនៃអាយុកាលសេវាកម្ម។
លក្ខណៈពិសេសនៃការកត់ត្រារហ័សរបស់អ្នកកាប់ឈើអាចត្រូវបានបិទកំឡុងពេលរៀបចំអ្នកកាប់ឈើ។ នៅពេលដែលបើកដំណើរការ អ្នកកាប់ឈើមានយុទ្ធសាស្ត្រពីរសម្រាប់ដោះស្រាយជាមួយនឹងអង្គចងចាំពេញ។ ទាំងការកត់ត្រារហ័សនឹងបញ្ឈប់ ឬទិន្នន័យចាស់ៗអាចត្រូវបានសរសេរលើស។ ធ្វើការជ្រើសរើសដែលអ្នកត្រូវការកំឡុងពេលដំឡើង។
មិនមែនប្រភេទឧបករណ៍ចាប់សញ្ញាទាំងអស់អាចដំណើរការនៅកម្រិតខ្ពស់បានទេ។ampប្រេកង់ ling ។ ដូច្នេះជាធម្មតា លក្ខណៈពិសេសនេះត្រូវបានកំណត់ឱ្យដំណើរការជាមួយឧបករណ៍ចាប់សញ្ញា analogue ដូចជាឧបករណ៍ប្តូរសម្ពាធ។
ការកាប់ឈើរហ័សត្រូវបានប្រើជាញឹកញាប់ដើម្បីតាមដានការប្រែប្រួលសម្ពាធនៅលើបណ្តាញផ្គត់ផ្គង់ទឹក។
ការកត់ត្រា 'បណ្តាញដែលប្រសើរឡើង' និងការកត់ត្រា 'Pressure Transient' គឺជាការកំណត់ផ្តាច់មុខទៅវិញទៅមក (អាចប្រើបានតែមួយប៉ុណ្ណោះ)។ នីមួយៗមានប្រតិបត្តិការផ្សេងៗគ្នា។
ការកត់ត្រាបណ្តាញដែលបានធ្វើឱ្យប្រសើរឡើង៖
- ជម្រើសនេះអនុញ្ញាតឱ្យព្រឹត្តិការណ៍ជាក់លាក់ដើម្បីបង្កើតការថតបន្ទាប់បន្សំ។
- ការថតនឹងត្រូវបានធ្វើឡើងនៅផ្ទៃខាងក្រោយ sampអត្រាលីង
- ការថតអាចជាឆានែលតែមួយឬអាចរួមបញ្ចូលឆានែលបន្ថែម (ប្រសិនបើឧបករណ៍ចាប់សញ្ញាអាចទប់ទល់នឹងល្បឿន) ។
- អតិបរមា sampអត្រា ling ត្រូវបានកំណត់ត្រឹមប្រេកង់ 1Hz ។
ការកត់ត្រាបណ្តោះអាសន្នសម្ពាធ៖
- ជម្រើសនេះអនុញ្ញាតឱ្យព្រឹត្តិការណ៍ជាក់លាក់ដើម្បីបង្កើតការថតបន្ទាប់បន្សំ។
- អ្នកកាប់ឈើមានអង្គចងចាំបន្ថែម ដោយសារចំនួនទិន្នន័យដែលត្រូវការដើម្បីរក្សាទុក។
- ការថតនឹងធ្វើឡើងនៅម៉ោងampអត្រា ling នៃ 1Hz ឬមួយនៃជម្រើសនៃប្រេកង់ខ្ពស់រហូតដល់ 25Hz ។
- នៅលើ Multilog2 អាចប្រើបានរហូតដល់ពីរប៉ុស្តិ៍។ ទាំងនេះនីមួយៗត្រូវតែសម្រាប់ ក
- ឧបករណ៍ចាប់សញ្ញាសម្ពាធ។ ឧបករណ៍ចាប់សញ្ញាត្រូវតែត្រូវបានបែងចែកទៅឆានែល 1 ឬឆានែល 1 និង 2 ។
- ការកត់ត្រាអាចត្រូវបានកំណត់ឱ្យកើតឡើងនៅពេលវេលាជាក់លាក់ ឬឆ្លើយតបទៅនឹងផ្សេងៗ
- ព្រឹត្តិការណ៍រោទិ៍ ឬការផ្លាស់ប្តូរនៅក្នុងធាតុបញ្ចូលស្ថានភាព (ឧ. បង្កឡើងដោយការប្តូរទិន្នផលពីឧបករណ៍ខាងក្រៅ)។
ការរួមបញ្ចូលម៉ាស៊ីនមេ - ការផ្ទុកនិង Viewទិន្នន័យ
អ្នកកាប់ឈើរួមមានចំណុចប្រទាក់ (ហៅថាម៉ូដឹម) ដែលផ្តល់ការចូលប្រើអ៊ីនធឺណិតតាមរយៈបណ្តាញទំនាក់ទំនងចល័តកោសិកា។ ស៊ីមកាតត្រូវបានប្រើដើម្បីផ្តល់ការចូលប្រើបណ្តាញ។
ទិន្នន័យរង្វាស់ត្រូវបានរក្សាទុកដំបូងនៅក្នុងអ្នកកាប់ឈើ រហូតដល់ម៉ោងហៅចូលបន្ទាប់។ បន្ទាប់មកទិន្នន័យអាចត្រូវបានផ្ទុកឡើងទៅកាន់ម៉ាស៊ីនមេដោយប្រើទម្រង់ដែលបានអ៊ិនគ្រីប។ ជាធម្មតាម៉ាស៊ីនមេ
ប្រើដើម្បីទទួល និងរក្សាទុកទិន្នន័យនឹងជាម៉ាស៊ីនមេ HWM Data Gate ទោះបីជាម៉ាស៊ីនមេផ្សេងទៀតអាចត្រូវបានប្រើប្រាស់ដោយភ្ជាប់ជាមួយកម្មវិធី HWM ក៏ដោយ។
ទិន្នន័យអ្នកកាប់ឈើអាចជា viewed ដោយប្រើ a viewing portal ដែលមានសិទ្ធិចូលប្រើទិន្នន័យដែលបានរក្សាទុកនៅលើម៉ាស៊ីនមេ។ (សូមមើលការណែនាំអ្នកប្រើប្រាស់ដែលពាក់ព័ន្ធសម្រាប់ព័ត៌មានលម្អិតអំពីរបៀបដែលទិន្នន័យរបស់អ្នក។ viewing អាចត្រូវបានប្រើដើម្បី view ទិន្នន័យអ្នកកាប់ឈើ) ។
DataGញ៉ាំ Server / Data viewនៅក្នុងវិបផតថល។
នៅពេលរួមបញ្ចូលជាមួយ HWM's DataGate server ទិន្នន័យរង្វាស់របស់អ្នកកាប់ឈើអាចត្រូវបានរក្សាទុកនៅកណ្តាល និងធ្វើឱ្យមានដល់អ្នកប្រើប្រាស់តាមរយៈ a viewវិបផតថល (webគេហទំព័រ) ។ ម៉ាស៊ីនមេផ្ទុកទិន្នន័យអាចគ្រប់គ្រងការទទួល និងរក្សាទុកទិន្នន័យពីអង្គភាពតែមួយ ឬពីក្រុមអ្នកកាប់ឈើទាំងមូល។
Viewការកត់ត្រាបឋម៖
ទិន្នន័យពីអ្នកកាប់ឈើរបស់អ្នកអាចជា viewed ពីចម្ងាយ / ក្រាហ្វិកដោយនរណាម្នាក់ដែលត្រូវបានអនុញ្ញាតឱ្យធ្វើដូច្នេះដោយមានគណនីអ្នកប្រើប្រាស់សមរម្យ (និងពាក្យសម្ងាត់) ដោយប្រើស្តង់ដារ web- កម្មវិធីរុករក។
HWM មានជម្រើស webគេហទំព័រដែលអាចប្រើបាន view ទិន្នន័យអ្នកកាប់ឈើ។ ជម្រើសដ៏ល្អបំផុតនៃ webគេហទំព័រអាស្រ័យលើប្រភេទឧបករណ៍ចាប់សញ្ញាដែលប្រើជាមួយអ្នកកាប់ឈើ។
A webគេហទំព័រដែលមានទិន្នន័យទូទៅ viewer អាចបង្ហាញទិន្នន័យជាក្រាហ្វិក ប៉ុន្តែសម្រាប់តែអ្នកកាប់ឈើម្តងប៉ុណ្ណោះ ដែលបានដំឡើងនៅលើគេហទំព័រ A webគេហទំព័រដែលអាចបង្ហាញក្រុមអ្នកកាប់ឈើ ដែលនីមួយៗមានឧបករណ៍ចាប់សញ្ញាប្រភេទដូចគ្នា ជារឿយៗអាចបង្ហាញទិន្នន័យក្នុងមធ្យោបាយដ៏មានន័យដល់អ្នកប្រើប្រាស់ រួមជាមួយនឹងព័ត៌មានបន្ថែមដែលមានប្រយោជន៍ (ឧទាហរណ៍ ផែនទីបង្ហាញទីតាំងអ្នកកាប់ឈើ)។ ដូច្នេះ ក webគេហទំព័រអាចផ្តល់រូបភាពនៃស្ថានភាពបច្ចុប្បន្ននៃគេហទំព័រជាច្រើនក្នុងពេលតែមួយ។
សូមមើលមគ្គុទ្ទេសក៍អ្នកប្រើប្រាស់ IDT ឬមគ្គុទ្ទេសក៍អ្នកប្រើឧបករណ៍ចាប់សញ្ញាសម្រាប់ព័ត៌មានលម្អិតអំពីអ្វីដែល viewing portal គឺសមស្របបំផុតក្នុងការប្រើប្រាស់។ ជាជម្រើស សូមពិភាក្សាបញ្ហានេះជាមួយអ្នកតំណាង HWM របស់អ្នក។
ដាtaGate server ក៏អាចបញ្ជូនការជូនដំណឹងណាមួយដែលទទួលបានពីអ្នកកាប់ឈើទៅកាន់អ្នកប្រើប្រាស់ទាំងអស់ដែលបានជាវពួកវា។ ដូច្នេះសារជូនដំណឹងអ្នកកាប់ឈើមួយអាចត្រូវបានចែកចាយទៅ Da ច្រើន។taGញ៉ាំអ្នកប្រើប្រាស់។
DataGញ៉ាំក៏អាច (ដោយការរៀបចំជាមួយអ្នកតំណាងផ្នែកលក់របស់អ្នក) ដើម្បីនាំចេញទិន្នន័យអ្នកកាប់ឈើទៅកាន់ម៉ាស៊ីនមេផ្សេងទៀត។
ការរៀបចំរដ្ឋបាលមួយចំនួននៃម៉ាស៊ីនមេ និងរបស់ viewing portal ជាធម្មតាត្រូវបានទាមទារដើម្បីជួយសម្រួលដល់ការទទួល រក្សាទុក និងបង្ហាញទិន្នន័យអ្នកកាប់ឈើឱ្យបានត្រឹមត្រូវ។ (ការដំឡើង និងការប្រើប្រាស់ឌីtaGប្រព័ន្ធបរិភោគ (ឬម៉ាស៊ីនមេផ្សេងទៀត) មិនត្រូវបានគ្របដណ្តប់ដោយការណែនាំអ្នកប្រើប្រាស់នេះទេ)។
Viewការកត់ត្រាអនុវិទ្យាល័យ៖
សម្រាប់គេហទំព័រដែលមានគំរូអ្នកកាប់ឈើជាមួយនឹងការកត់ត្រារហ័សរួមបញ្ចូល ការកត់ត្រាបន្ទាប់បន្សំ
ប្រហែលជាត្រូវបានបង្កើតឡើង។ ទាំងនេះក៏ត្រូវបានរក្សាទុកនៅលើម៉ាស៊ីនមេផងដែរ។
ទិន្នន័យរបស់អ្នក។ viewer នឹងមានមធ្យោបាយបង្ហាញការថតបន្ទាប់បន្សំ។ វាអាច, សម្រាប់ឧample, បង្ហាញសញ្ញាសម្គាល់នៅលើដានមេ ដើម្បីចង្អុលបង្ហាញចំណុចដែលទិន្នន័យលឿនមាន (ឧ. កន្លែងដែលបណ្តោះអាសន្នបានកើតឡើង)។ ចុចសញ្ញាសម្គាល់ដើម្បីផ្តល់ការបិទជិត view នៃបណ្តោះអាសន្ន។
គ្រឿងបន្លាស់សម្រាប់ការដំឡើង
គ្រឿងបន្ថែម (ឧ. អង់តែន) អាចរកបានតាមស្ថានភាពដំឡើងផ្សេងៗ។ ពិភាក្សាអំពីភាពអាចរកបានជាមួយអ្នកតំណាង HWM របស់អ្នក។
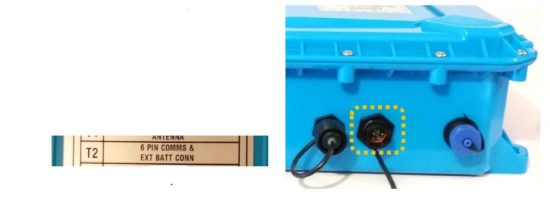
ចំណុចប្រទាក់ទំនាក់ទំនង និងខ្សែកម្មវិធី
ដើម្បីទាក់ទងជាមួយអ្នកកាប់ឈើ Multilog2WW ខ្សែសរសេរកម្មវិធី (ឧទាហរណ៍ CABA2093 ឬ CABA6600) ត្រូវបានទាមទារ។ វានឹងរួមបញ្ចូលចុង USB-A និងឧបករណ៍ភ្ជាប់សម្រាប់ផ្នែកអ្នកកាប់ឈើផងដែរ (ជាធម្មតាឧបករណ៍ភ្ជាប់ 6-pin ដែលមិនជ្រាបទឹកនៅពេលបំពាក់)។ ម៉ូដែលមួយចំនួនអាចត្រូវការខ្សែដែលមាន 10 pins; ប្រើខ្សែសរសេរកម្មវិធីដែលត្រូវគ្នានឹងឧបករណ៍ភ្ជាប់របស់អ្នកកាប់ឈើ។ (សូមទាក់ទងតំណាង HWM របស់អ្នកដើម្បីពិភាក្សាអំពីតម្រូវការខ្សែកម្មវិធីណាមួយ)។
ចំណុចប្រទាក់សម្រាប់ខ្សែទំនាក់ទំនង
នៅលើ Multilog2WW ជាធម្មតាត្រូវបានដាក់នៅទីតាំង “T2” ហើយត្រូវបានចែករំលែកជាមួយឧបករណ៍ភ្ជាប់ដែលប្រើសម្រាប់ថ្មខាងក្រៅណាមួយ។
កន្លែងដែលមិនមានថ្មខាងក្រៅត្រូវបានភ្ជាប់ ខ្សែត្រង់គឺត្រូវបានទាមទារ។ ភ្ជាប់ខ្សែទំនាក់ទំនងទៅចំណុចប្រទាក់ Comms ។
នៅពេលដែលថ្មខាងក្រៅត្រូវបានបំពាក់ វាត្រូវបានណែនាំឱ្យប្រើកំណែ 'Y-cable' នៃខ្សែសរសេរកម្មវិធី ដែលត្រូវបានបញ្ចូលជាបណ្តោះអាសន្នរវាងថ្ម និងឧបករណ៍ភ្ជាប់ Comms អ្នកកាប់ឈើ។ ការប្រើប្រាស់របស់វាត្រូវបានណែនាំដោយសារតែឧបករណ៍ចាប់សញ្ញាមួយចំនួនដែលទាមទារថាមពលបន្ថែមដែលត្រូវបានផ្តល់ដោយកញ្ចប់ថ្មខាងក្រៅ។ ចងចាំថាត្រូវភ្ជាប់ថ្មខាងក្រៅឡើងវិញនៅពេលបញ្ចប់។ ភ្ជាប់ខ្សែ Comms ទៅនឹងអ្នកកាប់ឈើ ហើយបន្ទាប់មកបញ្ចប់ការភ្ជាប់ទៅម៉ាស៊ីន IDT ដោយប្រើវិធីសាស្រ្តមួយដែលបានពិពណ៌នានៅក្នុងផ្នែក 2.8 ។
ការបញ្ចប់ផ្លូវទំនាក់ទំនង
សម្រាប់ IDT ដើម្បីទំនាក់ទំនងជាមួយអ្នកកាប់ឈើ ជាដំបូងជ្រើសរើសខ្សែដែលសមស្រប ហើយភ្ជាប់វាទៅឧបករណ៍ភ្ជាប់ COMMS របស់អ្នកកាប់ឈើ ដូចដែលបានពិពណ៌នានៅក្នុងផ្នែក 2.7 ។ ចុង USB-A នៃខ្សែសរសេរកម្មវិធីគួរតែត្រូវបានប្រើដើម្បីភ្ជាប់ទៅម៉ាស៊ីន IDT ដោយប្រើវិធីមួយក្នុងចំណោមវិធីខាងក្រោម៖
IDT - ប្រើជាមួយកុំព្យូទ័រ (&Windows)
មុនពេលប្រើ កុំព្យូទ័រគួរតែមានឧបករណ៍សរសេរកម្មវិធី IDT (PC version) ។
ចុង USB-A គួរតែត្រូវបានដោតដោយផ្ទាល់ទៅក្នុងរន្ធ USB-A របស់កុំព្យូទ័រ (ឬទៅច្រក USB-B ឬ USB-C តាមរយៈអាដាប់ទ័រដែលសមរម្យ)។ សូមមើលរូបភាពទី 1 ។

រូបភាពទី 1. ផ្លូវតភ្ជាប់នៅពេលប្រើ IDT ជាមួយកុំព្យូទ័រដែលមានមូលដ្ឋានលើ Windows
កម្មវិធី IDT – ប្រើជាមួយជម្រើសទូរសព្ទចល័ត ឬថេប្លេត/ប៊្លូធូស
ឧបករណ៍ទូរសព្ទចល័ត ឬថេប្លេតមួយចំនួន (ដែលត្រូវតែជាប្រព័ន្ធប្រតិបត្តិការ Android ឬ iOS ដែលមានមូលដ្ឋានលើ និងគាំទ្រវិទ្យុប៊្លូធូស) អាចប្រើវិធីនេះ។ (សម្រាប់ព័ត៌មានចុងក្រោយអំពីឧបករណ៍ដែលត្រូវគ្នាស្គាល់ សូមទាក់ទងតំណាង HWM របស់អ្នក)។
មុនពេលប្រើ ឧបករណ៍ចល័តគួរតែមានកម្មវិធី IDT ដំឡើងកម្មវិធី។ 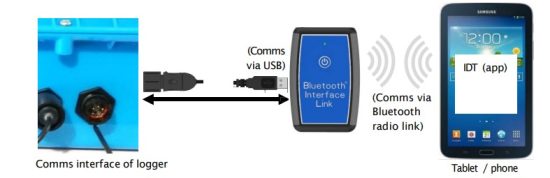
រូបភាពទី 2. ផ្លូវតភ្ជាប់នៅពេលប្រើកម្មវិធី IDT ជាមួយឧបករណ៍ចល័ត និងតំណភ្ជាប់ចំណុចប្រទាក់ប៊្លូធូស
ផ្លូវនៃការតភ្ជាប់ (សូមមើលរូបភាពទី 2) ប្រើអាដាប់ទ័រទំនាក់ទំនងដែលគេស្គាល់ថាជា HWM “Bluetooth Interface Link”។ ភ្ជាប់ចុងអ្នកកាប់ឈើនៃខ្សែទំនាក់ទំនងទៅអ្នកកាប់ឈើ។ បន្ទាប់មក ចុង USB-A នៃខ្សែទំនាក់ទំនងគួរតែត្រូវបានដោតចូលទៅក្នុងរន្ធ USB-A នៃអង្គភាព Bluetooth Interface Link ។ ឧបករណ៍គួរតែត្រូវបានបើកកំឡុងពេលប្រើប្រាស់។ កម្មវិធី IDT តម្រូវឱ្យផ្គូផ្គងទៅឯកតា Bluetooth Interface Link មុនពេលទំនាក់ទំនងជាមួយអ្នកកាប់ឈើ។ តំណភ្ជាប់ចំណុចប្រទាក់ប៊្លូធូសគ្រប់គ្រងការបកប្រែពិធីការ និងការគ្រប់គ្រងលំហូរនៃសាររវាងអ្នកកាប់ឈើ (តាមរយៈខ្សែ comms) និងតំណវិទ្យុ។
បើកដំណើរការតំណភ្ជាប់អ្នកកាប់ឈើ និងទំនាក់ទំនង
ចំណុចប្រទាក់ទំនាក់ទំនងតែងតែត្រូវបានត្រួតពិនិត្យសម្រាប់សកម្មភាព ហើយជាធម្មតាអ្នកកាប់ឈើនឹងឆ្លើយតប លុះត្រាតែវារវល់ក្នុងការទំនាក់ទំនងទៅកាន់បណ្តាញកោសិកា។
ដំណើរការធ្វើឱ្យសកម្មអ្នកកាប់ឈើ (សម្រាប់ការប្រើប្រាស់លើកដំបូង)
នៅពេលដឹកជញ្ជូនពីរោងចក្រ អង្គភាពស្ថិតនៅក្នុង 'របៀបដឹកជញ្ជូន' (បិទដំណើរការ មិនចូល ឬហៅចូល)។ របៀបនេះគឺសមរម្យសម្រាប់ការដឹកជញ្ជូន ឬការផ្ទុករយៈពេលវែង។ ដើម្បីប្រើឧបករណ៍កាប់ឈើ ត្រូវតែបើកដំណើរការជាមុនសិន។
ដំណើរការសម្រាប់ការធ្វើវាអាស្រ័យលើការកំណត់អ្នកកាប់ឈើសម្រាប់ការធ្វើឱ្យសកម្មឡើងវិញនៃការកត់ត្រា។ ជម្រើសនៃការកំណត់ផ្សេងៗគឺអាចរកបាន (ពេលវេលាជាក់លាក់ នៅពេលភ្ជាប់ថ្មខាងក្រៅ នៅពេលបើកដំណើរការកុងតាក់ម៉ាញេទិក 'ភ្លាមៗ')។
អ្នកកាប់ឈើភាគច្រើនត្រូវបានកំណត់ឱ្យចាប់ផ្តើម 'ភ្លាមៗ' នៅពេលមានការកំណត់របស់ពួកគេ។ អានដោយ IDT ហើយបន្ទាប់មក បានរក្សាទុកមកវិញ ទៅអង្គភាព។
នៅពេលដែលបានដំណើរការ អ្នកកាប់ឈើនឹងចូលទៅក្នុងស្ថានភាព 'រង់ចាំ' (ក្នុងរយៈពេលខ្លី)។
បន្ទាប់មកវានឹងបញ្ចូលស្ថានភាពនៃ 'ការកត់ត្រា' ដែលវាកំពុងដំណើរការមុខងារកត់ត្រាដដែលៗរបស់វា។
វិធីសាស្រ្តអាស្រ័យលើកំណែ IDT ណាមួយដែលកំពុងត្រូវបានប្រើប្រាស់៖
- សម្រាប់ IDT (PC) អ្នកប្រើអាចធ្វើវាដោយដៃ (ទោះបីជាមិនចាំបាច់មានការផ្លាស់ប្តូរកម្មវិធី)។ (សូមមើលមគ្គុទ្ទេសក៍អ្នកប្រើប្រាស់ IDT សម្រាប់ជំហានដែលត្រូវការដើម្បីអានកម្មវិធី logger ហើយបន្ទាប់មកដើម្បីរក្សាទុកវាត្រឡប់ទៅអង្គភាពវិញដោយប្រើប៊ូតុង 'ដំឡើងឧបករណ៍')។
- សម្រាប់កម្មវិធី IDT អ្នកប្រើប្រាស់ក៏អាចធ្វើវាដោយដៃតាមរយៈប៊ូតុងចាប់ផ្តើមឧបករណ៍។ លើសពីនេះ កម្មវិធីនឹងពិនិត្យរកមើលបញ្ហាដែលអាចកើតមាននៅពេលណាដែលអ្នកប្រើប្រាស់ធ្វើការកាត់ផ្តាច់ការគ្រប់គ្រងរបស់អ្នកកាប់ឈើចេញពីកម្មវិធី រួមទាំងការពិនិត្យរកអ្នកកាប់ឈើដែលមិនទាន់បានដំណើរការ / ថត។
មុនពេលចាកចេញពីគេហទំព័រ សូមពិនិត្យមើលថាអ្នកកាប់ឈើត្រូវបានតំឡើងយ៉ាងត្រឹមត្រូវសម្រាប់ការចូល កិច្ចការហៅចូល ហើយថាវាស្ថិតក្នុងស្ថានភាព 'ការកត់ត្រា' (ការចូល)។ សូមមើលការណែនាំអ្នកប្រើប្រាស់ IDT សម្រាប់ការណែនាំអំពីរបៀបពិនិត្យមើលចំណុចទាំងនេះ។
ចំណុចប្រទាក់ និងឧបករណ៍ចាប់សញ្ញាត្រូវបានគាំទ្រ
ចំណាំ៖ ការគាំទ្រសម្រាប់ចំណុចប្រទាក់ជាក់លាក់ ឬមុខងារខុសគ្នា និងអាស្រ័យលើម៉ូដែលដែលបានផ្គត់ផ្គង់។
ចំណុចប្រទាក់ដែលគាំទ្រ
ការបញ្ចូលសម្ពាធ៖ ការពិពណ៌នា
ឧបករណ៍ភ្ជាប់ 4-pin ឧបករណ៍ប្តូរសម្ពាធខាងក្រៅ
(ជម្រើស៖ ស្តង់ដារ ឬសីតុណ្ហភាពខ្ពស់ ឬភាពត្រឹមត្រូវខ្ពស់)។
ឧបករណ៍ភ្ជាប់ 6-pin (ដូចខាងលើ។ រួមបញ្ចូលអេក្រង់ដី)។
(ដោយផ្ទាល់) ការភ្ជាប់ឧបករណ៍បញ្ជូនសម្ពាធខាងក្នុង (ជម្រើស៖ 20 bar, 30 bar)។
ការបញ្ចូលជីពចរឌីជីថល៖ ឧampប្រើ (លំហូរ Bi)
ឧបករណ៍ភ្ជាប់ 4-pin 1 ឆានែលបញ្ចូល (Pulses/Direction)
ផលិតទិន្នផលឆានែលឡូជីខល 1: "លំហូរសុទ្ធ" ។
ឧបករណ៍ភ្ជាប់ 4-pin 2 ឆានែលបញ្ចូល (ជីពចរទៅមុខនិងបញ្ច្រាស)
រួមបញ្ចូលទៅនឹងទិន្នផលឆានែលឡូជីខល 1៖ “លំហូរសុទ្ធ”។
Exampប្រើ (លំហូរយូនី)
ឧបករណ៍ភ្ជាប់ 4-pin 2 x 1 channel input (Pulses)
ផលិត 2 x 1 ទិន្នផលឆានែលលទ្ធផលឡូជីខល:
"លំហូរតែមួយទិស" ។
Exampប្រើ (ស្ថានភាព)
ឧបករណ៍ភ្ជាប់ 4-pin 2 x 1 channel បញ្ចូលស្ថានភាព
ផលិតទិន្នផលឆានែលឡូជីខល 2 x 1: "ស្ថានភាព" ។
លទ្ធផលឌីជីថល៖ ការពិពណ៌នា
ឧបករណ៍ភ្ជាប់ 3-pin 2 x Digital Output channel (ការប្រើប្រាស់ដែលអាចកំណត់បាន)។
វ៉ុលtagអ៊ី ធាតុបញ្ចូល៖ ការពិពណ៌នា
ឧបករណ៍ភ្ជាប់ 4-pin Voltagអ៊ី បញ្ចូល (0-1V); អកម្ម
ឧបករណ៍ភ្ជាប់ 4-pin Voltagអ៊ី បញ្ចូល (0-10V); អកម្ម
ធាតុចូលបច្ចុប្បន្ន៖ ការពិពណ៌នា
ឧបករណ៍ភ្ជាប់ 4-pin បញ្ចូលបច្ចុប្បន្ន (4-20mA); អកម្ម
ឧបករណ៍ភ្ជាប់ 4-pin បញ្ចូលបច្ចុប្បន្ន (4-20mA); សកម្ម
ការបញ្ចូលសីតុណ្ហភាព៖ ការពិពណ៌នា
ឧបករណ៍ភ្ជាប់ 4-pin បញ្ចូលសីតុណ្ហភាពខាងក្រៅ (RTD)
ឧបករណ៍ភ្ជាប់ 6-pin បញ្ចូលសីតុណ្ហភាពខាងក្រៅ (RTD); (រួមបញ្ចូលអេក្រង់ដី)
ការបញ្ចូល Serial Comms៖ ការពិពណ៌នា
ឧបករណ៍ភ្ជាប់ 4-pin Modbus
ឧបករណ៍ភ្ជាប់ 4-pin SDI-12
ការបញ្ចូលឧបករណ៍ចាប់សញ្ញាផ្ទាល់ខ្លួន៖ ការពិពណ៌នា
ឧបករណ៍ភ្ជាប់ 4-pin SonicSens2 (ឧបករណ៍ចាប់សញ្ញាចម្ងាយអ៊ុលត្រាសោន / ជម្រៅ) ។
ឧបករណ៍ភ្ជាប់ 6-pin SonicSens3 (ឧបករណ៍ចាប់សញ្ញាចម្ងាយអ៊ុលត្រាសោន / ជម្រៅ) ។
ឧបករណ៍ភ្ជាប់ 4-pin Raven Eye Interface (ចំណុចប្រទាក់ Modbus ដែលមានថាមពលសម្រាប់ឧបករណ៍វាស់លំហូររ៉ាដា)។
(ធាតុចូលផ្សេងទៀត)
ទាក់ទងភ្នាក់ងារលក់របស់អ្នកសម្រាប់ព័ត៌មានបន្ថែម ឬពិភាក្សាអំពីតម្រូវការរបស់អ្នក។
សម្រាប់ប៉ារ៉ាម៉ែត្រដែលបានផ្តល់ឱ្យណាមួយ ឧបករណ៍ចាប់សញ្ញាជាច្រើនអាចមានជាមួយប្រភេទផ្សេងគ្នានៃចំណុចប្រទាក់អគ្គិសនី។ ឧបករណ៍ចាប់សញ្ញាដែលផ្តល់ដោយ HWM នឹងរួមបញ្ចូលខ្សែដែលមានឧបករណ៍ភ្ជាប់សមរម្យសម្រាប់ Multilog2WW ដែលបានផ្គត់ផ្គង់។
ការដំឡើង
សេចក្តីសង្ខេបនៃជំហានដំឡើង
- ពិនិត្យមើលថាការវាយតម្លៃនៃការងារត្រូវបានធ្វើរួច ហើយមានវិធានការសុវត្ថិភាពណាមួយនៅនឹងកន្លែង។ (ឧ. ការប្រុងប្រយ័ត្នសុវត្ថិភាព សម្លៀកបំពាក់ការពារ និង/ឬឧបករណ៍ដែលកំពុងប្រើប្រាស់)។
- ពិនិត្យមើលឧបករណ៍កាប់ឈើគឺសមរម្យសម្រាប់ប្រើនៅកន្លែងដំឡើង។ ពិនិត្យមើលថាអ្នកមានឧបករណ៍ចាប់សញ្ញា និងអង់តែនដែលត្រូវការ។ ពិចារណាកន្លែងដែលឧបករណ៍នឹងមានទីតាំងនៅក្នុងចន្លោះដែលមាន ហើយថាខ្សែ និងទុយោទាំងអស់មានប្រវែងសមស្រប។
- ពិនិត្យឧបករណ៍ភ្ជាប់មានដើម្បីភ្ជាប់ទៅចំណុចវាស់សម្ពាធណាមួយ។
- អ្នកកាប់ឈើ ខ្សែ និងឧបករណ៍ចាប់សញ្ញា គួរតែត្រូវទុកឱ្យឆ្ងាយពីប្រភពនៃការជ្រៀតជ្រែកអគ្គិសនី ដូចជាម៉ូទ័រ ឬស្នប់ជាដើម។
- ខ្សែ និងទុយោគួរតែត្រូវបានបញ្ជួន និងធានាសុវត្ថិភាព ដើម្បីកុំឱ្យមានគ្រោះថ្នាក់ណាមួយកើតឡើង។ កុំអនុញ្ញាតឱ្យឧបករណ៍ណាមួយសម្រាកនៅលើខ្សែ តំណភ្ជាប់ ឬទុយោ ព្រោះអាចបណ្តាលឱ្យមានការខូចខាត។
- ជ្រើសរើសខ្សែកម្មវិធីដែលសមរម្យសម្រាប់អ្នកកាប់ឈើ ហើយភ្ជាប់វាទៅឧបករណ៍ភ្ជាប់ COMMS អ្នកកាប់ឈើ។ បំពេញផ្លូវតភ្ជាប់ទៅឧបករណ៍ម៉ាស៊ីន IDT (សូមមើលផ្នែក 2.8.1 និង 2.8.2) ។ ប្រើ IDT ដើម្បីអានការកំណត់អ្នកកាប់ឈើ។ (សូមមើលការណែនាំអ្នកប្រើប្រាស់ IDT សម្រាប់ការណែនាំនៅពេលណាដែលត្រូវការ)។
- ធ្វើបច្ចុប្បន្នភាពកម្មវិធីបង្កប់អ្នកកាប់ឈើប្រសិនបើចាំបាច់។ (សូមមើលសៀវភៅណែនាំ IDT សម្រាប់ការណែនាំ សូមពិចារណាទាញយកទិន្នន័យដែលមានស្រាប់ណាមួយពីអ្នកកាប់ឈើ មុនពេលដំឡើងកំណែ)។
- ប្រើ IDT ដើម្បីពិនិត្យ ឬកែប្រែការកំណត់អ្នកកាប់ឈើដែលមានស្រាប់៖
- សរសេរកម្មវិធីតំបន់ពេលវេលាក្នុងតំបន់ចូលទៅក្នុងអ្នកកាប់ឈើ (ពិនិត្យ ឬកែប្រែ)។
- កំណត់សកម្មភាព ឬពេលវេលានៅពេលដែល Logger ចាប់ផ្តើមដំណើរការ ហើយចាប់ផ្តើមថត (កត់ត្រា)។
- កំណត់ចន្លោះពេលសម្រាប់ធ្វើការវាស់វែង (sample interval និង log interval) ។ ពួកគេគួរតែត្រូវបានកំណត់រចនាសម្ព័ន្ធឱ្យសមស្របទៅនឹងតម្រូវការកត់ត្រាជាក់លាក់នៃកម្មវិធីរបស់អ្នក (បង្រួមអប្បបរមា sampអត្រា ling ដើម្បីរក្សាអាយុកាលថ្ម) ។
- ពិនិត្យ / កែប្រែការកំណត់ឆានែលដើម្បីបង្កើតការវាស់វែង samples និងចំណុចទិន្នន័យដែលត្រូវការពីចំណុចប្រទាក់នីមួយៗ។
- កំណត់រចនាសម្ព័ន្ធឆានែលអ្នកកាប់ឈើដើម្បីផ្គូផ្គងឧបករណ៍ចាប់សញ្ញាឬឧបករណ៍ផ្សេងទៀតដែលអ្នកកាប់ឈើភ្ជាប់ទៅ។ (ពិនិត្យឯកតារង្វាស់ត្រឹមត្រូវ ។ល។)
- ត្រូវប្រាកដថាឧបករណ៍ចាប់សញ្ញាត្រូវបានផ្គូផ្គងទៅនឹងលេខឆានែលលទ្ធផលត្រឹមត្រូវ; នេះជាឧបករណ៍សម្គាល់ដែលបានប្រើពេលផ្ទុកទិន្នន័យរង្វាស់ដែលបានចូលទៅម៉ាស៊ីនមេ។ (ឧទាហរណ៍ លេខឆានែលត្រូវតែផ្គូផ្គងរវាងអ្នកកាប់ឈើ និងដាtaGញ៉ាំ) ។
- អនុវត្តមុខងារស្ថិតិដែលត្រូវការណាមួយចំពោះការវាស់វែងផ្ទៃខាងក្រោយ samples ដើម្បីផលិតចំណុចទិន្នន័យដែលបានកត់ត្រា (តម្លៃដែលបានរក្សាទុក)។
- នៅពេលដែលត្រូវការ សូមធ្វើការរៀបចំជម្រើសបន្ថែមណាមួយដែលទាក់ទងនឹងឆានែល។ (ឧទាហរណ៍ បន្ថែមការអានម៉ែត្រដំបូង ការកំណត់ការចម្លងជីពចរ ការក្រិតឧបករណ៍ចាប់សញ្ញា។ ទាំងនេះនឹងអាស្រ័យលើឧបករណ៍ចាប់សញ្ញា និងការប្រើប្រាស់ឧបករណ៍កាប់ឈើ)។ (សូមមើលមគ្គុទ្ទេសក៍អ្នកប្រើប្រាស់ IDT សម្រាប់ព័ត៌មានលម្អិតអំពីការណែនាំ និងជម្រើសនៃការកំណត់បន្ថែមដែលទាក់ទងនឹងចំណុចប្រទាក់)។
- សម្រាប់ឧបករណ៍ចាប់សញ្ញាសម្ពាធ ភ្ជាប់ពួកវាដោយអេឡិចត្រូនិច ប៉ុន្តែបង្ហាញឧបករណ៍ចាប់សញ្ញាទៅនឹងសម្ពាធបរិយាកាសក្នុងតំបន់ ហើយដាក់សូន្យពួកវាឡើងវិញ (ដោយប្រើ IDT) មុនពេលចាប់ផ្តើមភ្ជាប់ទៅចំណុចរង្វាស់។
- ដំឡើង (ទីតាំងនិងភ្ជាប់) ឧបករណ៍ចាប់សញ្ញានៅចំណុចរង្វាស់របស់វា។
- បង្ហូរទំនាក់ទំនងណាមួយទៅនឹងទឹក។
- នៅកន្លែងដែលត្រូវការ សូមដាក់បំពង់ដែលពោរពេញដោយទឹកដែលភ្ជាប់ទៅនឹងឧបករណ៍ប្តូរសម្ពាធដើម្បីការពារវាពីការកក។ (គម្របបំពង់អ៊ីសូឡង់អាចត្រូវបានផ្គត់ផ្គង់តាមការស្នើសុំក្នុងតម្លៃបន្ថែម ឬប្រភពក្នុងស្រុកពីហាងផ្នែករឹង)។
- ត្រូវប្រាកដថាការតភ្ជាប់អគ្គិសនីដែលធ្វើឡើងនៅនឹងកន្លែងគឺស្ងួត ជាប់បានយូរ និងធន់នឹងទឹក។
- ប្រើ IDT ដើម្បី៖
- សាកល្បងឧបករណ៍កាប់ឈើ ហើយឧបករណ៍ចាប់សញ្ញាដំណើរការត្រឹមត្រូវ។ (ខ្លះអាចធ្វើការដំឡើងមុន ខ្លះទៀតក្រោយការដំឡើង)។
- ដំឡើងកម្មវិធីកត់ត្រាសម្រាប់ការជូនដំណឹងណាមួយ។ ពិចារណាលក្ខខណ្ឌសម្រាប់ការធ្វើឱ្យសារជូនដំណឹងសកម្ម និងលក្ខខណ្ឌសម្រាប់សម្អាតសំឡេងរោទិ៍ផងដែរ។
- ពិនិត្យ/កែប្រែការកំណត់ទំនាក់ទំនងរបស់ឧបករណ៍ តាមតម្រូវការ៖
- ការកំណត់ស៊ីម (ប៉ារ៉ាម៉ែត្រសម្រាប់ផ្តល់សិទ្ធិចូលប្រើបណ្តាញកោសិកា) ។
- ការកំណត់ម៉ូដឹម (បច្ចេកវិទ្យាបណ្តាញកោសិកា) ។
- ការកំណត់ការចែកចាយទិន្នន័យ (ព័ត៌មានលម្អិតទំនាក់ទំនងម៉ាស៊ីនមេ)។
- ពេលវេលាហៅចូល និងការកំណត់ពិធីការ។
- ផ្ទៀងផ្ទាត់ការផ្លាស់ប្តូរណាមួយចំពោះការកំណត់ត្រូវបានរក្សាទុកមុនពេលចាកចេញពីគេហទំព័រ។ ពិនិត្យមើលថាអ្នកកាប់ឈើស្ថិតនៅក្នុងស្ថានភាព "កត់ត្រា" ។
- ដំឡើង (ទីតាំង និងភ្ជាប់) អង់តែនសម្រាប់ការទំនាក់ទំនងម៉ាស៊ីនមេ។ ប្រើ IDT ដើម្បីសាកល្បងដំណើរការទំនាក់ទំនងកោសិកា។
- ត្រូវប្រាកដថាព័ត៌មានលម្អិតនៃគេហទំព័រនៃការដាក់ពង្រាយអ្នកកាប់ឈើត្រូវបានកត់ត្រាទុក។ (ការគ្រប់គ្រងសម្រាប់ម៉ាស៊ីនមេអាចត្រូវបានគ្រប់គ្រងដោយបុគ្គលិកការិយាល័យ ឬអ្នកដំឡើងអាចប្រើកម្មវិធី HWM Deployment) ។
ការដំឡើង Logger
អ្នកកាប់ឈើត្រូវតែត្រូវបានម៉ោននៅក្នុងទីតាំងសមស្របមួយ ដែលឧបករណ៍ចាប់សញ្ញាដែលភ្ជាប់ជាមួយវាអាចទៅដល់ចំណុចដំឡើងដែលគេចង់បាន។ ទីតាំងអ្នកកាប់ឈើ ឧបករណ៍ចាប់សញ្ញា និងអង់តែនឆ្ងាយពីប្រភពនៃការជ្រៀតជ្រែកអគ្គិសនី ដូចជាម៉ូទ័រ ឬស្នប់។ ខ្សែ និងទុយោគួរតែត្រូវបានបញ្ជួនដោយមិនបង្កគ្រោះថ្នាក់អ្វីឡើយ។ កុំអនុញ្ញាតឱ្យឧបករណ៍ណាមួយសម្រាកនៅលើទុយោ ខ្សែ ឬឧបករណ៍ភ្ជាប់ ព្រោះអាចបណ្តាលឱ្យខូចខាត។
ការដំឡើងជញ្ជាំង
សូមមើលការតំរង់ទិសដែលបង្ហាញក្នុងដ្យាក្រាមក្នុងផ្នែក 2.1.1; ឧបករណ៍កាប់ឈើគួរតែត្រូវបានដំឡើងដូចដែលបានបង្ហាញសម្រាប់ដំណើរការថ្មល្អបំផុត។
ពិនិត្យមើលបញ្ហានៃការចូលប្រើសម្រាប់ការប្រើប្រាស់ទំនាក់ទំនងនៅនឹងកន្លែង (ឧ. ការចូលប្រើដើម្បីភ្ជាប់ខ្សែ comms)។
អ្នកកាប់ឈើគួរតែត្រូវបានដាក់នៅជញ្ជាំង។ ខួងឧបករណ៍ជួសជុលសមស្របទៅក្នុងទីតាំង ធានាថាពួកគេអាចទ្រាំទ្រនឹងទម្ងន់របស់អ្នកកាប់ឈើ និងខ្សែដែលភ្ជាប់មកជាមួយ។ ប្រើរន្ធសម្រាប់ម៉ោនរន្ធគន្លឹះដើម្បីជួសជុលអ្នកកាប់ឈើនៅទីតាំង។ ប្រឆាំង tampការផ្សាភ្ជាប់ er ក៏អាចត្រូវបានប្រើផងដែរ ប្រសិនបើតម្រូវឱ្យធ្វើជាសាក្សី ប្រសិនបើអ្នកណាម្នាក់បានជ្រៀតជ្រែកក្នុងការដំឡើងដោយការផ្តាច់ឧបករណ៍កាប់ឈើ។ (សូមមើលដ្យាក្រាមក្នុងផ្នែក 2.1.1។ )
ត្រូវប្រាកដថាអង់តែនអាចត្រូវបានម៉ោននៅក្នុងទីតាំងសមរម្យដែលសញ្ញាវិទ្យុនឹងមានកម្លាំងគ្រប់គ្រាន់ដើម្បីហៅចូលទៅក្នុងបណ្តាញកោសិកា។
ការតភ្ជាប់អគ្គិសនីទៅនឹងអ្នកកាប់ឈើ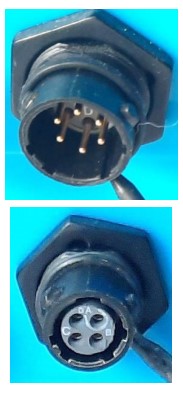
នៅពេលធ្វើការភ្ជាប់អគ្គិសនីទៅនឹងឧបករណ៍កាប់ឈើ (ឧទាហរណ៍ ការភ្ជាប់ឧបករណ៍ភ្ជាប់សម្រាប់ឧបករណ៍ចាប់សញ្ញា) សូមប្រាកដថាឧបករណ៍ភ្ជាប់ត្រូវបានបំពាក់យ៉ាងត្រឹមត្រូវ។ ផ្នែកទាំងពីរនៃឧបករណ៍ភ្ជាប់គួរតែស្ងួត និងគ្មានកំទេចកំទី។ ឧបករណ៍ភ្ជាប់ត្រូវបានចាក់សោ (មើលផ្ទុយសម្រាប់ឧamples) ដើម្បីធានាបាននូវការតម្រឹមត្រឹមត្រូវនៃម្ជុល និងបង្កាន់ដៃ។ តម្រឹមឧបករណ៍ចាប់សញ្ញាទៅនឹងឧបករណ៍ភ្ជាប់អ្នកកាប់ឈើ ហើយរុញទៅផ្ទះទាំងស្រុង។ បន្ទាប់មកបង្វិលផ្នែកខាងក្រៅនៃឧបករណ៍ភ្ជាប់ឧបករណ៍ចាប់សញ្ញា រហូតដល់វាភ្ជាប់ជាមួយយន្តការតោង ហើយចាក់សោរចូល។ បន្ទាប់មកឧបករណ៍ភ្ជាប់នឹងមានសុវត្ថិភាពនិងមិនជ្រាបទឹក។
នៅពេលដកការតភ្ជាប់ចេញ សូមអនុវត្តតាមជំហានបញ្ច្រាសនៃនីតិវិធីដែលបានពិពណ៌នាខាងលើ។ តែងតែគ្រប់គ្រងការតភ្ជាប់ដោយឧបករណ៍ភ្ជាប់; កុំទាញខ្សែព្រោះវាអាចបណ្តាលឱ្យខូច។
តម្រង់ខ្សែទាំងអស់ ដើម្បីកុំឱ្យមានគ្រោះថ្នាក់ដែលអាចកើតមាន និងធានាសុវត្ថិភាពក្នុងកន្លែងដោយប្រើខ្សែភ្ជាប់សមរម្យ។
សម្រាប់អង់តែន សូមអនុវត្តតាមជំហានបន្ថែមដែលបានផ្តល់ឱ្យក្នុងផ្នែក 5.16 ។
ការកំណត់រោងចក្រ
ចំណាំ៖ ជាធម្មតា អ្នកកាប់ឈើនឹងមានការកំណត់កម្មវិធីជាមុនដោយរោងចក្រមុនពេលដឹកជញ្ជូន។ ទោះជាយ៉ាងណាក៏ដោយ កម្មវិធីដំឡើងមានទំនួលខុសត្រូវក្នុងការបញ្ជាក់ការកំណត់គឺសមរម្យសម្រាប់ការប្រើប្រាស់នៅកន្លែងដែលបានដំឡើង។
ប្រសិនបើអ្នកមានតម្រូវការជាក់លាក់ វាអាចត្រូវបានពិភាក្សាជាមួយអ្នកតំណាងផ្នែកលក់ HWM របស់អ្នកនៅពេលបញ្ជាអ្នកកាប់ឈើ។
នៅកន្លែងដែលត្រូវការ IDT អាចត្រូវបានប្រើដើម្បីពិនិត្យ ឬធ្វើការផ្លាស់ប្តូរណាមួយចំពោះការកំណត់អ្នកកាប់ឈើ។
សម្រាប់ចំណុចប្រទាក់ឧបករណ៍ចាប់សញ្ញាភាគច្រើន សូមអនុវត្តតាមការណែនាំទូទៅនៅក្នុងការណែនាំអ្នកប្រើប្រាស់ IDT ។ អ្នកកាប់ឈើអនុលោមតាមការពិពណ៌នា និងឧamples នៃការដំឡើងដែលបានផ្តល់ឱ្យនៅទីនោះ។ ទោះយ៉ាងណាក៏ដោយ ឧបករណ៍ចាប់សញ្ញា HWM មួយចំនួនត្រូវការអេក្រង់ដំឡើងឯកទេស ឬមានការណែនាំផ្ទាល់ខ្លួនដែលផ្តល់ការណែនាំបន្ថែម។
ឧបករណ៍ចាប់សញ្ញាសម្ពាធ
គ្រឿងបរិក្ខារសូន្យឡើងវិញ (សម្រាប់សម្ពាធទាក់ទងនឹងបរិយាកាសក្នុងតំបន់)
ឧបករណ៍ចាប់សញ្ញាសម្ពាធដែលផ្គត់ផ្គង់ដោយ HWM ជាធម្មតាវាស់សម្ពាធទាក់ទងទៅនឹងសម្ពាធបរិយាកាស។ ដោយសារវាអាចមានការប្រែប្រួលខ្លះនៃសម្ពាធបរិយាកាសក្នុងតំបន់ (ឧទាហរណ៍ ដោយសារកម្ពស់) អ្នកកាប់ឈើមានកន្លែងសម្រាប់ដាក់ឧបករណ៍ចាប់សញ្ញាសម្ពាធឡើងវិញ។ នេះត្រូវធ្វើ ជាមួយនឹងឧបករណ៏ដែលប៉ះពាល់នឹងបរិយាកាស។
មុននឹង ការភ្ជាប់ឧបករណ៍ប្តូរទៅចំណុចវាស់ជាក់ស្តែង ទុកវាឱ្យប៉ះនឹងខ្យល់។ បន្ទាប់មក "សូន្យឡើងវិញ" ឧបករណ៍ចាប់សញ្ញាដោយប្រើវិធីសាស្រ្តដែលបានរកឃើញនៅក្នុងការណែនាំអ្នកប្រើប្រាស់ IDT ។
ឧបករណ៍ចាប់សញ្ញាសម្ពាធ (ខាងក្នុង)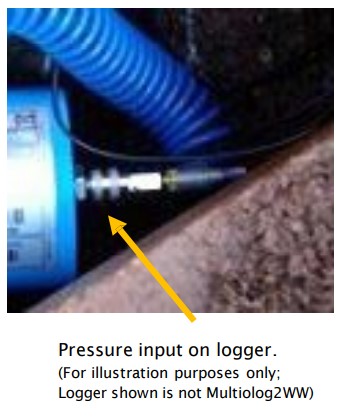
ចំណាំ៖ កុំភ្ជាប់ឧបករណ៍ចាប់សញ្ញាទៅនឹងចំណុចរង្វាស់មុនពេលឆ្លងកាត់ដំណើរការសូន្យឡើងវិញ (ទៅសម្ពាធបរិយាកាសក្នុងតំបន់) ប្រសិនបើចាំបាច់។
សម្រាប់ឧបករណ៍ប្តូរសម្ពាធខាងក្នុងគ្រាន់តែភ្ជាប់សម្ពាធដែលត្រូវវាស់តាមរយៈទុយោដែលសមស្រប (ជាមួយឧបករណ៍ភ្ជាប់) ទៅនឹងឧបករណ៍ចាប់សញ្ញាសម្ពាធនៅលើឧបករណ៍កាប់ឈើ។
ចំណុចប្រទាក់នេះត្រូវបានក្រិតតាមរោងចក្រ។ មិនចាំបាច់មានការក្រិតតាមខ្នាតនៅនឹងកន្លែងទេ។
ចំណាំ៖ បន្ថែមអ៊ីសូឡង់ទៅបំពង់ និងឧបករណ៍កាប់ឈើដើម្បីការពារការកក។ ប្រសិនបើទឹកនៅក្នុងទុយោ ឬអ្នកកាប់ឈើដោយខ្លួនវាបង្កក វាមានគ្រោះថ្នាក់នៃការខូចខាតជាអចិន្ត្រៃយ៍ចំពោះឧបករណ៍ប្តូរសម្ពាធ។
ឧបករណ៍ចាប់សញ្ញាសម្ពាធ (ខាងក្រៅ)
ការបញ្ចូលសម្ពាធអាចត្រូវបានបង្ហាញជាចំណុចប្រទាក់អគ្គិសនី ដោយប្រើឧបករណ៍ភ្ជាប់ 4-pin ឬ 6-pin ។
ឧបករណ៍ចាប់សញ្ញាសម្ពាធខ្សែសម្រាប់ Multilog2WW អាចរកបានពី HWM ។ សម្រាប់ស្ថានភាពភាគច្រើន ឧបករណ៍ចាប់សញ្ញាសម្ពាធប្រភេទបិទជិត (ឬជម្រៅ) ត្រូវបានប្រើ ហើយឧបករណ៍ចាប់សញ្ញានឹងត្រូវបានភ្ជាប់ដោយផ្ទាល់ទៅឧបករណ៍ភ្ជាប់ ដូចដែលបានបង្ហាញក្នុងដ្យាក្រាមខាងក្រោម។

អ្នកកាប់ឈើអនុវត្តថាមពលជាបណ្តោះអាសន្នទៅឧបករណ៍ចាប់សញ្ញា មុនពេល (និងកំឡុងពេល) ធ្វើការវាស់វែង។
ចំណុចប្រទាក់អ្នកកាប់ឈើនឹងត្រូវបានដាក់ស្លាកថា "សម្ពាធ (20 bar)" (ឬស្រដៀងគ្នា) ។
pinout នៃឧបករណ៍ភ្ជាប់ត្រូវបានបង្ហាញខាងក្រោម។
| ឧបករណ៍ភ្ជាប់ bulkhead pinout: 4-pin សម្ពាធខាងក្រៅ | |||
| A | B | C | D |
| វី (+); (PWR) | វី (+); (សញ្ញា) | វី (-); (PWR) | វី (-); (សញ្ញា) |
| ឧបករណ៍ភ្ជាប់ bulkhead pinout: 6-pin សម្ពាធខាងក្រៅ | |||||
| A | B | C | D | E | F |
| វី (+); (PWR) | វី (+); (សញ្ញា) | វី (-); (PWR) | វី (-); (សញ្ញា) | GND / អេក្រង់ | (មិនបានតភ្ជាប់)
|
កន្លែងដែលឧបករណ៍ប្តូរសម្ពាធមានចុងខ្សែស្រឡាយសម្រាប់ភ្ជាប់ទៅនឹងរង្វាស់សម្ពាធ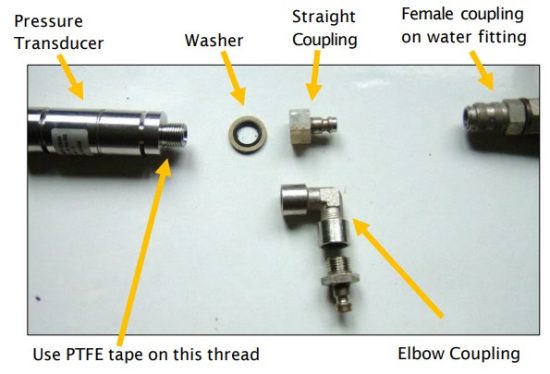 ent point, fittings អាចត្រូវបានទាមទារដើម្បីកែប្រែការតភ្ជាប់ (ឧ. ឧបករណ៍ភ្ជាប់រហ័សសម្រាប់ភ្ជាប់ទៅ hose) ។ ឧamples ត្រូវបានបង្ហាញខាងក្រោម។
ដំឡើងគ្រឿងបរិក្ខារណាមួយ មុនពេលភ្ជាប់ទៅអ្នកកាប់ឈើ។ រចនាប័ទ្មត្រង់ ឬកែងនៃឧបករណ៍ភ្ជាប់មាន។
បញ្ជាក់ថាអ្នកកាប់ឈើមានចំណុចប្រទាក់សមរម្យសម្រាប់ឧបករណ៍ចាប់សញ្ញាសម្ពាធ ឬជម្រៅ។ បន្ទាប់មកភ្ជាប់ឧបករណ៍ចាប់សញ្ញាទៅចំណុចប្រទាក់អ្នកកាប់ឈើដែលពាក់ព័ន្ធ។
ចំណាំ៖ កុំភ្ជាប់ឧបករណ៍ចាប់សញ្ញាទៅនឹងចំណុចរង្វាស់មុនពេលឆ្លងកាត់ ការក្រិតតាមខ្នាត ដំណើរការ (សូមមើលខាងក្រោម) ហើយបន្ទាប់មក សូន្យឡើងវិញ (ទៅនឹងសម្ពាធបរិយាកាសក្នុងតំបន់) ។
សម្រាប់ ក ឧបករណ៍ចាប់សញ្ញាសម្ពាធ, ភ្ជាប់ទៅចំណុចរង្វាស់ ហើយ (ប្រសិនបើមាន) បង្ហូរបំពង់តភ្ជាប់ណាមួយ។
សម្រាប់ ក ឧបករណ៍ចាប់សញ្ញាជម្រៅឧបករណ៍ចាប់សញ្ញាគួរតែត្រូវបានដាក់ទម្ងន់ចុះក្រោម ឬដំឡើងដោយសុវត្ថិភាពនៅផ្នែកខាងក្រោមនៃបណ្តាញទឹក ដោយប្រើឧបករណ៍ភ្ជាប់ (ឧ. បន្ទះឧបករណ៍បញ្ជូន ឬតង្កៀបយុថ្កា) ប្រសិនបើចាំបាច់។ ខ្សែក៏គួរត្រូវបានធានាសុវត្ថិភាពនៅនឹងកន្លែងផងដែរ ដើម្បីការពារកុំឱ្យទឹកហូរចេញពីសកម្មភាពលើខ្សែ ដើម្បីទាញឧបករណ៍ចាប់សញ្ញាចេញពីទីតាំង ឬភាពតានតឹងនៃការតភ្ជាប់ណាមួយ។
ដំណើរការក្រិតតាមខ្នាត (ដោយប្រើតម្លៃក្រិតពីខ្សែ)៖
មុនពេលប្រើឧបករណ៍ចាប់សញ្ញា គូអ្នកកាប់ឈើ និងឧបករណ៍ចាប់សញ្ញាត្រូវតែត្រូវបានក្រិតតាមខ្នាត ដើម្បីផ្តល់ការអានត្រឹមត្រូវ។
វិធីសាស្រ្តនេះអាចត្រូវបានប្រើដោយអ្នកដំឡើងដើម្បីផ្គូផ្គងនិងក្រិតឧបករណ៍ចាប់សញ្ញាសម្ពាធទៅឧបករណ៍កាប់ឈើ។
ឧបករណ៍ចាប់សញ្ញាសម្ពាធ/ជម្រៅដែលបានផ្គត់ផ្គង់ HWM ជាធម្មតាមានតម្លៃក្រិតដែលបង្ហាញនៅលើខ្សែ (សូមមើលឧampខាងក្រោម) ។ ប្រើ IDT ដើម្បីបន្ថែមព័ត៌មានលម្អិតពីស្លាកក្រិតតាមខ្នាតនៅលើខ្សែចូលទៅក្នុងអ្នកកាប់ឈើ ដោយប្រើការណែនាំនៅក្នុងសៀវភៅណែនាំអ្នកប្រើប្រាស់ IDT។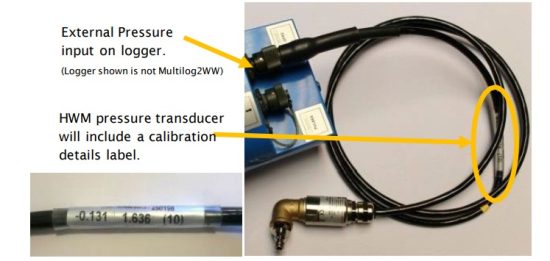
ដំណើរការក្រិតត្រូវតែកើតឡើងមុនពេលសូន្យឡើងវិញនៃឧបករណ៏សម្ពាធ។
បន្ទាប់ពីដំណើរការក្រិតតាមខ្នាត និងដំណើរការសូន្យឡើងវិញ ឧបករណ៍ប្តូរអាចមានទីតាំងនៅ (ឬសមទៅនឹង) ចំណុចរង្វាស់របស់វា។
អ្នកកាប់ឈើត្រូវតែត្រូវបានរៀបចំយ៉ាងត្រឹមត្រូវ ដើម្បីធ្វើការវាស់វែងពីឧបករណ៍ចាប់សញ្ញា។ សូមមើលការណែនាំអ្នកប្រើប្រាស់ IDT សម្រាប់ព័ត៌មានលម្អិតបន្ថែម។
ដំណើរការក្រិតតាមខ្នាត (ដោយប្រើសម្ពាធដែលបានអនុវត្ត)៖
វិធីសាស្រ្តនេះអាចត្រូវបានប្រើដោយមជ្ឈមណ្ឌលសេវាកម្មដែលមានការអនុញ្ញាតដើម្បីផ្គូផ្គង និងក្រិតឧបករណ៍ចាប់សញ្ញាសម្ពាធទៅកាន់អ្នកកាប់ឈើ។
វិធីសាស្រ្តរួមមានការអនុវត្តសម្ពាធយោងទៅឧបករណ៍ប្តូរ និងបង្កើតតារាងតម្លៃក្រិត។
ការបញ្ចូលឧបករណ៍ចាប់សញ្ញាលំហូរ (ការប្រមូលជីពចរម៉ែត្រ)
អាស្រ័យលើគំរូដែលបានផ្គត់ផ្គង់ អ្នកកាប់ឈើអាចមានលំហូរចូលពី 0 ទៅ 6។ ទាំងនេះគឺជាធាតុបញ្ចូលឌីជីថល ដែលត្រូវបានរចនាឡើងដើម្បីដឹងពីស្ថានភាពបើក ឬបិទនៃកុងតាក់ (ធ្វើឱ្យសកម្មដោយម៉ែត្រដែលបានដំឡើង)។ ដើម្បីប្រើបណ្តាញលំហូរ អ្នកកាប់ឈើត្រូវតែតំឡើង (ដោយប្រើ IDT) ដើម្បីដឹងពីអ្វីដែលជីពចរម៉ែត្រនីមួយៗតំណាងឱ្យ។
ការពន្យល់នៃបណ្តាញលំហូរ និងសញ្ញាបញ្ចូល
លំហូរនៃអង្គធាតុរាវនៅក្នុងបំពង់ជាធម្មតាត្រូវបានរកឃើញដោយម៉ែត្រ ដែលបង្កើតជីពចរទាក់ទងនឹងបរិមាណសារធាតុរាវដែលឆ្លងកាត់វា។ មានប្រភេទជាច្រើននៃម៉ែត្រ; ខ្លះអាចរកឃើញទាំងលំហូរទៅមុខ និងលំហូរបញ្ច្រាស (លំហូរទ្វេទិស); ខ្លះអាចរកឃើញលំហូរក្នុងទិសដៅតែមួយ (លំហូរតែមួយទិស)។ ដូច្នេះមានវិធីជាច្រើនក្នុងការអនុវត្តសញ្ញាទិន្នផលជីពចរម៉ែត្រពីម៉ែត្រ។ អ្នកកាប់ឈើរបស់អ្នកត្រូវតែមានចំណុចប្រទាក់ត្រឹមត្រូវ និងការកំណត់សម្រាប់សញ្ញាពីម៉ែត្រដើម្បីឱ្យត្រូវគ្នាជាមួយវា។
ជួនកាលការបញ្ចូលលំហូរ Multilog2WW ត្រូវការសញ្ញាបញ្ចូលពីរ ដើម្បីដំណើរការជាមួយសញ្ញាម៉ែត្រជីពចរនៃម៉ែត្រជាក់លាក់។ ដូច្នេះពេលខ្លះ ធាតុបញ្ចូលមួយគូអាចត្រូវបានកំណត់រចនាសម្ព័ន្ធ ដើម្បីដំណើរការជាឆានែលតែមួយ។ ប្រភេទម៉ែត្រផ្សេងទៀតត្រូវការតែសញ្ញាមួយប៉ុណ្ណោះ ដូច្នេះគូនៃធាតុបញ្ចូលអាចដំណើរការជាបណ្តាញពីរដាច់ដោយឡែកពីគ្នា។ គូនៃសញ្ញាលំហូរអាចត្រូវបានដាក់ស្លាកតាមវិធីមួយដូចខាងក្រោមៈ
| ឈ្មោះសញ្ញាជំនួស | ||||
| គូនៃសញ្ញា FLOW | ការបញ្ចូលលំហូរ 1 | លំហូរ ១ | ជីពចរ | លំហូរ (ទៅមុខ) |
| ការបញ្ចូលលំហូរ 2 | លំហូរ ១ | ទិសដៅ | លំហូរ (បញ្ច្រាស) | |
| ទូទៅ | GND | |||
ការដាក់ស្លាកអាស្រ័យលើលំនាំដើមរបស់រោងចក្រសម្រាប់ការកំណត់រចនាសម្ព័ន្ធនៃបណ្តាញលំហូរនៅលើលេខម៉ូដែល-លេខអ្នកកាប់ឈើរបស់អ្នក ប៉ុន្តែពេលខ្លះប្រភេទនៃការកំណត់រចនាសម្ព័ន្ធផ្សេងទៀតអាចត្រូវបានសម្រេចដោយការផ្លាស់ប្តូរការកំណត់អ្នកកាប់ឈើ។
កន្លែងដែលអ្នកកាប់ឈើ កំណត់រចនាសម្ព័ន្ធជាមុនដោយរោងចក្រដើម្បីផលិតតែ 1 Flow channel (ស្ទ្រីមចំណុចទិន្នន័យ) គូនៃធាតុបញ្ចូលអាចត្រូវបានប្រើក្នុងវិធីមួយក្នុងចំណោមវិធីបីផ្សេងគ្នា:
(1) បញ្ចូល 1 អាចប្រើជាមួយ a ឧបករណ៍វាស់ស្ទង់ទិសដៅតែមួយ (មួយដែលវាស់តែលំហូរទៅមុខ / ការប្រើប្រាស់) ។
សម្រាប់ប្រើក្នុងការកំណត់នេះ៖
- បញ្ចូល 1 ធ្វើសកម្មភាពដើម្បីប្រមូលជីពចរម៉ែត្រ និង
- ការបញ្ចូល 2 ជាធម្មតាត្រូវបានទុកចោល (ឬបែងចែកដើម្បីប្រើជា 'Tamper Alarm' ឬប្រើជាការបញ្ចូលស្ថានភាព)។
(2) ធាតុបញ្ចូល 1 និង 2 អាចប្រើជាគូជាមួយ a ម៉ែត្រទ្វេទិស (មួយដែលអាចវាស់ទាំងលំហូរទៅមុខ និងបញ្ច្រាស)។
សម្រាប់ប្រើក្នុងការកំណត់នេះ៖
- បញ្ចូល 1 ធ្វើសកម្មភាពដើម្បីប្រមូលជីពចរម៉ែត្រ និង
- បញ្ចូល 2 ត្រូវបានប្រើសម្រាប់ការចង្អុលបង្ហាញទិសដៅលំហូរពីម៉ែត្រ (បើក = លំហូរទៅមុខបិទ = លំហូរបញ្ច្រាស) ។
(3) ធាតុបញ្ចូល 1 និង 2 អាចត្រូវបានប្រើជាគូជាមួយម៉ែត្រ Bi-directional (មួយដែលអាចវាស់ទាំងលំហូរទៅមុខ និងបញ្ច្រាសផងដែរ)។
សម្រាប់ប្រើក្នុងការកំណត់នេះ៖
- បញ្ចូល 1 ធ្វើសកម្មភាពដើម្បីប្រមូលជីពចរម៉ែត្រ (ទិសដៅលំហូរទៅមុខ) និង
- បញ្ចូល 2 ធ្វើសកម្មភាពដើម្បីប្រមូលជីពចរម៉ែត្រ (ទិសដៅលំហូរបញ្ច្រាស) ។
កន្លែងដែលអ្នកកាប់ឈើ កំណត់រចនាសម្ព័ន្ធជាមុនដោយរោងចក្រដើម្បីផលិតបណ្តាញលំហូរចំនួន 2 (ស្ទ្រីមទិន្នន័យចំណុច) គូនៃធាតុបញ្ចូលអាចត្រូវបានប្រើជា 2 ឯករាជ្យ ឆានែលលំហូរ uni-directional បញ្ចូល (ឆានែល 1 និង 2) ។
ការបញ្ចូលនីមួយៗអាចប្រើជាមួយម៉ែត្រ Uni-directional meter (ដែលវាស់តែលំហូរទៅមុខ/ការប្រើប្រាស់)។
តាមរយៈឧបករណ៍ភ្ជាប់ Bulkhead 4-pin Logger
ការបញ្ចូលសញ្ញាលំហូរ Multilog2WW ត្រូវបានបង្ហាញនៅលើឧបករណ៍ភ្ជាប់ 4-pin ។ ឧបករណ៍ភ្ជាប់នីមួយៗមានគូនៃ Flow signal inputs។
pinout នៃឧបករណ៍ភ្ជាប់នេះត្រូវបានបង្ហាញដូចខាងក្រោម:
| ឧបករណ៍ភ្ជាប់ bulkhead pinout: 4-pin Flow Inputs | ||||
| ម្ជុល | A | B | C | D |
| សញ្ញា | (មិនបានតភ្ជាប់) | ការបញ្ចូលលំហូរ 1 | លំហូរ_GND | ការបញ្ចូលលំហូរ 2 |
ពិនិត្យមើលម៉ែត្រដែលអ្នកកាប់ឈើនឹងត្រូវភ្ជាប់ និងធានាថាវិធីសាស្ត្រផ្តល់សញ្ញាជីពចរម៉ែត្ររបស់វាត្រូវបានយល់ រួមជាមួយនឹងសារៈសំខាន់នៃជីពចរម៉ែត្រនីមួយៗ។ ភ្ជាប់អ្នកកាប់ឈើទៅនឹងលទ្ធផលជីពចររបស់ម៉ែត្រដោយប្រើខ្សែដែលសមរម្យ។ ប្រសិនបើខ្សែដែលមានកន្ទុយទទេត្រូវតែភ្ជាប់គ្នាទៅវិញទៅមក សូមមើលការណែនាំនៅក្នុងផ្នែក 5.5 ។ ប្រើ IDT ដើម្បីបញ្ចប់ការដំឡើង ធានាថាអ្នកកាប់ឈើត្រូវបានកំណត់យ៉ាងត្រឹមត្រូវដើម្បីបកស្រាយម៉ែត្រជីពចរ។ ប្រសិនបើអ្នកកាប់ឈើត្រូវបានតម្រូវឱ្យរក្សាដាននៃការបង្ហាញបញ្ជរម៉ែត្រ សូមធ្វើការអានដំបូងនៃបញ្ជរម៉ែត្រ ហើយសរសេរកម្មវិធីទៅក្នុងអ្នកកាប់ឈើ។ អ្នកកាប់ឈើបង្ហោះការប្រើប្រាស់បន្ថែមជាទៀងទាត់ ដូច្នេះការអានម៉ែត្រអាចត្រូវបានធ្វើឡើងពីចម្ងាយ។
ការភ្ជាប់ខ្សភ្លើងដែលមិនបានបិទភ្ជាប់ទៅនឹងឧបករណ៍
នៅពេលប្រើខ្សែដែលមិនមានការបិទ អ្នកដំឡើងនឹងត្រូវបានទាមទារដើម្បីធ្វើការតភ្ជាប់ដោយខ្លួនឯងទៅនឹងឧបករណ៍ផ្សេងទៀតនៅលើគេហទំព័រ។
នៅពេលធ្វើការភ្ជាប់ទៅ Multilog2WW ជាធម្មតាអ្នកត្រូវភ្ជាប់កន្ទុយទទេជាមួយគ្នា។ វាជាការសំខាន់ណាស់ដែលឧបករណ៍ភ្ជាប់មិនជ្រាបទឹកត្រូវបានប្រើប្រាស់ ដូចជាឯករភជប់ "Tuff-Splice" ដែលមានពី HWM ។ 
ចំណាំ៖ ការភ្ជាប់ទិន្នន័យយូរគួរត្រូវបានធ្វើឡើងដោយប្រើខ្សែអេក្រង់។ ការប្រើប្រាស់ខ្សែអេក្រង់នឹងធានាបាននូវការបដិសេធអតិបរមានៃការជ្រៀតជ្រែកពីប្រភពខាងក្រៅ។ តែងតែប្រើចំណុចដីរួមដោយមិនបង្កើតរង្វិលជុំដី។
ការបញ្ចូលស្ថានភាព
ម្ជុលបញ្ចូលស្ថានភាពគឺជាការប្រើប្រាស់ឡើងវិញនូវឧបករណ៍អេឡិចត្រូនិកបញ្ចូលលំហូរ (សូមមើលផ្នែក 5.4)
ការផ្លាស់ប្តូរកម្មវិធីបញ្ជាកម្មវិធីសម្រាប់ឧបករណ៍ភ្ជាប់ផ្តល់ឱ្យម្ជុលបញ្ចូលនូវមុខងារផ្សេងគ្នា។
ចំណុចប្រទាក់នឹងត្រូវបានដាក់ស្លាកថា 'ស្ថានភាព' ឬ 'ស្ថានភាពទ្វេ' ។
pinout នៃឧបករណ៍ភ្ជាប់នេះត្រូវបានបង្ហាញដូចខាងក្រោម:
| ឧបករណ៍ភ្ជាប់ bulkhead pinout: 4-pin Flow Inputs | ||||
| ម្ជុល | A | B | C | D |
| សញ្ញា | (មិនបានតភ្ជាប់) | ការបញ្ចូលលំហូរ 1 | លំហូរ_GND | ការបញ្ចូលលំហូរ 2 |
សញ្ញាបញ្ចូលស្ថានភាពអាចត្រូវបានកំណត់រចនាសម្ព័ន្ធសម្រាប់ការប្រើប្រាស់ក្នុងគោលបំណងទូទៅក្នុងការស្វែងរកទំនាក់ទំនងប្តូរ។ នេះមានការប្រើប្រាស់ជាច្រើន។
- ការរកឃើញទ្វារ / បង្អួច / ឧបករណ៍ - ការបើកទ្វារចូលសម្រាប់គោលបំណងសុវត្ថិភាព។
- ម្ជុល 'ទំនេរ' នៅលើឆានែលលំហូរអាចត្រូវបានប្រើដើម្បីបង្កើត 'tamper' alarm ក្នុងករណីដែលខ្សែ logger ត្រូវបានកាត់ ឬដកចេញពីម៉ែត្រ។ (ម៉ែត្រត្រូវតែគាំទ្រគ្រឿងបរិក្ខារនេះដោយផ្តល់រង្វិលជុំបិទជិតពី tamper បញ្ចូលទៅម្ជុលត្រឡប់ Status_GND) ។
ភ្ជាប់ឧបករណ៍កាប់ឈើទៅនឹងឧបករណ៍ខាងក្រៅដោយប្រើខ្សែដែលសមរម្យ។ ប្រសិនបើខ្សែដែលមានកន្ទុយទទេត្រូវតែភ្ជាប់គ្នាទៅវិញទៅមក សូមមើលការណែនាំនៅក្នុងផ្នែក 5.5 ។
ប្រើ IDT ដើម្បីបញ្ចប់ការដំឡើង ធានាថាអ្នកកាប់ឈើត្រូវបានកំណត់ដើម្បីបង្កើតការជូនដំណឹងដែលចង់បាន។
លទ្ធផល (កុងតាក់ឌីជីថល៖ បើក/បិទ)
លទ្ធផល Multilog2WW ត្រូវបានបង្ហាញនៅលើឧបករណ៍ភ្ជាប់ 3-pin ។
ទិន្នផលរហូតដល់បួនអាចត្រូវបានគាំទ្រ។ ឧបករណ៍ភ្ជាប់នីមួយៗមានលទ្ធផលមួយគូ។
ចំណុចប្រទាក់នឹងត្រូវបានដាក់ស្លាកថា 'ទិន្នផលទ្វេ' ។
pinout នៃឧបករណ៍ភ្ជាប់នេះត្រូវបានបង្ហាញដូចខាងក្រោម:
| ឧបករណ៍ភ្ជាប់ bulkhead pinout: លទ្ធផល 3-pin | |||
| ម្ជុល | A | B | C |
| សញ្ញា | លទ្ធផលទី ១ | លទ្ធផលទី ១ | GND |
អ្នកកាប់ឈើមិនផ្គត់ផ្គង់ថាមពលដល់ទិន្នផលទេ។ ទិន្នផលត្រូវប្រើទម្រង់នៃកុងតាក់អេឡិចត្រូនិច (ត្រង់ស៊ីស្ទ័រ) ដែលអាចបើក ឬបិទ។ នៅពេលបិទ ផ្លូវបច្ចុប្បន្ន ឬស្ថិតនៅចន្លោះម្ជុលទិន្នផល និងដី។
វ៉ុលដែលបានវាយតម្លៃអតិបរមាtagអ៊ីគឺ 12V (DC)
ចរន្តដែលបានវាយតម្លៃអតិបរមាគឺ 120mA ។
ការប្រើប្រាស់ទូទៅនៃម្ជុលទិន្នផលគឺសម្រាប់ការចម្លងជីពចរ (នៃជីពចរម៉ែត្រដែលត្រូវបានបញ្ចូលទៅក្នុងបណ្តាញលំហូរ) ។ កន្លែងដែលវាត្រូវបានអនុវត្ត៖
- Flow input 1 ត្រូវបានចម្លងទៅ Output 1
- Flow input 2 ត្រូវបានចម្លងទៅ Output 2
- Flow input 3 ត្រូវបានចម្លងទៅ Output 3
- Flow input 4 ត្រូវបានចម្លងទៅ Output 4
សញ្ញាទិន្នផលក៏អាចត្រូវបានប្រើដើម្បីធ្វើសកម្មភាពឧបករណ៍ខាងក្រៅផងដែរ។
ដើម្បីប្រើលទ្ធផល ខ្សែដែលសមរម្យគឺត្រូវបានទាមទារ (តម្រូវការពិតប្រាកដនឹងអាស្រ័យលើឧបករណ៍ដែលអ្នកកាប់ឈើកំពុងត្រូវបានប្រើប្រាស់។ ពិភាក្សាជាមួយអ្នកតំណាង HWM របស់អ្នក)។ ប្រសិនបើខ្សែដែលមានកន្ទុយទទេត្រូវភ្ជាប់គ្នាទៅវិញទៅមក សូមមើលការណែនាំនៅក្នុងផ្នែក 5.5 ។
ប្រើ IDT ដើម្បីបញ្ចប់ការដំឡើង អាស្រ័យលើកម្មវិធីរបស់អ្នកសម្រាប់លទ្ធផល។
ថ្មខាងក្រៅ
ការប្រើប្រាស់ថ្មខាងក្រៅគឺស្រេចចិត្តសម្រាប់ការដំឡើងជាច្រើន ប៉ុន្តែអាចត្រូវបានទាមទារដើម្បីគាំទ្រអ្នកកាប់ឈើដើម្បីទទួលបានរយៈពេលនៃសេវាកម្មដែលត្រូវការ។
សម្រាប់អាយុកាលថ្មល្អបំផុត សូមតំរង់ទិសថ្មខាងក្រៅតាមទិសដែលពេញចិត្ត (សូមមើលការសម្គាល់នៅលើថ្ម)។ ថ្មគឺជាឧបករណ៍ធ្ងន់។ នៅពេលដាក់ទីតាំងថ្ម សូមពិនិត្យមើលថាវាមិនខូចខ្សែ ឬបំពង់ណាមួយនៅក្នុងការដំឡើងនោះទេ។ ត្រូវប្រាកដថាថ្មមានសុវត្ថិភាពនៅក្នុងទីតាំងដំឡើងរបស់វា (ដូច្នេះវាមិនអាចធ្លាក់ចុះបានទេ) ។ បន្ទាប់មកភ្ជាប់វាទៅអ្នកកាប់ឈើ។
ការតភ្ជាប់អ្នកកាប់ឈើសម្រាប់ថ្មខាងក្រៅនឹងត្រូវបានបង្ហាញតាមរយៈឧបករណ៍ភ្ជាប់ (6-pin ឬ 10 pin) ដែលត្រូវបានចែករំលែកជាមួយចំណុចប្រទាក់កម្មវិធី (ដាក់ស្លាក "COMMS") ។
ខ្សែដែលប្រើសម្រាប់ភ្ជាប់គ្នានៃកញ្ចប់ថ្មខាងក្រៅទៅកាន់អ្នកកាប់ឈើនឹងរួមបញ្ចូលតែម្ជុលដែលត្រូវការសម្រាប់ការផ្គត់ផ្គង់ថាមពល។ ម្ជុលដែលបានកំណត់សម្រាប់គោលបំណងទំនាក់ទំនងនឹងមិនត្រូវបានបំពាក់ទេ។
ការភ្ជាប់ថ្មខាងក្រៅត្រូវតែត្រូវបានផ្តាច់ជាបណ្តោះអាសន្ន នៅពេលណាដែលខ្សែសរសេរកម្មវិធីអ្នកកាប់ឈើត្រូវភ្ជាប់។
SONICSENS3 (ឧបករណ៍ចាប់សញ្ញាចម្ងាយអ៊ុលត្រាសោន/ជម្រៅ)
កន្លែងដែលចំណុចប្រទាក់ SonicSens3 មាននៅលើអ្នកកាប់ឈើរបស់អ្នក វានឹងមានឧបករណ៍ភ្ជាប់ 6-pin ។ ចំណុចប្រទាក់ផ្តល់ថាមពល និងទំនាក់ទំនងទៅឧបករណ៍ចាប់សញ្ញា ដែលវាស់ចម្ងាយទៅផ្ទៃវត្ថុរាវ។ តាមរយៈការបញ្ចូលប៉ារ៉ាម៉ែត្រផ្សេងទៀត (ឧទាហរណ៍ចម្ងាយពីបាតនៃបណ្តាញទឹក) អ្នកកាប់ឈើអាចគណនាជម្រៅទឹក។ វាក៏អាចទាញយកបាននូវភាពខុសគ្នានៃការវាស់វែងផ្សេងទៀត ដូចជាអត្រាលំហូរ ប្រសិនបើស្ថិតនៅជិត ទំនប់បើកចំហ។ សូមមើលមគ្គុទ្ទេសក៍អ្នកប្រើប្រាស់ SonicSens-3 (MAN-153-0001) សម្រាប់ការណែនាំអំពីរបៀបដំឡើង និងដំឡើងឧបករណ៍ចាប់សញ្ញាសម្រាប់ប្រតិបត្តិការ។
ចំណាំ៖ អ្នកកាប់ឈើ Multilog2WW មិនមែនជាសំណង់ដែលមានសុវត្ថិភាពខាងក្នុងទេ ដូច្នេះហើយមិនអាចប្រើក្នុងបរិយាកាសដែលមានបរិយាកាសដែលអាចផ្ទុះបាន។
SONICSENS2 (ឧបករណ៍ចាប់សញ្ញាចម្ងាយអ៊ុលត្រាសោន/ជម្រៅ)
កន្លែងដែលចំណុចប្រទាក់ SonicSens2 មាននៅលើអ្នកកាប់ឈើរបស់អ្នក វានឹងមានឧបករណ៍ភ្ជាប់ 4-pin ។ ចំណុចប្រទាក់ផ្តល់នូវទំនាក់ទំនងទៅឧបករណ៍ចាប់សញ្ញា ដែលវាស់ចម្ងាយទៅផ្ទៃវត្ថុរាវ។ តាមរយៈការបញ្ចូលប៉ារ៉ាម៉ែត្រផ្សេងទៀត (ឧទាហរណ៍ចម្ងាយពីបាតនៃបណ្តាញទឹក) អ្នកកាប់ឈើអាចគណនាជម្រៅទឹក។ វាក៏អាចទាញយកបាននូវភាពខុសគ្នានៃការវាស់វែងផ្សេងទៀត ដូចជាអត្រាលំហូរ ប្រសិនបើស្ថិតនៅជិត ទំនប់បើកចំហ។ សូមមើលមគ្គុទ្ទេសក៍អ្នកប្រើប្រាស់ SonicSens-2 (MAN-115-0004) សម្រាប់ការណែនាំអំពីរបៀបដំឡើង និងដំឡើងឧបករណ៍ចាប់សញ្ញាសម្រាប់ប្រតិបត្តិការ។ ចំណាំ៖ អ្នកកាប់ឈើ Multilog2WW មិនមែនជាសំណង់ដែលមានសុវត្ថិភាពខាងក្នុងទេ ដូច្នេះហើយមិនអាចប្រើក្នុងបរិយាកាសដែលមានបរិយាកាសដែលអាចផ្ទុះបាន។
ការបញ្ចូលសីតុណ្ហភាព (RTD - PT100)
អ្នកកាប់ឈើអាចត្រូវបានសាងសង់ជាមួយនឹងឧបករណ៍ភ្ជាប់ 4-pin សម្រាប់ភ្ជាប់ឧបករណ៍ចាប់សញ្ញាសីតុណ្ហភាព។ ជាធម្មតាវានឹងជាឧបករណ៍ចាប់សញ្ញា PT100 RTD ។
ចំណុចប្រទាក់អ្នកកាប់ឈើនឹងត្រូវបានដាក់ស្លាកថា "TEMP" ឬស្រដៀងគ្នា) ។
pinout នៃឧបករណ៍ភ្ជាប់ត្រូវបានបង្ហាញខាងក្រោម។
| Loggerbulkhead connectorpinout : 4-pin Temperature (RTD -PT100) | |||
| A | B | C | D |
| Temp_V + | Temp_S + | Temp_V – | Temp_S – |
| Loggerbulkhead connectorpinout : 4-pin Temperature (RTD -PT100) | |||||
| A | B | C | D | E | F |
| Temp_V + | Temp_S + | Temp_V – | Temp_S – | GND / អេក្រង់ | (មិនបានតភ្ជាប់) |
ដើម្បីប្រើឧបករណ៍ចាប់សញ្ញាសីតុណ្ហភាព ការក្រិតតាមខ្នាតនៃការបញ្ចូលត្រូវបានទាមទារ។
នៅពេលបញ្ជាជាមួយឧបករណ៍ចាប់សញ្ញាសីតុណ្ហភាពពី HWM ឧបករណ៍ចាប់សញ្ញានឹងមានឧបករណ៍ភ្ជាប់ត្រឹមត្រូវសម្រាប់ឧបករណ៍កាប់ឈើ Multilog2WW ។ ការបញ្ចូលឧបករណ៍កាប់ឈើក៏នឹងត្រូវបានក្រិតតាមរោងចក្រសម្រាប់ប្រើជាមួយឧបករណ៍ចាប់សញ្ញាដែលបានផ្គត់ផ្គង់ផងដែរ។
អាណាឡូក វ៉ុលtagអ៊ី បញ្ចូល (0-1V, 0-10V)
ឧបករណ៍កាប់ឈើអាចត្រូវបានសាងសង់ជាមួយនឹងឧបករណ៍ភ្ជាប់ 4-pin សម្រាប់ភ្ជាប់ឧបករណ៍ចាប់សញ្ញាដែលប្រើវ៉ុលលទ្ធផលtagកម្រិត e ជាវិធីសាស្រ្តនៃសញ្ញា។
ទាំងចំណុចប្រទាក់បញ្ចូល 0-1V និង 0-10V មាននៅលើ Multilog2WW ប៉ុន្តែត្រូវតែបញ្ជាក់នៅពេលបញ្ជាទិញ។
អ្នកកាប់ឈើមិនផ្តល់ថាមពលដល់ឧបករណ៍ចាប់សញ្ញាទេ។ វាត្រូវតែមានប្រភពថាមពលរបស់ខ្លួន។
pinout នៃឧបករណ៍ភ្ជាប់នេះត្រូវបានបង្ហាញដូចខាងក្រោម:
| ឧបករណ៍ភ្ជាប់ bulkhead pinout របស់ Logger : Voltagអ៊ី បញ្ចូល 0-1V (& 0-10V) | ||||
| ម្ជុល | A | B | C | D |
| សញ្ញា | (មិនបានតភ្ជាប់) | 0-10V + / 0-1V + | (មិនបានតភ្ជាប់) | 0-10V - / 0-1V - |
ឧបករណ៍ចាប់សញ្ញាជាច្រើនប្រភេទមានជាមួយចំណុចប្រទាក់នេះ។
នៅពេលបញ្ជាទិញពី HWM ឧបករណ៍ចាប់សញ្ញានឹងមានឧបករណ៍ភ្ជាប់ត្រឹមត្រូវសម្រាប់ឧបករណ៍កាប់ឈើ Multilog2WW ។
កម្មវិធីដំឡើងនឹងត្រូវប្រើ IDT ដើម្បីបញ្ជាក់ ឬកែតម្រូវការកំណត់របស់អ្នកកាប់ឈើដើម្បីធ្វើមាត្រដ្ឋានឱ្យបានត្រឹមត្រូវ និងបកស្រាយប៉ារ៉ាម៉ែត្ររាងកាយដែលឧបករណ៍ចាប់សញ្ញាដែលបានភ្ជាប់ត្រូវបានប្រើដើម្បីរកឃើញ។
ការបញ្ចូលបច្ចុប្បន្នអាណាឡូក (4 ទៅ 20 mA)
អ្នកកាប់ឈើអាចត្រូវបានសាងសង់ជាមួយនឹងឧបករណ៍ភ្ជាប់ 4-pin សម្រាប់ភ្ជាប់ឧបករណ៍ចាប់សញ្ញាដែលប្រើចរន្តទិន្នផលជាវិធីសាស្ត្រនៃការផ្តល់សញ្ញា។
ចំណុចប្រទាក់ពីរប្រភេទអាចប្រើបាន៖
- អកម្ម
- សកម្ម
4-20mA (អកម្ម)
នៅពេលដែលចំណុចប្រទាក់ "អកម្ម" 4-20mA ត្រូវបានបំពាក់ អ្នកកាប់ឈើមិនផ្តល់ថាមពលដល់ឧបករណ៍ចាប់សញ្ញាទេ។ វាត្រូវតែមានប្រភពថាមពលរបស់ខ្លួន។
ចំណុចប្រទាក់អ្នកកាប់ឈើនឹងត្រូវបានដាក់ស្លាក "4-20mA" (ឬស្រដៀងគ្នា) ។
pinout នៃឧបករណ៍ភ្ជាប់នេះត្រូវបានបង្ហាញដូចខាងក្រោម:
| ឧបករណ៍ភ្ជាប់ bulkhead pinout: បញ្ចូលបច្ចុប្បន្ន (4-20mA) | |||
| A | B | C | D |
| (មិនបានតភ្ជាប់) | 4-20mA + | (មិនបានតភ្ជាប់) | 4-20mA - |
ឧបករណ៍ចាប់សញ្ញាជាច្រើនប្រភេទមានជាមួយចំណុចប្រទាក់នេះ។
នៅពេលបញ្ជាទិញពី HWM ឧបករណ៍ចាប់សញ្ញានឹងមានឧបករណ៍ភ្ជាប់ត្រឹមត្រូវសម្រាប់ឧបករណ៍កាប់ឈើ Multilog2WW ។
កម្មវិធីដំឡើងនឹងត្រូវប្រើ IDT ដើម្បីបញ្ជាក់ ឬកែតម្រូវការកំណត់របស់អ្នកកាប់ឈើដើម្បីធ្វើមាត្រដ្ឋានឱ្យបានត្រឹមត្រូវ និងបកស្រាយប៉ារ៉ាម៉ែត្ររាងកាយដែលឧបករណ៍ចាប់សញ្ញាត្រូវបានប្រើដើម្បីរក។
4-20mA (សកម្ម)
នៅពេលដែលចំណុចប្រទាក់ "សកម្ម" 4-20mA ត្រូវបានបំពាក់ អ្នកកាប់ឈើអាចផ្តល់ថាមពលដល់ឧបករណ៍ចាប់សញ្ញាដែលត្រូវគ្នា។
ចំណុចប្រទាក់អ្នកកាប់ឈើនឹងត្រូវបានដាក់ស្លាក "4-20mA (សកម្ម)" (ឬស្រដៀងគ្នា) ។
pinout នៃឧបករណ៍ភ្ជាប់នេះត្រូវបានបង្ហាញដូចខាងក្រោម:
| ឧបករណ៍ភ្ជាប់ bulkhead pinout: បញ្ចូលបច្ចុប្បន្ន (4-20mA) | |||
| A | B | C | D |
| V+ (PWR) | 4-20mA + | GND (PWR) | 4-20mA - |
ឧបករណ៍ចាប់សញ្ញាជាច្រើនប្រភេទមានជាមួយចំណុចប្រទាក់នេះ។ ទោះយ៉ាងណាក៏ដោយ មិនមែនទាំងអស់សុទ្ធតែមានតម្រូវការថាមពលដូចគ្នានោះទេ។ ឧបករណ៍ភ្ជាប់អាចផ្គត់ផ្គង់ចរន្តរហូតដល់ 50mA ។ វ៉ុលលទ្ធផលtage គឺអថេរ (ពី 6.8 V ដល់ 24.2 V ក្នុង 32 ជំហាន) ហើយអាចកំណត់ដោយប្រើ IDT ។
ដើម្បីជៀសវាងការខូចខាត៖ មុនពេលភ្ជាប់ឧបករណ៍ចាប់សញ្ញា សូមប្រើ IDT ដើម្បីធានាបាននូវវ៉ុលលទ្ធផលត្រឹមត្រូវ។tage សម្រាប់ឧបករណ៍ចាប់សញ្ញាត្រូវបានកំណត់។
អ្នកកាប់ឈើមិនផ្គត់ផ្គង់ថាមពលបន្តទៅចំណុចប្រទាក់នោះទេ ប៉ុន្តែគ្រាន់តែបើកដំណើរការវាក្នុងរយៈពេលខ្លីប៉ុណ្ណោះ ខណៈពេលដែលធ្វើការវាស់វែង។ IDT ផ្តល់សិទ្ធិចូលប្រើការគ្រប់គ្រងដើម្បីកំណត់ចំនួនពេលវេលាដែលឧបករណ៍ចាប់សញ្ញាបានប្រើថាមពលមុនពេល និងអំឡុងពេលវាស់។ កម្មវិធីដំឡើងអាចកំណត់ទាំងនេះ ដើម្បីអនុញ្ញាតឱ្យចាប់ផ្តើម ឬកំណត់ពេលវេលាដែលឧបករណ៍ចាប់សញ្ញាទាមទារ។
នៅពេលបញ្ជាទិញពី HWM ឧបករណ៍ចាប់សញ្ញានឹងមានឧបករណ៍ភ្ជាប់ត្រឹមត្រូវសម្រាប់ឧបករណ៍កាប់ឈើ Multilog2WW ។
កម្មវិធីដំឡើងនឹងត្រូវប្រើ IDT ដើម្បីបញ្ជាក់ ឬកែតម្រូវការកំណត់របស់អ្នកកាប់ឈើដើម្បីធ្វើមាត្រដ្ឋានឱ្យបានត្រឹមត្រូវ និងបកស្រាយប៉ារ៉ាម៉ែត្ររាងកាយដែលឧបករណ៍ចាប់សញ្ញាត្រូវបានប្រើដើម្បីរក។
ចំណុចប្រទាក់ក៏អាចប្រើជាមួយឧបករណ៍ចាប់សញ្ញាដែលមានប្រភពថាមពលផ្ទាល់ខ្លួនផងដែរ។
ការបញ្ចូលសៀរៀល (ចំណុចប្រទាក់ SDI-12)
អ្នកកាប់ឈើអាចត្រូវបានសាងសង់ជាមួយនឹងឧបករណ៍ភ្ជាប់ 4-pin សម្រាប់ភ្ជាប់ទៅឧបករណ៍ដែលប្រើវិធីសាស្ត្រ SDI-12 នៃការផ្តល់សញ្ញា។ នេះគឺជាចំណុចប្រទាក់ទិន្នន័យសៀរៀល។ ឧបករណ៍ខាងក្រៅជំរុញឧបករណ៍អេឡិចត្រូនិកឧបករណ៍ចាប់សញ្ញាណាមួយ; ឧបករណ៍ចាប់សញ្ញាមួយ ឬច្រើនអាចត្រូវបានភ្ជាប់ជាមួយវា។
អ្នកកាប់ឈើមិនផ្តល់ថាមពលដល់ចំណុចប្រទាក់ SDI-12 ទេ។ ឧបករណ៍/ឧបករណ៍ចាប់សញ្ញាដែលបានភ្ជាប់ត្រូវតែមានប្រភពថាមពលផ្ទាល់ខ្លួន។
ចំណុចប្រទាក់អ្នកកាប់ឈើនឹងត្រូវបានដាក់ស្លាកថា "SDI-12" (ឬស្រដៀងគ្នា) ។
pinout នៃឧបករណ៍ភ្ជាប់ត្រូវបានបង្ហាញដូចខាងក្រោម:
| ឧបករណ៍ភ្ជាប់ bulkhead pinout: SDI-12 | |||
| A | B | C | D |
| SDI-12_ទិន្នន័យ | (RS485, មិនបានប្រើ) |
Comms_GND | (RS485, មិនបានប្រើ) |
ឧបករណ៍ចាប់សញ្ញាជាច្រើនប្រភេទមានជាមួយចំណុចប្រទាក់នេះ។ នៅពេលបញ្ជាទិញពី HWM ឧបករណ៍ចាប់សញ្ញានឹងមានឧបករណ៍ភ្ជាប់ត្រឹមត្រូវសម្រាប់ឧបករណ៍កាប់ឈើ Multilog2WW ។ កំឡុងពេលដំឡើង និងដំឡើង សូមយោងទៅមគ្គុទ្ទេសក៍អ្នកប្រើប្រាស់នៃឧបករណ៍ដែលកំពុងត្រូវបានភ្ជាប់។
ចំណាំ៖ ត្រូវប្រាកដថាឧបករណ៍ចាប់សញ្ញាដែលបានភ្ជាប់មានពិធីការ SDI-12 ដែលបានជ្រើសរើស បើមិនដូច្នេះទេ ការទំនាក់ទំនងនឹងបរាជ័យ។
ដោយប្រើពិធីការ SDI-12 អ្នកកាប់ឈើអាចស្នើសុំការវាស់វែងទៅឧបករណ៍ដែលបានភ្ជាប់។ ឧបករណ៍ភ្ជាប់ឆ្លើយតបនៅពេលដែលការវាស់វែងត្រូវបានទទួល។
ឧបករណ៍ចាប់សញ្ញានឹងមានអាសយដ្ឋានដែលអ្នកកាប់ឈើត្រូវប្រើនៅពេលទំនាក់ទំនងជាមួយវា។ ការទទួលបានទិន្នន័យចាប់ផ្តើមដោយអ្នកកាប់ឈើស្នើសុំការវាស់វែង (ផ្ញើពាក្យបញ្ជា "M" ឬពាក្យបញ្ជា "C") ។
ឧបករណ៍ឧបករណ៍ចាប់សញ្ញាមួយចំនួននឹងបញ្ជូនធាតុជាច្រើននៃទិន្នន័យវាស់វែងជាប្លុក (ឧទាហរណ៍ ឧបករណ៍មួយអាចរួមបញ្ចូលឧបករណ៍ចាប់សញ្ញាជាច្រើន)។ ការរៀបចំអ្នកកាប់ឈើអាចរួមបញ្ចូលលិបិក្រមដើម្បីជ្រើសរើសទិន្នន័យដែលត្រូវការពីប្លុក។
កម្មវិធីដំឡើងនឹងត្រូវប្រើ IDT ដើម្បីបញ្ជាក់ ឬកែតម្រូវការកំណត់របស់អ្នកកាប់ឈើ ដើម្បីស្នើសុំទិន្នន័យរង្វាស់ដែលត្រូវការពីឧបករណ៍ចាប់សញ្ញា។ ការដំឡើងអ្នកកាប់ឈើគួរតែរួមបញ្ចូលអាសយដ្ឋានដែលពាក់ព័ន្ធ ពាក្យបញ្ជា និងលិបិក្រមដែលតម្រូវឱ្យចាប់ផ្តើមការវាស់វែង ហើយបន្ទាប់មកជ្រើសរើសធាតុទិន្នន័យជាក់លាក់ដែលត្រូវការ។
កម្មវិធីដំឡើងគឺតម្រូវឱ្យធ្វើមាត្រដ្ឋានឱ្យបានត្រឹមត្រូវ និងបកស្រាយប៉ារ៉ាម៉ែត្ររាងកាយដែលឧបករណ៍ចាប់សញ្ញាត្រូវបានប្រើដើម្បីរកឱ្យឃើញ។
ចំណុចប្រទាក់បញ្ចូលស៊េរី (RS485 / Modbus)
អ្នកកាប់ឈើអាចត្រូវបានសាងសង់ជាមួយនឹងឧបករណ៍ភ្ជាប់ 4-pin សម្រាប់ភ្ជាប់ឧបករណ៍ចាប់សញ្ញា
ប្រើវិធីសាស្រ្ត RS-485/MODBUS នៃការផ្តល់សញ្ញា; នេះគឺជាចំណុចប្រទាក់ទិន្នន័យសៀរៀល។
(មានជម្រើសទំហំពីរដែលប្រើសម្រាប់ឧបករណ៍ភ្ជាប់)។
កំឡុងពេលដំឡើង និងដំឡើង សូមយោងទៅមគ្គុទ្ទេសក៍អ្នកប្រើប្រាស់នៃឧបករណ៍ដែលកំពុងដំណើរការ
ភ្ជាប់។
ចំណាំ៖ សូមប្រាកដថាឧបករណ៍ចាប់សញ្ញាដែលបានភ្ជាប់មានពិធីការ RS485/MODBUS ដែលបានជ្រើសរើស បើមិនដូច្នេះទេ។
ការទំនាក់ទំនងនឹងបរាជ័យ។
ចំណុចប្រទាក់ MODBUS មានពីរប្រភេទ៖
• អកម្ម។
• សកម្ម។
សម្រាប់ចំណុចប្រទាក់អកម្ម អ្នកកាប់ឈើមិនផ្តល់ថាមពលដល់ឧបករណ៍ចាប់សញ្ញាទេ។ វាត្រូវតែមានរបស់វា។
ប្រភពថាមពលផ្ទាល់ខ្លួន។
សម្រាប់ចំណុចប្រទាក់សកម្ម អ្នកកាប់ឈើផ្តល់ថាមពលបណ្តោះអាសន្នដល់ឧបករណ៍ចាប់សញ្ញា មុនពេល (និងអំឡុងពេល) វដ្តរង្វាស់។
ប្រភេទច្រក (សកម្មឬអកម្ម) អាចត្រូវបានកំណត់ដោយការត្រួតពិនិត្យថាតើ (ឬអត់) មានវ៉ុលtage ការត្រួតពិនិត្យទិន្នផលបង្ហាញនៅក្នុង IDT ។ លើសពីនេះទៀតស្លាកឧបករណ៍ភ្ជាប់នឹង
ចង្អុលបង្ហាញ 'MODBUS' ឬ 'POWERED MODBUS' ។
ឧបករណ៍ចាប់សញ្ញាជាច្រើនប្រភេទមានជាមួយចំណុចប្រទាក់នេះ។ នៅពេលបញ្ជាទិញពី HWM ឧបករណ៍ចាប់សញ្ញានឹងមានឧបករណ៍ភ្ជាប់ត្រឹមត្រូវសម្រាប់ឧបករណ៍កាប់ឈើ Multilog2WW ។ លើសពីនេះទៀត
ប្រភេទឧបករណ៍ចាប់សញ្ញានឹងត្រូវបានសាកល្បងជាមួយអ្នកកាប់ឈើដើម្បីបញ្ជាក់ភាពឆបគ្នាសម្រាប់ការប្រើប្រាស់ដើម្បីទទួលបានការវាស់វែងជាក់លាក់។ ទោះយ៉ាងណាក៏ដោយ នេះអាចតម្រូវឱ្យជ្រើសរើសអ្នកបើកបរជាក់លាក់
សម្រាប់ឧបករណ៍ចាប់សញ្ញានៅក្នុង IDT ។
Multilog2WW ដំណើរការជាឧបករណ៍មេនៅពេលប្រើពិធីការ Modbus ។ វាផ្ញើការណែនាំអំពីការដំឡើង និងព័ត៌មានផ្សេងទៀតទៅកាន់ឧបករណ៍ចាប់សញ្ញាដែលបានភ្ជាប់
(ដែលដំណើរការក្នុងរបៀបទាសករ)។ ពិធីការរួមបញ្ចូលសមត្ថភាពក្នុងការដោះស្រាយការចុះឈ្មោះនីមួយៗដើម្បីអាន និង (អាស្រ័យលើអង្គភាពដែលបានភ្ជាប់) សរសេរទៅកាន់ការចុះឈ្មោះ។
លទ្ធផលរង្វាស់ត្រូវបានផ្តល់ជូនសម្រាប់អ្នកកាប់ឈើដោយអានពួកវាពីការចុះឈ្មោះជាក់លាក់នៅក្នុងឧបករណ៍ចាប់សញ្ញាតាមរយៈតំណ Modbus ។
ឧបករណ៍ចាប់សញ្ញានឹងមានអាសយដ្ឋានដែលអ្នកកាប់ឈើត្រូវប្រើដើម្បីកំណត់អត្តសញ្ញាណវានៅពេលទំនាក់ទំនង។ ដូច្នេះការដំឡើងឧបករណ៍កាប់ឈើគួរតែរួមបញ្ចូលអាសយដ្ឋានឧបករណ៍ចាប់សញ្ញាជា
ក៏ដូចជាព័ត៌មានលម្អិតនៃការចូលប្រើការចុះឈ្មោះ (លេខកូដមុខងារ អាសយដ្ឋានចុះឈ្មោះចាប់ផ្តើម)។
បរិមាណនៃការចុះឈ្មោះដែលត្រូវអាននឹងអាស្រ័យលើទម្រង់នៃទិន្នន័យនៅក្នុងឧបករណ៍ចាប់សញ្ញាចុះឈ្មោះ។ អ្នកកាប់ឈើអាចគ្រប់គ្រងទម្រង់ជាច្រើននៃទិន្នន័យជាលេខ (ឧទាហរណ៍ 16-bit signed, 16-bit unsigned, float, double); ទោះយ៉ាងណាក៏ដោយ ទម្រង់ទិន្នន័យដែលរំពឹងទុកត្រូវតែបញ្ជាក់នៅក្នុងការរៀបចំអ្នកកាប់ឈើ។ វានឹងធានាថាចំនួនចុះឈ្មោះដែលត្រូវការត្រូវបានអាន ហើយទិន្នន័យត្រូវបានបកស្រាយយ៉ាងត្រឹមត្រូវដោយអ្នកកាប់ឈើ។ បន្ទាប់មកទិន្នន័យដែលបានអានអាចត្រូវបានប្រើដើម្បីទទួលបានចំណុចទិន្នន័យឆានែល។
នៅពេលកំណត់អ្នកកាប់ឈើសម្រាប់ប្រើជាមួយឧបករណ៍ចាប់សញ្ញារបស់អ្នក ជាធម្មតាការកំណត់ "ទូទៅ" គឺសមរម្យ។ ទោះយ៉ាងណាក៏ដោយ ការកែប្រែខ្លះនៃប្រតិបត្តិការអ្នកកាប់ឈើត្រូវបានទាមទារសម្រាប់ជាក់លាក់
ប្រភេទនៃឧបករណ៍ចាប់សញ្ញា ដើម្បីទទួលបានអ្វីដែលល្អបំផុតពីពួកគេ។ IDT ផ្តល់នូវការគ្រប់គ្រងដើម្បីជ្រើសរើសឧបករណ៍ចាប់សញ្ញាជាក់លាក់ពីបញ្ជីមួយ។ នៅពេលជ្រើសរើស អ្នកកាប់ឈើនឹងដោះស្រាយណាមួយ។
ភាពបារម្ភនៃឥរិយាបទរបស់ឧបករណ៍ចាប់សញ្ញា ពិធីការរបស់វា ឬតម្រូវការបន្ថែមសម្រាប់ការវាស់វែងដែលកំពុងត្រូវបានអនុវត្ត (ឧទាហរណ៍ ការផ្លាស់ប្តូរព័ត៌មានបន្ថែមរវាងអ្នកកាប់ឈើ និងឧបករណ៍ឧបករណ៍ចាប់សញ្ញា)។
សូមមើលមគ្គុទ្ទេសក៍អ្នកប្រើប្រាស់ IDT ទាក់ទងនឹងរបៀបតំឡើងចំណុចប្រទាក់ RS485 / Modbus ។ នេះត្រូវតែអានដោយភ្ជាប់ជាមួយការណែនាំអ្នកប្រើប្រាស់នៃឧបករណ៍ដែលកំពុងដំណើរការ
ភ្ជាប់; វានឹងផ្តល់ព័ត៌មានអំពីរង្វាស់ដែលមានពីការចុះឈ្មោះឧបករណ៍ចាប់សញ្ញា (និងទម្រង់ជាលេខនៃទិន្នន័យ) និងរបៀបចាប់ផ្តើមចុះឈ្មោះ
អានដើម្បីទទួលបានទិន្នន័យដែលត្រូវការ។
កម្មវិធីដំឡើងគួរតែប្រើ IDT ដើម្បីបញ្ជាក់ ឬកែតម្រូវការកំណត់របស់អ្នកកាប់ឈើដែលស្នើសុំទិន្នន័យរង្វាស់ដែលត្រូវការពីឧបករណ៍ចាប់សញ្ញា។ បន្ទាប់មកប្រើ IDT ដើម្បីធ្វើមាត្រដ្ឋានឱ្យបានត្រឹមត្រូវ និងបកស្រាយប៉ារ៉ាម៉ែត្ររាងកាយដែលឧបករណ៍ចាប់សញ្ញាត្រូវបានប្រើដើម្បីរក។
RS485 / MODBUS (អកម្ម)
ចំណុចប្រទាក់អ្នកកាប់ឈើនឹងត្រូវបានដាក់ស្លាកថា "MODBUS" (ឬស្រដៀងគ្នា) ។
pinout នៃឧបករណ៍ភ្ជាប់នេះត្រូវបានបង្ហាញដូចខាងក្រោម:
| ឧបករណ៍ភ្ជាប់ bulkhead pinout : RS485 / MODBUS (អកម្ម) | |||
| A | B | C | D |
| (SDI-12, មិនបានប្រើ) |
អេស ៤៨៥_ អេ | Comms_GND | RS485_B |
ឧបករណ៍ចាប់សញ្ញាជាច្រើនប្រភេទមានជាមួយចំណុចប្រទាក់នេះ។
នៅពេលបញ្ជាទិញពី HWM ឧបករណ៍ចាប់សញ្ញានឹងមានឧបករណ៍ភ្ជាប់ត្រឹមត្រូវសម្រាប់ឧបករណ៍កាប់ឈើ Multilog2WW ។ លើសពីនេះទៀត ប្រភេទឧបករណ៍ចាប់សញ្ញានឹងត្រូវបានសាកល្បងជាមួយអ្នកកាប់ឈើ ដើម្បីបញ្ជាក់ភាពឆបគ្នាសម្រាប់ការប្រើប្រាស់ដើម្បីទទួលបានការវាស់វែងជាក់លាក់។ ទោះយ៉ាងណាក៏ដោយ វាអាចតម្រូវឱ្យជ្រើសរើសកម្មវិធីបញ្ជាជាក់លាក់សម្រាប់ឧបករណ៍ចាប់សញ្ញានៅក្នុង IDT ។
កម្មវិធីដំឡើងគួរតែប្រើ IDT ដើម្បីបញ្ជាក់ ឬកែតម្រូវការកំណត់របស់អ្នកកាប់ឈើ ដើម្បីស្នើសុំទិន្នន័យរង្វាស់ដែលត្រូវការពីឧបករណ៍ចាប់សញ្ញា។ បន្ទាប់មកប្រើ IDT ដើម្បីធ្វើមាត្រដ្ឋានឱ្យបានត្រឹមត្រូវ និងបកស្រាយប៉ារ៉ាម៉ែត្ររាងកាយដែលឧបករណ៍ចាប់សញ្ញាត្រូវបានប្រើដើម្បីរក។
RS485 / MODBUS (សកម្ម)
ចំណុចប្រទាក់អ្នកកាប់ឈើនឹងត្រូវបានដាក់ស្លាកថា "POWERED MODBUS" (ឬស្រដៀងគ្នា) ។
ចំណាំ៖ នៅពេលផ្គត់ផ្គង់ជាមួយ (និងកំណត់រចនាសម្ព័ន្ធសម្រាប់) ឧបករណ៍ចាប់សញ្ញាដែលស្គាល់ ចំណុចប្រទាក់ MODBUS អ្នកកាប់ឈើអាចត្រូវបានដាក់ស្លាកជាជម្រើសដើម្បីកំណត់អត្តសញ្ញាណឧបករណ៍ចាប់សញ្ញាខ្លួនឯង។
Examples គឺ៖
• Raven Eye
pinout នៃឧបករណ៍ភ្ជាប់នេះត្រូវបានបង្ហាញដូចខាងក្រោម:
| ឧបករណ៍ភ្ជាប់ bulkhead pinout : RS485 / MODBUS (អកម្ម) | |||
| A | B | C | D |
| V+ (PWR) | អេស ៤៨៥_ អេ | GND | RS485_B |
សម្រាប់ចំណុចប្រទាក់ 'សកម្ម' អ្នកកាប់ឈើជាធម្មតាផ្តល់ថាមពលបណ្តោះអាសន្នទៅឧបករណ៍ចាប់សញ្ញា មុនពេល (និងអំឡុងពេល) វដ្តរង្វាស់។ ឧបករណ៍ចាប់សញ្ញាដែលប្រើត្រូវតែត្រូវគ្នាជាមួយការផ្គត់ផ្គង់ថាមពល logger ទៅកាន់ចំណុចប្រទាក់ (voltage និងទិន្នផលបច្ចុប្បន្ន) ។ វាក៏ត្រូវតែស៊ីគ្នាជាមួយនឹងពេលវេលានៃការធ្វើឱ្យសកម្មថាមពល និងការផ្លាស់ប្តូរសារណាមួយ។ ពិគ្រោះជាមួយតំណាង HWM របស់អ្នកសម្រាប់ការណែនាំអំពីភាពឆបគ្នារបស់ឧបករណ៍ចាប់សញ្ញា ឬប្រសិនបើអ្នកមានតម្រូវការឧបករណ៍ចាប់សញ្ញាជាក់លាក់ណាមួយ។ ឧបករណ៍ចាប់សញ្ញាជាច្រើនប្រភេទមានជាមួយចំណុចប្រទាក់នេះ។ ទោះយ៉ាងណាក៏ដោយ មិនមែនទាំងអស់សុទ្ធតែមានតម្រូវការថាមពលដូចគ្នានោះទេ។
ដើម្បីជៀសវាងការខូចខាត សូមពិនិត្យមើលឧបករណ៍ចាប់សញ្ញាគឺត្រូវគ្នាជាមួយជួរផ្គត់ផ្គង់ថាមពលអ្នកកាប់ឈើ ហើយប្រើ IDT ដើម្បីពិនិត្យមើលថាការកំណត់ថាមពលរបស់អ្នកកាប់ឈើត្រូវបានកំណត់យ៉ាងត្រឹមត្រូវមុនពេលភ្ជាប់។
- ចំណុចប្រទាក់អាចផ្គត់ផ្គង់ចរន្តរហូតដល់ 50mA ។
- វ៉ុលលទ្ធផលtage អាចត្រូវបានកំណត់ដោយប្រើ IDT (ពី 6.8 V ដល់ 24.2 V ក្នុង 32 ជំហាន)។
IDT ផ្តល់សិទ្ធិចូលប្រើការគ្រប់គ្រងដើម្បីកំណត់ចំនួនពេលវេលាដែលឧបករណ៍ចាប់សញ្ញាបានប្រើថាមពលមុនពេល និងអំឡុងពេលវាស់។ កម្មវិធីដំឡើងអាចកំណត់ទាំងនេះ ដើម្បីអនុញ្ញាតឱ្យចាប់ផ្តើម ឬកំណត់ពេលវេលាដែលឧបករណ៍ចាប់សញ្ញាទាមទារ។
នៅពេលបញ្ជាទិញពី HWM ឧបករណ៍ចាប់សញ្ញានឹងមានឧបករណ៍ភ្ជាប់ត្រឹមត្រូវសម្រាប់ឧបករណ៍កាប់ឈើ Multilog2WW ។ លើសពីនេះទៀត ប្រភេទឧបករណ៍ចាប់សញ្ញានឹងត្រូវបានសាកល្បងជាមួយអ្នកកាប់ឈើ ដើម្បីបញ្ជាក់ភាពឆបគ្នាសម្រាប់ការប្រើប្រាស់ដើម្បីទទួលបានការវាស់វែងជាក់លាក់។ ទោះយ៉ាងណាក៏ដោយ វាអាចតម្រូវឱ្យជ្រើសរើសកម្មវិធីបញ្ជាជាក់លាក់សម្រាប់ឧបករណ៍ចាប់សញ្ញានៅក្នុង IDT ។
កម្មវិធីដំឡើងគួរតែប្រើ IDT ដើម្បីបញ្ជាក់ ឬកែតម្រូវការកំណត់របស់អ្នកកាប់ឈើ ដើម្បីស្នើសុំទិន្នន័យរង្វាស់ដែលត្រូវការពីឧបករណ៍ចាប់សញ្ញា។ បន្ទាប់មកប្រើ IDT ដើម្បីធ្វើមាត្រដ្ឋានឱ្យបានត្រឹមត្រូវ និងបកស្រាយប៉ារ៉ាម៉ែត្ររាងកាយដែលឧបករណ៍ចាប់សញ្ញាត្រូវបានប្រើដើម្បីរក។
ការដំឡើងអង់តែន និងការធ្វើតេស្តទំនាក់ទំនងកោសិកា
អង់តែនគួរតែត្រូវបានជ្រើសរើសឱ្យសមនឹងទំហំដែលមាននៅក្នុងអង្គជំនុំជម្រះ ដោយអនុញ្ញាតឱ្យមានកន្លែងខ្លះសម្រាប់ដាក់ទីតាំងឡើងវិញ (ប្រសិនបើចាំបាច់)។ ប្រើតែអង់តែនដែលផ្តល់ដោយ HWM ជាមួយអ្នកកាប់ឈើរបស់អ្នកប៉ុណ្ណោះ ដើម្បីធានាថាចំណុចប្រទាក់វិទ្យុបំពេញតាមតម្រូវការការអនុម័ត (សុវត្ថិភាព។ល។)។
អ្នកកាប់ឈើ Multilog2WW ប្រើឧបករណ៍ភ្ជាប់អង់តែនរចនាប័ទ្មប្លាស្ទិក។
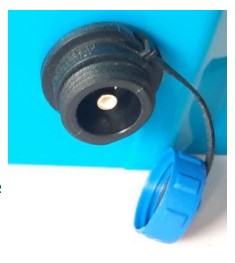
មុនពេលភ្ជាប់អង់តែន ដោះមួកការពារចេញ ហើយត្រូវប្រាកដថាឧបករណ៍ភ្ជាប់ស្ងួត និងជម្រះភាពកខ្វក់ និងកំទេចកំទី។ សំណើម ឬសារធាតុកខ្វក់អាចបង្ខូចដំណើរការអង់តែន។ សម្អាតប្រសិនបើចាំបាច់។
បញ្ចូលឧបករណ៍ភ្ជាប់អង់តែនទៅក្នុងការតភ្ជាប់អ្នកកាប់ឈើ ហើយបន្ទាប់មក (ដំបូងត្រូវប្រាកដថាខ្សែភ្ជាប់ត្រូវបានភ្ជាប់យ៉ាងត្រឹមត្រូវ) រឹតបន្តឹងគ្រាប់ជ័រជ័រដោយប្រុងប្រយ័ត្ន ដើម្បីធានាអង់តែនទៅនឹងឧបករណ៍ភ្ជាប់អ្នកកាប់ឈើ។
គ្រាប់នៅលើអង់តែនគួរតែតឹងម្រាមដៃ។
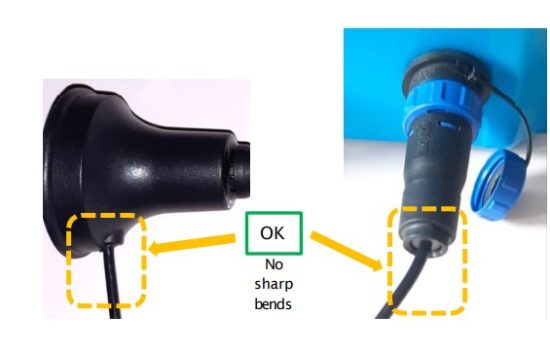
មិនគួរមានពត់មុតស្រួចនៅចុងខ្សែ ឬនៅក្នុងផ្លូវនៃខ្សែអង់តែននោះទេ។
ដើម្បីជៀសវាងហានិភ័យនៃការខូចខាតដល់ខ្សែអង់តែន សូមពិនិត្យមើលថាគ្មានឧបករណ៍ណាមួយត្រូវបានដាក់នៅលើវាទេ។
ស្រដៀងគ្នានេះដែរ ការភ្ជាប់ខ្សែដែលជួសជុលខ្សែនៅនឹងកន្លែងមិនគួរតឹងពេកទេ។
អង់តែនមិនគួរពត់ដើម្បីឱ្យសមនឹងការដំឡើង; ប្រសិនបើវាធំពេកសម្រាប់អង្គជំនុំជម្រះ សូមប្រើប្រភេទ HWM តូចជាងដែលត្រូវបានអនុម័ត
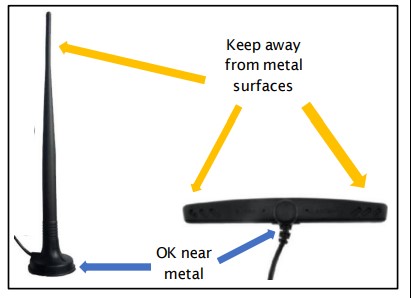
អង់តែន។ នៅពេលកំណត់ទីតាំងអង់តែន សូមប្រាកដថាចុងវិទ្យុសកម្មនៃអង់តែនមិនប៉ះ ឬចូលទៅជិតផ្ទៃដែក។ ធាតុវិទ្យុសកម្មនៃអង់តែនគួរតែត្រូវបានដាក់តាមឧត្ដមគតិនៅក្នុងខ្យល់ទំនេរ (មិនមានការស្ទះ) ។
ព្យាយាមជៀសវាងការដាក់អង់តែននៅកន្លែងដែលវាអាចជន់លិច។ ប្រសិនបើវាជៀសមិនរួច ចូរដាក់វានៅកន្លែងដែលមានហានិភ័យអប្បបរមា។
សម្រាប់ឧបករណ៍ដែលត្រូវបានដំឡើងនៅក្នុងបន្ទប់ក្រោមកម្រិតដី អង់តែនគួរតែត្រូវបានដាក់នៅពីលើកម្រិតដីប្រសិនបើអាចធ្វើទៅបាន។ នៅកន្លែងដែលមិនអាចធ្វើទៅរួច ដាក់វានៅជិតផ្នែកខាងលើនៃបន្ទប់។
IDT គួរតែត្រូវបានប្រើដើម្បីពិនិត្យមើលថាអ្នកកាប់ឈើអាចភ្ជាប់ទៅបណ្តាញកោសិកា ហើយអង់តែនស្ថិតនៅក្នុងទីតាំងល្អបំផុតសម្រាប់គេហទំព័រ។
• ជ្រើសរើសអង់តែនដែលសមរម្យសម្រាប់ការដំឡើង ហើយសម្រេចចិត្តលើទីតាំងដំបូងរបស់វា។
• កំណត់បច្ចេកវិជ្ជាបណ្តាញដែលកំពុងប្រើប្រាស់ និងដែនកំណត់គុណភាពសញ្ញាសមស្របដែលគួរប្រើ (សូមមើលការណែនាំអ្នកប្រើប្រាស់ IDT)។
• ធ្វើតេស្ដសញ្ញាបណ្តាញ ដើម្បីបញ្ជាក់ថាអ្នកកាប់ឈើភ្ជាប់ទៅបណ្តាញទូរស័ព្ទចល័ត និងស្វែងរកទីតាំងល្អបំផុតនៃអង់តែន។
• អនុវត្តការហៅទូរសព្ទសាកល្បង ដើម្បីបញ្ជាក់ថាអ្នកកាប់ឈើអាចទំនាក់ទំនងជាមួយម៉ាស៊ីនមេ Data Gate តាមរយៈអ៊ីនធឺណិត និង (ប្រសិនបើចាំបាច់ / មាន) SMS ។
(ព័ត៌មានលម្អិតនៃការប្រើប្រាស់ IDT សម្រាប់ការធ្វើតេស្តទាំងនេះត្រូវបានផ្តល់ជូននៅក្នុងកម្មវិធី IDT user-guide)។
ដោះស្រាយបញ្ហាការបរាជ័យក្នុងការហៅទូរសព្ទសាកល្បង ប្រសិនបើចាំបាច់ ធ្វើតាមការណែនាំនៅក្នុងការណែនាំអ្នកប្រើប្រាស់កម្មវិធី IDT។ ព័ត៌មានបន្ថែមត្រូវបានផ្តល់ឱ្យនៅក្នុងការណែនាំអំពីការដំឡើងអង់តែន HWM (MAN-072-0001) និងនៅលើ webទំព័រ https://www.hwmglobal.com/antennas-support/ រក្សាឱ្យឆ្ងាយពីផ្ទៃលោហៈ OK នៅជិតលោហៈ មិនមានពត់មុត OK ដំបូន្មានទូទៅមួយចំនួនត្រូវបានផ្តល់ឱ្យខាងក្រោម៖
អង់តែនម៉ូណូប៉ូល។
សម្រាប់ការដំឡើងភាគច្រើន អង់តែន monopole នឹងផ្តល់នូវដំណើរការដែលអាចទទួលយកបាន។ ការពិចារណាលើការដំឡើង៖
- អង់តែនមានមូលដ្ឋានម៉ាញេទិកដែលត្រូវប្រើសម្រាប់ម៉ោន។
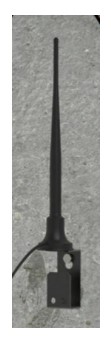
- សម្រាប់ដំណើរការល្អបំផុត អង់តែនត្រូវការ "យន្តហោះដី" (ផ្ទៃលោហៈ)។ ពិចារណាការដំឡើងតង្កៀបដែកដែលធ្វើពីវត្ថុធាតុដែកដើម្បីភ្ជាប់មូលដ្ឋានម៉ាញ៉េទិចនៃអង់តែន ប្រសិនបើចន្លោះអនុញ្ញាត ឬកម្លាំងសញ្ញាគឺរឹម។
- នៅពេលដំឡើងអង់តែននៅក្នុងបន្ទប់ក្រោមដីដ៏ធំវាគួរតែត្រូវបានដាក់នៅជិតផ្ទៃ។
- ត្រូវប្រាកដថាគម្របបន្ទប់ណាមួយនឹងមិនជ្រៀតជ្រែកជាមួយអង់តែន ឬខ្សែនៅពេលបើក/បិទ។
- អង់តែននេះមានរាងប៉ូលបញ្ឈរ វាគួរតែត្រូវបានដំឡើងក្នុងទិសបញ្ឈរជានិច្ច។
- កុំពត់ធាតុវិទ្យុសកម្មនៃអង់តែន។
- អង់តែនក៏អាចត្រូវបានភ្ជាប់ជាមួយតង្កៀបដំឡើងដែលបានភ្ជាប់ទៅនឹងបង្គោលសម្គាល់ដែលមានស្រាប់។
- នៅកន្លែងដែលអង់តែនត្រូវដាក់នៅនឹងកន្លែងដោយមេដែក ត្រូវប្រាកដថាទម្ងន់នៃខ្សែណាមួយមិនផ្ទុកមេដែកខ្លាំងពេក ដើម្បីដកវាចេញពីទីតាំងដែលបានដំឡើង។
- មិនត្រូវអនុញ្ញាតឱ្យឧបករណ៍ណាមួយសម្រាកនៅលើឧបករណ៍ភ្ជាប់អង់តែននោះទេ ព្រោះការខូចខាតដល់ឧបករណ៍ភ្ជាប់ ឬខ្សែអង់តែនអាចបណ្តាលឱ្យខូចខាត។
សម្រាប់ជម្រើសអង់តែនផ្សេងទៀត និងការណែនាំអំពីការដំឡើងបន្ថែម សូមមើលឯកសារដែលមាននៅលើជំនួយ webទំព័រ៖ https://www.hwmglobal.com/antennas-support/ ការដោះស្រាយបញ្ហាការបរាជ័យនៃការធ្វើតេស្តការហៅទូរសព្ទ មានហេតុផលមួយចំនួនដែលការធ្វើតេស្តហៅអាចបរាជ័យ។
ចំណុចខាងក្រោមគួរតែត្រូវបានពិនិត្យមុនពេលហៅជំនួយ HWM សម្រាប់ជំនួយ៖ -
| បញ្ហាដែលអាចកើតមាន | ដំណោះស្រាយ |
| បណ្តាញរវល់ដោយសារចរាចរណ៍ច្រើនពេក។ ជាធម្មតាកើតឡើងនៅជុំវិញសាលារៀន និងនៅពេលធ្វើដំណើរខ្ពស់បំផុត។ | សាកល្បងម្តងទៀតបន្ទាប់ពីពីរបីនាទី។ |
| សញ្ញាបណ្តាញមិនមាននៅទីតាំងរបស់អ្នកទេ។ មិនមែនកោសិកាក្រឡាទាំងអស់មានចរាចរណ៍ទិន្នន័យទេ។ | ផ្លាស់ប្តូរទីតាំងអ្នកកាប់ឈើទៅតំបន់ដែលមានសេវាកម្មទិន្នន័យ ឬប្តូរទៅអ្នកផ្តល់បណ្តាញផ្សេង |
| សញ្ញាបណ្តាញមិនខ្លាំងគ្រប់គ្រាន់ទេ។ សម្រាប់ 2G, 3G អ្នកត្រូវការ CSQ (រាយការណ៍ដោយការធ្វើតេស្ត Call) យ៉ាងហោចណាស់ 8 សម្រាប់ទំនាក់ទំនងដែលអាចទុកចិត្តបាន។ សម្រាប់បណ្តាញ 4G សូមពិនិត្យមើលតម្លៃ RSRP និង RSRQ គឺសមរម្យ ដូចដែលបានពិពណ៌នានៅក្នុងការណែនាំអ្នកប្រើប្រាស់ IDT | ផ្លាស់ប្តូរទីតាំងអង់តែនប្រសិនបើអាចធ្វើទៅបាន ឬសាកល្បងការកំណត់រចនាសម្ព័ន្ធអង់តែនជំនួស។ |
| ការកំណត់ APN មិនត្រឹមត្រូវ។ | ពិនិត្យជាមួយប្រតិបត្តិករបណ្តាញរបស់អ្នកថាអ្នកមានការកំណត់ត្រឹមត្រូវសម្រាប់ស៊ីមរបស់អ្នក។ |
ប្រសិនបើអ្នកបន្តជួបប្រទះបញ្ហាជាមួយនឹងការទំនាក់ទំនង អ្នកប្រហែលជាត្រូវពិនិត្យមើលការគ្របដណ្តប់បណ្តាញនៅក្នុងទីតាំងរបស់អ្នក។
ការដោះស្រាយបញ្ហា
បញ្ហាណាមួយគួរតែពិចារណាផ្នែកទាំងអស់នៃប្រព័ន្ធ (IDT អ្នកប្រើប្រាស់ អ្នកកាប់ឈើ ឧបករណ៍ចាប់សញ្ញា បណ្តាញកោសិកា និងម៉ាស៊ីនមេ)។
ការត្រួតពិនិត្យទូទៅ៖
ការត្រួតពិនិត្យដំបូងដែលត្រូវធ្វើក្នុងអំឡុងពេលចូលមើលគេហទំព័ររួមមាន:
- ពិនិត្យមើលថាតើកំណែ IDT ដែលអ្នកកំពុងប្រើ (កម្មវិធី IDT សម្រាប់ឧបករណ៍ចល័ត / IDT សម្រាប់ Windows PC) គាំទ្រលក្ខណៈពិសេស និងឧបករណ៍ចាប់សញ្ញាដែលអ្នកកំពុងប្រើ។ យោងទៅផ្នែក 8 ។
- ពិនិត្យមើលថាកំណែចុងក្រោយបំផុតរបស់ IDT កំពុងត្រូវបានប្រើប្រាស់។
- ពិនិត្យមើលថាអ្នកកាប់ឈើដែលកំពុងប្រើមានកម្មវិធីចុងក្រោយបំផុត (IDTwill ផ្តល់ជូនដើម្បីធ្វើឱ្យប្រសើរឡើងប្រសិនបើចាំបាច់) ។
- ពិនិត្យវ៉ុលថ្មtage of logger គឺល្អ (ដោយប្រើ IDT Hardware Test)។
- ពិនិត្យមើលខ្សែ និងឧបករណ៍ភ្ជាប់រវាងឧបករណ៍ចាប់សញ្ញា និងអ្នកកាប់ឈើស្ថិតក្នុងស្ថានភាពយល់ព្រម ដោយគ្មានការខូចខាត ឬទឹកចូល។
អ្នកកាប់ឈើហាក់ដូចជាមិនអាចទំនាក់ទំនងជាមួយ IDT បានទេ៖
- ពិនិត្យមើលផ្លូវទំនាក់ទំនងពីឧបករណ៍ម៉ាស៊ីន IDT ទៅកាន់អ្នកកាប់ឈើបានបញ្ចប់។ (សូមមើលផ្នែក 2.8 ។ )
- ប្រសិនបើប្រើវិធីភ្ជាប់ខ្សែដោយផ្ទាល់ជាមួយ IDT (PC) អ្នកកាប់ឈើអាចនឹងបិទការភ្ជាប់ទៅ IDT ដោយសារតែមិនត្រូវបានប្រើអស់រយៈពេលជាច្រើននាទី។ អានការកំណត់អ្នកកាប់ឈើឡើងវិញទៅក្នុង IDT ។ រាល់ការកំណត់ដែលមិនបានរក្សាទុកពីមុននឹងត្រូវបាត់បង់។
- ប្រសិនបើប្រើកម្មវិធី IDT ការអនុញ្ញាតឱ្យប្រើខ្សែអាចផុតកំណត់ហើយ។ ផ្ដាច់ចុង USB-A នៃខ្សែកម្មវិធី ហើយភ្ជាប់ម្តងទៀតពីរបីវិនាទីក្រោយ។ ផ្តល់ការអនុញ្ញាតឱ្យប្រើខ្សែ ហើយបន្ទាប់មកអានការកំណត់អ្នកកាប់ឈើឡើងវិញទៅក្នុង IDT។ រាល់ការកំណត់ដែលមិនបានរក្សាទុកពីមុននឹងត្រូវបាត់បង់។
ទិន្នន័យពីអ្នកកាប់ឈើមិនបង្ហាញនៅលើម៉ាស៊ីនមេទេ៖
- ពិនិត្យមើលការកំណត់សម្រាប់ស៊ីមកាត ដើម្បីចូលប្រើបណ្តាញទិន្នន័យចល័ត។
- ត្រូវប្រាកដថាអ្នកកាប់ឈើប្រើគោលដៅទិន្នន័យត្រឹមត្រូវ។ URL និងលេខច្រកសម្រាប់ម៉ាស៊ីនមេរបស់អ្នក។
- ពិនិត្យម៉ោងហៅចូលត្រូវបានកំណត់។
- ពិនិត្យអង់តែនត្រូវបានភ្ជាប់ ហើយស្ថិតក្នុងស្ថានភាពយល់ព្រម។
ពិនិត្យគុណភាពសញ្ញា និងប៉ារ៉ាម៉ែត្រកម្លាំងគឺសមរម្យ។ កំណត់ទីតាំងអង់តែនឡើងវិញ ប្រសិនបើចាំបាច់ ឬសាកល្បងប្រភេទអង់តែនជំនួស។ - ធ្វើតេស្តការហៅទូរសព្ទ ហើយបញ្ជាក់យល់ព្រម។
- ត្រូវប្រាកដថាម៉ាស៊ីនមេរបស់អ្នកត្រូវបានកំណត់រចនាសម្ព័ន្ធត្រឹមត្រូវដើម្បីទទួល និងបង្ហាញទិន្នន័យ។
ថែទាំ សេវាកម្ម និងជួសជុល
សេវាកម្មដែលគ្មានការអនុញ្ញាតនឹងចាត់ទុកជាមោឃៈនូវការធានា និងការទទួលខុសត្រូវដែលអាចកើតមានចំពោះ HWM-Water Ltd.
ការសម្អាត
ចំណាំការព្រមានអំពីសុវត្ថិភាពដែលអាចអនុវត្តបានចំពោះការសម្អាត។ អង្គភាពអាចត្រូវបានសម្អាតដោយប្រើដំណោះស្រាយសម្អាតកម្រិតស្រាល និងការផ្សាយពាណិជ្ជកម្មamp ក្រណាត់ទន់។ តែងតែរក្សាឧបករណ៍ភ្ជាប់ដោយមិនមានភាពកខ្វក់ និងសំណើម។
គ្រឿងបន្លាស់ដែលអាចជំនួសបាន។
អង់តែន
• ប្រើតែអង់តែនដែលបានណែនាំ និងផ្តល់ដោយ HWM ប៉ុណ្ណោះ។
សម្រាប់ព័ត៌មានលម្អិតនៃជម្រើសអង់តែន និងលេខផ្នែកដែលត្រូវបញ្ជាទិញ សូមមើលតំណខាងក្រោម៖ https://www.hwmglobal.com/antennas-support/ (ឬពិគ្រោះជាមួយតំណាង HWM របស់អ្នក)។
ថ្ម
- ប្រើតែថ្ម និងផ្នែកដែលត្រូវបានណែនាំ និងផ្តល់ដោយ HWM ប៉ុណ្ណោះ។
- ថ្មអាចផ្លាស់ប្តូរបានដោយមជ្ឈមណ្ឌលសេវាកម្មដែលបានអនុម័តដោយ HWM ឬអ្នកបច្ចេកទេសដែលបានទទួលការបណ្តុះបណ្តាលពាក់ព័ន្ធប៉ុណ្ណោះ។ ទាក់ទងតំណាង HWM របស់អ្នកសម្រាប់ព័ត៌មានលម្អិតប្រសិនបើចាំបាច់។
- ថ្មអាចត្រូវបានត្រលប់ទៅ HWM វិញសម្រាប់ការចោល។ ដើម្បីរៀបចំការត្រឡប់មកវិញ សូមបំពេញទម្រង់ RMA លើបណ្តាញ (ការអនុញ្ញាតសម្ភារៈត្រឡប់មកវិញ)៖ https://www.hwmglobal.com/hwm-rma/
សូមមើលការព្រមានអំពីសុវត្ថិភាព និងការអនុម័តព័ត៌មានសម្រាប់ការណែនាំអំពីតម្រូវការវេចខ្ចប់។
សុីមកាត
- ស៊ីមកាតអាចជំនួសបានដោយមជ្ឈមណ្ឌលសេវាកម្មដែលបានអនុម័តដោយ HWM ឬអ្នកបច្ចេកទេសដែលបានទទួលការបណ្តុះបណ្តាលពាក់ព័ន្ធ។
- ប្រើតែផ្នែកប្រើប្រាស់ដែលបានណែនាំ និងផ្តល់ដោយ HWM ប៉ុណ្ណោះ។
ការត្រលប់មកវិញនូវផលិតផលសម្រាប់សេវាកម្ម ឬជួសជុល
នៅពេលប្រគល់ផលិតផលមកវិញសម្រាប់ការស៊ើបអង្កេត ឬជួសជុល ត្រូវប្រាកដថាធ្វើតាមការណែនាំរបស់អ្នកចែកចាយរបស់អ្នក ដើម្បីចងក្រងឯកសារអំពីមូលហេតុដែលផលិតផលត្រូវបានប្រគល់មកវិញ និងផ្តល់ព័ត៌មានលម្អិតទំនាក់ទំនង។
ប្រសិនបើត្រលប់ទៅ HWM នេះអាចត្រូវបានធ្វើដោយបំពេញទម្រង់ RMA លើបណ្តាញ៖
https://www.hwmglobal.com/hwm-rma/
មុនពេលដឹកជញ្ជូន សូមដាក់គ្រឿងបរិក្ខារទៅក្នុងរបៀបដឹកជញ្ជូន (សូមមើលការណែនាំអ្នកប្រើប្រាស់ IDT)។ សូមមើលការព្រមានអំពីសុវត្ថិភាព និងការអនុម័តព័ត៌មានសម្រាប់ការណែនាំអំពីតម្រូវការវេចខ្ចប់។
ប្រសិនបើកខ្វក់ សូមប្រាកដថាគ្រឿងត្រូវបានសម្អាតជាមួយនឹងដំណោះស្រាយសម្អាតស្រាល និងជក់ទន់ លាងជម្រះមេរោគ និងស្ងួតមុនពេលដឹកជញ្ជូន។
ឧបសម្ព័ន្ធទី 1៖ ប្រព័ន្ធ និងលក្ខណៈពិសេសដែលត្រូវការ IDT (PC)
ជាប្រវត្តិសាស្ត្រ ការរៀបចំអ្នកកាប់ឈើ Multilog2WW ត្រូវបានអនុវត្តដោយប្រើឧបករណ៍ IDT (PC/Windows) ។ ការដំឡើងមុខងារអ្នកកាប់ឈើ Multilog2WW ភាគច្រើនសម្រាប់ឆានែលសម្ពាធ និងលំហូរ និងប្រភេទសំឡេងរោទិ៍ដែលប្រើញឹកញាប់បំផុតថ្មីៗនេះត្រូវបានណែនាំទៅឧបករណ៍ IDT (កម្មវិធីទូរស័ព្ទ) ។ ទោះយ៉ាងណាក៏ដោយ IDT (កម្មវិធីទូរស័ព្ទ) មិនទាន់គាំទ្រស្ថានភាពមួយចំនួននៅឡើយ។
ការរួមបញ្ចូលគ្នានៃអ្នកកាប់ឈើ/ឧបករណ៍ចាប់សញ្ញាខាងក្រោមទាមទារ IDT (PC) សម្រាប់ការដំឡើង៖
- Multilog2WW ដោយប្រើឧបករណ៍ចាប់សញ្ញា SonicSens2 ។
- Multilog2WW ដោយប្រើឧបករណ៍ចាប់សញ្ញា SonicSens3 ។
- Multilog2WW ដោយប្រើឧបករណ៍ចាប់សញ្ញា RS485/MODBUS ។
- Multilog2WW ដោយប្រើឧបករណ៍ចាប់សញ្ញា SDI-12 ។
មុខងារអ្នកកាប់ឈើខាងក្រោមទាមទារ IDT (PC) សម្រាប់ការដំឡើង៖
- អាប់ដេតកម្មវិធីបង្កប់របស់ logger ឬឧបករណ៍ចាប់សញ្ញាដែលបានភ្ជាប់។
- លក្ខណៈពិសេសនៃការកត់ត្រារហ័ស (Pressure Transient, Enhanced Network loggging) ។
- អត្រាលំហូរ (នៅពេលគណនាពីល្បឿនលំហូរ ជម្រៅឆានែល ធរណីមាត្រឆានែល) ។
- គាំទ្រfile សំឡេងរោទិ៍។
- Tampសំឡេងរោទិ៍

ប្រព័ន្ធអភិរក្សសារធាតុរាវ
ឆ្នាំ 1960 ផ្លូវ Old Gatesburg
ឈុត ១១០
មហាវិទ្យាល័យរដ្ឋ PA, 16803
៨៦៦-៤៤៧-២១៩៤
www.fluidconservation.com
© HWM-Water Limited ។ ឯកសារនេះគឺជាកម្មសិទ្ធិរបស់ក្រុមហ៊ុន HWM-Water Ltd. ហើយមិនត្រូវចម្លង ឬបង្ហាញទៅកាន់ភាគីទីបីដោយគ្មានការអនុញ្ញាតពីក្រុមហ៊ុនឡើយ។ រូបភាព អត្ថបទ និងការរចនាទាំងអស់ត្រូវបានការពារដោយច្បាប់ចម្លងអន្តរជាតិ និងចក្រភពអង់គ្លេស ហើយនៅតែជាកម្មសិទ្ធិរបស់ HWM-Water ។ វាផ្ទុយនឹងច្បាប់ក្នុងការចម្លង ឬប្រើប្រាស់ខ្លឹមសារណាមួយពី HWM webគេហទំព័រ ឬអក្សរសិល្ប៍ដោយគ្មានការយល់ព្រមជាលាយលក្ខណ៍អក្សរពី HWM-Water ។ HWM-Water Ltd រក្សាសិទ្ធិក្នុងការផ្លាស់ប្តូរការបញ្ជាក់។
MAN-147-0004-D
ឯកសារ/ធនធាន
 |
FCS MAN-147-0004 Multilog WW Evice គឺជាកម្មវិធីកត់ត្រាទិន្នន័យពហុគោលបំណង [pdf] សៀវភៅណែនាំអ្នកប្រើប្រាស់ MAN-147-0004 Multilog WW Evice គឺជា Multilog WW Evice គឺជា Multilog Data Logger, MAN-147-0004, Multilog WW Evice គឺជា Multilog Data Logger, Evice is Multi Purpose Data Logger, Multi Purpose Data Logger, Purpose Data Logger, Data Logger |