1. សេចក្តីផ្តើម
Thank you for choosing the Linique 36-inch Bathroom Vanity with Sink Combo Set. This manual provides essential information for the safe assembly, installation, operation, and maintenance of your new vanity. Please read all instructions carefully before beginning assembly and retain this manual for future reference.
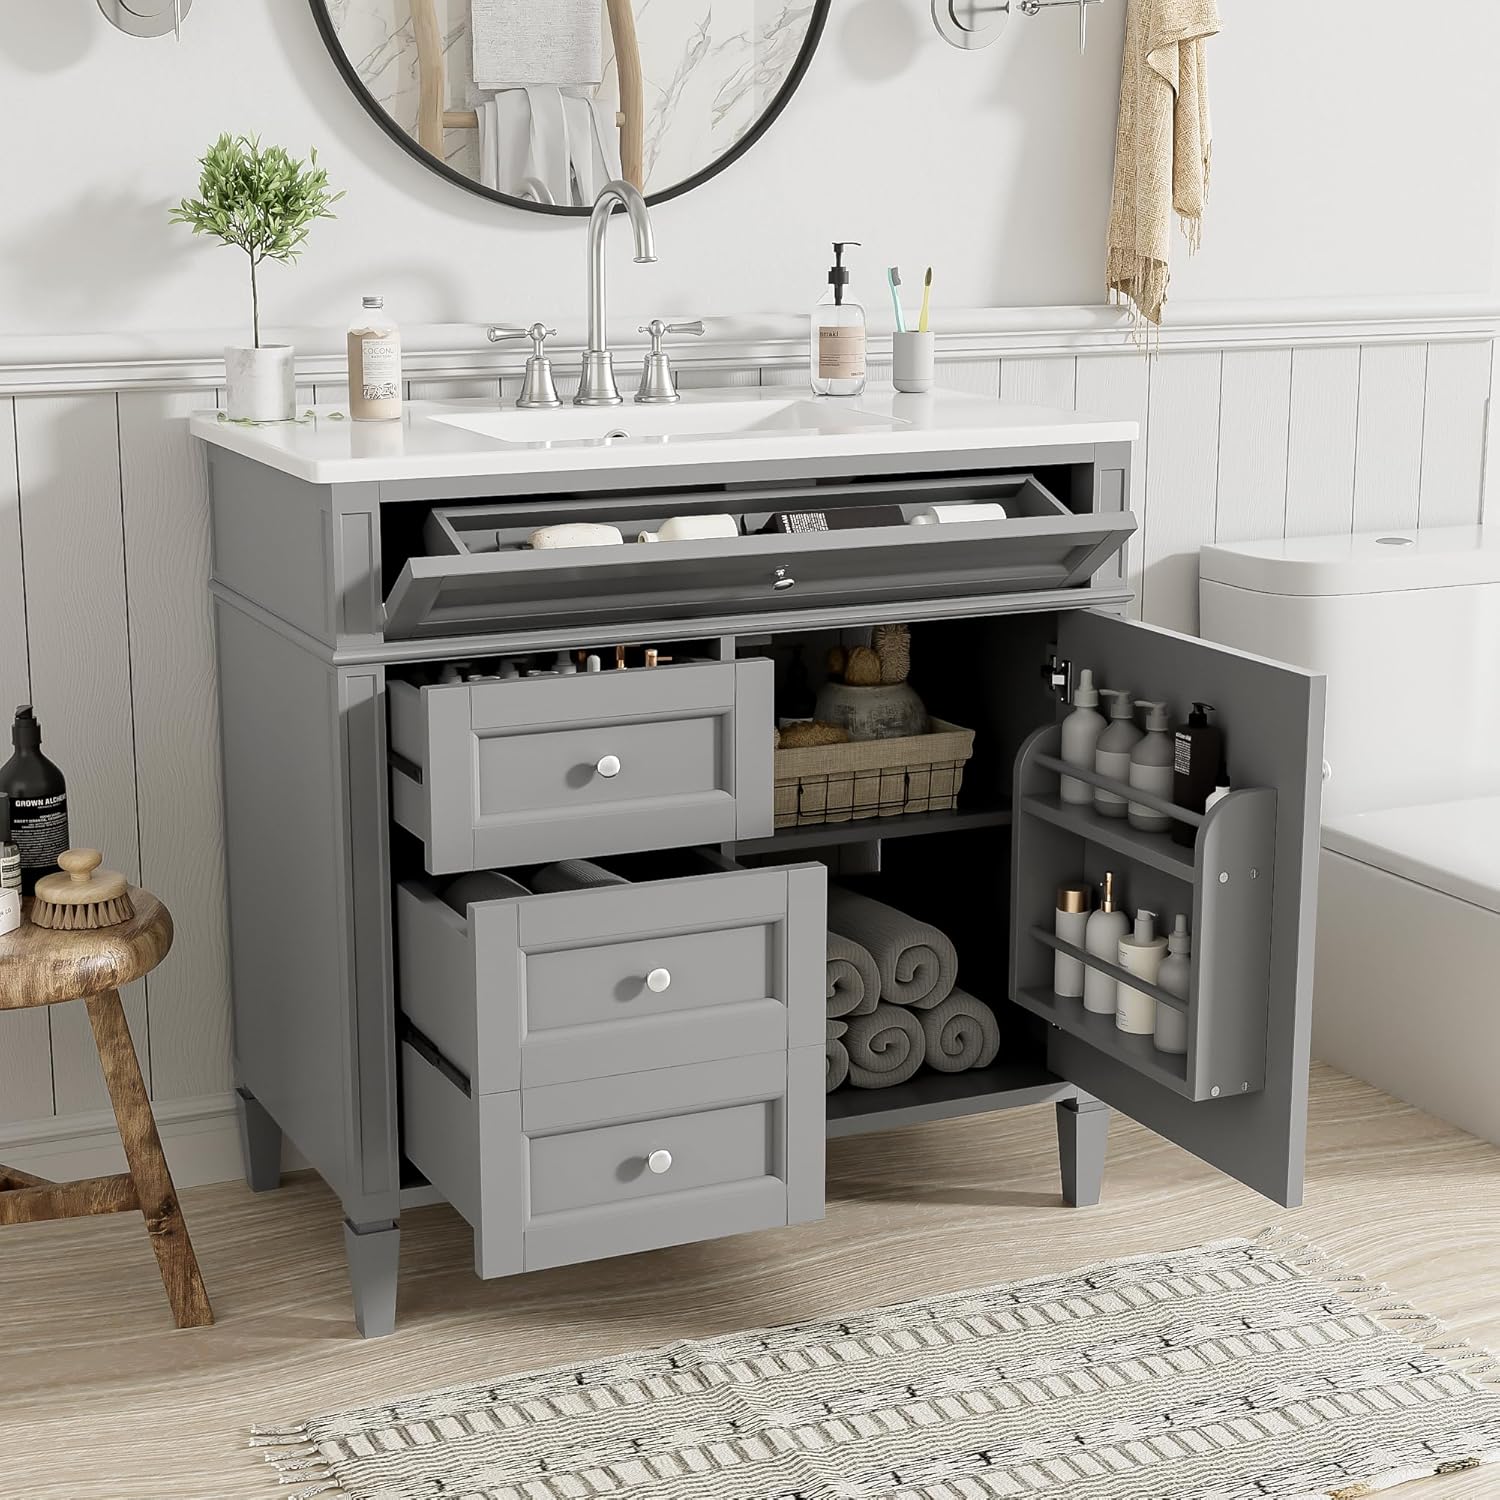
Image 1.1: The Linique 36-inch Bathroom Vanity with Sink Combo Set, showcasing its open storage compartments, including drawers, a tip-out drawer, and a cabinet door organizer.
2. ព័ត៌មានសុវត្ថិភាព
WARNING: Failure to follow these safety instructions could result in injury or property damage.
- តែងតែធ្វើតាមការណែនាំអំពីការដំឡើងដោយប្រុងប្រយ័ត្ន។
- Secure the vanity to the wall using appropriate anchoring hardware to prevent tip-over.
- រក្សាកុមារ និងសត្វចិញ្ចឹមឱ្យឆ្ងាយពីកន្លែងប្រមូលផ្តុំ។
- Use caution when handling heavy components, especially the ceramic sink. Two people are recommended for lifting.
- Ensure all connections for plumbing are secure and watertight to prevent leaks.
- កុំផ្ទុកលើសទម្ងន់ថតឬធ្នើ។
- Avoid using harsh chemicals or abrasive cleaners on any part of the vanity.
3. មាតិកាកញ្ចប់
ផ្ទៀងផ្ទាត់ថាសមាសធាតុទាំងអស់មានវត្តមានមុនពេលចាប់ផ្តើមដំឡើង។ ប្រសិនបើផ្នែកណាមួយបាត់ ឬខូចខាត សូមទាក់ទងផ្នែកជំនួយអតិថិជន។
- Vanity Cabinet (Solid Wood Frame)
- Ceramic Sink Top
- Drawers (pre-assembled or requiring minor assembly)
- Tip-Out Drawer Mechanism
- Cabinet Door with Organizer
- Hardware Pack (screws, cam locks, dowels, drawer slides, handles, wall anchors)
- ធ្នើដែលអាចលៃតម្រូវបាន។
Note: Faucet and drain assembly are not included and must be purchased separately.
4. លក្ខណៈបច្ចេកទេស
| លក្ខណៈ | លម្អិត |
|---|---|
| ម៉ាក | លីនិច |
| វិមាត្រផលិតផល | 36"D x 18.2"W x 33.78"H |
| សម្ភារៈស៊ុម | ឈើ |
| ប្រភេទម៉ោន | ឈរដោយសេរី |
| រចនាប័ទ្មទ្វារ | បិទទន់ |
| ទំងន់ធាតុ | 113.54 ផោន |
| តម្រូវឱ្យមានការជួបប្រជុំគ្នា។ | បាទ |
| ប្រភេទលិច | សេរ៉ាមិច ខasin |
| រន្ធ Faucet | 4" Pre-Drilled |

Image 4.1: Detailed dimensions of the Linique 36-inch Bathroom Vanity, including height, width, and depth measurements for the cabinet and sink.
5. ការដំឡើងនិងការជួបប្រជុំគ្នា។
Assembly is required for this vanity. Please follow the step-by-step instructions provided in the included assembly guide. The following is a general overview.
5.1 ឧបករណ៍ដែលត្រូវការ (មិនរួមបញ្ចូល)
- ហ្វីលីពក្បាលវីសស្ពឺ
- ក្បាលវីសស្ពឺ
- Wrench លៃតម្រូវបាន។
- កម្រិត
- Drill (for wall anchors)
- Silicone Sealant (for sink installation)
5.2 ជំហានដំឡើង
- វេចខ្ចប់ និងពិនិត្យ៖ Carefully remove all components from the packaging. Lay them out on a clean, soft surface to prevent scratches. Verify all parts against the parts list in your detailed assembly guide.
- ដំឡើងស៊ុមគណៈរដ្ឋមន្ត្រី៖ Follow the specific instructions to connect the side panels, back panel, and base of the vanity cabinet using the provided hardware (cam locks, dowels, screws). Ensure all connections are tight and the frame is square.
- ដំឡើងស្លាយ Drawer៖ Attach the drawer slides to the cabinet interior according to the guide. Ensure they are level and properly aligned for smooth drawer operation.
- ប្រមូលផ្តុំថត៖ If drawers are not pre-assembled, follow instructions to put them together and attach the drawer fronts and handles. Insert the assembled drawers onto the slides.
- ដំឡើងទ្វារទូ៖ Attach the soft-closing hinges to the cabinet door and then to the cabinet frame. Adjust hinges as needed for proper door alignment. Install the cabinet door organizer if it is a separate component.
- Place Sink Top: Carefully place the ceramic sink top onto the assembled vanity cabinet. Apply a bead of silicone sealant around the top edge of the cabinet where the sink will rest to secure it and prevent water infiltration.
- ដំឡើងម៉ាស៊ីនបូមទឹក និងលូ៖ Install your chosen faucet and drain assembly into the pre-drilled holes on the ceramic sink top. Follow the manufacturer's instructions for your specific faucet and drain.
- ភ្ជាប់បំពង់ទឹក៖ Connect the water supply lines to the faucet and the drain pipe to the P-trap. Ensure all connections are hand-tightened, then use a wrench for a final snug turn. Check for leaks after turning on the water supply.
- សុវត្ថិភាពទៅនឹងជញ្ជាំង៖ Position the vanity against the wall. Use a level to ensure it is straight. Mark the locations for wall anchors through the vanity's back panel. Drill pilot holes, insert wall anchors, and secure the vanity to the wall using the provided screws. This step is crucial for stability and safety.
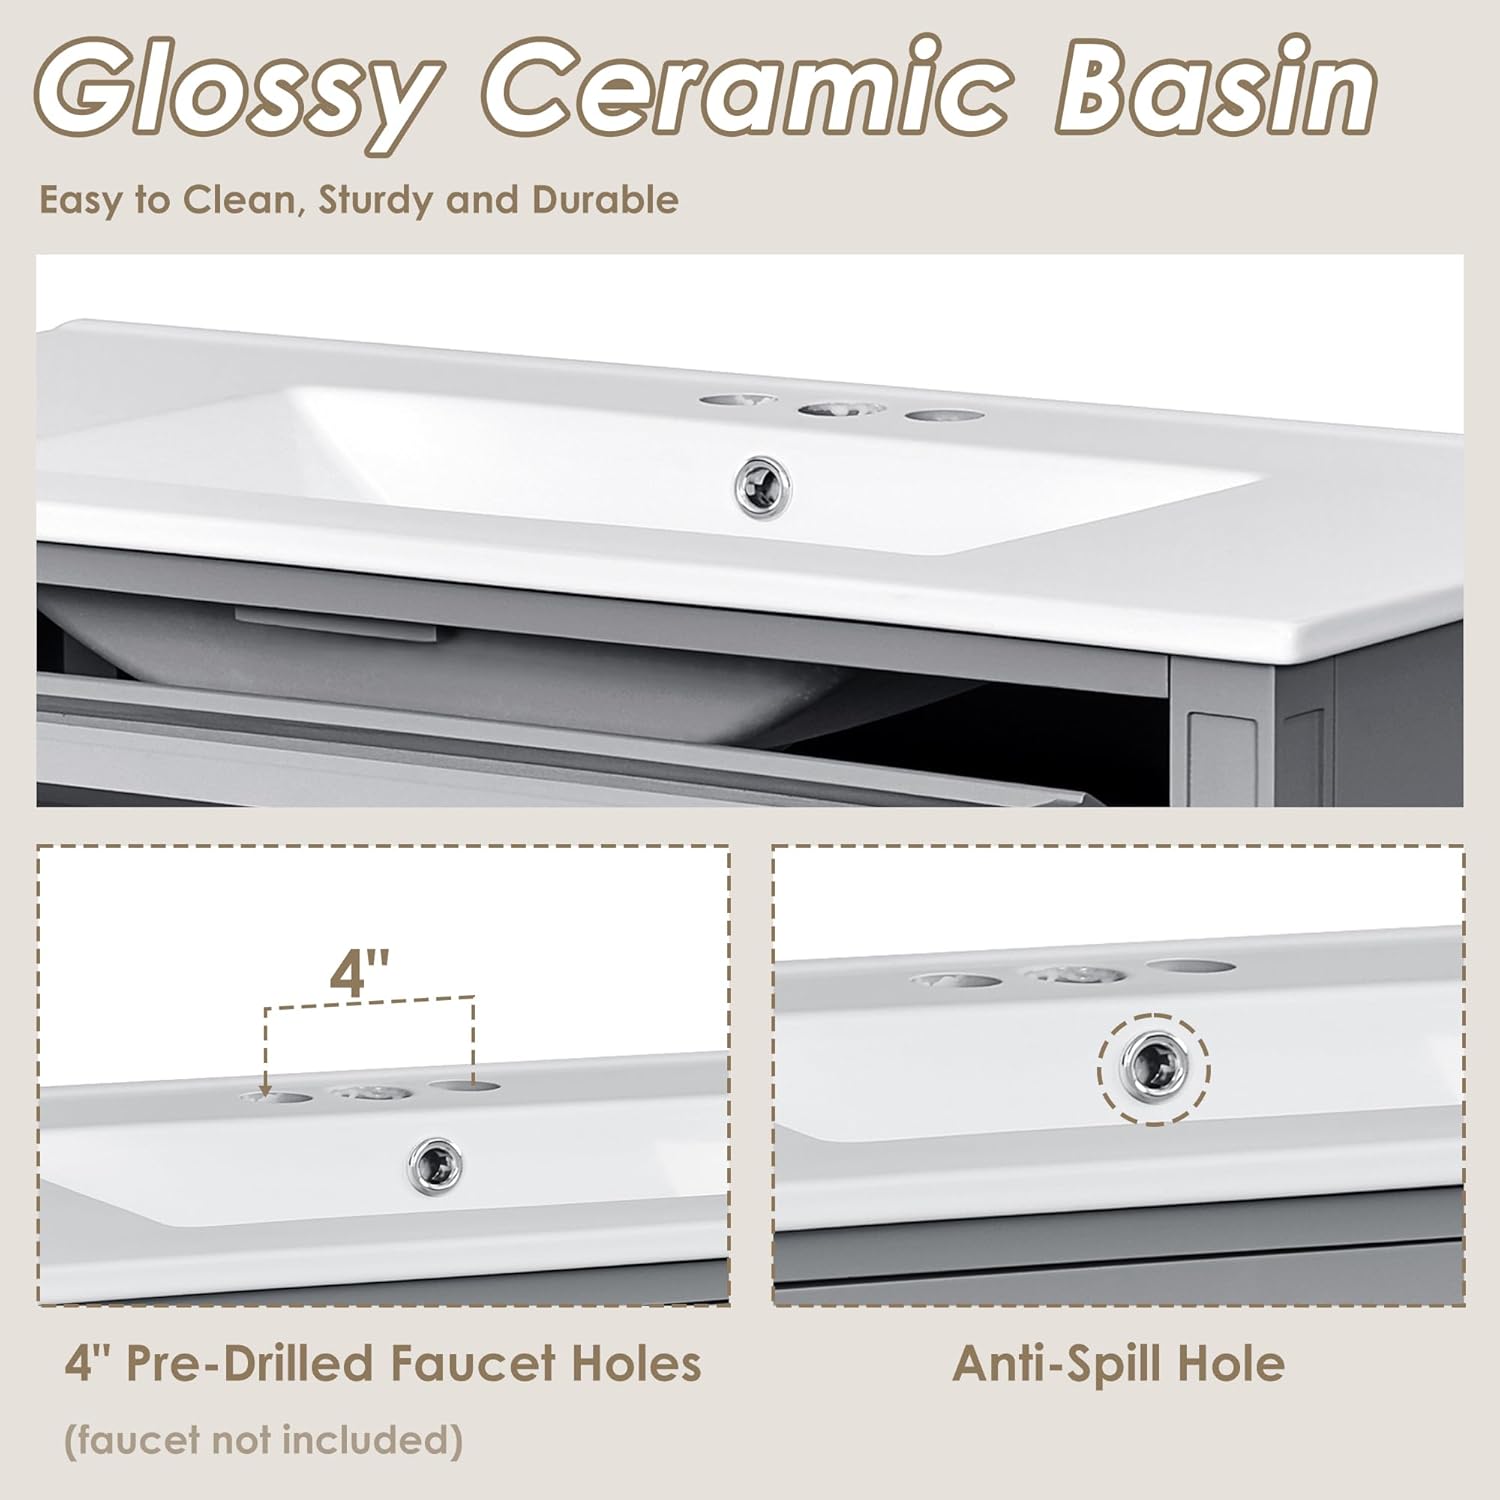
Image 5.1: Detail of the glossy ceramic basin, highlighting the 4-inch pre-drilled faucet holes and the anti-spill overflow hole for easy faucet installation.
6. ប្រតិបត្តិការ
The Linique vanity is designed for ease of use and efficient storage.
6.1 ថត
The vanity features two main drawers and one tip-out drawer. The main drawers operate on smooth slide rails for easy opening and closing. The tip-out drawer provides convenient access to smaller items directly below the sink.
6.2 Soft-Closing Cabinet Door
The cabinet door is equipped with soft-closing hinges, which prevent slamming and reduce noise. The integrated organizer on the inside of the door provides additional storage for bottles and smaller items.
6.3 ធ្នើដែលអាចលៃតម្រូវបាន។
The interior cabinet includes an adjustable shelf, allowing you to customize storage space to fit various item heights. To adjust, remove the shelf, reposition the shelf pins to the desired height, and reinsert the shelf.

រូបភាពទី 6.1៖ ការបិទជិត view illustrating the multifunctional storage options: the tip-out drawer, the cabinet door organizer, and the adjustable shelf within the main cabinet.
7. ការថែទាំ
Proper care will ensure the longevity and appearance of your Linique vanity.
- ការសម្អាតគណៈរដ្ឋមន្ត្រី៖ ជូតស៊ុមឈើដោយទន់ ឃamp ក្រណាត់។ ជៀសវាងសារធាតុសម្អាតដែលមានជាតិស្អិត ឬសារធាតុគីមីដ៏ខ្លាំងដែលអាចបំផ្លាញផ្ទៃខាងក្រៅ។ សម្ងួតភ្លាមៗជាមួយក្រណាត់ស្អាត។
- Cleaning the Ceramic Sink: សម្អាតសេរ៉ាមិចខasin with mild soap and water. For tougher stains, use a non-abrasive bathroom cleaner. Rinse thoroughly and wipe dry to prevent water spots.
- កំពប់៖ Wipe up any water spills on the vanity surface immediately to prevent water damage to the wood.
- ផ្នែករឹង៖ សូមពិនិត្យមើលវីស និងចំណុចភ្ជាប់ទាំងអស់ជាប្រចាំ ដើម្បីធានាថាវានៅតែតឹង។ រឹតឱ្យតឹងបើចាំបាច់។
- ជៀសវាងសំណើមហួសប្រមាណ៖ Ensure proper ventilation in the bathroom to prevent excessive humidity, which can affect wood furniture.
8. ការដោះស្រាយបញ្ហា
If you encounter issues with your vanity, refer to the following common solutions:
| បញ្ហា | មូលហេតុដែលអាចកើតមាន | ដំណោះស្រាយ |
|---|---|---|
| Vanity wobbles or is not level | Uneven floor; loose connections; not secured to wall | Adjust leveling feet (if present) or place shims under the base. Ensure all assembly screws are tightened. Verify the vanity is securely anchored to the wall. |
| ផ្ទាំងគំនូរមិនរអិលដោយរលូនទេ។ | Misaligned drawer slides; debris in slides; overloaded drawer | Check that drawer slides are properly installed and aligned. Clean any dust or debris from the slides. Reduce the weight in the drawer. |
| Cabinet door does not close properly | Misaligned hinges; obstruction | Adjust the soft-closing hinges using a screwdriver to align the door. Ensure nothing is obstructing the door's path. |
| Water leaks from plumbing connections | Loose connections; improper sealant; damaged washer | Tighten all plumbing connections. Ensure proper use of plumber's tape or sealant. Check and replace any damaged washers. If leaks persist, consult a professional plumber. |
9. ព័ត៌មានធានា
Linique products are manufactured with quality and care. This product comes with a standard manufacturer's warranty covering defects in materials and workmanship under normal use. Please refer to the warranty card included with your purchase or contact Linique customer service for specific warranty terms and conditions.
៥.៧. ជំនួយអតិថិជន
For further assistance, missing parts, or warranty claims, please contact Linique customer support through the retailer where the product was purchased or visit the official Linique webគេហទំព័រសម្រាប់ព័ត៌មានទំនាក់ទំនង។
នៅពេលទាក់ទងផ្នែកជំនួយ សូមត្រៀមលេខម៉ូដែលផលិតផល និងកាលបរិច្ឆេទទិញរបស់អ្នក។


