សេចក្តីផ្តើម
Thank you for choosing the Cerwin-Vega XED3001D 1 Channel XED Series Ampឧបករណ៍បញ្ចូលថាមពល។ សៀវភៅណែនាំនេះផ្តល់នូវការណែនាំលម្អិតសម្រាប់ការដំឡើង ប្រតិបត្តិការ និងការថែទាំឱ្យបានត្រឹមត្រូវ ampឧបករណ៍បញ្ចូលថាមពល។ សូមអានសៀវភៅណែនាំនេះឱ្យបានហ្មត់ចត់មុនពេលព្យាយាមដំឡើង ឬប្រតិបត្តិការ ដើម្បីធានាបាននូវដំណើរការ និងសុវត្ថិភាពល្អបំផុត។
ព័ត៌មានសុវត្ថិភាព
Always observe the following safety precautions when installing and operating your ampរស់រានមានជីវិត៖
- ផ្តាច់ខ្សែអាគុយអវិជ្ជមានរបស់យានយន្ត មុនពេលចាប់ផ្តើមការដំឡើងណាមួយ។
- ត្រូវប្រាកដថាខ្សែភ្លើងទាំងអស់ត្រូវបានតភ្ជាប់ និងធានាបានត្រឹមត្រូវ ដើម្បីការពារការខូចខាត ឬសៀគ្វីខ្លី។
- Use appropriate gauge wiring for power, ground, and speaker connections as specified in this manual.
- កុំម៉ោន ampឧបករណ៍នេះត្រូវបានប្រើក្នុងតំបន់ដែលប៉ះពាល់នឹងពន្លឺថ្ងៃដោយផ្ទាល់ កម្ដៅខ្លាំង សំណើម ឬធូលី។
- ជៀសវាងការដាក់ amplifier near the vehicle's fuel lines, brake lines, or electrical wiring.
- ប្រសិនបើអ្នកមិនប្រាកដអំពីផ្នែកណាមួយនៃដំណើរការដំឡើង សូមពិគ្រោះជាមួយអ្នកដំឡើងសំឡេងរថយន្តដែលមានជំនាញវិជ្ជាជីវៈ។
- កុំព្យាយាមបម្រើសេវាកម្ម amplifier yourself. Refer all servicing to qualified personnel.
មាតិកាកញ្ចប់
Please check the contents of your amplifier package. It should include:
- Cerwin-Vega XED3001D 1 Channel Ampកាន់តែចាស់
- ការដំឡើងផ្នែករឹង (វីស)
- សៀវភៅណែនាំរបស់ម្ចាស់ (ឯកសារនេះ)
- Remote Bass Level Control (if included with your model)
ផលិតផលលើសview
The Cerwin-Vega XED3001D is a compact and powerful 1-channel (monoblock) amplifier designed to deliver robust bass performance. It features a durable chassis and essential controls for fine-tuning your audio system.
Ampកាន់តែចាស់ Views


លក្ខណៈសំខាន់ៗ
- Compact Monoblock Design
- អថេរ Low Pass Filter (LPF)
- តម្រង Subsonic អថេរ
- បាសបាសអថេរ
- High-Level Input Capability
- Remote Bass Level Control Input
ការដំឡើងនិងការដំឡើង
ការដំឡើងត្រឹមត្រូវគឺជាកត្តាសំខាន់សម្រាប់ដំណើរការ និងប្រើប្រាស់បានយូររបស់អ្នក។ amplifier ។ អនុវត្តតាមជំហានទាំងនេះដោយប្រុងប្រយ័ត្ន។
២.៧. បញ្ជីត្រួតពិនិត្យការដំឡើងជាមុន
- Read the entire manual before starting.
- Gather all necessary tools and wiring materials (power wire, ground wire, remote turn-on wire, RCA cables, speaker wire, fuse holder, fuse).
- Disconnect the vehicle's negative battery terminal.
- Plan your wiring routes to avoid interference and ensure safety.
៦.១. ទីតាំងដំឡើង
ជ្រើសរើសទីតាំងដំឡើងដែលមាន៖
- Dry and well-ventilated.
- Away from direct sunlight or heat sources.
- Secure and stable, preventing vibration.
- អាចចូលប្រើបានសម្រាប់ខ្សែភ្លើង និងការកែតម្រូវ។
Common locations include under a seat, in the trunk, or behind a panel.
3. ការតភ្ជាប់ខ្សែភ្លើង
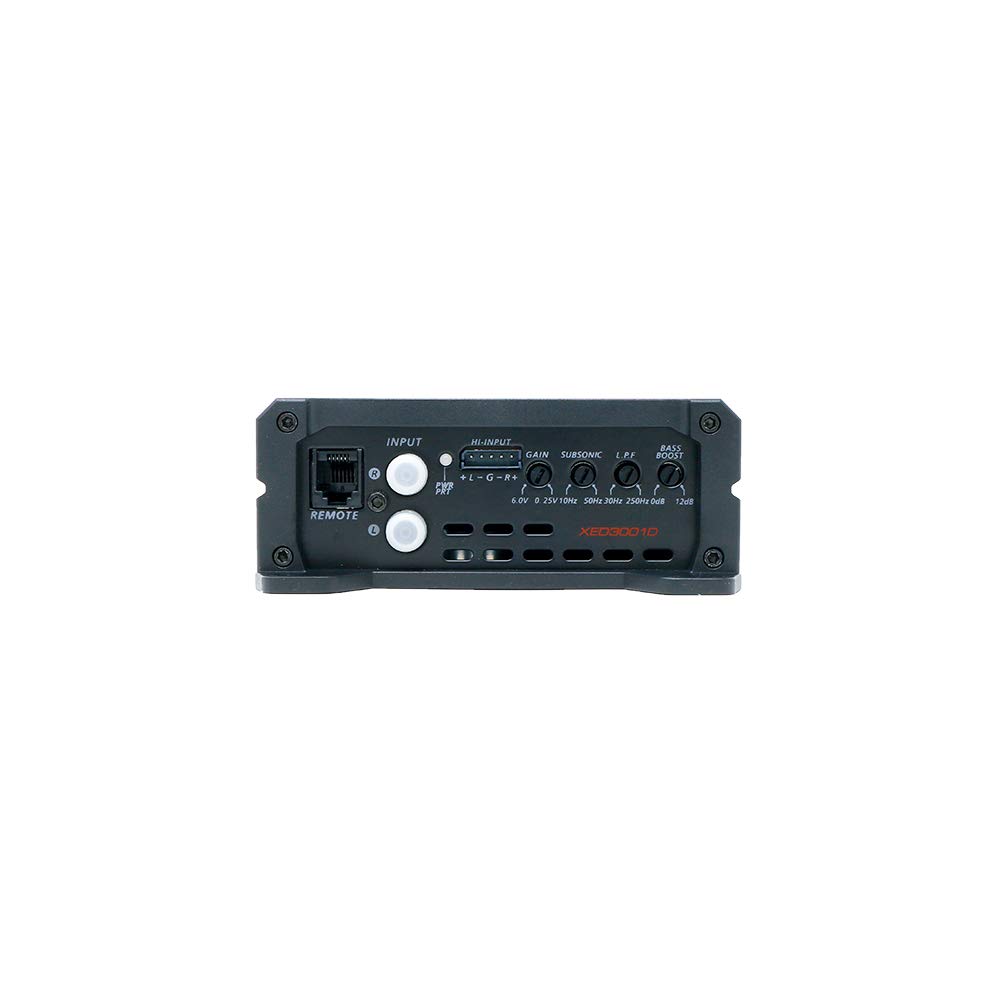
Refer to Figure 4 for the power and speaker output terminals, and Figure 3 for the input terminals.
Power Wiring (GND, REM, +12V)
- GND (ដី): Connect a short (less than 3 feet) heavy-gauge wire from the amplifier's GND terminal to a clean, unpainted metal surface of the vehicle's chassis. Ensure a good electrical connection.
- REM (ការបើកពីចម្ងាយ)៖ Connect a thin wire from the ampស្ថានីយ REM របស់ឧបករណ៍បញ្ជូនទៅកាន់ទិន្នផលបើកពីចម្ងាយនៃឯកតាក្បាលរបស់អ្នក។ ខ្សែនេះបង្វិល amplifier បើក និងបិទជាមួយនឹងស្តេរ៉េអូរបស់អ្នក។
- +12V (ថាមពល): Connect a heavy-gauge wire from the amplifier's +12V terminal directly to the positive terminal of the vehicle's battery. Install an appropriate fuse holder with a fuse (not supplied) within 18 inches of the battery.
រង្វាស់ខ្សែដែលបានណែនាំ៖ For optimal performance and safety, use 8-gauge power and ground wire for this ampកាន់តែចាស់។
Input Signal Connection (RCA or High-Level)
- ការបញ្ចូល RCA៖ If your head unit has RCA pre-outs, connect RCA cables from the head unit's subwoofer or full-range output to the amplifier's "INPUT" RCA jacks.
- ការបញ្ចូលកម្រិតខ្ពស់៖ If your head unit does not have RCA outputs, use the high-level input feature. Connect the speaker wires from your head unit's speaker outputs directly to the amplifier's high-level input connector (if provided, typically a multi-pin connector).
ការតភ្ជាប់លទ្ធផលរបស់វាគ្មិន
- Connect your subwoofer(s) to the "SPEAKER OUTPUT" terminals. Ensure correct polarity (+ to + and - to -).
- The XED3001D is a monoblock amplifier, designed for a single subwoofer or multiple subwoofers wired to a compatible impedance. Refer to your subwoofer's specifications for proper wiring configurations and impedance matching. The amplifier supports a minimum impedance of 2 Ohms.
Remote Bass Level Control (Optional)
- ប្រសិនបើរបស់អ្នក។ amplifier came with a remote bass level control, connect its cable to the "REMOTE" port on the amplifier's input side (Figure 3). Route the cable to a convenient location for the driver.
ប្រតិបត្តិការ Ampកាន់តែចាស់
ពេលដំឡើងរួច អ្នកអាចកែសម្រួល amplifier's settings to optimize sound performance.
ការបញ្ចូលថាមពលដំបូង
- After all connections are made and checked, reconnect the vehicle's negative battery terminal.
- បើកឧបករណ៍បញ្ជាក្បាលរបស់អ្នក។ amplifier should power on automatically (indicated by a power LED, if present).
- Start with all amplifier settings at their minimum or flat positions.
Audio Adjustments (Refer to Figure 3)
- ការគ្រប់គ្រងទទួលបាន៖ This matches the amplifier's input sensitivity to the output level of your head unit. Start with the gain at minimum. Play a familiar song at about 75% of your head unit's maximum volume. Slowly increase the amplifier's gain until you hear slight distortion, then back off slightly. This is the maximum clean output.
- LPF (Low Pass Filter)៖ This filter allows only frequencies below the set point to pass through to the subwoofer. For subwoofers, a common range is 80Hz-120Hz. Adjust this to blend smoothly with your main speakers.
- SUBSONIC Filter: This high-pass filter removes extremely low frequencies that are below the audible range or below the tuning frequency of a ported enclosure. This protects the subwoofer from over-excursion and improves sound quality. A common setting is 25Hz-30Hz.
- បង្កើនសំឡេងបាស៖ This control provides an increase in output at a specific low frequency. Use sparingly, as excessive bass boost can lead to distortion and potential damage to your subwoofer.
ថែទាំ
Your Cerwin-Vega amplifier requires minimal maintenance. Follow these guidelines to ensure its longevity:
- ការសម្អាត៖ ជូតជាប្រចាំ ampផ្នែកខាងក្រៅរបស់ Lifier ជាមួយនឹងក្រណាត់ទន់ស្ងួត។ ហាមប្រើសារធាតុគីមីខ្លាំង ឬថ្នាំលាងសម្អាត។
- ខ្យល់ចេញចូល៖ ធានាថា ស amplifier's heat sink fins are free from dust and debris to allow for proper heat dissipation. Do not block any ventilation openings.
- ការតភ្ជាប់៖ Occasionally check all wiring connections to ensure they are secure and free from corrosion.
ការដោះស្រាយបញ្ហា
ប្រសិនបើអ្នកជួបប្រទះបញ្ហាជាមួយនឹងរបស់អ្នក។ amplifier, consult the following troubleshooting guide before contacting support.
| បញ្ហា | មូលហេតុដែលអាចកើតមាន | ដំណោះស្រាយ |
|---|---|---|
| គ្មានថាមពល / Amplifier មិនបើក |
|
|
| គ្មានលទ្ធផលសំឡេង |
|
|
| សំឡេងខូច |
|
|
| Amplifier Overheating / Goes into Protect Mode |
|
|
លក្ខណៈបច្ចេកទេស
The following are the technical specifications for the Cerwin-Vega XED3001D ampរស់រានមានជីវិត៖
| លក្ខណៈ | ការបញ្ជាក់ |
|---|---|
| លេខម៉ូដែល | XED3001D |
| ម៉ាក | CV |
| ចំនួនឆានែល | 1 (Monoblock) |
| វ៉ុលtage | 12 វ៉ុល (DC) |
| ប្រភេទម៉ោន | ភ្នំផ្ទៃ |
| ទិន្នផលថាមពលអតិបរមា | 300W អតិបរមា |
| ការរំខានអប្បបរមា | 2 Ohms |
| កាលបរិច្ឆេទដំបូងអាចរកបាន | ថ្ងៃទី 29 ខែមករា ឆ្នាំ 2021 |
ព័ត៌មានធានា
Cerwin-Vega products are designed and engineered to the highest standards. For specific warranty terms and conditions, please refer to the warranty card included with your product or visit the official Cerwin-Vega webគេហទំព័រ។ រក្សាបង្កាន់ដៃទិញរបស់អ្នកជាភស្តុតាងនៃការទិញសម្រាប់ការទាមទារធានាណាមួយ។
ជំនួយអតិថិជន
If you have any questions or require further assistance with your Cerwin-Vega XED3001D amplifier, please contact Cerwin-Vega customer support. Contact information can typically be found on the official brand webគេហទំព័រ ឬនៅលើវេចខ្ចប់ផលិតផល។
Webគេហទំព័រ៖ www.cerwinvega.com (នេះជាកន្លែងដាក់ URL, please verify the actual official webគេហទំព័រ)