KANDAO QooCam Studio User Guide

QooCam Studio support for native media of QooCam,QooCam
8K and QooCam 3 to stitch and edit.
QooCam Studio Workflow
The overall process for putting together a media with QooCam Studio is described below. You don’t have to do every step, and you might do others that aren’t listed and the workflow is not necessarily linear.
Step1:Import your media into Qoo Cam Studio.
To use QooCam Studio, you need to transfer your videos and images from QooCam, QooCam 8K and QooCam 3 devices to your computer’s local folder or external or storage device.
Step2:Select the appropriate stitching parameters for your media.
QooCam Studio will select some stitching parameters for your media by default. These parameters are suitable for many scenarios, but there are still special cases that need to be adjusted. The adjusted parameters will be applied in real time, and you can see the effect in the preview.
Step 3:Add effect
During this process, you can choose Panorama mode and Reframe mode. Support different editing functions in different modes. Reframe mode allows you to add keyframe.
Step 4:Render your media.
You can set the resolution, bitrate, export address, and so on of the exported media.
QooCam Studio system requirements
Windows

If you have a NVIDIA graphics card, make sure that your graphics driver has been updated after January 2023 because different versions can affect media rendering.
The driver download link:
https://www.nvidia.com/Download/index.aspx
macOS

Intel ® 6thGen processor reference :
i5:https://ark.intel.com/content/www/us/en/ark/products/series/88392/6thgeneration-intel-core-i7-processors.html
i7:https://ark.intel.com/content/www/us/en/ark/products/series/88393/6thgeneration-intel-core-i5-processors.html
Intel ® 7thGen processor reference :
i5:https://ark.intel.com/content/www/us/en/ark/products/series/95543/7thgeneration-intel-core-i5-processors.html
i7:https://ark.intel.com/content/www/us/en/ark/products/series/95544/7thgeneration- intel-core-i7-processors.html
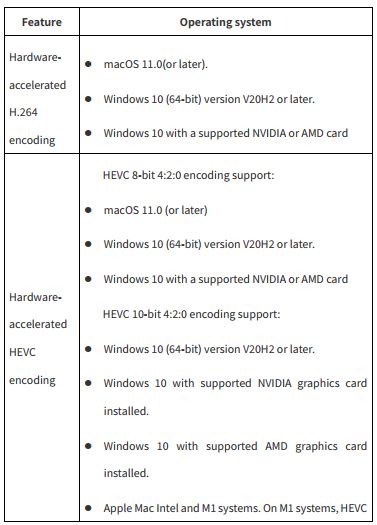
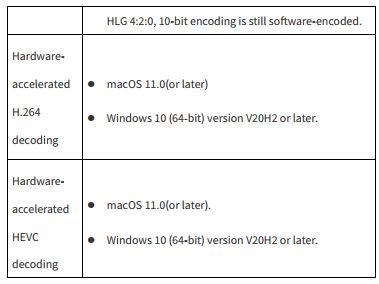
Hardware acceleration system requirements
1 Import
1.1 How to import media


1.2 Support media format
① Video format
mp4(H.264)
mov(H.265)
② Image format
JPEG
PNG
TIFF
DNG
2 Edit your media
2.1 Play media in QooCam Studio
Press the space bar or click the Play button in the viewer. ![]() Stop play:While playing, press the space bar to press the pause button in the inspector.
Stop play:While playing, press the space bar to press the pause button in the inspector. ![]()
2.2 Stitching parameters
2.2.1 Stabilization
OFF: Stabilization off. Suitable for video taken in a fixed position. Horizon Steady: It will eliminate the wobble of the video and follow the direction of rotation of the camera.
View Lock Steady: Eliminate lens rotation direction and video shake.
2.2.2 Process
① Defringe: It can eliminate the purple fringing caused by high contrast to a certain extent.
② Color Correction:Due to the characteristics of panoramic cameras, the image of each lens will be slightly different in color, and there will be obvious chromatic aberration at the stitching seam. The color correction algorithm can largely eliminate this chromatic aberration, so that the entire picture remains natural. The color can be smoother.
③ Optical flow: using pixel-level dense optical flow to accurately calculate the pixel correspondence between different lenses, enabling seamless and precise stitching.
2.2.3 FPS
① 23.976
② 24
③ 25
④ 29.97
⑤ 30
⑥ 48
⑦ 50
⑧ 59.94
⑨ 60
⑩ 120
⑪ Original
2.2.4 Panorama and Reframe

2.2.4.1 Reframe
① Angle parameters:
In Reframe mode, there are the following:
Yaw: range -180 to 180, accurate to one decimal places.
Pitch: range -180 to 180, accurate to one decimal places.
Roll: range -180 to 180, accurate to one decimal places.
FOV: range 0 to 179, accurate to the ones.
Radius: range 0 to 100, accurate to the ones.
Distortion: Range 0 to 100, accurate to the ones.
Method to adjust the viewing angle parameters:
A. Drag and drop preview screen


C、Click the parameter value, enter the value you need.

② Keyframe
In the editing mode, the key frame function is provided. Represents the control of the value of the video viewing angle parameter at a specific point in the video. When two keyframes with different values are set in QooCamStudio, the change from one value to another will be calculated, thereby dynamically changing to the second parameter.


2.2.4.2 Panorama:
In panoramic mode, there are the following viewing angle parameters,
Yaw: range -180 to 180, accurate to two decimal places
Pitch: range -180 to 180, accurate to two decimal places
Roll: range -180 to 180, accurate to two decimal places.
2.2.5 Grid
The grid function can help you accurately adjust the horizontal line of the image and position the image accurately.


2.2.6 Export current frame
As the name implies, that is to export the current frame.

2.2.7 Panorama mode——Columnar projection
In the panorama mode, the viewer bar provides the function of columnar projection preview.

3 Render
3.1 Render Resolution
3.1.1 Panorama

3.1.2 Feframe


4The ratio is 1:1.


⑦ The ratio is 2.35:1 .

3.2 Render Format

3.3 Preset (ProRes)
When the export format is MOV (ProRes), there are four presets:

See the ProRes white paper https://support.apple.com/zhcn/HT202410
3.4 Export path
In this step, you can select the export path of the file.
① Same folder as source material: the same address as the material you imported.
② Specify folder: select the address of the non-source material folder.

3.5 Unstitched Pano
When you want to render a image, QooCam Studio supports simultaneous rendering of two single fisheye unfolded plan views. This function allows you to adjust the stitching more naturally in other retouching software.

Tutorial:
https://prd.kandaovr.com/2019/04/26/8-tips-to-choose-thebest-360-camera/
Video Tutorial:
3.6 Export with Ambisonics
When using the QooCam 3 to capture panoramic videos, you can choose to export panoramic audio during the export process.
Whether it’s spatial audio for the 360° image in VR headsets or stereo audio for flat images with re-framing, it enhances the immersive audio-visual experience for users.

Read More About This Manual & Download PDF:
Documents / Resources
 |
KANDAO QooCam Studio [pdf] User Guide QooCam Studio, Studio |


