Danfoss EKC 202A Controller For Temperature Control

შესავალი
განაცხადი
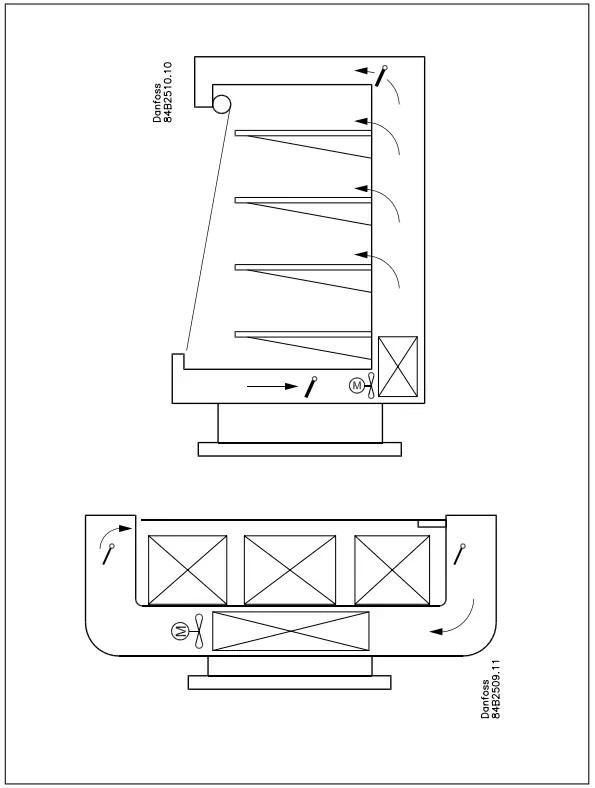
- The controller is used for temperature control of refrigeration appliances and cold rooms in supermarkets
- Control of defrost, fans, alarm and light
პრინციპი
The controller contains a temperature control where the signal can be received from one temperature sensor. The sensor is placed in the cold air flow after the evaporator or in the warm air flow just before the evaporator. The controller controls the defrost with either natural defrost or electric defrost. Renewed cutting after defrost can be accomplished based on time or temperature. A measurement of the defrost temperature can be obtained directly through the use of a defrost sensor. Two to four relays will cut the required functions in and out – the application determines which:
- Refrigeration (compressor or solenoid valve)
- ყინვა
- ფანი
- განგაში
- სინათლე
The different applications are described on the next page.
ადვანსtages
- Integrated refrigeration-technical functions
- Defrost on demand in 1:1 systems
- Buttons and seal are embedded in the front
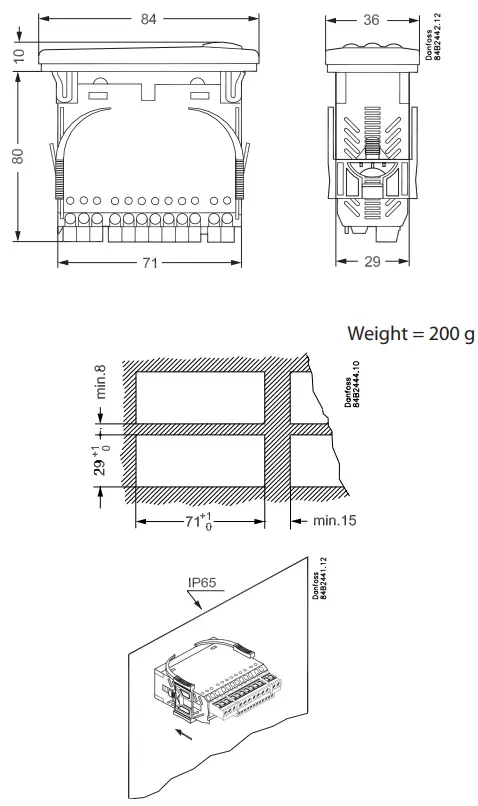
- IP65 enclosure on the front panel
- Digital input for either:
- კართან კონტაქტის ფუნქცია სიგნალიზაციით
- გაყინვის დაწყება
- რეგულირების დაწყება/შეჩერება
- ღამის ოპერაცია
- ორ ტემპერატურულ მითითებას შორის გადართვა
- ქეისის დასუფთავების ფუნქცია
- Instant programming via programming key
- HACCP Factory calibration that will guarantee better measurement accuracy than stated in the standard EN ISO 23953-2 without subsequent calibration (Pt 1000 ohm sensor)
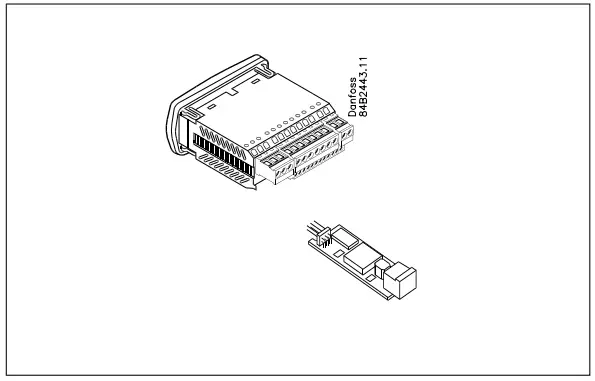
დამატებითი მოდული
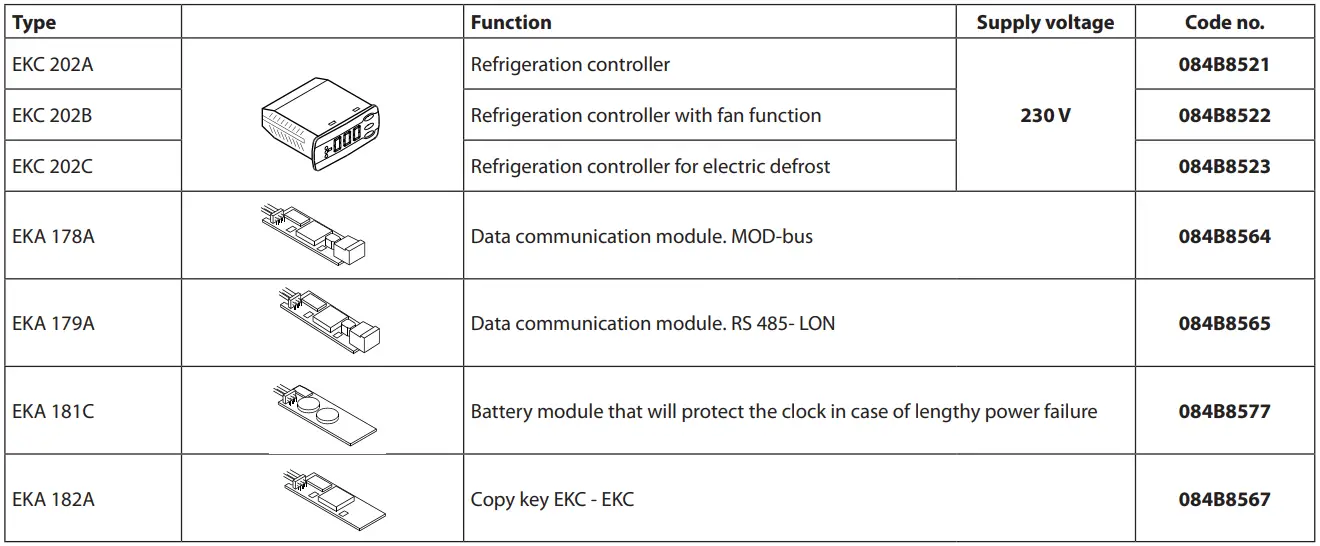
- The controller can afterwards be fitted with an insertion module if the application requires it. The controller has been prepared with plug, so the module simply has to be pushed in.
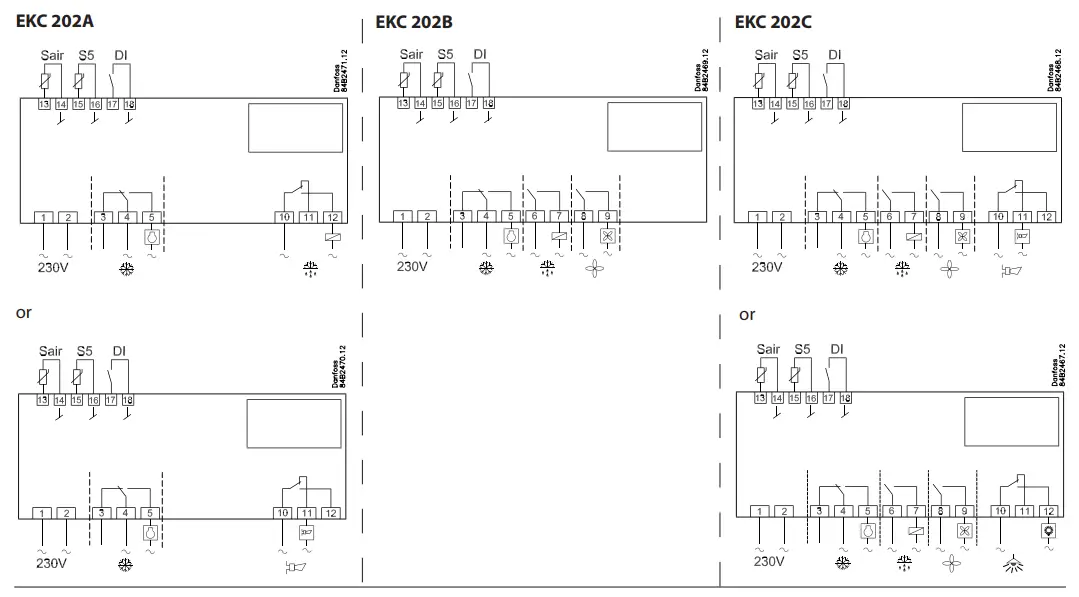
EKC 202A
Controller with two relay outputs, two temperature sensors, and a digital input. Temperature control at the start/stop of the compressor/solenoid valve
გაყინვის სენსორი
Electrical defrost / gas defrost
სიგნალიზაციის ფუნქცია
If an alarm function is required, relay number two may be used for it. Defrost is performed here with a circulation of the air as the fans are operating continuously.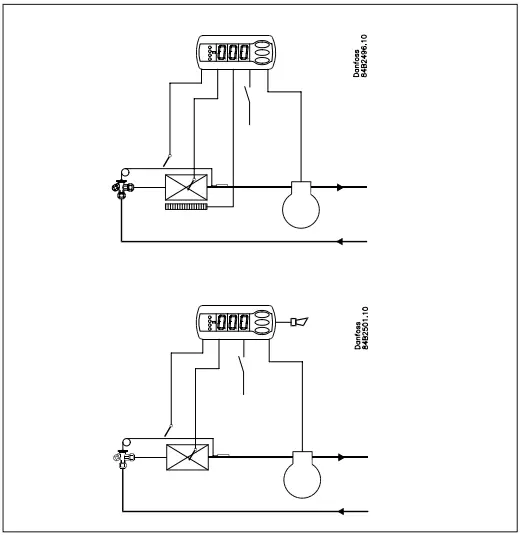
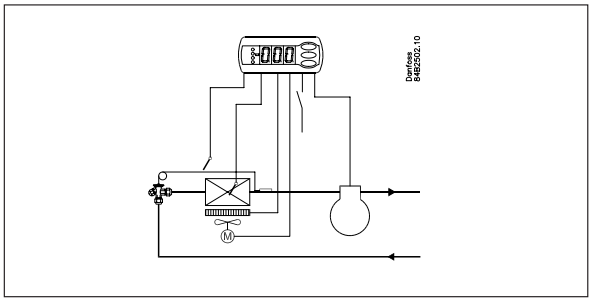
EKC 202B
Controller with three relay outputs, two temperature sensors, and a digital input. Temperature control at start/stop of compressor/solenoid valve, Defrost sensor, Electrical defrost / gas defrost Relay output 3 is used for control of fan.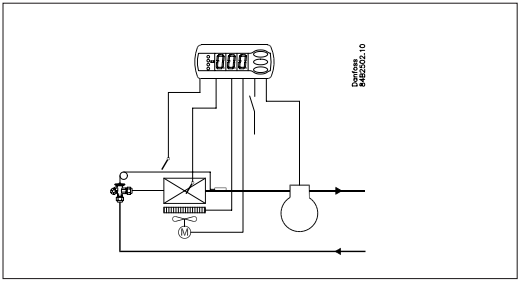
EKC 202C
Controller with four relay outputs, two temperature sensors, and a digital input. Temperature control at start/stop of compressor/solenoid valve, Defrost sens, or Electrical defrost / gas defrost. Control of fan Relay output 4 can be used for an alarm function or for a light function.
გალღობის დაწყება
გალღობის დაწყება სხვადასხვა გზით შეიძლება
ინტერვალი: Defrost is started at fixed time intervals, say, every eight hours
- გაციების დრო: Defrost is started at fixed refrigeration time intervals. In other words, a low need for refrigeration will ”postpone” the coming defrost
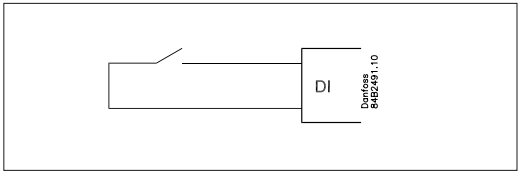
- კონტაქტი Defrost is started here with a pulse signal on a digital input.
- სახელმძღვანელო: An extra defrost can be activated from the controller’s lowest button
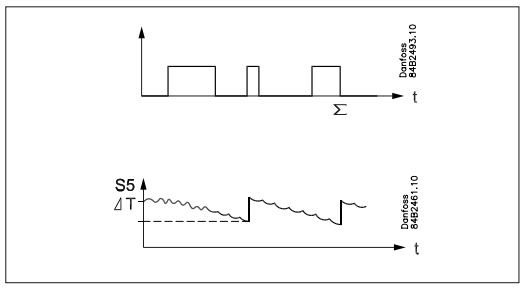
- S5-temp. In 1:1 systems, the efficiency of the evaporator can be followed. Icing up will start a defrost.
- განრიგი Defrost here can be started at fixed times of the day and night. But max. six defrosts
- ქსელი A defrost can be started via data communication
All the mentioned methods can be used at random – if just one of them is activated, a defrost will be started. When the defrost starts, the defrost timers are set at zero.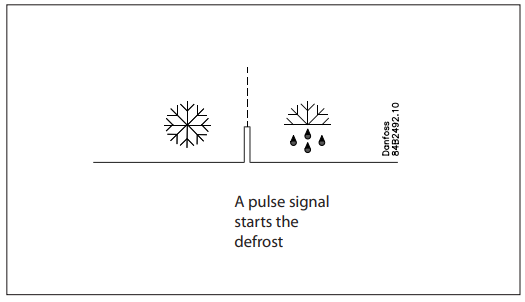
If you need coordinated defrost, this must be done via data communication.
ციფრული შეყვანა
The digital input can be used for the following functions:
- Door contact function with alarm if the door has been open for too long.
- გაყინვის დაწყება
- რეგულირების დაწყება/შეჩერება
- Change-over to night operation
- ქეისის გაწმენდა
- Change to another temperature reference
- Inject on/off
ქეისის დასუფთავების ფუნქცია
This function makes it easy to steer the refrigeration appliance through a cleaning phase. Via three pushes on a switch, you change from one phase to the next phase. The first push stops the refrigeration – the fans keep working.”Later”: The next push stops the fans.”Still later,”: The next push restarts refrigeration The different situations can be followed on the display. There is no temperature monitoring during case cleaning. On the network, a cleaning alarm is transmitted to the system unit. This alarm can be ”logged” so that proof of the sequence of events is provided.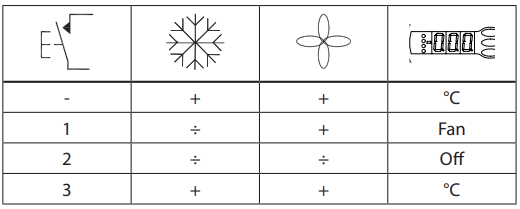
გაყინვა მოთხოვნით
- Based on refrigeration time, when the aggregate refrigeration time has passed a fixed time, a defrost will be started.
- Based on temperature, the controller will constantly follow the temperature at S5. Between two defrosts, the S5 temperature will become lower the more the evaporator ices up (the compressor operates for a longer time and pulls the S5 temperature further down). When the temperature passes a set allowed variation, the defrost will be started.
This function can only be used in 1:1 systems
ოპერაცია
ჩვენება
მნიშვნელობები ნაჩვენები იქნება სამი ციფრით, ხოლო პარამეტრით შეგიძლიათ განსაზღვროთ, ტემპერატურა უნდა იყოს ნაჩვენები °C-ში თუ °F-ში.
სინათლის გამოსხივების დიოდები (LED) წინა პანელზე
There are leds on the front panel which will light up when the belonging relay is activated.
The light-emitting diodes will flash when there is an alarm. In this situation, you can download the error code to the display and cancel/sign for the alarm by giving the top button a brief push.
ყინვა
During defrost a–d– is shown in the display. This view will continue up to 15 min. after the cooling has resumed. However, the view of –d– will be discontinued if:
- ტემპერატურა შესაფერისია 15 წუთის განმავლობაში
- The regulation is stopped with the “Main Switch”
- ჩნდება მაღალი ტემპერატურის სიგნალიზაცია
ღილაკები
როდესაც გსურთ პარამეტრის შეცვლა, ზედა და ქვედა ღილაკები მოგცემთ უფრო მაღალ ან დაბალ მნიშვნელობას, იმ ღილაკის მიხედვით, რომელსაც აჭერთ. თუმცა, მნიშვნელობის შეცვლამდე, მენიუში უნდა გქონდეთ წვდომა. ამას მიიღებთ ზედა ღილაკზე რამდენიმე წამის განმავლობაში დაჭერით - შემდეგ შეხვალთ პარამეტრის კოდების სვეტში. იპოვეთ პარამეტრის კოდი, რომლის შეცვლაც გსურთ და დააჭირეთ შუა ღილაკებს მანამ, სანამ პარამეტრის მნიშვნელობა არ გამოჩნდება. მნიშვნელობის შეცვლის შემდეგ, შეინახეთ ახალი მნიშვნელობა შუა ღილაკზე კიდევ ერთხელ დაჭერით.
Examples
Დააყენე მენიუ
- დააჭირეთ ზედა ღილაკს, სანამ არ გამოჩნდება პარამეტრი r01
- Push the upper or the lower button and find the parameter you want to change
- დააჭირეთ შუა ღილაკს, სანამ არ გამოჩნდება პარამეტრის მნიშვნელობა
- დააჭირეთ ზედა ან ქვედა ღილაკს და აირჩიეთ ახალი მნიშვნელობა
- Push the middle button again to enter the value. Cutout alar,m relay / receipt alarm/see alarm code
- მოკლედ დააჭირეთ ზედა ღილაკს
- If there are several alarm codes, they are found in a rolling stack. Push the uppermost or lowermost button to scan the rolling stack.
დააყენეთ ტემპერატურა
- დააჭირეთ შუა ღილაკს, სანამ არ გამოჩნდება ტემპერატურის მნიშვნელობა
- დააჭირეთ ზედა ან ქვედა ღილაკს და აირჩიეთ ახალი მნიშვნელობა
- Push the middle button to select the setting
Manuel starts or stop the defrost
- Push the lower button for four seconds. See the temperature at the defrost sensor
- Push briefly the lower button. If no sensor has been mounted, ”non” will appear.
100% tight
The buttons and the seal are imbedded in the front. A special moulding technique unites the hard front plastic, the softer buttons and the seal, so that they become an integral part of the front panel. There are no openings that can receive moisture or dirt.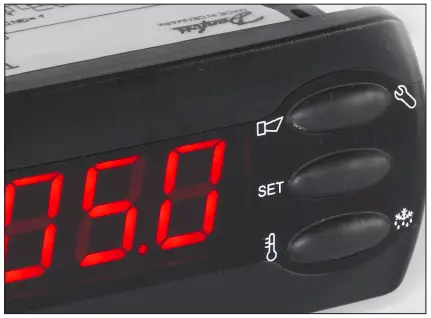
| პარამეტრები | კონტროლერი | მინ.- მნიშვნელობა | Max.- value | ქარხანა დაყენება | ფაქტობრივი პარამეტრი | |||
| ფუნქცია | კოდები | EKC
202A |
EKC
202B |
EKC
202C |
||||
| ნორმალური ოპერაცია | ||||||||
| ტემპერატურა (დადგენის წერტილი) | — | -50°C | 50°C | 2°C | ||||
| თერმოსტატი | ||||||||
| დიფერენციალური | r01 | 0,1 კ | 20 კ | 2 კ | ||||
| Max. limitation of set point setting | r02 | -49°C | 50°C | 50°C | ||||
| დაყენებული წერტილის მინიმალური ლიმიტი | r03 | -50°C | 49°C | -50°C | ||||
| ტემპერატურის ჩვენების რეგულირება | r04 | -20 კ | 20 კ | 0.0 კ | ||||
| ტემპერატურის ერთეული (°C/°F) | r05 | °C | °F | °C | ||||
| საირიდან სიგნალის გასწორება | r09 | -10 კ | 10 კ | 0 კ | ||||
| Manual service(-1), stop regulation(0), start regulation (1) | r12 | -1 | 1 | 1 | ||||
| მითითების გადაადგილება ღამის მუშაობის დროს | r13 | -10 კ | 10 კ | 0 კ | ||||
| საცნობარო გადაადგილების r40 გააქტიურება | r39 | გამორთულია | on | გამორთულია | ||||
| Value of reference displacement (activation by r39 or DI) | r40 | -50 კ | 50 კ | 0 კ | ||||
| განგაში | ||||||||
| ტემპერატურის განგაშის დაგვიანება | A03 | 0 წთ | 240 წთ | 30 წთ | ||||
| კარის განგაშის დაგვიანება | A04 | 0 წთ | 240 წთ | 60 წთ | ||||
| ტემპერატურის განგაშის შეფერხება გალღობის შემდეგ | A12 | 0 წთ | 240 წთ | 90 წთ | ||||
| განგაშის მაღალი ლიმიტი | A13 | -50°C | 50°C | 8°C | ||||
| განგაშის დაბალი ლიმიტი | A14 | -50°C | 50°C | -30°C | ||||
| განგაშის დაყოვნება DI1 | A27 | 0 წთ | 240 წთ | 30 წთ | ||||
| High alarm limit for condenser temperature (o70) | A37 | 0°C | 99°C | 50°C | ||||
| კომპრესორი | ||||||||
| მინ. Დროზე | c01 | 0 წთ | 30 წთ | 0 წთ | ||||
| მინ. Არასამუშაო დრო | c02 | 0 წთ | 30 წთ | 0 წთ | ||||
| Compressor relay must cutin and out inversely (NC-function) | c30 | 0 / OFF | 1 / ჩართულია | 0 / OFF | ||||
| ყინვა | ||||||||
| Defrost method (none/EL/gas) | d01 | არა | გაზი | EL | ||||
| გაყინვის გაჩერების ტემპერატურა | d02 | 0°C | 25°C | 6°C | ||||
| გაყინვის დაწყებას შორის ინტერვალი | d03 | 0 საათი | 48 საათი | 8 საათი | ||||
| მაქს. გაყინვის ხანგრძლივობა | d04 | 0 წთ | 180 წთ | 45 წთ | ||||
| დროის გადაადგილება გალღობის კუთხით გაშვებისას | d05 | 0 წთ | 240 წთ | 0 წთ | ||||
| წვეთოვანი დრო | d06 | 0 წთ | 60 წთ | 0 წთ | ||||
| ვენტილატორის გაშვების შეფერხება გაყინვის შემდეგ | d07 | 0 წთ | 60 წთ | 0 წთ | ||||
| ვენტილატორის დაწყების ტემპერატურა | d08 | -15°C | 0°C | -5°C | ||||
| Fan cutin გალღობის დროს
0: გაჩერდა 1: Running during the whole phase 2: Running during the heating phase only |
d09 | 0 | 2 | 1 | ||||
| Defrost sensor (0=time, 1=S5, 2=Sair) | d10 | 0 | 2 | 0 | ||||
| მაქს. საერთო გაგრილების დრო ორ გაყინვას შორის | d18 | 0 საათი | 48 საათი | 0 საათი | ||||
| Defrost on demand – S5 temperature’s permitted variation during frost build-up. On
central plant choose 20 K (=off) |
d19 | 0 კ | 20 კ | 20 კ | ||||
| ფანები | ||||||||
| ვენტილატორის გაჩერება კომპრესორის გამორთვისას | F01 | არა | დიახ | არა | ||||
| ვენტილატორის გაჩერების შეფერხება | F02 | 0 წთ | 30 წთ | 0 წთ | ||||
| ვენტილატორის გაჩერების ტემპერატურა (S5) | F04 | -50°C | 50°C | 50°C | ||||
| რეალურ დროში საათი | ||||||||
| გალღობის ექვსი დაწყების დრო. საათების დაყენება.
0 = გამორთული |
t01-t06 | 0 საათი | 23 საათი | 0 საათი | ||||
| გალღობის ექვსი დაწყების დრო. წუთების დაყენება.
0 = გამორთული |
t11-t16 | 0 წთ | 59 წთ | 0 წთ | ||||
| საათი - საათის დაყენება | t07 | 0 საათი | 23 საათი | 0 საათი | ||||
| საათი - წუთის დაყენება | t08 | 0 წთ | 59 წთ | 0 წთ | ||||
| საათი - თარიღის დაყენება | t45 | 1 | 31 | 1 | ||||
| საათი - თვის დაყენება | t46 | 1 | 12 | 1 | ||||
| საათი - წელიწადის დაყენება | t47 | 0 | 99 | 0 | ||||
| სხვადასხვა | ||||||||
| გამომავალი სიგნალების შეფერხება ელექტროენერგიის გათიშვის შემდეგ | o01 | 0 წ | 600 წ | 5 წ | ||||
| შეყვანის სიგნალი DI1-ზე. ფუნქცია:
0=not used. 1=status on DI1. 2=door function with alarm when open. 3=door alarm when open. 4=defrost start (pulse-signal). 5=ext.main switch. 6=night operation 7=change reference (r40 will be activated) 8=alarm function when closed. 9=alarm func- tion when open. 10=case cleaning (pulse signal). 11=Inject off when open. |
o02 | 0 | 11 | 0 | ||||
| ქსელის მისამართი | o03 | 0 | 240 | 0 | ||||
| ჩართვა/გამორთვის გადამრთველი (მომსახურების PIN შეტყობინება) | o04 | გამორთულია | ON | გამორთულია | ||||
| წვდომის კოდი 1 (ყველა პარამეტრი) | o05 | 0 | 100 | 0 | ||||
| გამოყენებული სენსორის ტიპი (Pt /PTC/NTC) | o06 | Pt | ნტკ | Pt | ||||
| ჩვენების ნაბიჯი = 0.5 (ნორმალური 0.1 Pt სენსორზე) | o15 | არა | დიახ | არა | ||||
| მაქსიმალური შენახვის დრო კოორდინირებული გალღობის შემდეგ | o16 | 0 წთ | 60 წთ | 20 | ||||
| განათების ფუნქციის კონფიგურაცია (რელე 4)
1=ON during day operation. 2=ON / OFF via data communication. 3=ON follows the DI- function, when DI is selected to door function or to door alarm |
o38 | 1 | 3 | 1 | ||||
| სინათლის რელეს გააქტიურება (მხოლოდ იმ შემთხვევაში, თუ o38=2) | o39 | გამორთულია | ON | გამორთულია | ||||
| კორპუსის გაწმენდა. 0=კორპუსის გაწმენდა არ ხდება. 1=მხოლოდ ვენტილატორები. 2=ყველა გამომავალი გამორთულია. | o46 | 0 | 2 | 0 | ||||
| წვდომის კოდი 2 (ნაწილობრივ წვდომა) | o64 | 0 | 100 | 0 | ||||
| Save the controllers present settings to the programming key. Select your own number. | o65 | 0 | 25 | 0 | ||||
| Load a set of settings from the programming key (previously saved via o65 function) | o66 | 0 | 25 | 0 | ||||
| შეცვალეთ კონტროლერების ქარხნული პარამეტრები წინამდებარე პარამეტრებით | o67 | გამორთულია | On | გამორთულია | ||||
| Re alternative application for the S5 sensor (maintain the setting at 0 if it is used as defrost sensor, otherwise 1 = product sensor and 2 = condenser sensor with alarm) | o70 | 0 | 2 | 0 | ||||
| Select application for relay 4: 1=defrost/light, 2= alarm | o72 | defrost /
განგაში |
Მსუბუქი /
განგაში |
1 | 2 | 2 | ||
| სერვისი | ||||||||
| ტემპერატურა იზომება S5 სენსორით | u09 | |||||||
| სტატუსი DI1 შეყვანაზე. ჩართვა/1=დახურული | u10 | |||||||
| ღამის რეჟიმის სტატუსი (ჩართული ან გამორთული) 1=დახურული | u13 | |||||||
| წაიკითხეთ წინამდებარე რეგულაციის მითითება | u28 | |||||||
| Status on relay for cooling (Can be controlled manually, but only when r12=-1) | u58 | |||||||
| Status on relay for fans (Can be controlled manually, but only when r12=-1) | u59 | |||||||
| Status on relay for defrost. (Can be controlled manually, but only when r12=-1) | u60 | |||||||
| ტემპერატურა გაზომილია Sair სენსორით | u69 | |||||||
| Status on relay 4 (alarm, defrost, light). (Can be controlled manually, but only when
r12=-1) |
u71 | |||||||
ქარხნული დაყენება
თუ თქვენ გჭირდებათ ქარხნულად დაყენებულ მნიშვნელობებზე დაბრუნება, ეს შეიძლება გაკეთდეს ამ გზით:
- ამოიღეთ მიწოდება ტtagე კონტროლერს
- Keep the upper and lower buttons depressed at the same time as you reconnect the supply voltage.
| ბრალია კოდი ჩვენება | Alarm code display | სტატუსი კოდი ჩვენება | |||
| E1 | კონტროლერის გაუმართაობა | A 1 | მაღალი ტემპერატურის სიგნალიზაცია | S0 | მარეგულირებელი |
| E6 | შეცვალეთ ბატარეა + შეამოწმეთ საათი | A 2 | დაბალი ტემპერატურის სიგნალიზაცია | S1 | ელოდება კოორდინირებული გაყინვის დასრულებას |
| E 27 | S5 სენსორის შეცდომა | A 4 | კარის სიგნალიზაცია | S2 | ჩართვის კომპრესორი |
| E 29 | Sair სენსორის შეცდომა | A 5 | Max. Hold time | S3 | გამორთული კომპრესორი |
| A 15 | DI 1 alarm | S4 | წვეთოვანი დრო | ||
| A 45 | ლოდინის რეჟიმი | S10 | გაგრილება შეჩერებულია მთავარი გადამრთველით | ||
| A 59 | ქეისის გაწმენდა | S11 | Refrigeration stopped by a thermostat | ||
| A 61 | კონდენსატორის სიგნალიზაცია | S14 | გაყინვის თანმიმდევრობა. გაყინვა | ||
| S15 | Defrost sequence. Fan delay | ||||
| S16 | Refrigeration stopped because of open DI
შეყვანა |
||||
| S17 | კარი ღია (ღია DI შეყვანა) | ||||
| S20 | გადაუდებელი გაგრილება | ||||
| S25 | გამოსავლების ხელით კონტროლი | ||||
| S29 | ქეისის გაწმენდა | ||||
| S32 | გამოშვების შეფერხება გაშვებისას | ||||
| არა | The defrost temperature cannot be dis-
ითამაშა. დროზე დაფუძნებული გაჩერებაა |
||||
| -დ- | Defrost in progress / First cooling after
გალღობა |
||||
| PS | საჭიროა პაროლი. პაროლის დაყენება | ||||
დაწყება:
რეგულაცია იწყება მაშინ, როდესაც ტtage ჩართულია.
- გაიარეთ ქარხნის პარამეტრების გამოკვლევა. შეიტანეთ ნებისმიერი საჭირო ცვლილება შესაბამის პარამეტრებში.
- For the network. Set the address in o03 and then transmit it to the gateway/ system unit with setting o04.
ფუნქციები
Here is a description of the individual functions. A controller only contains this part of the functions. Cf. the menu survey.
| ფუნქცია | Პარამეტრი | Parameter by operation via data com- კომუნიკაცია |
| ნორმალური ჩვენება | ||
| Normally the temperature value from thermostat sensor Sair is displayed. | ჰაერის ჩვენება (u69) | |
| თერმოსტატი | თერმოსტატის კონტროლი | |
| დაყენების წერტილი
რეგულირება ეფუძნება დაყენებულ მნიშვნელობას პლუს გადაადგილებას, თუ ეს შესაძლებელია. მნიშვნელობა დგინდება ცენტრალურ ღილაკზე დაჭერით. დაყენებული მნიშვნელობის დაბლოკვა ან შეზღუდვა შესაძლებელია დიაპაზონით r02 და r03 პარამეტრებით. The reference at any time can be seen in ”u28 Temp. ref” |
ამოჭრა °C | |
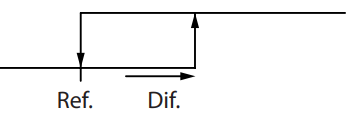
| დიფერენციალური
როდესაც ტემპერატურა აღემატება მითითებას + დაყენებულ დიფერენციალს, კომპრესორის რელე ჩაიჭრება. ის ისევ ამოიჭრება, როცა ტემპერატურა დაყენებულ მითითებამდე ჩამოვა. |
r01 | დიფერენციალური |
| კომპლექტი წერტილი შეზღუდვა
The controller’s setting range for the set point may be narrowed down, so that much too high or much too low values are not set accidentally – with resulting damages. |
||
| To avoid a too high setting of the set point, the max. allowable reference value must be lowered. | r02 | მაქსიმალური გამორთვა °C |
| To avoid a too low setting of the set point, the min. allowable reference value must be increased. | r03 | მინიმალური გამორთვა °C |
| ეკრანის ტემპერატურის ჩვენების კორექტირება
თუ პროდუქტებზე ტემპერატურა და კონტროლერის მიერ მიღებული ტემპერატურა არ არის იდენტური, შეიძლება განხორციელდეს ნაჩვენები ეკრანის ტემპერატურის ოფსეტური რეგულირება. |
r04 | დისპ. ადჯ. კ |
| ტემპერატურის ერთეული
დააყენეთ აქ, თუ კონტროლერმა ტემპერატურის მნიშვნელობები °C-ში ან °F-ში უნდა აჩვენოს. |
r05 | ტემპერატურა ერთეული
°C=0. / °F=1 (მხოლოდ °C AKM-ზე, პარამეტრის მიუხედავად) |
| შესწორება of სიგნალი from Sair
კომპენსაციის შესაძლებლობა გრძელი სენსორის კაბელის მეშვეობით |
r09 | საირის რეგულირება |
| გაგრილების დაწყება/შეჩერება
ამ პარამეტრით შესაძლებელია გაცივების დაწყება, შეჩერება ან გამოსავლების ხელით გადაფარვის დაშვება. Start / stop of refrigeration can also be accomplished with the external switch function con- nected to the DI input. გათიშვის შემთხვევაში, მაცივარი „მოლოდინის სიგნალიზაციას“ გამოიმუშავებს. |
r12 | მთავარი შეცვლა
1: დაწყება 0: გაჩერდი -1: ნებადართულია შედეგების ხელით კონტროლი |
| ღამის დაბრუნების მნიშვნელობა
The thermostat’s reference will be the set point plus this value when the controller changes over to night operation. (Select a negative value if there is to be cold accumulation.) |
r13 | ღამის ოფსეტი |
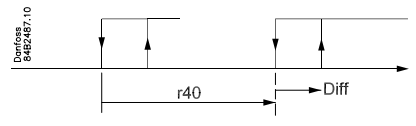
| საცნობარო გადაადგილების გააქტიურება
When the function is changed to ON the thermostat differential will be increased by the value in r40. Activation can also take place via input DI (defined in o02).
|
r39 | Th. ოფსეტი |
| მითითების გადაადგილების მნიშვნელობა
The thermostat reference and the alarm values are shifted by the following number of degrees when the displacement is activated. Activation can take place via r39 or input DI |
r40 | Th. ოფსეტი K |
| ღამის უკუსვლა
(start of night signal) |
| განგაში | განგაშის პარამეტრები | |
| კონტროლერს შეუძლია განგაშის გაცემა სხვადასხვა სიტუაციებში. როდესაც განგაშია, კონტროლერის წინა პანელზე ყველა შუქის დიოდი (LED) ციმციმდება და განგაშის რელე ჩაირთვება. | With data communication, the importance of individual alarms can be defined. Setting is carried out in the “Alarm destinations” menu. | |
| განგაშის დაგვიანება (განგაშის ხანმოკლე შეფერხება)
If one of the two limit values is exceeded, a timer function will commence. The alarm will not become active until the set time delay has passed. The time delay is set in minutes. |
A03 | განგაშის დაგვიანება |
| კარის სიგნალიზაციის დროის შეფერხება
დროის შეფერხება წუთებშია მითითებული. ფუნქცია განსაზღვრულია o02-ში. |
A04 | კარის გაღება |
| გაგრილების დროის შეფერხება (განგაშის ხანგრძლივი დაყოვნება)
This time delay is used during start-up, during defrost, and immediately after a defrost. There will be change-over to the normal time delay (A03) when the temperature has dropped below the set upper alarm limit. დროის შეფერხება წუთებშია მითითებული. |
A12 | Pulldown del |
| განგაშის ზედა ზღვარი
Here you set when the alarm for high temperature is to start. The limit value is set in °C (absolute value). The limit value will be raised during night operation. The value is the same as the one set for night setback, but will only be raised if the value is positive. ზღვრული მნიშვნელობა ასევე გაიზრდება საცნობარო გადაადგილებასთან (r39) დაკავშირებით. |
A13 | მაღალი ლიმიტ ჰაერი |
| განგაშის ქვედა ზღვარი
აქ თქვენ აყენებთ დაბალი ტემპერატურის სიგნალიზაციის ჩართვის დროს. ზღვრული მნიშვნელობა დაყენებულია °C-ში (აბსოლუტური მნიშვნელობა). ზღვრული მნიშვნელობა ასევე გაიზრდება საცნობარო გადაადგილებასთან (r39) დაკავშირებით. |
A14 | დაბალი ლიმიტირებული ჰაერი |
| Delay of a DI alarm
A cut-out/cut-in input will result in alarm when the time delay is passed. The function is defined in o02. |
A27 | AI.Delay DI |
| High alarm limit for condenser temperature
If the S5 sensor is used for monitoring the condenser’s temperature you must set the value at which the alarm is to become activated. The value is set in °C. The definition of S5 as a condenser sensor is accomplished in o70. The alarm is reset again to 10 K below the set temperature. |
A37 | Condtemp Al. |
| განგაშის გადატვირთვა |
| კომპრესორი | კომპრესორის კონტროლი | |
| The compressor relay works in conjunction with the thermostat. When the thermostat calls for refrigeration will the compressor relay be operated. | ||
| სირბილის დრო
To prevent irregular operation, values can be set for the time the compressor is to run once it has been started. And for how long it at least to be stopped? გალღობის დაწყებისას მუშაობის დრო არ შეინიშნება. |
||
| მინ. ჩართვის დრო (წუთებში) | c01 | მინ. დროზე |
| მინ. გამორთვის დრო (წუთებში) | c02 | მინ. გამორთვის დრო |
| Reversed relay function for the compressor relay
0: ნორმალური ფუნქცია, სადაც რელე ერთვება, როდესაც საჭიროა გაგრილება 1: Reversed function where the relay cuts out when refrigeration is demanded (this wiring pro- duces the result that there will be refrigeration if the supply voltagკონტროლერთან კავშირი ვერ ხერხდება). |
c30 | Cmp რელე NC |
| ყინვა | გაყინვის კონტროლი | |
| კონტროლერი შეიცავს ტაიმერის ფუნქციას, რომელიც ნულზეა დაყენებული ყოველი გალღობის დაწყების შემდეგ. ტაიმერის ფუნქცია დაიწყებს გალღობას, თუ/როდესაც ინტერვალი ამოიწურება.
ტაიმერის ფუნქცია იწყება, როდესაც მოცულობაtage is connected to the controller, but it is displaced the first time by the setting in d05. If there is power failure, the timer value will be saved and continue from here when the power returns. ეს ტაიმერის ფუნქცია შეიძლება გამოყენებულ იქნას გალღობის დაწყების მარტივ საშუალებად, მაგრამ ის ყოველთვის იმოქმედებს როგორც უსაფრთხოების გალღობა, თუ შემდგომი გალღობის ერთ-ერთი დაწყება არ განხორციელდება. The controller also contains a real-time clock. By means of the settings of this clock and times for the required defrost times, defrost can be started at fixed times of the day. If there is a risk of power failure for periods longer than four hours, a battery module should be mounted in the controller. Defrost start can also be accomplished via data communication, via contact signals or manually დაწყება. |
||
| კონტროლერში ყველა ჩართვის მეთოდი იმუშავებს. სხვადასხვა ფუნქცია უნდა იყოს დაყენებული, რათა გალღობა ერთმანეთის მიყოლებით არ „იტრიალოს“.
Defrost can be accomplished with electricity, hot gas or brine. ფაქტობრივი გალღობა შეჩერდება დროის ან ტემპერატურის მიხედვით ტემპერატურის სენსორის სიგნალით. |
||
| გაყინვის მეთოდი
Here you set whether defrost is to be accomplished with electricity or “non”. During defrost the defrost relay will be cut in. When gas defrosting the compressor relay will be cut in during defrost. |
d01 | Def. method |
| გაყინვის გაჩერების ტემპერატურა
გალღობა წყდება მოცემულ ტემპერატურაზე, რომელიც იზომება სენსორით (სენსორი განსაზღვრულია d10-ში). ტემპერატურის მნიშვნელობა დაყენებულია. |
d02 | ტემპერატურის გაჩერება |
| გაყინვის დაწყებას შორის ინტერვალი
ფუნქცია ნულებზეა დაყენებული და ტაიმერის ფუნქციას ყოველი გალღობის დაწყებისას ჩართავს. დროის ამოწურვის შემდეგ, ფუნქცია გალღობას დაიწყებს. ფუნქცია გამოიყენება როგორც მარტივი გალღობის დაწყება, ან შეიძლება გამოყენებულ იქნას როგორც დამცავი ღონისძიება, თუ ნორმალური სიგნალი არ გამოჩნდება. თუ მთავარი/დამოუკიდებელი რეჟიმის გალღობა საათის ფუნქციის ან მონაცემთა გადაცემის გარეშე გამოიყენება, გალღობებს შორის მაქსიმალური დროის სახით გამოყენებული იქნება ინტერვალი. თუ გალღობა მონაცემთა კომუნიკაციის საშუალებით არ დაიწყება, გალღობებს შორის მაქსიმალურ დროდ გამოყენებული იქნება ინტერვალი. როდესაც ხდება გალღობა საათის ფუნქციით ან მონაცემთა კომუნიკაციით, ინტერვალის დრო უნდა დაყენდეს დაგეგმილზე ოდნავ უფრო ხანგრძლივი პერიოდით, რადგან სხვა შემთხვევაში ინტერვალის დრო დაიწყებს გალღობას, რომელსაც ცოტა მოგვიანებით მოჰყვება დაგეგმილი. In connection with a power failure, the interval time will be maintained, and when the power returns the interval time will continue from the maintained value. 0-ზე დაყენებისას ინტერვალის დრო არ არის აქტიური. |
d03 | დეფინიციის ინტერვალი (0=გამორთული) |
| გალღობის მაქსიმალური ხანგრძლივობა
ეს პარამეტრი წარმოადგენს უსაფრთხოების დროს, ამიტომ გალღობა შეჩერდება, თუ ის უკვე არ შეჩერებულა ტემპერატურის ან კოორდინირებული გალღობის საფუძველზე. (The setting will be the defrost time if d10 is selected to be 0) |
d04 | მაქსიმალური განსაზღვრის დრო |
| დრო სtagგალღობის მოთხოვნილება დაწყებისას
ფუნქცია მხოლოდ მაშინ არის შესაბამისი, თუ გაქვთ რამდენიმე მაცივრის მოწყობილობა ან ჯგუფი, სადაც გსურთ გალღობა.tagერთმანეთთან მიმართებაში. ფუნქცია ასევე აქტუალურია მხოლოდ იმ შემთხვევაში, თუ თქვენ აირჩიეთ გალღობა ინტერვალური დაწყებით (d03). ფუნქცია დროის ინტერვალს d03 წუთების მითითებული რაოდენობით აჭიანურებს, მაგრამ ამას მხოლოდ ერთხელ აკეთებს და ეს ხდება პირველივე გალღობისას, როდესაც voltage დაკავშირებულია კონტროლერთან. ფუნქცია გააქტიურდება ყოველი დენის გამორთვის შემდეგ. |
d05 | დრო სtagg. |
| წვეთოვანი დრო
აქ თქვენ აყენებთ დროს, რომელიც უნდა გავიდეს გალღობიდან კომპრესორის ხელახლა ჩართვამდე (დრო, როდესაც წყალი აორთქლებიდან ჩამოწვეთდება). |
d06 | წვეთების დრო |
| ვენტილატორის ჩართვის შეფერხება გალღობის შემდეგ
აქ თქვენ აყენებთ დროს, რომელიც უნდა გავიდეს კომპრესორის ჩართვის მომენტიდან გალღობის შემდეგ ვენტილატორის ხელახლა ჩართვამდე. (დრო, როდესაც წყალი „მიბმულია“ აორთქლებაზე). |
d07 | FanStartDel |
| ვენტილატორის დაწყების ტემპერატურა
ვენტილატორი ასევე შეიძლება ჩაირთოს „ვენტილატორის ჩართვის დაყოვნების შემდეგ“ პუნქტში მითითებულზე ცოტა უფრო ადრე, თუ გალღობის სენსორი S5 აფიქსირებს აქ დაყენებულზე დაბალ მნიშვნელობას. |
d08 | ვენტილატორის დაწყების ტემპერატურა |
| ვენტილატორი ჩაირთო გალღობის დროს
აქ შეგიძლიათ დააყენოთ, იმუშავებს თუ არა ვენტილატორი გალღობის დროს. 0: გაჩერებულია (მუშაობს ამოტუმბვის გამორთვის დროს) 1: Running during the whole phase 2: Running during the heating phase only. After that stopped |
d09 | ვენტილატორის დროს |
| გაყინვის სენსორი
აქ თქვენ განსაზღვრავთ გალღობის სენსორს. 0: არა, გალღობა დაფუძნებულია დროზე 1: S5 2: საირი |
d10 | DefStopSens. |
| მოთხოვნისამებრ გალღობა - გაციების ჯამური დრო
აქ დაყენებულია გალღობის გარეშე დაშვებული გაგრილების დრო. თუ დრო ამოიწურება, გალღობა დაიწყება. = 0 პარამეტრის შემთხვევაში ფუნქცია გამორთულია. |
d18 | MaxTherRunT |
| გალღობა მოთხოვნისამებრ – S5 ტემპერატურა
The controller will follow the effectivity of the evaporator, and via internal calculations and measurements of the S5 temperature it will be able to start a defrost when the variation of the S5 temperature becomes larger than required. აქ თქვენ ადგენთ S5 ტემპერატურის დაშვებული რხევის ზომას. როდესაც ეს მნიშვნელობა გადაეცემა, დაიწყება გალღობა. ფუნქციის გამოყენება შესაძლებელია მხოლოდ 1:1 სისტემებში, როდესაც აორთქლების ტემპერატურა დაიკლებს ჰაერის ტემპერატურის შესანარჩუნებლად. ცენტრალურ სისტემებში ფუნქცია უნდა გამოირთოს. = 20 პარამეტრით ფუნქცია გამორთულია |
d19 | CutoutS5Dif. |
| If you wish to see the temperature at the S5 sensor, push the controller’s lowermost button. | გაყინვის ტემპერატურა. | |
| If you wish to start an extra defrost, push the controller’s lowermost button for four seconds. You can stop an ongoing defrost in the same way | დეფ დაწყება
Here you can start a manual defrost. |
|
| გამართეთ დეფის შემდეგ
ჩართულია, როდესაც კონტროლერი მუშაობს კოორდინირებული გალღობით. |
||
| გალღობის მდგომარეობის სტატუსი გალღობისას
1= ტუმბოს გამორთვა / გალღობა |
||
| ფანი | ვენტილატორის კონტროლი | |
| ვენტილატორი გათიშულ კომპრესორთან გაჩერდა
აქ შეგიძლიათ აირჩიოთ, გამორთოთ თუ არა ვენტილატორი კომპრესორის გათიშვისას. |
F01 | ვენტილატორის გაჩერება CO
(დიახ = ვენტილატორი გაჩერდა) |
| Delay of fan stop when the compressor is cut out
თუ კომპრესორის გათიშვისას ვენტილატორის გამორთვა აირჩიეთ, კომპრესორის გათიშვის შემდეგ შეგიძლიათ ვენტილატორის გამორთვა გადადოთ. აქ შეგიძლიათ დააყენოთ დროის შეფერხება. |
F02 | ფან დელ. კო |
| ვენტილატორის გაჩერების ტემპერატურა
The function stops the fans in an error situation, so that they will not provide power to the appli- ance. If the defrost sensor registers a higher temperature than the one set here, the fans will be stopped. There will be re-start at 2 K below the setting. ფუნქცია არ არის აქტიური გალღობის დროს ან გალღობის შემდეგ ჩართვის დროს. With setting +50°C the function is interrupted. |
F04 | FanStopTemp. |
| გაყინვის შიდა განრიგი/საათის ფუნქცია | ||
| (არ გამოიყენება, თუ გალღობის გარე განრიგი გამოიყენება მონაცემთა კომუნიკაციის საშუალებით.) ექვსამდე ინდივიდუალური დრო შეიძლება დაყენდეს გალღობის დასაწყებად მთელი დღის განმავლობაში. | ||
| გაყინვის დაწყება, საათის დაყენება | t01-t06 | |
| გალღობის დაწყება, წუთების დაყენება (1 და 11 ერთადაა და ა.შ.). როდესაც t01-დან t16-მდე ყველა მნიშვნელობა 0-ის ტოლია, საათი გალღობას არ დაიწყებს. | t11-t16 | |
| რეალურ დროში საათი
საათის დაყენება მხოლოდ მაშინ არის საჭირო, როდესაც მონაცემთა კომუნიკაცია არ არის. ოთხ საათზე ნაკლები ხანგრძლივობის ელექტროენერგიის გათიშვის შემთხვევაში, საათის ფუნქცია შენახული იქნება. ბატარეის მოდულის დამონტაჟებისას საათის ფუნქცია შეიძლება უფრო დიდხანს შენარჩუნდეს. (EKC 202 only) |
||
| საათი: საათის დაყენება | t07 | |
| საათი: წუთის დაყენება | t08 | |
| საათი: თარიღის დაყენება | t45 | |
| საათი: თვის პარამეტრი | t46 | |
| საათი: წლის პარამეტრი | t47 |
| სხვადასხვა | სხვადასხვა | |
| გამომავალი სიგნალის შეფერხება გაშვების შემდეგ
After start-up or a power failure, the controller’s functions can be delayed so that overloading of the electricity supply network is avoided. აქ შეგიძლიათ დააყენოთ დროის შეფერხება. |
o01 | DelayOfOutp. |
| Digital input signal – DI
The controller has a digital input which can be used for one of the following functions: Off: The input is not used 1) Status display of a contact function 2) Door function. When the input is open it signals that the door is open. The refrigeration and the fans are stopped. When the time setting in “A04” is passed, an alarm will be given and refrigeration will be resumed. 3) Door alarm. When the input is open it signals that the door is open. When the time setting in “A04” is passed, there will be alarm. 4) Defrost. The function is started with a pulse signal. The controller will register when the DI input is activated. The controller will then start a defrost cycle. If the signal is to be received by several controllers it is important that ALL connections are mounted the same way (DI to DI and GND to GND). 5) Main switch. Regulation is carried out when the input is short-circuited, and regulation is stopped when the input is put in place. OFF. 6) Night operation. When the input is short-circuited, there will be a regulation for night operation. 7) Reference displacement when DI1 is short-circuited. Displacement with “r40”. 8) Separate alarm function. An alarm will be given when the input is short-circuited. 9) Separate alarm function. An alarm will be given when the input is opened. (For 8 and 9 the time delay is set in A27) 10) Case cleaning. The function is started with a pulse signal. Cf. also description on page 4. 11) Inject on/off. Off when DI is open. |
o02 | DI 1 კონფიგურაცია.
განმარტება ხდება მარცხნივ ნაჩვენები რიცხვითი მნიშვნელობით. (0 = გამორთვა)
DI მდგომარეობა (გაზომვა) DI შეყვანის მიმდინარე სტატუსი აქ ნაჩვენებია. ჩართულია თუ გამორთული. |
| მისამართი
თუ კონტროლერი ჩაშენებულია ქსელში მონაცემთა კომუნიკაციით, მას უნდა ჰქონდეს მისამართი, ხოლო მონაცემთა კომუნიკაციის მთავარ კარიბჭეს უნდა იცოდეს ეს მისამართი. The installation of the data communication cable has been mentioned in a separate document, “RC8AC”. The address is set between 1 and 240, gateway determined The address is sent to the system manager when the menu o04 is set to ‘ON’, or when the system manager’s scanning function is activated. (o04 is only to be used if the data communication is LON.) |
After installation of data communication, the controller can be operated on an equal footing with the other controllers in ADAP- KOOL® refrigeration controls. | |
| o03 | ||
| o04 | ||
| წვდომის კოდი 1 (წვდომა ყველა პარამეტრზე)
If the settings in the controller are to be protected with an access code you can set a numerical value between 0 and 100. If not, you can cancel the function with setting 0. (99 will always give you access). |
o05 | – |
| სენსორის ტიპი
Normally, a Pt 1000 sensor with great signal accuracy is used. But you can also use a sensor with another signal accuracy. That may either be a PTC 1000 sensor or an NTC sensor (5000 Ohm at 25°C). ყველა დამონტაჟებული სენსორი უნდა იყოს ერთი და იგივე ტიპის. |
o06 | სენსორის კონფიგურაციის Pt = 0
PTC = 1 NTC = 2 |
| ნაბიჯის ჩვენება
Yes: Gives steps of 0.5° No: Gives steps of 0.1° |
o15 | დისპლეის ნაბიჯი = 0.5 |
| მაქსიმალური ლოდინის დრო კოორდინირებული გალღობის შემდეგt
When a controller has completed a defrost, it will wait for a signal that tells the refrigeration may be resumed. If this signal fails to appear for one reason or another, the controller will itself starts the refrigeration when this standby time has elapsed. |
o16 | მაქსიმალური დაყოვნების დრო |
| სინათლის ფუნქციის კონფიგურაცია
1) The relay cuts in during day operation 2) The relay to be controlled via data communication 3) The relay to be controlled by the door switch defined in either o02 where the setting is selected to either 2 or 3. When the door is opened the relay will cut in. When the door is closed again there will be a time delay of two minutes before the light is switched off. |
o38 | განათების კონფიგურაცია |
| გააქტიურება of light relay
The light relay can be activated here (if 038=2) |
o39 | განათების დისტანციური მართვა |
| ქეისის გაწმენდა
The status of the function can be followed here or the function can be started manually. 0 = Normal operation (no cleaning) 1 = Cleaning with fans operating. All other outputs are Off. 2 = Cleaning with stopped fans. All outputs are Off. If the function is controlled by a signal at the DI input, the relevant status can be seen here in the მენიუ. |
o46 | კორპუსის გაწმენდა |
| წვდომის კოდი 2 (შესწორებებზე წვდომა)
There is access to adjustments of values, but not to configuration settings. If the settings in the controller are to be protected with an access code you can set a numerical value between 0 and 100. If not, you can cancel the function with setting 0. If the function is used, access code 1 (o05) ასევე უნდა გამოყენებული იყოს. |
o64 | – |
| კონტროლერის ამჟამინდელი პარამეტრების კოპირება
With this function, the controller’s settings can be transferred to a programming key. The key can contain up to 25 different sets. Select a number. All settings except for Address (o03) will be copied. When copying has started, the display returns to o65. After two seconds, you can move into the menu again and check whether the copying was satisfactory. Showing of a negative figure spells problems. See the significance in the Fault Message section. |
o65 | – |
| პროგრამირების კოდიდან კოპირება
This function downloads a set of settings previously saved in the controller. Select the relevant number. All settings except for Address (o03) will be copied. When copying has started the display returns to o66. After two seconds, you can move back into the menu again and check whether the copying was satisfactory. Showing of a negative figure spells problems. See the significance in the Fault Message section. |
o66 | – |
| შენახვა როგორც ქარხნული პარამეტრი
With this setting you save the controller’s actual settings as a new basic setting (the earlier fac- tory settings are overwritten). |
o67 | – |
| Other application for S5 sensor
Maintain the setting at 0 if the sensor has been defined as defrost sensor in D10. If D10 has been set at 0 or 2 the S5 input can be used as product sensor or condenser sensor. Here you define which: 0: Defrost sensor 1: Product sensor 2: Condenser sensor with alarm |
o70 | S5 Config |
| სარელეო 4
Here you define the application for relay 4: 1: Defrost (EKC 202A) or Light (EKC 202C) 2: Alarm |
o72 | DO4 Config |
| – – – ღამის უკუსვლა 0=დღე
1=ღამე |
| სერვისი | სერვისი | |
| ტემპერატურა იზომება S5 სენსორით | u09 | S5 ტემპერატურა. |
| Status on DI input. on/1=closed | u10 | DI1 სტატუსი |
| Status on night operation (on or off) 1=night operation | u13 | ღამის კონდიციონერი |
| წაიკითხეთ წინამდებარე რეგულაციის მითითება | u28 | ტემპერატურის მითითება |
| * Status on relay for cooling | u58 | Comp1/LLSV |
| * Status on relay for fan | u59 | ვენტილატორის რელე |
| * Status on relay for defrost | u60 | დეფ. რელე |
| * Temperature measured with Sair sensor | u69 | საირ ტემ |
| * Status on relay 4 (alarm, defrost or light function) | u71 | DO4 status |
| *) ყველა ელემენტი არ იქნება ნაჩვენები. ჩანს მხოლოდ შერჩეული აპლიკაციის კუთვნილი ფუნქცია. |
| შეცდომის შეტყობინება | სიგნალიზაცია | |
| In an error situation the LED’s on the front will flash and the alarm relay will be activated. If you push the top button in this situation you can see the alarm report in the display. If there are further push again to see them.
There are two kinds of error reports – it can either be an alarm occurring during the daily opera- tion, or there may be a defect in the installation. A-სიგნალიზაცია არ გამოჩნდება მანამ, სანამ დაყენებული დროის შეფერხება არ ამოიწურება. მეორეს მხრივ, ელექტრონული სიგნალიზაცია ხილული გახდება შეცდომის დადგომის მომენტში. (განგაში არ იქნება ხილული მანამ, სანამ არის აქტიური E სიგნალიზაცია). აქ არის შეტყობინებები, რომლებიც შეიძლება გამოჩნდეს: |
1 = განგაში |
|
| A1: მაღალი ტემპერატურის სიგნალიზაცია | მაღალი სიხშირის სიგნალიზაცია | |
| A2: დაბალი ტემპერატურის სიგნალიზაცია | დაბალი ტ. სიგნალიზაცია | |
| A4: კარის სიგნალიზაცია | კარების სიგნალიზაცია | |
| A5: ინფორმაცია. პარამეტრი o16 ვადაგასულია | მაქსიმალური დაყოვნების დრო | |
| A15: Alarm. Signal from DI input | DI1 სიგნალიზაცია | |
| A45: Standby position (stopped refrigeration via r12 or DI input) | ლოდინის რეჟიმი | |
| A59: Case cleaning. Signal from DI input | ქეისის გაწმენდა | |
| A61: Condenser alarm | Cond. alarm | |
| E1: კონტროლერის გაუმართაობა | EKC შეცდომა | |
| E6: რეალურ დროში საათის გაუმართაობა. შეამოწმეთ ბატარეა / გადატვირთეთ საათი. | – | |
| E27: სენსორის შეცდომა S5-ზე | S5 შეცდომა | |
| E29: Sensor error on Sair | საირის შეცდომა | |
| When copying settings to or from a copying key with functions o65 or o66, the following infor- mation may appear:
0: კოპირება დასრულდა და კარგია 4: კოპირების გასაღები სწორად არ არის დამონტაჟებული 5: კოპირება არასწორი იყო. გაიმეორეთ კოპირება 6: EKC-ში კოპირება არასწორია. გაიმეორეთ კოპირება 7: კოპირების გასაღებში კოპირება არასწორია. გაიმეორეთ კოპირება 8: კოპირება შეუძლებელია. შეკვეთის ნომერი ან პროგრამული უზრუნველყოფის ვერსია არ ემთხვევა. 9: კომუნიკაციის შეცდომა და დროის ამოწურვა. 10: კოპირება კვლავ მიმდინარეობს (The information can be found in o65 or o66 a couple of seconds after copying has been started). |
||
| სიგნალიზაციის მიმართულებები | ||
| ინდივიდუალური სიგნალიზაციის მნიშვნელობის განსაზღვრა შესაძლებელია პარამეტრით (0, 1, 2 ან 3). |
გაფრთხილება! Direct start of compressors
To prevent compressor breakdown parameters c01 and c02 should be set according to the supplier’s requirements o,r in general, Hermetic Compressors c02 min. 5 minutes, Semihermetic Compressors c02 min. 8 minutes, and c01 min. 2 to 5 minutes ( Motor from 5 to 15 KW ) * ). Direct activation of solenoid valves does not require settings different from factory (0).
გადალახვა
კონტროლერი შეიცავს რიგ ფუნქციას, რომელთა გამოყენება შესაძლებელია მთავარ კარიბჭეში / სისტემის მენეჯერში გადაფარვის ფუნქციასთან ერთად.
|
ფუნქციონირება მონაცემთა კომუნიკაციის საშუალებით |
კარიბჭეში გამოსაყენებელი ფუნქციები გადაფარვის ფუნქცია |
Used parameter in EKC 202 |
| გაყინვის დაწყება | გაყინვის კონტროლი დროის განრიგი | – – – დეფ. დაწყება |
| კოორდინირებული გაყინვა | გაყინვის კონტროლი |
– – – HoldAfterDef u60 Def.relay |
| ღამის უკუსვლა |
დღე/ღამის კონტროლი დროის განრიგი |
– – – ღამის უკუსვლა |
| სინათლის კონტროლი | დღე/ღამის კონტროლი დროის განრიგი | o39 სინათლის პულტი |
კავშირები
ელექტრომომარაგება
- 230 ვ ც
სენსორები
- Sair is a thermostat sensor.
- S5 is a defrost sensor and is used if defrost has to be stopped based on temperature. It may, however, also be used as a product sensor or condenser sensor.
Digital On/Off signal
A cut-in input will activate a function. The possible functions are described in menu o02.
რელეები
The general connections are: Refrigeration. The contact will cut in when the controller demands refrigeration Defrost. Fan.
- Alarm. The relay is cut out during normal operation and cuts in in alarm situations and when the controller is dead (de-energised)
- Light. The contact will cut in when the controller demands light.
ელექტრო ხმაური
Cables for sensors, DI inputs, and data communication must be kept separate from other electrical cables:
- გამოიყენეთ ცალკე საკაბელო უჯრები
- შეინახეთ მანძილი კაბელებს შორის მინიმუმ 10 სმ
- თავიდან უნდა იქნას აცილებული გრძელი კაბელები DI შესასვლელთან
მონაცემთა კომუნიკაცია
If data communication is used, it is important that the installation of the data communication cable is performed correctly. See the separate literature No. RC8AC.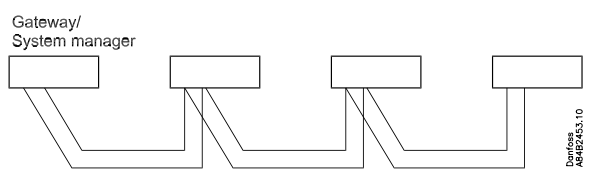
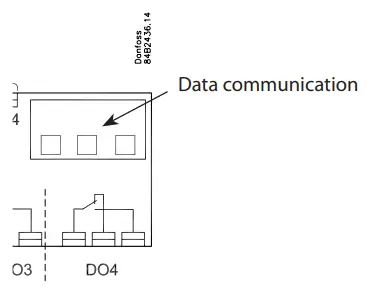
- MODBUS or LON-RS485 via insert cards.
შეკვეთა
- ტემპერატურის სენსორები: please refer to lit. no. RK0YG

ტექნიკური მონაცემები
| მიწოდება voltage | 230 V ac +10/-15 %. 2.5 VA, 50/60 ჰც | ||
| სენსორებიც 3 ცალი გამორთულია | Pt 1000 ან
PTC 1000 ან NTC-M2020 (5000 ohm / 25°C) |
||
|
სიზუსტე |
საზომი დიაპაზონი | -60-დან +99°C-მდე | |
|
კონტროლერი |
±1 K -35°C-ზე ქვემოთ
±0.5 K -35-დან +25°C-მდე ±1 K +25°C-ზე ზემოთ |
||
| Pt 1000
სენსორი |
±0.3 K 0°C-ზე
±0.005 K გრადზე |
||
| ჩვენება | LED, 3 ციფრი | ||
|
ციფრული შეყვანები |
Signal from contact functions Requirements to contacts: Gold plating, Cable length must be max. 15 m
გამოიყენეთ დამხმარე რელეები, როდესაც კაბელი გრძელია |
||
| ელექტრო კავშირის კაბელი | მაქს.1,5 მმ2 მრავალბირთვიანი კაბელი
მაქს. 1 მმ2 on sensors and DI inputs |
||
|
რელეები * |
IEC60730 | ||
| EKC 202
|
DO1 | 8 (6) A & (5 FLA, 30 LRA) | |
| DO2 | 8 (6) A & (5 FLA, 30 LRA) | ||
| DO3 | 6 (3) A & (3 FLA, 18 LRA) | ||
| DO4** | 4 (1) A, Min. 100 mA** | ||
| მონაცემთა კომუნიკაცია | Via insert card | ||
|
გარემო |
0-დან +55°C-მდე, მუშაობის დროს
ტრანსპორტირების დროს -40-დან +70°C-მდე |
||
| 20 - 80% Rh, არა შედედებული | |||
| არ არის შოკის გავლენა/ვიბრაცია | |||
| დანართი | IP65 წინა მხრიდან.
ღილები და შეფუთვა წინა მხარესაა ჩასმული. |
||
| გაქცევის რეზერვი საათისთვის |
4 საათი |
||
|
დამტკიცებები |
EU Low Voltage დირექტივა და EMC მოთხოვნები CE- მარკირების დაცვას
EKC 202: UL approval acc. UL 60730 LVD გამოცდილი აკ. EN 60730-1 და EN 60730-2-9, A1, A2 ელექტრომაგნიტური თავსებადობა ტესტირებულია EN 61000-6-3 და EN 61000-6-2 სტანდარტების შესაბამისად |
||
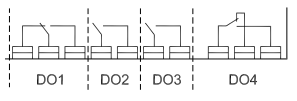

- DO1 and DO2 are 16 A relays. The mentioned 8 A can be increased up to 10 A, when the ambient temperature is kept below 50°C. DO3 and DO4 are 8A relays. Above max. The load must be kept.
- ოქროთი მოპირკეთება უზრუნველყოფს კარგ ფუნქციონირებას მცირე კონტაქტური დატვირთვით
Danfoss can accept no responsibility for possible errors in catalogues, brochures, and other printed material. Danfoss reserves the right to alter its products without notice. This also applies to products already on order provided that such alterations can be made without subsequent changes being necessary in specifications already agreed. All trademarks in this material are property of the respective companies. Danfoss and Danfoss logotype are trademarks of Danfoss A/S. All rights reserved.
ხშირად დასმული კითხვები
How do I start a defrost cycle?
A defrost cycle can be started in various ways, including interval, refrigeration time, contact signal, manual activation, schedule, or network communication.
What can the digital input be used for?
The digital input can be utilized for functions such as door contact with an alarm notification if the door remains open.
დოკუმენტები / რესურსები
 |
Danfoss EKC 202A Controller For Temperature Control [pdf] მომხმარებლის სახელმძღვანელო 202A, 202B, 202C, EKC 202A Controller For Temperature Control, EKC 202A, Controller For Temperature Control, For Temperature Control, Temperature Control |