JTECH IStation Transmitter Network Setup
Connecting Transmitter to Network
Integrating with pagers
To utilize pagers, you will require an Integration Station transmitter plugged into your network router or directly in a wall connection to deliver messages.
As of publication date, JTECH products using this configuration include, but are not limited to, HostConcepts, SmartCall Messenger, DirectSMS, DirectAlert, CloudAlert, FindMe with Arriva.
JTECH strives to ensure most programming is completed prior to shipment; however, some of the items listed below will require the use of a wired USB keyboard to perform. Please ensure that you have one available to proceed if one was not purchased with the equipment.
 Your Integration Station transmitter requires a dedicated IP address within your network. To configure the transmitter, you will require the information below, an Ethernet cable, and a free port on your network and router.
Please contact your IT Administrator to obtain the address information prior to proceeding. If provided prior to shipping, JTECH will configure the transmitter in advance.
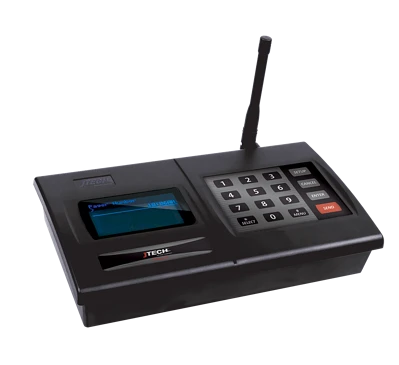
To configure the transmitter
Company Code: ___ ___ ___ ___ ___ ___ ___ ___ ___
Company Token: ___ ___ ___ ___ ___ ___ ___ ___ ___ ___ ___ ___ ___ ___ ___
Dedicated IP Address: ___ ___ ___. ___ ___ ___ . ___ ___ ___ . ___ ___ ___ (example: 192.168.001.222)
Gateway Address: ___ ___ ___. ___ ___ ___ . ___ ___ ___ . ___ ___ ___ (example: 192.168.001.001)
Subnet Mask Address: ___ ___ ___. ___ ___ ___ . ___ ___ ___ . ___ ___ ___ (example: 255.255.255.000)
DNS IP Address: ___ ___ ___. ___ ___ ___ . ___ ___ ___ . ___ ___ ___ (example: 008.008.008.008)
Connecting Transmitter to Network
- Press SETUP, enter the password 6629 and press ENTER, you should see TCPIP SETUP.
- Press * MENU 1x. The display will say IP ADDRESS; press ENTER to edit this field
- Enter the 12-digit IP address IT has provided, when entered press ENTER to accept.
- Press MENU 1x. The display will say SUBNET MASK; press ENTER to edit this field.
- Press MENU 1x. The display will say GATEWAY IP.; press ENTER to edit this field.
- Enter the 12-digit IP address IT has provided, when entered press ENTER to accept.
- Enter the 12-digit IP address IT has provided, when entered press ENTER to accept.
- Press CANCELL to exit the menus
- Connect transmitter to your network router by plugging an Ethernet cable in the available port, then into the transmitter jack labeled LAN CABLE On the back of the transmitter the light on the transmitter jack should illuminate green when the connection is live
NOTE: The transmitter will display a small `T’ in the upper right-hand corner when messages are received from the software and broadcast .
If you experience any issues, please contact JTECH for assistance. wecare@jtech.com or by phone at 1.800.321.6221.
Documents / Resources
 |
JTECH IStation Transmitter Network Setup [pdf] User Guide IStation Transmitter Network Setup, Transmitter Network Setup, Network Setup, IStation Transmitter, Transmitter |


