Johnson Controls PGxWLSHW8 Wireless Upgrade and Expansion Module
Product Information
Specifications
- Product Name: PowerG Qolsys Wired to Wireless Upgrade & Expansion Module (PgxWLSHW8 & PGxHRDW8)
- Compatibility: IQ2+ firmware 2.6.1, IQ Hub firmware 3.1.0, IQ4 / IQ4 Hub firmware 4.1.1
- Enrollment: Auto learn or manual entry of PowerG ID (Starts with 460-xxxx)
Product Usage Instructions
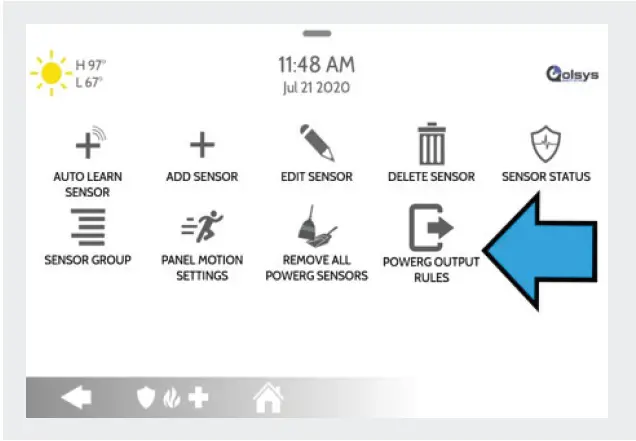
- Access the Installation menu: Installation > Devices > Security Sensors
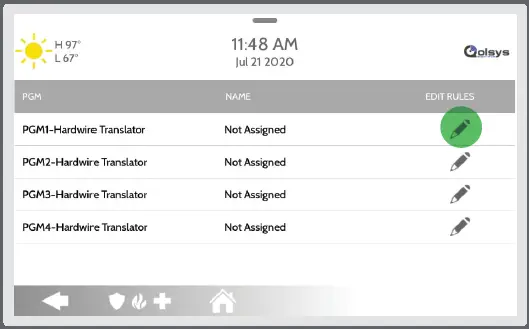
- Click on the pencil symbol to edit or create the PGM rule
- Click “Add” to proceed
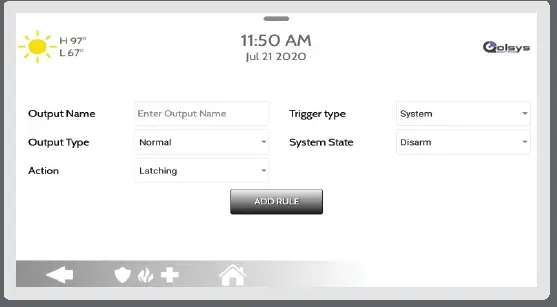
- Enter your PGM Output Name
- Choose Action – Select duration in seconds or minutes
- Choose Trigger Type based on system or zone state
- Choose from the various Arm/Disarm options available
- Click “Add Rule” to save your settings
Additional Information
- Partition on the PGM Output entry screen will only appear if Partitions are enabled
- Utilizing a PowerG keyfob as a latching PGM requires pressing the star button for unlatching
- Motion sensors do not allow the latching action option
- Latching action changes state when a contact opens or closes
- To enable 2-Wire smoke functionalities on the W2W, choose PGM 2 and select 2-
- Multiple rules can be programmed for each PGM output to avoid duplicate or conflicting rules
Introduction
- Enroll Module via auto learn or by entering the PowerG ID manually (Starts with 460-xxxx)
- New Option will be visible, Installation > Devices > Security Sensors
PowerG
Step 1
- Click the pencil symbol to edit or create the PGM rule
Step 2
- Click Add
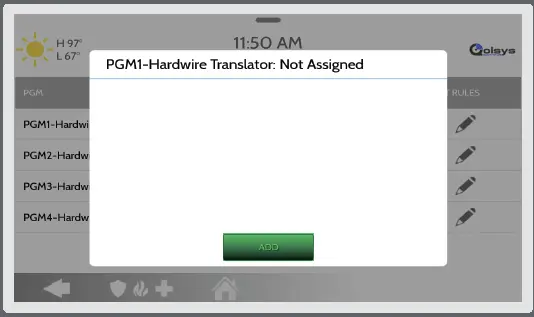
Step 3
- Default View
Step 4
- Enter your PGM Output Name
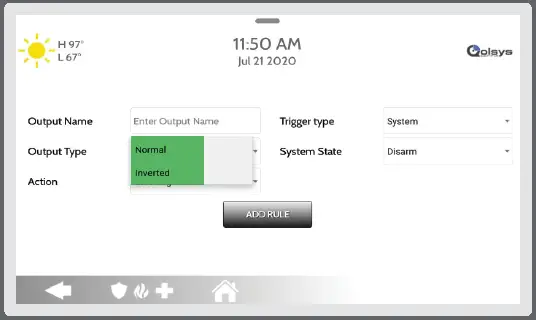
- Choose Output type
- Normal
- Inverted
Step 5
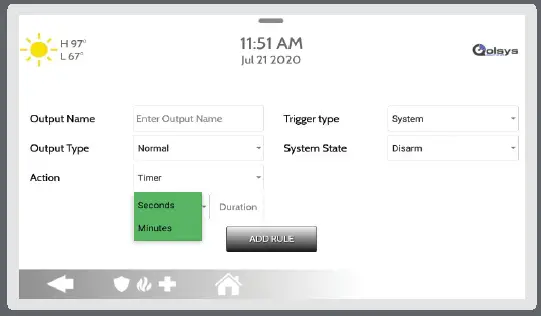
Choose Action
- Latching
- Timer (1 second to 300 minutes)
- Choose seconds or minutes
- Scroll or enter the required duration
Step 6
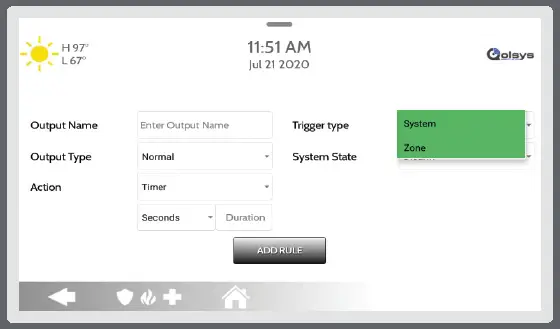
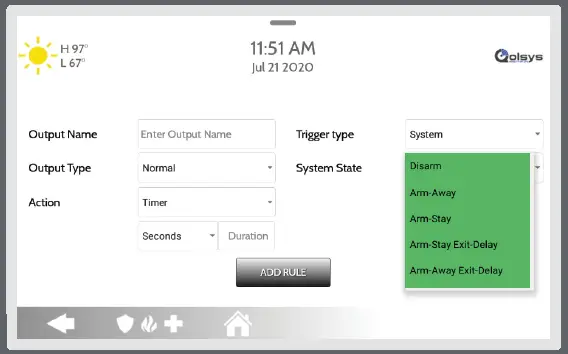
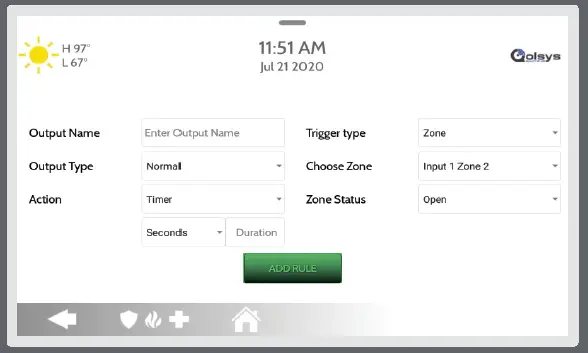
Choose Trigger Type
- System
- Zone
- Command
- 2-Wire Smoke (only available on PGM2)
Step 7
Choose System or Zone state based on the selection
- System State Options
- Disarm
- Arm Away
- Arm Away Entry Delay
- Arm Away Exit Delay
- Arm Stay
- Arm Stay Entry Delay
- Arm Stay Exit Delay
- Arm Night (not available on the panel yet)
- Arm Night Entry Delay (not available on panel yet)
- Arm Night Exit Delay (not available on panel yet)
- Alarm
- Police Emergency
- Aux Emergency
- Fire Emergency
- CO Emergency
- Flood Emergency
- Sensor reset
- Siren Follower
- Zone Options
- Open
- Closed
- Star button (only available with PowerG 4 Button Keyfob)
Step 8
- Click Add Rule to save your settings
- Best practice – All intrusion devices should be powered from AUX1 and all
- Life Safety devices should be powered from AUX2.
- Partition on the PGM Output entry screen will only appear if Partitions are enabled
- When utilizing a PowerG keyfob as a latching PGM, pressing the star button will also unlatch the PGM.
- Motion sensors will not allow the option for Latching action.
- Latching action will change state when a contact opens or closes.
- To enable 2-Wire smoke functionalities on the W2W – Choose PGM 2 and select 2- wire smoke under trigger type.
- When programming any smoke on the W2W, PGM2 will be locked as used by the Smoke Detector.
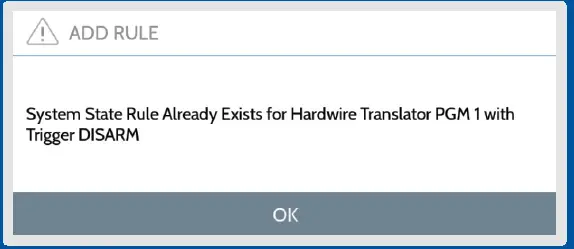
- Multiple rules can be programmed to each PGM output; duplicate rules or conflicting rules on the same PGM output will generate the following;
About Johnson Controls
- Johnson Controls is a global diversified technology and multi-industrial leader serving a wide range of customers in more than 150 countries.
- Our 120,000 employees create intelligent buildings, efficient energy solutions, integrated infrastructure, and next-generation transportation systems that work seamlessly together to deliver on the promise of smart cities and communities.
- Our commitment to sustainability dates back to our roots in 1885, with the invention of the first electric room thermostat.
More Information
- For further information, please refer to www.dsc.com and www.qolsys.com
- © 2020 Johnson Controls. All rights reserved. Product offerings and specifications are subject to change without notice.
- Actual products may vary from photos. Not all products include all features. Availability varies by region; contact your sales representative. PN 300026088
FAQ
- Q: Where can I find further information about the product?
- A: For more details, please refer to www.dsc.com and www.qolsys.com
- Q: How can I troubleshoot issues related to conflicting rules on the same PGM output?
- A: To resolve conflicts, ensure that each rule programmed to a PGM output is unique and does not overlap with others.
- Q: Can I use a PowerG keyfob with latching functionality for this module?
- A: Yes, you can utilize a PowerG keyfob as a latching PGM by pressing the star button to unlatch.
Documents / Resources
 |
Johnson Controls PGxWLSHW8 Wireless Upgrade and Expansion Module [pdf] Instruction Manual IQ2, PGxWLSHW8, PGxHRDW8, PGxWLSHW8 Wireless Upgrade and Expansion Module, PGxWLSHW8, Wireless Upgrade and Expansion Module, Expansion Module |