FOTING CBK-KLC-T1-GN010
FOTING 4200 PSI 高圧洗浄機 取扱説明書
Model: CBK-KLC-T1-GN010
1. はじめに
This manual provides essential information for the safe and effective operation, maintenance, and troubleshooting of your FOTING 4200 PSI Pressure Power Washer. Please read all instructions carefully before use and retain this manual for future reference.
The FOTING 4200 PSI Pressure Power Washer is designed for various cleaning tasks, delivering up to 4200 PSI water pressure at 2.8 GPM water flow. It is suitable for cleaning decks, terraces, driveways, siding, sheds, cars, and other outdoor equipment.
2. 安全情報
一般的な安全上の警告:
- Always wear appropriate personal protective equipment, including safety glasses, gloves, and hearing protection, when operating the pressure washer.
- スプレーガンを人、ペット、電気機器に向けないでください。高圧のスプレーにより、重傷を負う可能性があります。
- 漏れや潜在的な危険を防ぐために、ユニットを起動する前に、すべての接続が確実に固定されていることを確認してください。
- Do not operate the pressure washer in an enclosed space due to potential exhaust fumes (if applicable to electric models, though this is electric, it's a general warning).
- 操作エリアに子供や傍観者を近づけないでください。
- メンテナンスや清掃を行う前に必ず電源を切ってください。
- The Total Stop System (TSS) automatically shuts off the pump when the trigger is not engaged, saving energy and prolonging pump life.
安全ロック機能:
The spray gun is equipped with a safety lock to prevent accidental activation. Always engage the safety lock when the pressure washer is not in use or when changing nozzles.
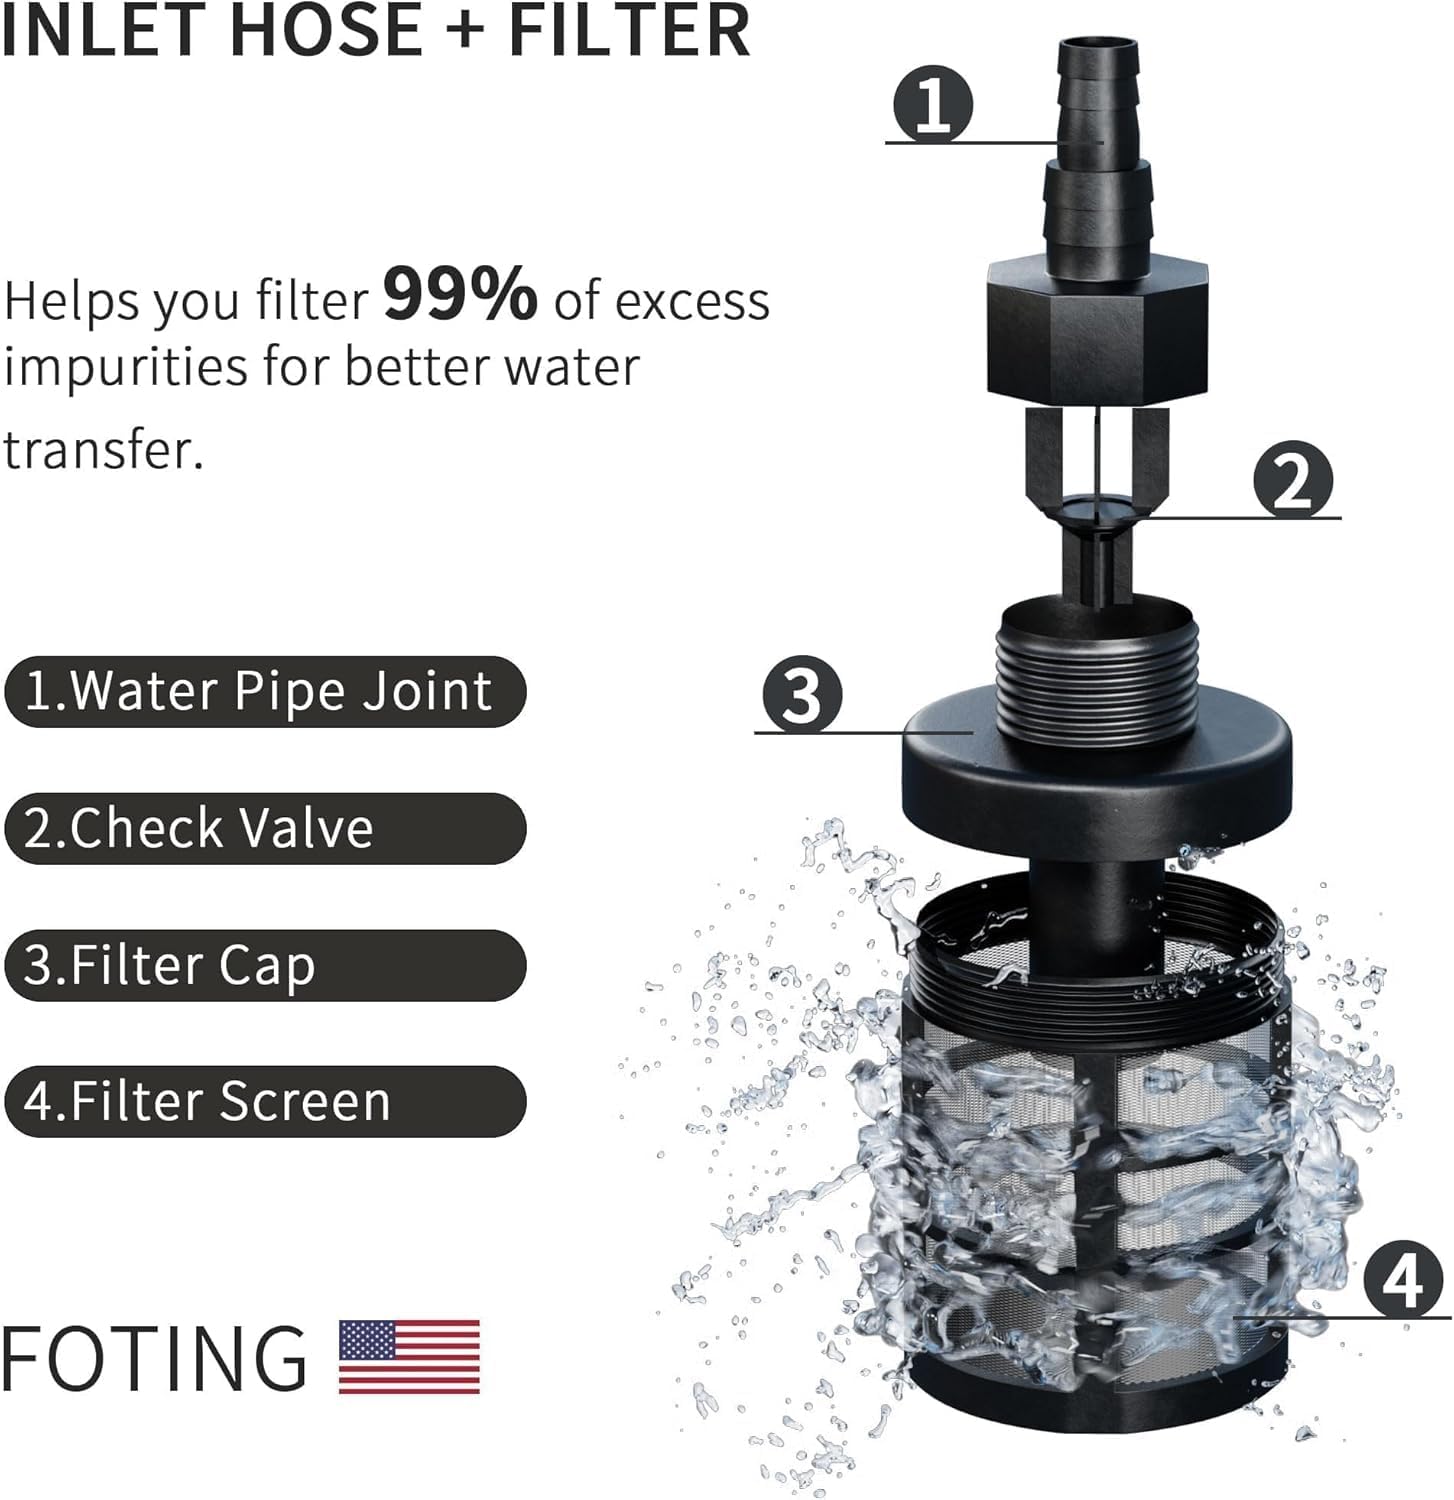
Figure 2.1: Safety Lock and other operational precautions.
3. パッケージ内容
組み立てと操作の前に、すべてのコンポーネントが揃っていることを確認してください。
- FOTING 高圧洗浄機ユニット
- スプレーガン
- 高圧ホース(23フィート)
- 電源コード(35フィート)
- 4つのクイックコネクトノズル(0°、15°、25°、40°)
- インレットホース
- 水フィルターアセンブリ
- 泡砲(洗剤ボトル)
- ノズルクリーニングピン
- 取扱説明書

Figure 3.1: All components included with the FOTING Pressure Power Washer.
4. セットアップ手順
高圧洗浄機を組み立てるには、次の手順に従ってください。
- 取り付けハンドル: Secure the handle to the main unit using the provided swivel screw.
- 取付けブラケット: Attach any necessary mounting brackets for accessories to the main unit.
- 接続ノズル: Insert the desired quick-connect nozzle into the spray gun wand until it clicks securely into place.
- 排水管の取り付け: Connect the high-pressure hose to the water outlet on the pressure washer unit. Ensure it is tightened along the thread to prevent leaks.
- 給水管の取り付け: Connect the inlet hose to the water inlet on the pressure washer. Attach the water filter assembly to the inlet hose and then connect it to your water source (e.g., garden hose).
- ロータリースイッチ: Ensure the rotary switch is in the 'OFF' position before connecting to power.

Figure 4.1: Assembly steps for the FOTING Pressure Power Washer.
Water Filter Assembly:
The included water filter helps remove impurities from the water supply, protecting the pump. Ensure the water pipe joint, check valve, filter cap, and filter screen are correctly assembled and clean before use.
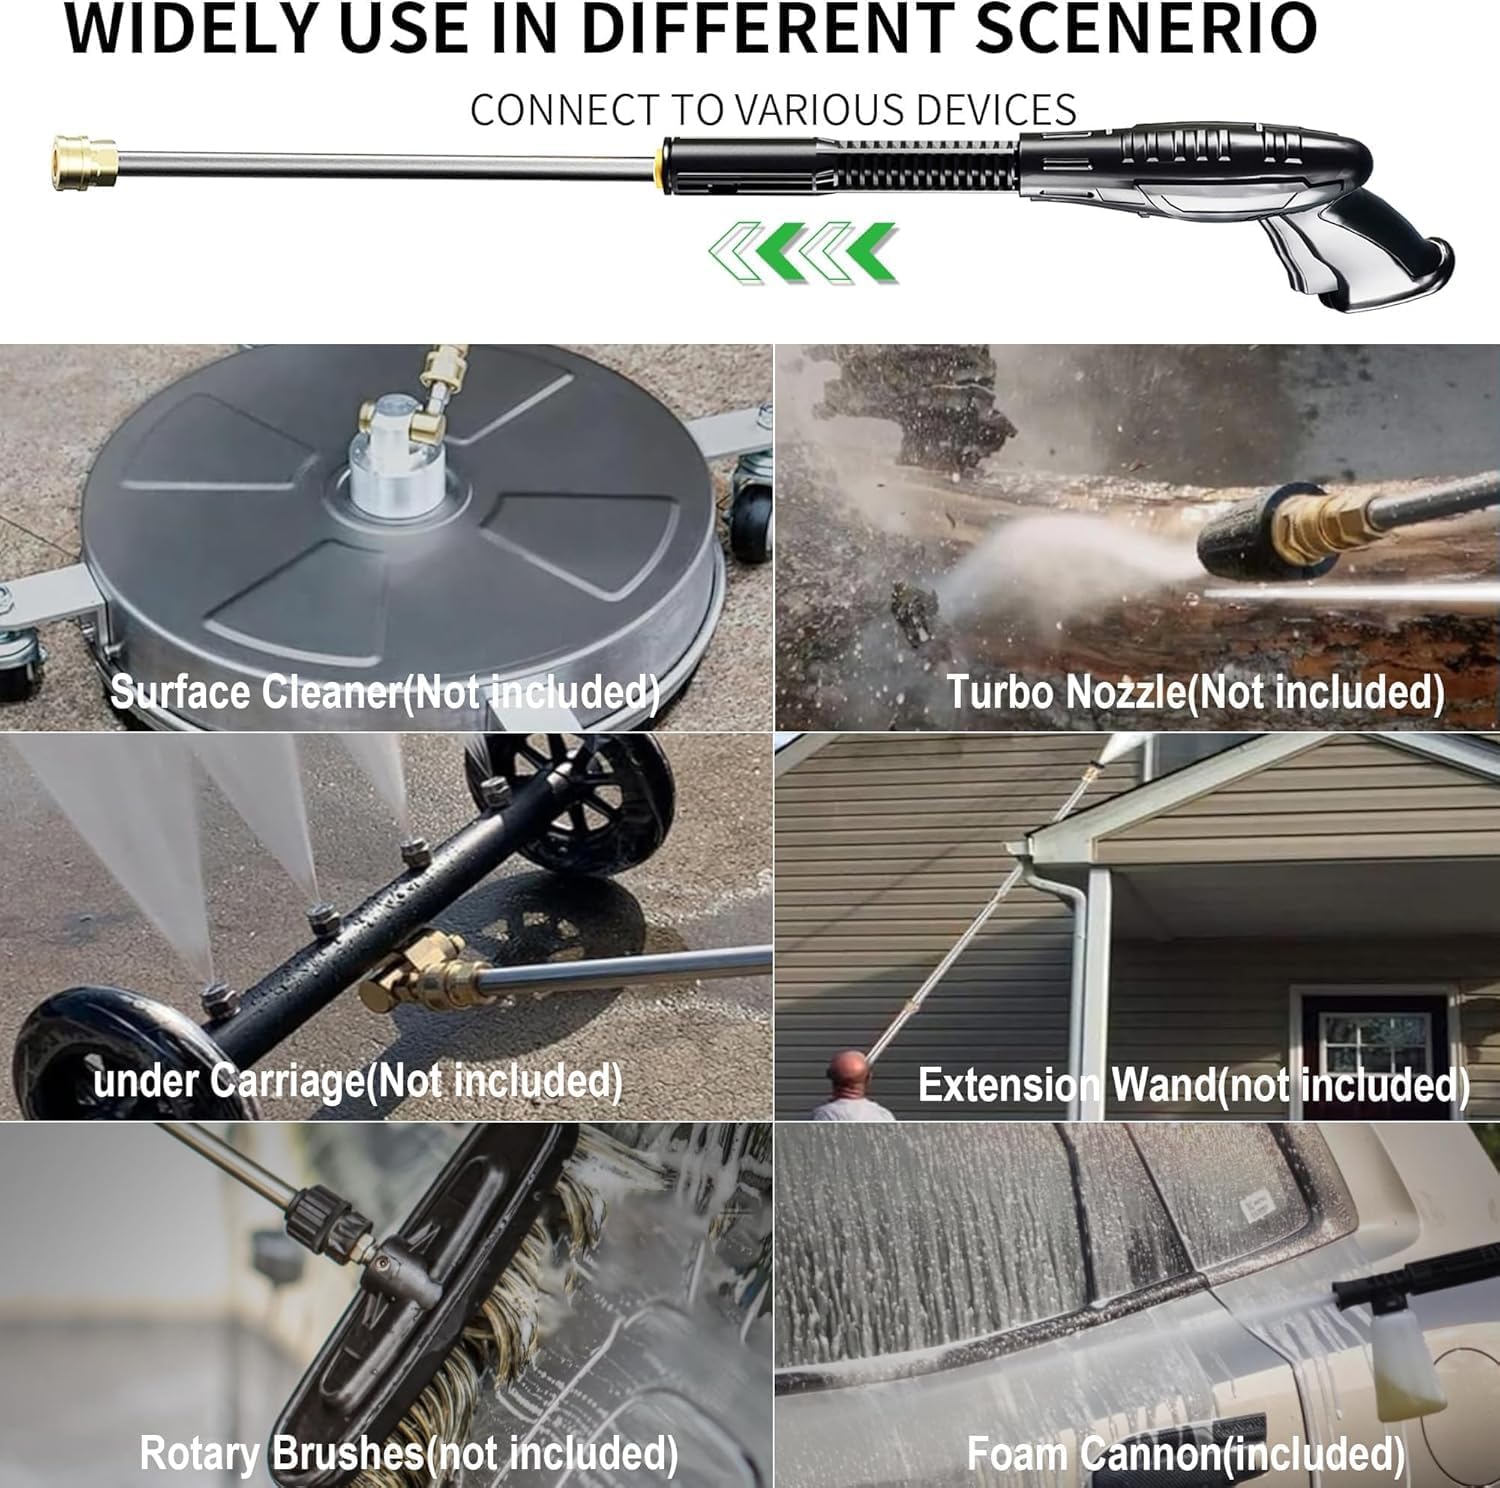
Figure 4.2: Inlet hose and filter components.
5. 操作手順
5.1 初期起動:
- Connect the pressure washer to a grounded power outlet.
- 給水を完全にオンにします。
- スプレーガンのトリガーを引いて、一定の水流が出るまでシステムから空気を排出します。
- Turn the rotary switch to the 'ON' position. The motor will start.
5.2 Nozzle Selection:
高圧洗浄機には 4 つのクイックコネクトノズルが付属しており、それぞれ特定の洗浄作業用に設計されています。
- 0°(赤): For stubborn stains and hard-to-reach areas. Delivers a concentrated, powerful stream. Use with caution.
- 15°(黄色): For mud and sand stains. Provides a powerful, narrow spray for intensive cleaning.
- 25°(グリーン): A versatile angle suitable for general cleaning of fences, wood decks, and painted surfaces.
- 40°(白): For sensitive materials and wider coverage, such as windows and vehicles.

Figure 5.1: Quick-connect nozzle spray patterns.
5.3 Using the Foam Cannon:
The foam cannon allows for the application of detergent. Fill the detergent bottle with appropriate pressure washer soap, attach it to the spray gun, and spray evenly over the surface to be cleaned. Allow the foam to dwell before rinsing with a suitable nozzle.
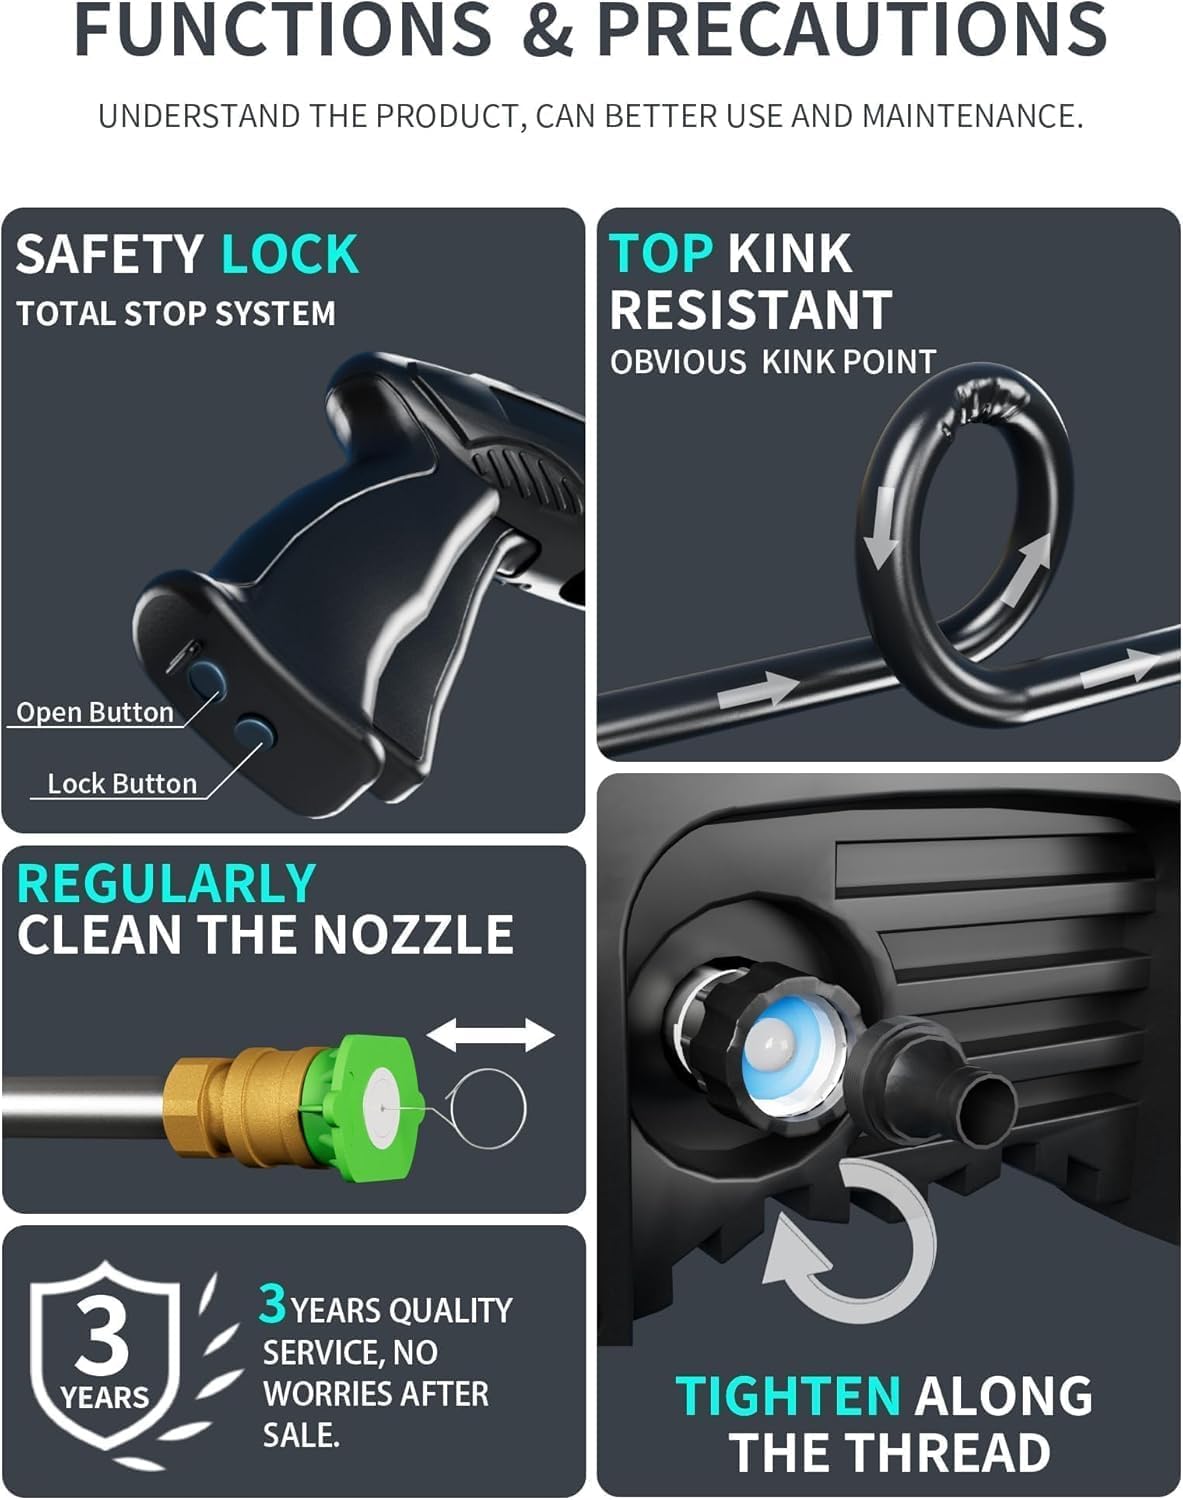
Figure 5.2: Foam cannon in operation.
5.4 Cleaning Applications:
The FOTING Pressure Power Washer is suitable for a variety of cleaning tasks. Always test on an inconspicuous area first to ensure compatibility with the surface and to select the correct nozzle and pressure.

Figure 5.3: Diverse cleaning applications.
5.5 製品デモビデオ:
Video 5.1: Official product video demonstrating the FOTING Pressure Power Washer in use, highlighting its features and cleaning capabilities.
6. メンテナンス
定期的なメンテナンスにより、最適なパフォーマンスが確保され、高圧洗浄機の寿命が延びます。
- きれいなノズル: Regularly inspect and clean the nozzles to prevent blockages. Use the provided nozzle cleaning pin to clear any debris.
- 水フィルターを確認してください: Periodically clean the water filter screen to ensure unrestricted water flow and protect the pump from impurities.
- ホースの検査: 使用する前に、高圧ホースにねじれ、切れ目、損傷がないか確認してください。損傷している場合は交換してください。
- ストレージ: Store the pressure washer in a dry, frost-free environment. Drain all water from the pump and hoses before storing to prevent freezing damage. Utilize the integrated accessory storage for tidy organization.

Figure 6.1: Portable storage and safety features.
7。 トラブルシューティング
一般的な問題とその解決策については、このセクションを参照してください。
| 問題 | 考えられる原因 | 解決 |
|---|---|---|
| ユニットが起動しない | No power supply; Power switch off; Safety lock engaged; Water supply off. | Check power connection; Turn power switch ON; Disengage safety lock; Turn on water supply. |
| 低圧 | 給水不足、ノズルの詰まり、ポンプ内の空気、ホースのねじれ。 | Ensure full water supply; Clean nozzle; Purge air from system (squeeze trigger without power); Straighten hose. |
| 接続部からの水漏れ | 接続が緩んでいる、O リングが損傷している。 | Tighten all connections securely; Inspect and replace damaged O-rings. |
| モーターが頻繁に停止する(TSS) | Normal operation of Total Stop System (TSS); Overheating. | This is normal when the trigger is not engaged. If stopping during continuous use, allow unit to cool down. |
8. 仕様
- ブランド: フォティング
- モデル番号: CBK-KLC-T1-GN010
- 最大圧力: 4200PSI
- 水の流れ: 2.8 GPM
- 電源: AC電気
- 製品寸法: 8 x 15 x 27インチ
- ホースの長さ: 23フィート
- 電源コードの長さ: 35フィート
- 色: 緑
9. 保証とサポート
FOTING offers a 3年間の高品質サービス for this product, ensuring support and peace of mind after purchase.
For technical assistance, troubleshooting beyond this manual, or warranty claims, please contact the seller, CBK-Kelier, through your purchase platform or their official support channels. Please have your model number (CBK-KLC-T1-GN010) and purchase details ready when contacting support.
Optional protection plans are available for extended coverage. Please refer to your purchase details for more information on these plans.
Ask a question about this manual
Ask about setup, troubleshooting, compatibility, parts, safety, or missing instructions. Manuals+ will review the question and use this page’s manual context to help answer it.