1. はじめに
Thank you for choosing the FOTING Electric Pressure Washer. This manual provides essential information for the safe and efficient operation, assembly, maintenance, and troubleshooting of your pressure washer. Please read this manual thoroughly before first use and retain it for future reference.
2. 重要な安全情報
警告:すべての安全上の警告と指示をお読みください。 警告および指示に従わないと、感電、火災、および/または重傷を負う可能性があります。
- 安全メガネ、聴覚保護具、保護靴などの適切な個人用保護具を常に着用してください。
- Ensure the power cord and plug are in good condition. Do not use if damaged.
- Connect the pressure washer only to a grounded outlet.
- スプレーガンを人、動物、電気機器に向けないでください。
- 手術エリアから子供やペットを遠ざけてください。
- Always engage the safety lock on the spray gun when not actively spraying.
- 雨天時や濡れた状態では高圧洗浄機を操作しないでください。
- メンテナンスや清掃を行う前に、必ず電源を切ってください。

図2.1: Safety Lock on Spray Gun. The safety lock prevents accidental activation of the spray gun. Always engage it when the unit is not in use.
3.製品コンポーネント
Familiarize yourself with the parts of your FOTING Electric Pressure Washer:

図3.1: Main Unit and Accessories. This image displays the pressure washer unit, spray gun, high-pressure hose, power cord, various nozzles, detergent tank, and water inlet filter.
- 高圧洗浄機本体
- 高圧スプレーガン
- 高圧ホース(23フィート)
- 電源コード(35フィート)
- クイックコネクトノズル(0°、15°、25°、40°)
- 洗剤タンク
- 給水フィルター
- ホースリール
- 持ち運びに便利な車輪

図3.2: Key Features. This image highlights the cable storage space, child safety switch on the spray gun, stable foot support for the unit, and dedicated storage for nozzles and the detergent sprayer.
4. 仕様
| 特徴 | 価値 |
|---|---|
| モデル番号 | FT-KLC-T3-BL |
| 最大圧力 | 4500PSI |
| 最大流量 | 3.2 GPM |
| 定格巻tage | 120V/60Hz |
| ホース長さ | 23フィート |
| 電源コードの長さ | 35フィート |
| 製品寸法 | 41.9 x 31 x 42.9 cm |
| 重さ | 9.78キロ |
| 認定資格 | EPA, TSS, UL, CE, RoHS |
| 水の保護 | IPX5 |

図4.1: 製品仕様以上view. This image summarizes the key performance and physical specifications of the pressure washer.
5. セットアップと組み立て
高圧洗浄機を組み立てて使用できるようにするには、次の手順に従ってください。
- 取り付けハンドル: Secure the handle to the main unit using the provided swivel screws.
- 取付けブラケット: Attach any necessary mounting brackets for accessories.
- 接続ノズル: Select the desired quick-connect nozzle and firmly attach it to the spray gun.
- 排水管の取り付け: Connect the high-pressure hose to the water outlet on the pressure washer unit.
- 給水管の取り付け: Connect your garden hose to the water inlet on the pressure washer. Ensure the water inlet filter is properly installed to prevent debris from entering the pump.
- ロータリースイッチ: Ensure the rotary switch is in the OFF position before connecting to power.

図5.1: Assembly Steps. This image illustrates the six primary steps for assembling the pressure washer components.
5.1給水接続
Your pressure washer supports three methods for water intake:
- Faucet Self-Priming: Direct connection to a standard garden faucet.
- Bucket Self-Priming: Drawing water from a bucket using the included filter and hose.
- Pool Self-Priming: Drawing water directly from a pool using the included filter and hose.
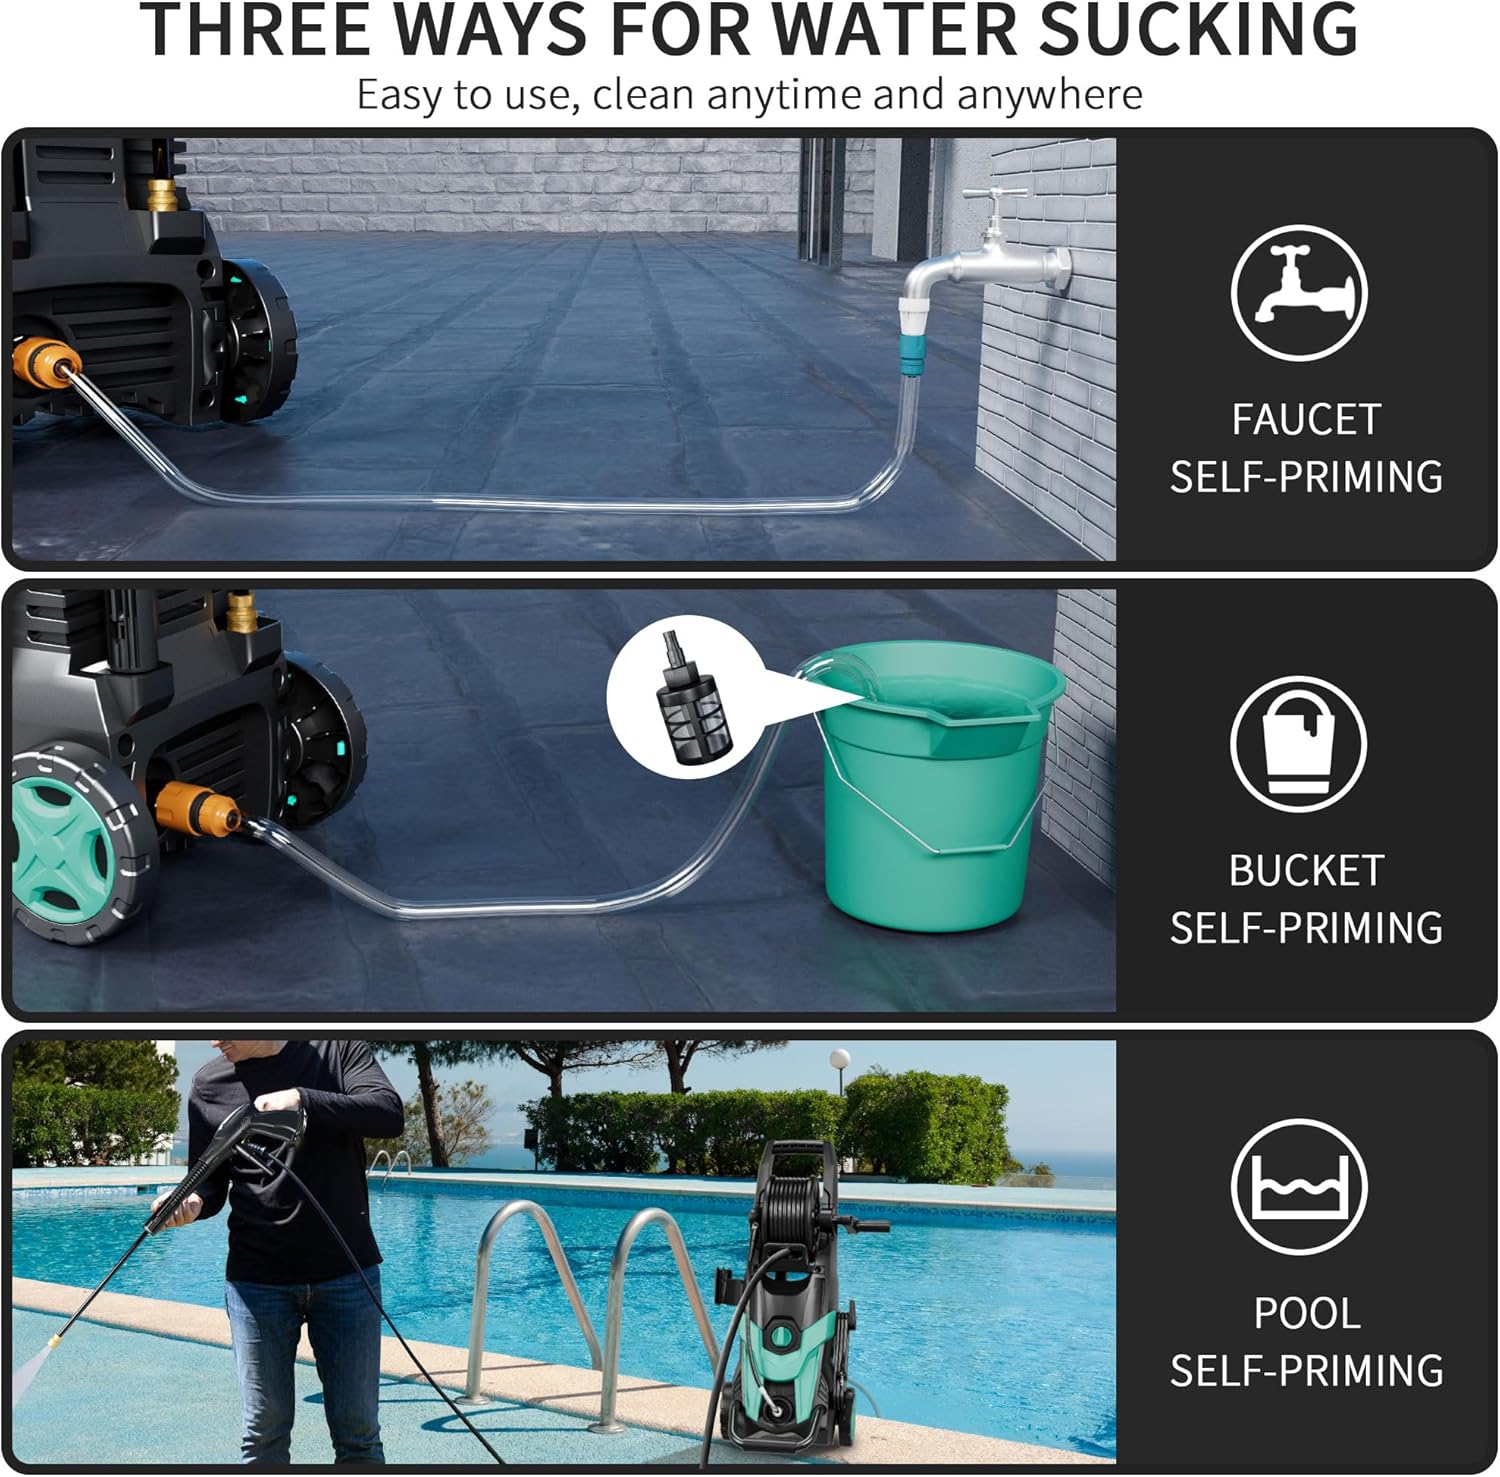
図5.2: Water Sourcing Methods. This diagram demonstrates connecting the pressure washer to a faucet, drawing water from a bucket, or drawing water from a pool.
5.2 Inlet Hose and Filter
The inlet hose filter is crucial for protecting the pump from impurities. Ensure it is clean and properly installed before each use.

図5.3: Inlet Hose and Filter Assembly. This diagram details the components of the water inlet filter, which helps remove impurities from the water supply.
6. 操作手順
6.1 高圧洗浄機の始動
- Ensure all connections (water inlet, high-pressure hose, spray gun) are secure.
- 給水を完全にオンにします。
- スプレーガンのトリガーを引いて、一定の水流が出るまでシステムから空気を排出します。
- 電源コードをアース付きコンセントに差し込みます。
- Turn the rotary switch on the pressure washer to the "ON" position.
- Release the safety lock on the spray gun and begin cleaning.
6.2 ノズルの選択
高圧洗浄機には、それぞれ特定の洗浄作業用に設計された 4 つのクイックコネクトノズルが含まれています。
- 0°(赤)ノズル: For concentrated, powerful blasting on stubborn stains. Use with caution on delicate surfaces.
- 15°(黄色)ノズル: For focused washing, ideal for removing mud and sand stains.
- 25°(緑)ノズル: A versatile nozzle for general cleaning tasks.
- 40°(白)ノズル: For uniform spraying, suitable for sensitive materials and wider coverage.

図6.1: Nozzle Application Guide. This image illustrates the different quick-connect nozzles and their suggested applications for various surfaces and cleaning needs.

図6.2: Quick Connect Nozzle Types. This image provides a visual guide to the four quick-connect nozzles and their specific spray patterns and uses.
6.3 洗剤タンクの使用
For enhanced cleaning, attach the detergent tank and fill it with an appropriate pressure washer-safe cleaning solution. The detergent will be applied at low pressure. After applying detergent, switch to a high-pressure nozzle to rinse the surface thoroughly.

図6.3: Foam Application. This image shows the pressure washer being used with the detergent tank to create foam for cleaning a vehicle.
7. メンテナンス
定期的なメンテナンスにより、最適なパフォーマンスが確保され、高圧洗浄機の寿命が延びます。
- きれいなノズル: Regularly check and clean nozzles for blockages. Use the included nozzle cleaning tool if necessary.
- ホースの検査: 高圧ホースとガーデンホースは、使用前に必ずねじれ、切れ目、漏れがないか確認してください。損傷したホースはすぐに交換してください。
- 浄水入口フィルター: Remove and clean the water inlet filter after every few uses or if water flow is reduced.
- 水を抜きます: After each use, disconnect the water supply and run the pressure washer for a few seconds to drain any remaining water from the pump and hoses. This is especially important before storing in freezing temperatures.
- 適切に保管してください: Store the pressure washer in a dry, protected area. Use the integrated hose reel and cable storage for neat organization.
8。 トラブルシューティング
高圧洗浄機で問題が発生した場合は、次の一般的な問題と解決策を参照してください。
| 問題 | 考えられる原因 | 解決 |
|---|---|---|
| モーターが始動しない | Power cord not plugged in; circuit breaker tripped; ON/OFF switch in OFF position. | Check power connection; reset circuit breaker; turn ON/OFF switch to ON. |
| 水圧がない、または水圧が低い | Water supply off or restricted; clogged water inlet filter; air in pump; incorrect nozzle. | Ensure water supply is fully open; clean filter; purge air by squeezing trigger; select appropriate nozzle. |
| 水漏れ | 緩んだ接続、損傷した O リングまたはシール、ひび割れたホース。 | すべての接続を締め、O リング/シールを点検して交換し、損傷したホースを交換します。 |
| 運転中にモーターが停止する | Overheating (thermal overload protection); power supply interruption. | Allow motor to cool down; check power supply. |
9. 保証と顧客サポート
FOTING provides a 3-year after-sales service for this product. For warranty claims, technical support, or replacement parts, please contact FOTING customer service through your original purchase platform or visit the official FOTING webサイト。
Please have your model number (FT-KLC-T3-BL) and purchase date available when contacting support.