FOTING 3000GPH (12in)
FOTING Sand Filter Pump User Manual
Model: 3000GPH (12in) | Brand: FOTING
1. はじめに
The FOTING 2025 Upgraded Sand Filter Pump is engineered to provide superior filtration for above ground pools up to 8000 gallons. Featuring a robust 1/2 HP motor, a 6-way valve for versatile operation, and intelligent timing settings, this pump ensures efficient water circulation and crystal-clear results. This manual provides essential information for safe installation, operation, and maintenance of your sand filter pump.

Figure 1.1: FOTING Sand Filter Pump Overview
2. 重要な安全情報
本製品を設置およびご使用になる前に、必ずすべての指示をよくお読みになり、理解してください。指示に従わない場合、重傷または死亡につながる可能性があります。
- 電気安全: To reduce the risk of electric shock, install only on a circuit protected by a Ground Fault Circuit Interrupter (GFCI). Do not operate the pump while standing on a wet or damp surface. Ensure all electrical connections are properly grounded.
- 水の安全性: Never operate the pump dry. Ensure the pump is filled with water before starting.
- 子供たち: ポンプや電気接続部に子供を近づけないでください。
- メンテナンス: メンテナンスや清掃を行う前に必ず電源を切ってください。
- 化学薬品: Handle pool chemicals with care and follow manufacturer's instructions.
3. パッケージ内容
以下にリストされているすべてのアイテムがパッケージに含まれていることを確認してください。
- ユーザーマニュアル x 1
- 保証カード x 1
- 1x圧力計
- 排水ピース×1
- フランジClのペア×1amps
- Oリング1個
- 1 xアレンレンチ
- 1 x NPT 1-1/2 Female Connectors
- シーリングテープ1本
- 1xホースClamps
- 砂カバー1個
- 1 x Sylphon Bellows
- フィルターアセンブリ x 1
- ベース x 1
- 1 x Valve Head Assembly
- 1×シリンダー
- ネジとナット1個
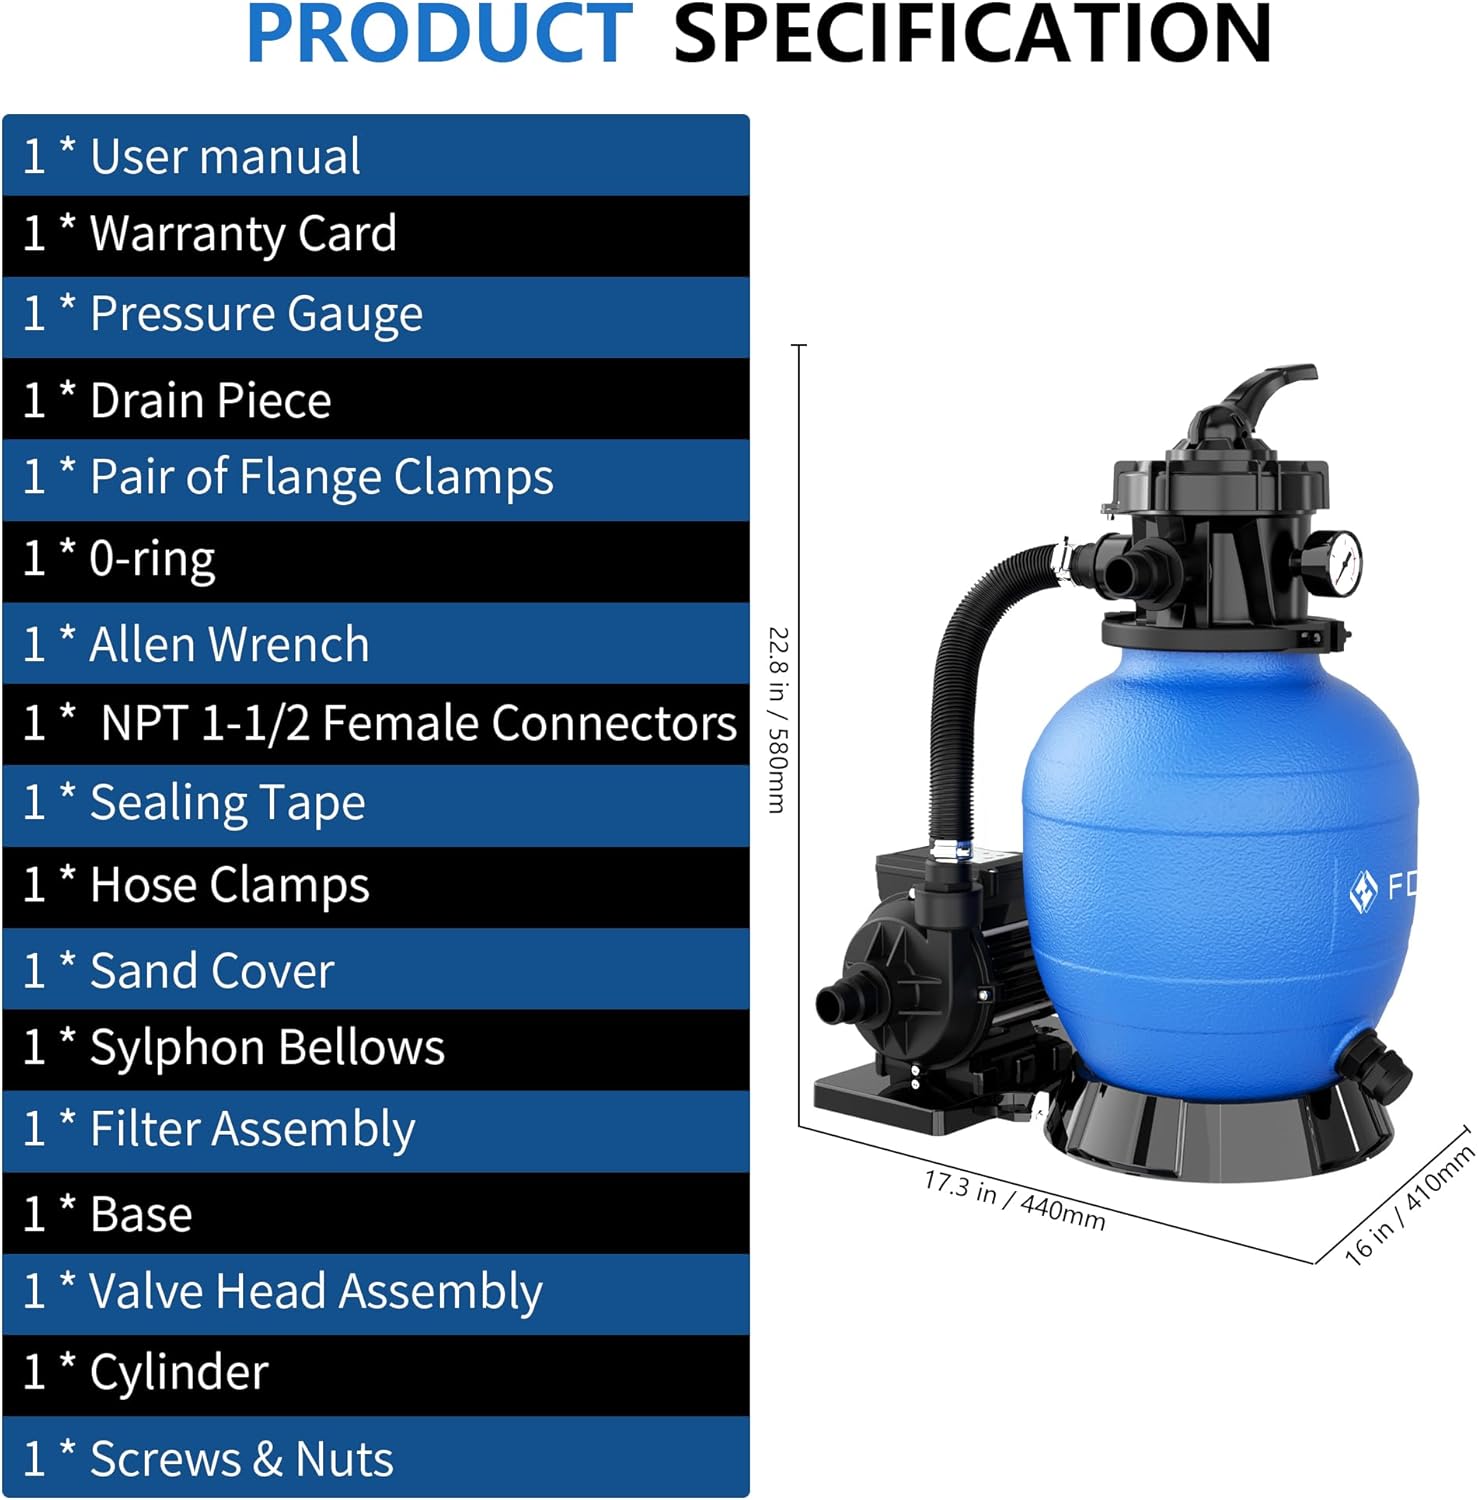
図3.1:製品の構成部品と寸法
4. 製品仕様
| 仕様 | 価値 |
|---|---|
| ブランド | フォティング |
| モデル | 3000GPH (12in) |
| 流量 | Max 3000 GPH |
| 馬力 | 1 / 2 HP |
| マックスヘッド | 27フィート |
| プール容量 | 最大 8000 ガロン |
| 砂容量 | 44ポンド |
| バルブタイプ | 6方向バルブ |
| タイマー設定 | 10 time settings (1-20 hours), Single/Continuous cycles |
| アイテム重量 | 22.9ポンド |
| パッケージ寸法 | 21.5 x 17.25 x 13.5インチ |
| 色 | 青 |
| スタイル | 地上 |
| 材料 | ステンレス鋼 |
| 電源 | AC |
| 初回利用可能日 | 19年2024月XNUMX日 |
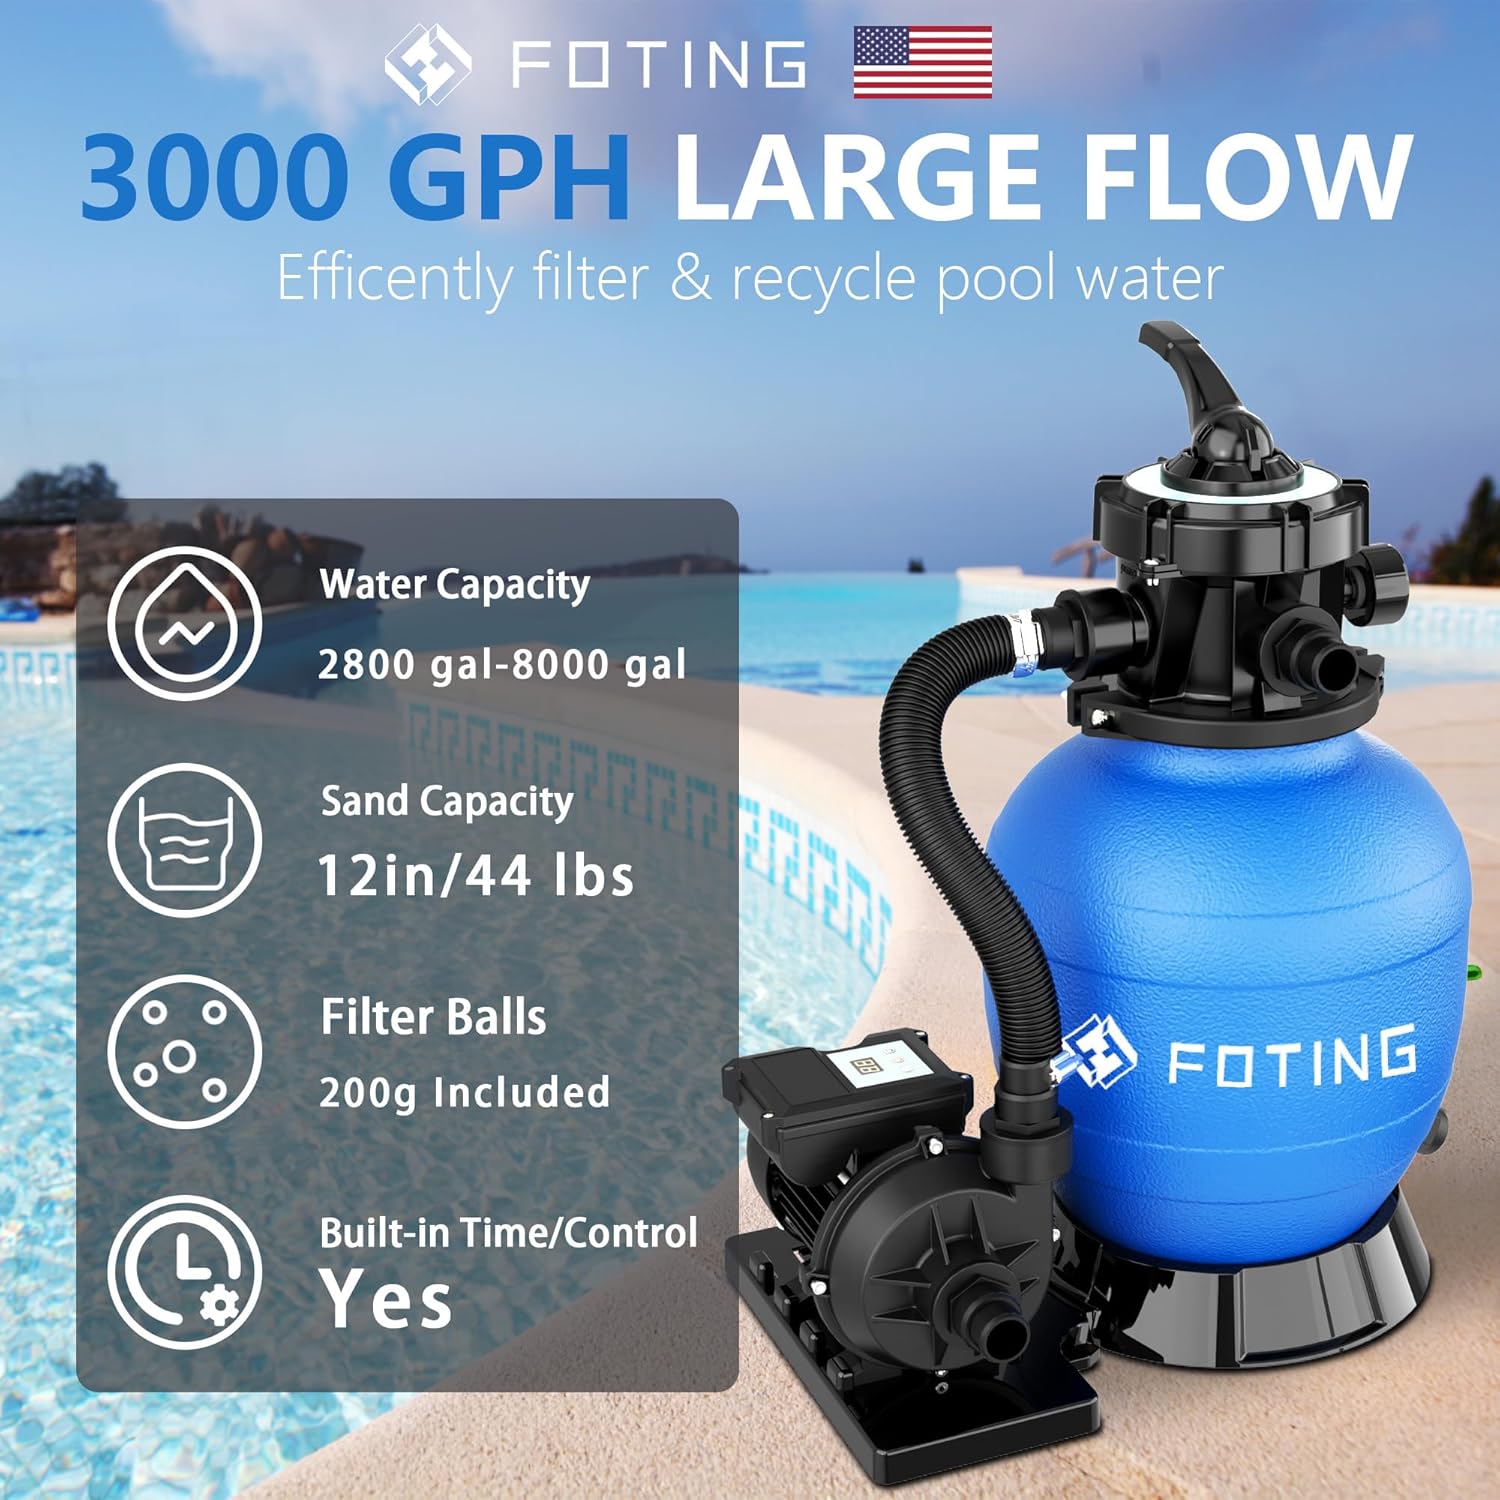
図4.1: 主な製品の特徴
5. セットアップとインストール
Follow these steps to properly set up your FOTING Sand Filter Pump. For a visual guide, please refer to the installation video below.
5.1組み立て手順
- タンクを準備する: Ensure the filter tank (cylinder) is clean and free of debris.
- Install Drain Piece: Attach the drain piece to the bottom of the tank, ensuring the O-ring is properly seated for a watertight seal. Secure it with the cap.
- ベースに配置: Position the filter tank securely onto the provided base.
- 内部コンポーネントを挿入します。 Carefully insert the filter assembly (laterals) into the tank. Ensure the standpipe is centered.
- フィルターメディアを追加: Slowly add the recommended amount of filter sand (44 lbs) or filter balls into the tank. Ensure the standpipe remains centered and covered to prevent media from entering it.
- Clean Tank Rim: Wipe the rim of the tank clean to ensure a good seal with the valve head.
- Attach Valve Head: Carefully place the 6-way valve head onto the tank, aligning the standpipe with the opening in the valve. Ensure the large O-ring is in place between the tank and the valve.
- Secure Valve Head: Use the flange clamps, screws, and nuts to securely fasten the valve head to the tank. Tighten evenly.
- 圧力計の取り付け: Apply sealing tape to the threads of the pressure gauge and screw it into the designated port on the valve head.
- Connect Pump to Filter: Place the pump onto the base next to the filter tank. Connect the pump's outlet to the filter's inlet using the provided hose and hose clamps. Ensure all connections are tight.
- プールに接続: Connect the pool's skimmer line to the pump's inlet and the pool's return line to the filter's outlet. Use appropriate connectors and hose clamps.
Video 5.1: FOTING Sand Filter Pump Assembly Guide. This video demonstrates the step-by-step process of assembling the sand filter pump, including connecting components and preparing it for use with your above ground pool.

図5.2: コントロールパネルの詳細

Figure 5.3: Pressure Gauge

Figure 5.4: 6-Way Valve Head
6. 操作手順
Your FOTING Sand Filter Pump features a versatile 6-way valve and an intelligent timing system for optimal pool maintenance.
6.1 6-Way Valve Functions
The multi-port valve allows you to perform various operations by simply rotating the handle to the desired position. Always turn off the pump before changing valve positions.
- フィルター: Normal filtering mode. Water flows through the sand media, trapping debris, and returns to the pool.
- バックウォッシュ: Cleans the filter by reversing the water flow, flushing trapped debris out through the waste port. Perform when pressure gauge reads 8-10 PSI above starting pressure.
- リンス: Used after backwashing to flush out any remaining dirty water from the filter before returning to FILTER mode.
- 無駄: Bypasses the filter and sends water directly out the waste port. Useful for vacuuming heavy debris or lowering pool water level.
- 休業: Shuts off all flow to the filter and pump. Never operate the pump with the valve in the CLOSED position.
- 循環: Circulates pool water without filtering it through the sand. Useful for mixing chemicals.

Figure 6.1: 6-Way Valve Functions

Figure 6.2: In-depth Explanation of Valve Positions
6.2 Intelligent Timing System
The pump features a 24-hour dual-mode intelligent timing system, allowing you to customize filtration cycles.
- 時間設定: Choose from 10 preset time settings (1, 2, 3, 4, 5, 6, 8, 10, 12, 16, 20 hours) for efficient operation.
- シングルサイクルモード: The pump runs for the set duration and then turns off.
- 連続サイクルモード: The pump runs continuously until manually turned off.

Figure 6.3: Intelligent Timing System

Figure 6.4: Timing Mode Selection
7. メンテナンス
定期的なメンテナンスにより、砂ろ過ポンプの寿命が長くなり、最適なパフォーマンスが確保されます。
7.1 逆洗とすすぎ
Backwash and rinse the filter when the pressure gauge reads 8-10 PSI above its clean starting pressure, or when pool water appears cloudy.
- ポンプをオフにします。
- Set the 6-way valve to BACKWASH.
- Turn on the pump and backwash until the water flowing from the waste port is clear (typically 2-3 minutes).
- ポンプをオフにします。
- Set the 6-way valve to RINSE.
- ポンプをオンにして、30〜60秒間すすいでください。
- ポンプをオフにします。
- Set the 6-way valve to FILTER for normal operation.
7.2 砂の交換
Filter sand typically needs to be replaced every 3-5 years, depending on usage and water quality. Refer to the setup section for instructions on adding filter media.

Figure 7.1: Filter Media (Filter Balls shown, sand also applicable)
7.3 防寒
Before freezing temperatures, drain all water from the pump and filter. Disconnect hoses and store the pump and filter in a dry, protected area to prevent freeze damage.
8。 トラブルシューティング
このセクションでは、砂ろ過ポンプで発生する可能性のある一般的な問題について説明します。
| 問題 | 考えられる原因 | 解決 |
|---|---|---|
| ポンプが作動していない/電源がない | No power to outlet, GFCI tripped, Motor overload, Timer setting | Check power supply, Reset GFCI, Allow motor to cool, Verify timer settings. |
| Low flow / Poor filtration | Dirty filter sand, Clogged skimmer/pump basket, Air in system, Low water level, Improper valve setting | Backwash and rinse filter, Clean baskets, Bleed air from system, Adjust water level, Set valve to FILTER. |
| Water not clearing / Cloudy pool | Insufficient filtration time, Incorrect chemical balance, Filter media needs replacement, Algae bloom | Increase filtration time, Test and adjust pool chemicals, Replace filter sand/balls, Shock pool. |
| Water leaking from pump/filter | Loose connections, Damaged O-rings/gaskets, Cracked housing | Tighten connections, Inspect and replace O-rings/gaskets, Contact customer support for cracked components. |
| ポンプから大きな音が出る | Air in system, Clogged impeller, Worn bearings | Bleed air, Clear debris from impeller, Contact customer support for motor issues. |

Figure 8.1: Filtration Effectiveness
9. 保証と顧客サポート
FOTING stands behind the quality of its products. This sand filter pump is backed by a 3年間の保証 購入日より。
If you experience any issues with your product or have questions regarding its operation, please contact FOTING customer service. Have your model number and purchase date ready when contacting support.
For further assistance, please visit the official FOTING store or contact their support team through the platform where you purchased the product.
Ask a question about this manual
Ask about setup, troubleshooting, compatibility, parts, safety, or missing instructions. Manuals+ will review the question and use this page’s manual context to help answer it.