1. 重要な安全対策
電気製品を使用するときは、火災、感電、人への傷害のリスクを軽減するために、次のような基本的な安全上の注意事項に常に従う必要があります。
- ケトルを操作する前にすべての説明書をお読みください。
- 熱い表面に触れないでください。ハンドルまたはノブを使用してください。
- 火災、感電、人への傷害を防ぐため、コード、プラグ、ケトルのベースを水やその他の液体に浸さないでください。
- いかなる機器も、子供が使用したり、子供の近くで使用したりする場合には、厳重な監視が必要です。
- 使用していないときや清掃する前には、コンセントからプラグを抜いてください。部品の取り付けや取り外し、および機器の清掃を行う前には、機器が冷めるまで待ってください。
- コードやプラグが損傷している機器、または故障や何らかの損傷を受けた機器は使用しないでください。点検、修理、調整については、カスタマーサービスまでご連絡ください。
- 機器メーカーが推奨していない付属品を使用すると、火災、感電、または人身事故につながる可能性があります。
- 屋外では使用しないでください。
- コードをテーブルやカウンターの端から垂らしたり、熱い表面に触れたりしないでください。
- 高温のガスバーナーや電気バーナーの上や近く、または加熱されたオーブンの中に置かないでください。
- 必ず最初にプラグを機器に接続し、次にコードを壁のコンセントに差し込んでください。取り外すには、いずれかのスイッチを「オフ」にしてから、プラグを壁のコンセントから抜いてください。
- 本来の用途以外には機器を使用しないでください。
- この機器は 120ボルト. Ensure your power supply matches this requirement to prevent damage or malfunction.
- Do not overfill the kettle. Fill only to the maximum fill line to prevent boiling water from overflowing.
2.製品オーバーview
The Brewista SmartPour Variable Digital Kettle is designed for precise temperature control, ideal for brewing coffee and tea. It features a gooseneck spout for controlled pouring and a digital display for accurate temperature readings.

図2.1: フロント view of the Brewista SmartPour Variable Digital Kettle. This image shows the stainless steel kettle body, the gooseneck spout, the handle, and the digital control base.
2.1 コンポーネント
- ケトル本体: Stainless steel construction with a 1.2-liter capacity.
- グースネック注ぎ口: 正確な注ぎ制御を実現する設計。
- 蓋: Removable lid with a handle.
- ハンドル: 人間工学に基づいて快適なグリップを実現したデザイン。
- パワーベース: Contains the heating element and digital controls.
- デジタルディスプレイ: Shows current and target temperatures, and timer settings.
- コントロールボタン: Power, Temperature Up/Down, Set Temperature, Keep Warm, Auto-Start.
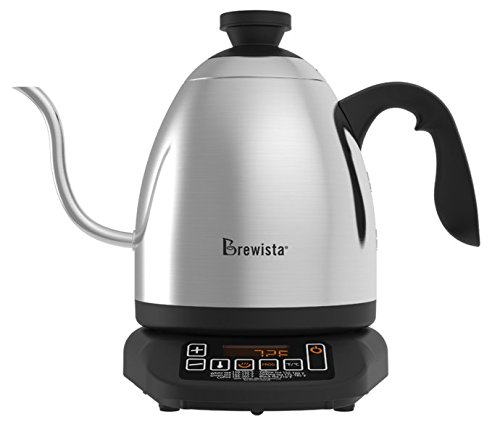
図2.2: Close-up of the control panel on the Brewista SmartPour Kettle base. This image highlights the digital display and various control buttons for temperature adjustment and function selection.
3. セットアップ
3.1 初期洗浄
- Remove all packaging materials and labels from the kettle and base.
- ケトルとベースの外側を広告で拭きますamp 布。
- Wash the interior of the kettle and the lid with warm, soapy water. Rinse thoroughly.
- Fill the kettle with water to the maximum fill line and boil. Discard this water. Repeat this process two to three times to ensure the kettle is clean and free of manufacturing residues.
3.2 配置
- 電源ベースを乾燥した、平らで安定した、耐熱性のある表面に置きます。
- 電源コードがぶら下がったり、熱い表面に触れたりしていないことを確認してください。
- 電源コードをアース付き 120V AC 電源コンセントに差し込みます。
4. 操作手順
4.1 ケトルに水を入れる
- ケトルを電源ベースから取り外します。
- Remove the lid and fill the kettle with fresh, cold water. Do not fill below the minimum or above the maximum fill lines. The capacity is 1.2 liters.
- 蓋をしっかりと元に戻してください。
- ケトルを電源ベースに戻します。
4.2 電源の投入と温度設定
- を押す 力 button to turn on the kettle. The digital display will illuminate.
- To select a preset temperature, press the 温度設定 button repeatedly to cycle through common brewing temperatures (e.g., 175°F, 195°F, 205°F, 212°F).
- To set a custom temperature, use the + そして - ボタンを使用して、希望の温度を 1 度単位で調整します。
- ケトルは自動的に選択した温度まで加熱を開始します。加熱中はディスプレイに現在の水温が表示されます。
4.3 温度単位の切り替え(°F/°C)
To switch between Fahrenheit (°F) and Celsius (°C), press and hold the + そして - buttons simultaneously for a few seconds until the unit changes on the display.
4.4 保温機能
- 希望の温度を設定したら、 暖かく保つ ボタン。
- The kettle will heat to the set temperature and then maintain that temperature for up to one hour.
- To deactivate the Keep Warm function, press the 暖かく保つ button again or turn off the kettle.
4.5 Auto-Start Timer
The auto-start timer allows you to program the kettle to begin heating at a specific time.
- Ensure the kettle is filled with water and placed on the base.
- Set your desired target temperature using the 温度設定 or +/- ボタン。
- を押し続けます 自動スタート ボタンを押します。ディスプレイに現在の時刻が表示されます。
- 使用 + そして - 希望の開始時間を設定するボタン。
- を押す 自動スタート button again to confirm. The kettle will now display the current time and a small timer icon, indicating the auto-start is active.
- The kettle will begin heating at the programmed time.
Note: The auto-start timer can typically be set for up to 24 hours in advance.
5. メンテナンスと清掃
Regular cleaning and maintenance will extend the life of your kettle.
5.1毎日の清掃
- Unplug the kettle from the power outlet and allow it to cool completely before cleaning.
- ケトルの外側と電源ベースを柔らかくて乾いた布で拭いてください。amp 布。 研磨クリーナーや研磨パッドは使用しないでください。
- The kettle body and lid can be hand washed with warm, soapy water. Rinse thoroughly and dry completely before returning to the base.
- Do not immerse the power base, cord, or plug in water or any other liquid.
5.2スケール除去
Mineral deposits (limescale) can build up inside the kettle over time, affecting performance. Descale your kettle regularly, depending on water hardness and frequency of use.
- Fill the kettle with a solution of equal parts white vinegar and water, or use a commercial descaling solution according to its instructions. Ensure the solution covers the mineral deposits.
- Allow the solution to soak for at least 30 minutes, or longer for heavy buildup. For stubborn deposits, you may heat the solution to just below boiling (do not boil vinegar).
- ケトルを空にして、真水で数回徹底的にすすいでください。
- Boil a full kettle of fresh water and discard it to remove any residual descaling agent.
6。 トラブルシューティング
| 問題 | 考えられる原因 | 解決 |
|---|---|---|
| ケトルがオンにならない。 | プラグが差し込まれていない、電源コンセントが機能していない、ケトルがベースに正しく設置されていない。 | Ensure the power cord is securely plugged into a working 120V outlet. Check if the kettle is correctly placed on the power base. |
| お湯が沸きません。 | Kettle not powered on; temperature not set; insufficient water. | Press the POWER button. Set a desired temperature. Ensure water level is between MIN and MAX lines. |
| 温度表示が不正確です。 | Mineral buildup on temperature sensor; internal sensor malfunction. | Descale the kettle thoroughly. If the problem persists, contact customer support. |
| Kettle leaks or rusts. | Overfilling; manufacturing defect; hard water corrosion. | Do not overfill past the MAX line. Regular descaling can prevent corrosion from hard water. If a defect is suspected, contact customer support. |
| Kettle is slow to heat. | Mineral buildup; low voltage. | Descale the kettle. Ensure the kettle is connected to a stable 120V power supply. |
| Auto-start timer does not activate. | タイマーが正しく設定されていないため、電源が切れています。 | Review the auto-start timer setting process. Ensure continuous power supply. |
For issues not listed here, or if solutions do not resolve the problem, please contact Brewista customer support.
7. 仕様
| モデル番号 | BKV12S02 |
| ブランド | ブリューイスタ |
| 容量 | 1.2リットル |
| 材料 | ステンレス鋼 |
| 巻tage | 120ボルト |
| 特集 | Concealed Heating, Indicator Light, Variable Temperature Control, Gooseneck Spout, Keep Warm Function, Auto-Start Timer |
| 製品のお手入れ | 手洗い、拭き取り |
| アイテム重量 | 3ポンド(約1.36kg) |
| 寸法(長さx幅x高さ) | 27.3 x 21.1 x 30.4 センチメートル |
| 欧州連合 | 735343350429、645240812855 |
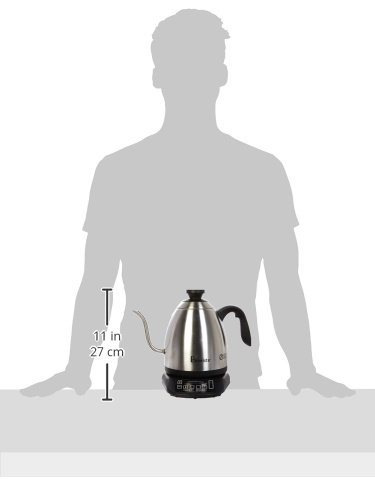
図7.1: Image illustrating the approximate size of the Brewista SmartPour Kettle in relation to a person, showing its compact countertop footprint.
8. 保証とサポート
For warranty information, product registration, or technical support, please refer to the official Brewista webご購入の際は、ウェブサイトをご覧いただくか、カスタマーサービスまでお問い合わせください。保証請求の際は、購入証明としてレシートを保管してください。
You may also find additional resources and product information by scanning the QR code provided on the product packaging or by visiting the link below:


