1. הקדמה
תודה על הרכישהasing the iTOMA CKS3501BT Radio Alarm Clock. This manual provides detailed instructions for setting up and operating your device. Please read it thoroughly before use to ensure proper functionality and to maximize your user experience.
תכולת החבילה:
- iTOMA CKS3501BT Radio Alarm Clock
- מתאם מתח
- אנטנת חוט FM
- מדריך למשתמש (מסמך זה)
2. המוצר נגמרview
Familiarize yourself with the controls and display of your iTOMA CKS3501BT Radio Alarm Clock.
פקדים בלוח העליון:
- VOL- / VOL+: Adjust volume.
- מַעֲרֶכֶת: Enter setup mode for time, date, and alarms.
- אזור זמן: Adjust time zone.
- AL 1 / AL 2: Set Alarm 1 / Alarm 2.
- נודניק / דימר: Snooze active alarm; adjust display brightness.
- TUNE - / TUNE +: Tune FM radio frequency; navigate menu options.
- זֵכֶר: Save and recall FM radio presets.
- מָקוֹר: Select audio source (FM, Bluetooth, AUX).
- כּוֹחַ: Turn unit on/off.
תצוגה קדמית:
- 1.4-inch blue LED display for time, date, and status indicators.
- Indicators for Alarm 1, Alarm 2, FM frequency, Bluetooth status.

איור 2.1: חזית view of the iTOMA CKS3501BT Radio Alarm Clock, showing the large blue LED display and top panel controls.
3. התקנה
3.1 הפעלה ראשונית
- חבר את ספק הכוח לשקע DC IN בגב היחידה.
- חבר את ספק הכוח לשקע חשמל סטנדרטי בקיר. התצוגה תידלק.
- The unit includes a pre-installed backup battery to maintain time and alarm settings during power outages.
3.2 הגדרת השעה והתאריך
- Ensure the unit is powered כבוי (לִלְחוֹץ כּוֹחַ button if display is on).
- לחץ והחזק את מַעֲרֶכֶת לחצן עד שהשנה מהבהבת בתצוגה.
- השתמש ב- TUNE - / TUNE + buttons to adjust the year. Press מַעֲרֶכֶת כדי לאשר.
- Repeat the process for Month, Day, Hour, and Minute.
- לאחר הגדרת הדקות, לחצו על מַעֲרֶכֶת to confirm and exit time setting mode.
3.3 Automatic Daylight Saving Time (DST)
The unit is equipped with an Auto DST feature. To enable or disable:
- Ensure the unit is powered כבוי.
- לחץ והחזק את אזור זמן button. The display will show "DST ON" or "DST OFF".
- השתמש ב- TUNE - / TUNE + buttons to toggle between "DST ON" and "DST OFF".
- שחרר את אזור זמן לחצן כדי לאשר את בחירתך.
4. הוראות הפעלה
4.1 Alarm Settings (Dual Alarm)
The CKS3501BT features two independent alarms (AL1 and AL2) that can be set to wake you with a buzzer or FM radio.
- Ensure the unit is powered כבוי.
- לחץ והחזק את אחד מהם AL 1 or AL 2 עד ששעת האזעקה תהבהב.
- לְהִשְׁתַמֵשׁ TUNE - / TUNE + to adjust the hour. Press the respective AL לחצן לאישור.
- חזור על הפעולה במשך דקות.
- Next, select the alarm source: Use TUNE - / TUNE + to choose between "Buzzer" or "FM Radio". Press the AL לחצן לאישור.
- If FM Radio is selected, use TUNE - / TUNE + to set the desired wake-up volume. Press the AL לחצן לאישור.
- Finally, select the alarm schedule: Use TUNE - / TUNE + to choose "Every Day", "Weekdays", or "Weekends". Press the AL כפתור כדי לאשר ולצאת ממצב הגדרת אזעקה.
כדי להפעיל/לבטל אזעקה, לחצו על הכפתור המתאים AL 1 or AL 2 button briefly when the unit is powered כבוי. The alarm indicator (1 or 2) will appear/disappear on the display.
4.2 פונקציית נודניק
כאשר נשמעת אזעקה, לחצו על נודניק / דימר button to temporarily silence it for 9 minutes. The alarm will sound again after the snooze period.
4.3 טיימר שינה
The sleep timer allows you to fall asleep to FM radio or Bluetooth audio, which will automatically turn off after a set duration (10 to 90 minutes).
- While the unit is playing FM radio or Bluetooth audio, press the לִישׁוֹן button (often integrated with SNOOZE or another button, refer to device markings if different).
- לחץ שוב ושוב על לִישׁוֹן button to cycle through sleep timer options (e.g., 90, 80, 70... 10 minutes, OFF).
- היחידה תכבה אוטומטית לאחר הזמן שנבחר.
פעולת רדיו FM 4.4

Figure 4.1: The iTOMA CKS3501BT can receive FM radio signals, indicated by the radio icon and waves.
- Ensure the FM wire antenna is properly connected to the antenna jack on the back of the unit for optimal reception.
- הקש על כּוֹחַ כפתור להפעלת היחידה.
- הקש על מָקוֹר לחץ שוב ושוב על הלחצן עד להופעת "FM" על הצג.
- כוונון ידני: לִלְחוֹץ TUNE - / TUNE + briefly to adjust the frequency step by step.
- סריקה אוטומטית: לחץ והחזק TUNE - / TUNE + for a few seconds to automatically scan for the next available station.
4.5 Saving and Recalling FM Presets
The unit can store up to 10 FM radio stations as presets.
- כוון לתחנת ה-FM הרצויה.
- לחץ והחזק את זֵכֶר עד ש-"P01" (או המספר הקבוע מראש הבא) יהבהב בתצוגה.
- לְהִשְׁתַמֵשׁ TUNE - / TUNE + to select the desired preset number (P01-P10).
- לִלְחוֹץ זֵכֶר שוב כדי לאשר ולשמור את התחנה.
- כדי לאחזר תחנה מוגדרת מראש, לחצו לחיצה קצרה על זֵכֶר לחץ שוב ושוב על הלחצן כדי לעבור בין התחנות השמורות.
4.6 תפעול בלוטות'
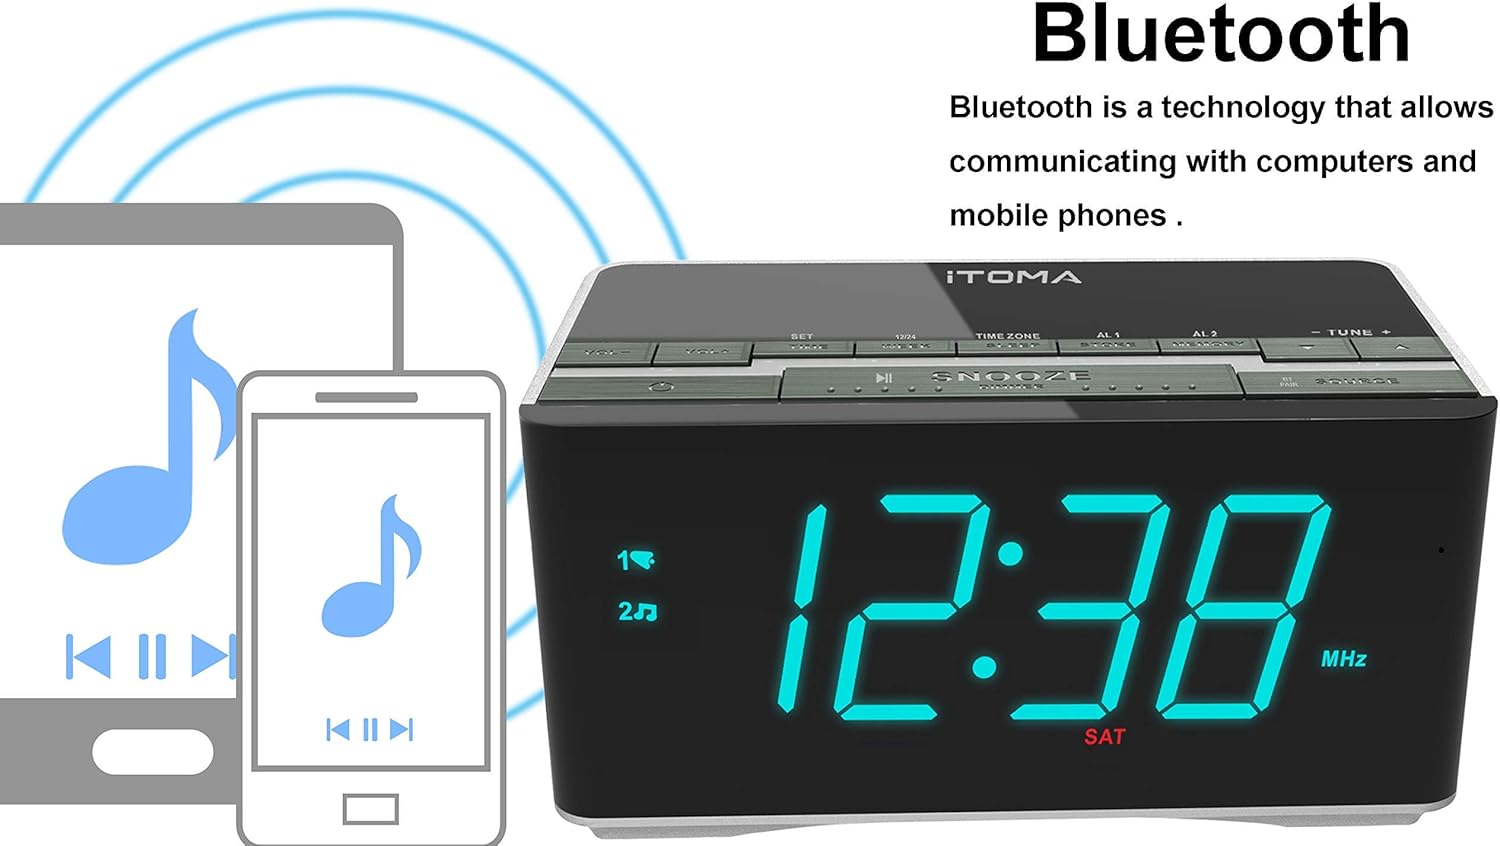
Figure 4.2: The iTOMA CKS3501BT supports Bluetooth connectivity for wireless audio streaming from compatible devices.
- הקש על כּוֹחַ כפתור להפעלת היחידה.
- הקש על מָקוֹר button repeatedly until "BT" appears on the display and the Bluetooth indicator flashes, indicating pairing mode.
- במכשיר התומך ב-Bluetooth שלך (למשל, סמארטפון, טאבלט), הפעל את Bluetooth וחפש מכשירים זמינים.
- Select "iTOMA CKS3501BT" from the list. Once paired, the Bluetooth indicator on the alarm clock will stop flashing and remain solid.
- You can now play audio from your device through the alarm clock's speakers. Use the VOL - / VOL + buttons on the alarm clock or your device to adjust the volume.
4.7 קלט עזר (AUX)
Connect external audio devices (e.g., MP3 players) using a 3.5mm audio cable (not included).
- Connect one end of a 3.5mm audio cable to the AUX IN jack on the back of the unit.
- חבר את הקצה השני לשקע האוזניות או ליציאת השמע של המכשיר החיצוני שלך.
- הקש על כּוֹחַ כפתור להפעלת היחידה.
- הקש על מָקוֹר button repeatedly until "AUX" appears on the display.
- הפעל אודיו מהמכשיר החיצוני שלך. כוונן את עוצמת הקול באמצעות VOL - / VOL + buttons on the alarm clock or your external device.
4.8 יציאת טעינה USB

Figure 4.3: The iTOMA CKS3501BT features a USB port for charging mobile devices.
The USB port on the back of the unit is for charging mobile devices only. It does not support data transfer or playing music from USB drives.
- Connect your mobile device's USB charging cable to the USB port on the alarm clock.
- חבר את הקצה השני של הכבל להתקן הנייד שלך.
- המכשיר שלך יתחיל בטעינה.
4.9 בהירות תצוגה (עמעם)

Figure 4.4: The iTOMA CKS3501BT offers an auto-dimmer function and manual brightness control for its display.
The display has an auto-dimmer feature that adjusts brightness based on ambient light. You can also manually adjust it.
- הקש על נודניק / דימר button repeatedly to cycle through different brightness levels (e.g., High, Medium, Low, Auto).
- Select "Auto" for automatic brightness adjustment.
5. תחזוקה
5.1 ניקוי
- נתק את ספק הכוח לפני הניקוי.
- השתמש במטלית רכה ויבשה כדי לנגב את החלק החיצוני של היחידה.
- Do not use liquid cleaners, abrasive cleaners, or sprays, as they may damage the finish.
5.2 סוללת גיבוי
The unit contains a pre-installed lithium-metal backup battery. This battery is designed to retain time and alarm settings during brief power interruptions. It is not user-replaceable and does not power the unit for normal operation.
6. פתרון תקלות
| בְּעָיָה | סיבה אפשרית | פִּתָרוֹן |
|---|---|---|
| היחידה לא נדלקת. | מתאם החשמל לא מחובר או פגום. | ודא שמתאם החשמל מחובר היטב ליחידה ולשקע קיר תקין. |
| No sound from FM radio. | Weak signal; volume too low; incorrect source. | Adjust FM antenna position. Increase volume. Ensure "FM" source is selected. |
| לא ניתן לבצע התאמה בין מכשירי בלוטות'. | Unit not in pairing mode; device too far; Bluetooth already connected. | Ensure "BT" is flashing on the display. Move device closer. Disconnect from other Bluetooth devices. |
| האזעקה לא נשמעת. | Alarm not activated; volume too low; incorrect time. | Verify alarm indicator (1 or 2) is on. Check alarm volume setting. Confirm alarm time is correct. |
| טעינת USB לא עובדת. | Cable faulty; device not compatible; unit not powered. | Try a different USB cable. Ensure the alarm clock is powered on. |
7. מפרטים
- דֶגֶם: CKS3501BT
- לְהַצִיג: 1.4-inch Blue LED
- מקור כוח: AC 100-240V, 50/60Hz (via power adapter)
- סוללת גיבוי: 1 x Lithium-metal (pre-installed)
- להקות רדיו: FM
- גרסת בלוטות': (Not specified, assuming standard)
- פלט טעינה USB: (Not specified, typically 5V/1A)
- קלט עזר: שקע סטריאו 3.5 מ"מ
- מידות: 14.5 x 8 x 7.52 ס"מ (5.71 x 3.15 x 2.93 אינץ ')
- מִשׁקָל: 390.09 גרם (0.86 פאונד)
- חוֹמֶר: פּלָסטִי

Figure 7.1: Dimensions of the iTOMA CKS3501BT Radio Alarm Clock.
8. אחריות ותמיכה
For warranty information or technical support, please refer to the warranty card included with your product or visit the official iTOMA webאתר. שמור את קבלת הרכישה כהוכחת קנייה.
iTOMA Official Webאֲתַר: www.itoma.com


