1. הקדמה
This manual provides detailed instructions for the installation, configuration, and operation of your NETGEAR ProSAFE XS712T 12-Port 10GBase-T Gigabit Smart Managed Switch. Designed for small to medium-sized businesses (SMBs), this switch offers high-performance 10-Gigabit connectivity, advanced Layer 2 features, and easy web-based management to meet diverse networking needs.
2. תכונות עיקריות
- Advanced VLAN features such as MAC (Media Access Control), protocol-based VLAN and guest VLAN.
- Advanced QoS (Quality of Service) including Q-in-Q.
- Dynamic VLAN assignment - Increases security by imposing consistent policy and user credentials across the network, regardless of where users connect.
- MLD snooping - Increases network efficiency by forwarding multicast traffic to designated hosts only, rather than flooding multicast packets across all ports.
- Security management.
- IPv6 for management, QoS and ACL.
- קל לשימוש Web-ניהול מבוסס.
3. תכולת החבילה
ודא שהחבילה שלך מכילה את הפריטים הבאים:
- NETGEAR ProSAFE XS712T 12-Port 10GBase-T Gigabit Smart Managed Switch
- כבל חשמל
- ערכת הרכבה במדף (אם רלוונטי)
- מדריך התקנה
4. המוצר נגמרview
The NETGEAR ProSAFE XS712T switch features a robust design with multiple ports and indicators for efficient network management.
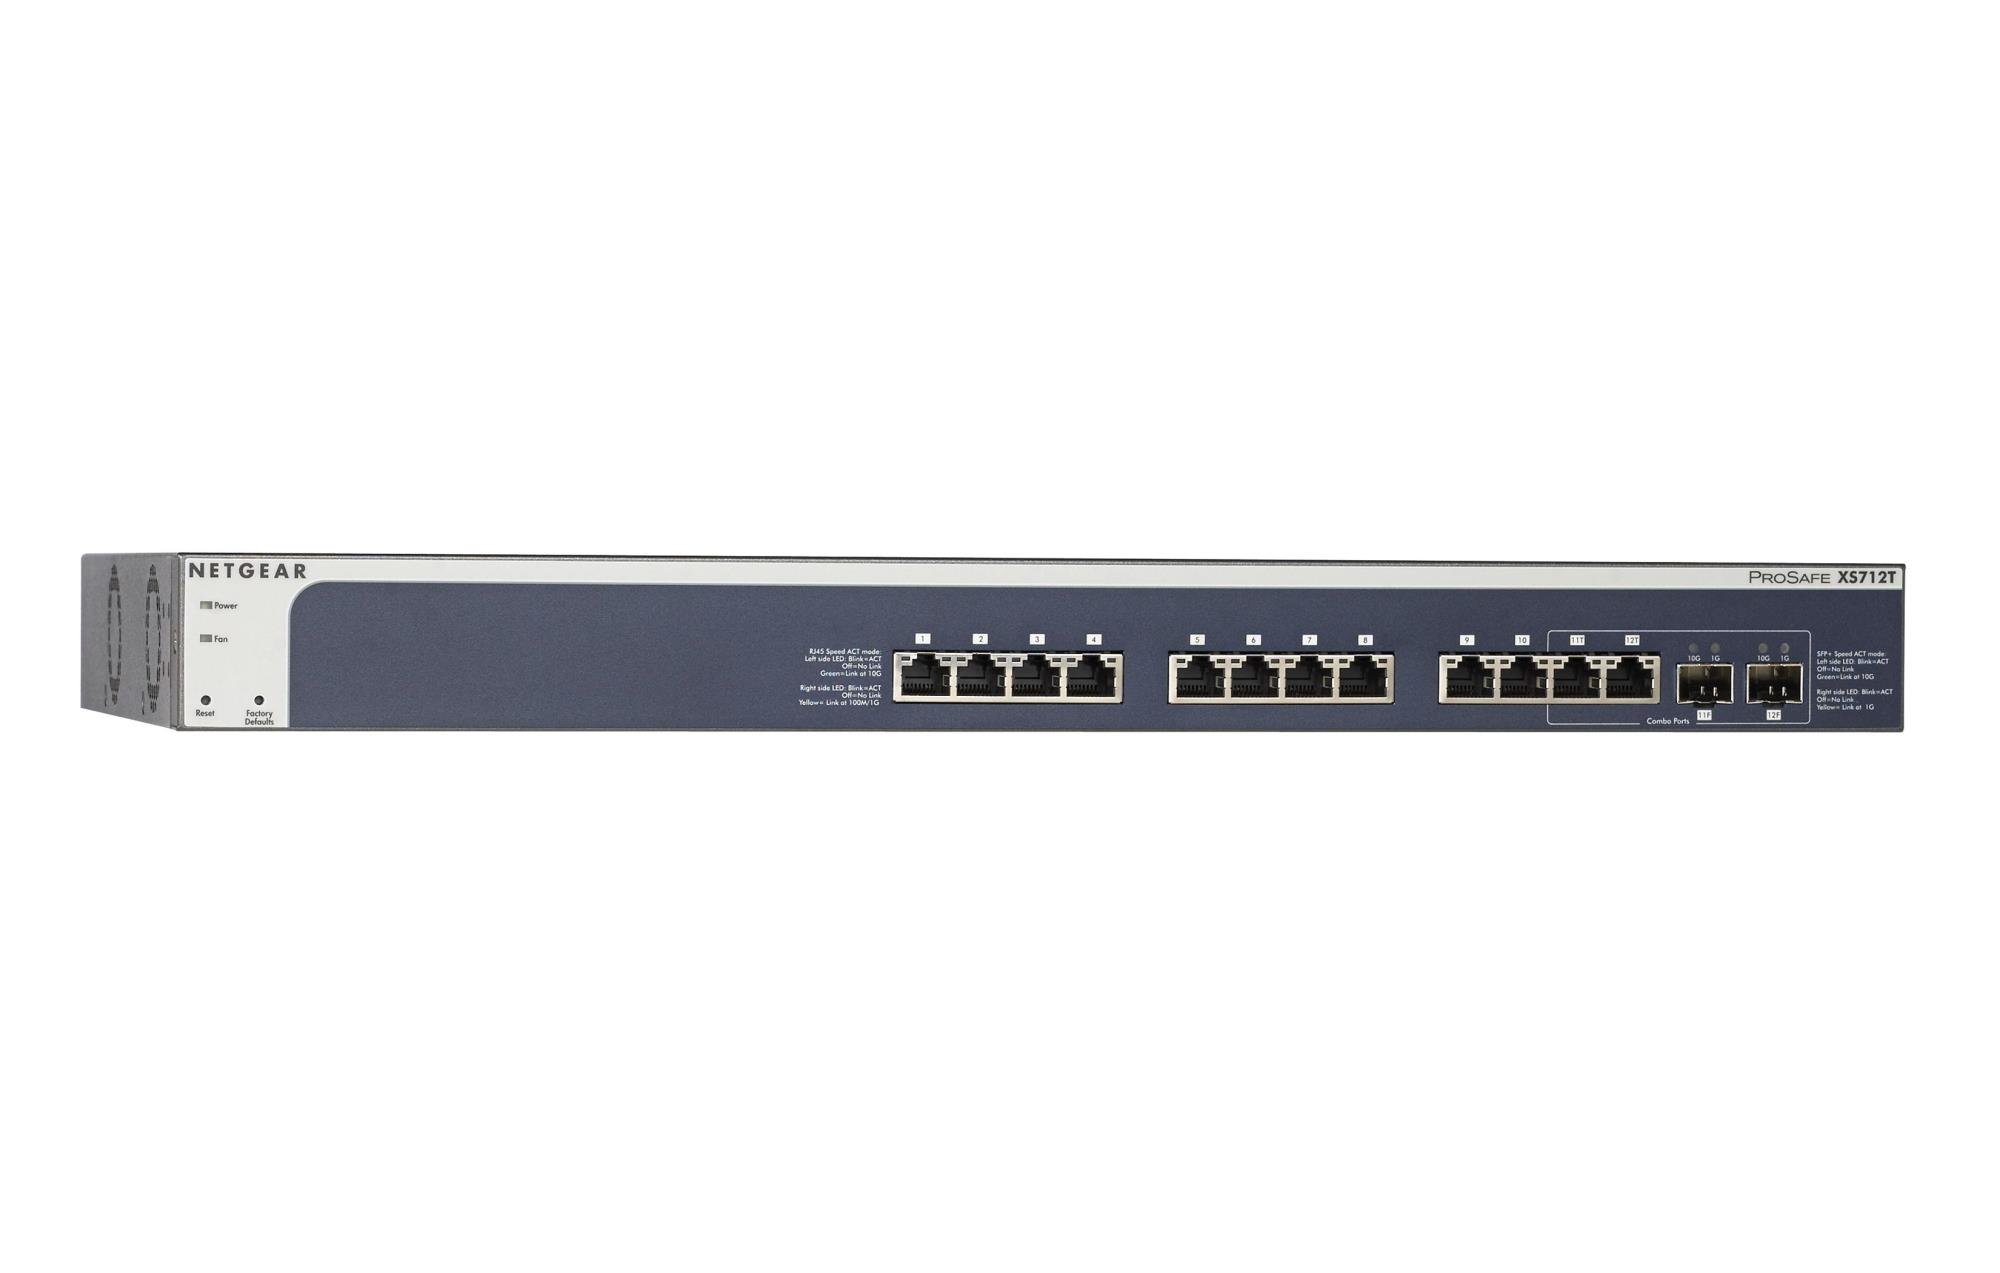
Figure 1: Front Panel of NETGEAR ProSAFE XS712T Switch
This image displays the front panel of the NETGEAR ProSAFE XS712T switch, showing the 12 10GBase-T ports, two combo SFP+ ports, and LED indicators for power, fan status, and port activity. The reset and factory defaults buttons are also visible on the left side.
רכיבי הפאנל הקדמי:
- LED מתח: מציין את מצב המתח של המכשיר.
- נורית LED של המאוורר: Indicates the operational status of the cooling fan.
- לחצן איפוס: Used to restart the switch.
- Factory Defaults Button: Used to restore the switch to its factory default settings.
- יציאות RJ45 (1-10): 10GBase-T Ethernet ports for high-speed network connections. Each port has associated Link/Act LEDs (Left side LED: Blink=ACT, Off=No Link, Green=Link at 100M/1G; Right side LED: Blink=ACT, Off=No Link, Yellow=Link at 10G).
- Combo Ports (11, 12): These ports can function as either 10GBase-T RJ45 ports or SFP+ fiber ports. Each combo port has associated SFP+ Speed/ACT LEDs (Left side LED: Blink=ACT, Off=No Link, Green=Link at 10G; Right side LED: Blink=ACT, Off=No Link, Yellow=Link at 1G).
5. התקנה
5.1 הרכבה על מדף (אופציונלי)
If you intend to install the switch in a standard 19-inch equipment rack, use the provided rack-mount kit. Secure the mounting brackets to the sides of the switch using the screws provided. Then, attach the switch to the rack using appropriate rack screws.
5.2 מיקום שולחן העבודה
For desktop use, ensure the switch is placed on a flat, stable surface. Allow adequate ventilation around the device to prevent overheating.
5.3 חיבור מתח
- Connect one end of the provided power cord to the AC power inlet on the rear panel of the switch.
- חבר את הקצה השני של כבל החשמל לשקע חשמל מוארק.
- ודא שנורית ה-LED בלוח הקדמי דולקת, דבר המציין שהמתג מקבל חשמל.
5.4 חיבורי רשת
- Connect your network devices (servers, workstations, other switches) to the RJ45 ports (1-10) using appropriate Ethernet cables (Cat6a or higher for 10G speeds).
- For fiber optic connections, insert compatible SFP+ transceivers into the combo SFP+ ports (11F, 12F) and connect fiber optic cables.
- Observe the Link/Act LEDs for each connected port. A solid green or yellow light indicates a successful link, and blinking indicates activity.
6. הוראות הפעלה
6.1 פעולה בסיסית
The NETGEAR ProSAFE XS712T is a plug-and-play device for basic connectivity. Once powered on and connected, it will automatically detect and configure connected devices for optimal performance.
6.2 Web-ניהול מבוסס
For advanced configuration and management, access the switch's webממשק מבוסס:
- ודא שהמחשב שלך מחובר למתג.
- פתח א web browser and enter the default IP address of the switch (refer to the Quick Start Guide or NETGEAR support for the specific default IP).
- Log in using the default username and password (typically "admin" and "password" or similar, check documentation).
- מה web interface, you can configure VLANs, QoS settings, security features, and monitor network status.
7. תחזוקה
- עדכוני קושחה: בדקו באופן קבוע את התמיכה של NETGEAR webאתר אינטרנט לקבלת עדכוני הקושחה האחרונים כדי להבטיח ביצועים ואבטחה אופטימליים.
- ניקוי: שמרו על ניקיון המתג וללא אבק. השתמשו במטלית רכה ויבשה לניקוי. אין להשתמש בחומרי ניקוי נוזליים או בתרסיס.
- אוורור: ודא שפתחי האוורור אינם חסומים כדי למנוע התחממות יתר.
- ניהול כבלים: Organize network cables to prevent strain on ports and improve airflow.
8. פתרון תקלות
- אין כוח: If the Power LED is off, ensure the power cord is securely connected to both the switch and the electrical outlet. Try a different outlet or power cord.
- אין קישור בפורט: Check the Ethernet cable connection at both ends. Try a different cable or port. Ensure the connected device is powered on and functioning correctly.
- מהירות רשת איטית: Verify that you are using appropriate cables (Cat6a or higher for 10G). Check for network congestion or misconfigurations in the switch's settings (e.g., QoS).
- לא ניתן לגשת Web מִמְשָׁק: Ensure your computer's IP address is in the same subnet as the switch's IP address. Verify the switch's IP address and login credentials. Try resetting the switch to factory defaults if necessary (this will erase all custom configurations).
- רעש מאוורר: The switch may generate fan noise during operation, especially under heavy load or in warmer environments. This is normal. Ensure proper ventilation.
9. מפרטים
| תכונה | פְּרָט |
|---|---|
| מותג | NETGEAR |
| מספר דגם | XS712T-100NES |
| מספר יציאות | 12 (10GBase-T RJ45, 2 Combo SFP+) |
| קצב העברת נתונים | 10000 מגה-ביט לשנייה (10 ג'יגה-ביט) |
| סוג ממשק | RJ45, SFP+ |
| חומר מארז | פּלָסטִי |
| משקל פריט | 1.32 פאונד |
| מידות המוצר | 22.44 x 3.54 x 13.74 אינץ' |
| דירוג טמפרטורה עליון | 40 מעלות צלזיוס |
| אַיִל | 2 מגה-בייט |
| שָׂפָה | אַנגְלִית |
10. אחריות ותמיכה
For warranty information, technical support, and product registration, please visit the official NETGEAR support website or refer to the warranty card included in your product package. Keep your purchase receipt for warranty claims.
משאבים מקוונים:


