1. הקדמה
This manual provides comprehensive instructions for the safe and efficient use of your Pandigital PANSCN08 Handheld Wand Scanner. This device is designed to digitize documents and photos up to 8.5 x 14 inches with resolutions up to 600 dpi, offering both color and grayscale scanning capabilities. It operates independently, saving scans directly to a microSD card.
2. מידע בטיחות
- אין לחשוף את הסורק למים או ללחות מוגזמת.
- הימנע מלהפיל את המכשיר או לחשוף אותו למכות חזקות.
- הרחק את הסורק מאור שמש ישיר וממקורות חום.
- השתמשו רק בסוג הסוללה שצוין והקפידו על קוטביות נכונה במהלך ההתקנה.
- Do not attempt to disassemble or repair the scanner yourself. Contact qualified service personnel.
- הרחק מהישג ידם של ילדים.
3. תכולת החבילה
אנא ודא שכל הפריטים נמצאים בחבילה שלך:
- Pandigital PANSCN08 Handheld Wand Scanner
- כבל USB
- כרטיס microSD 2GB
- מטלית לניקוי
- מדריך למשתמש (מסמך זה)
4. המוצר נגמרview
Familiarize yourself with the components of your scanner:
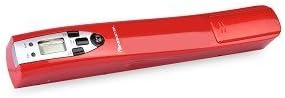
תמונה 1: The Pandigital PANSCN08 handheld wand scanner, showcasinהעיצוב הקומפקטי ולוח הבקרה שלו.
- לחצן סריקה: Initiates and stops scanning.
- לחצן מצב: Toggles between different scanning modes (e.g., DPI, Color/Grayscale, File פוּרמָט).
- תצוגת LCD: מציג את ההגדרות והסטטוס הנוכחיים.
- חריץ כרטיס MicroSD: להכנסת כרטיס הזיכרון.
- יציאת USB: For connecting to a computer to transfer files.
- תא סוללות: מאחסן את הסוללות.
- ראש סריקה: The optical sensor that captures the image.
- רולים: Guide the scanner smoothly over the document.
5. התקנה
5.1. התקנת סוללה
- Locate the battery compartment cover on the scanner.
- החלק או שחרר את המכסה כדי לפתוח אותו.
- Insert the required batteries (e.g., 2x AA batteries, not included) according to the polarity markings (+/-).
- סגור היטב את מכסה תא הסוללות.
5.2. התקנת כרטיס MicroSD
- Locate the microSD card slot on the side of the scanner.
- Insert the included 2GB microSD card into the slot with the gold contacts facing down, until it clicks into place.
- כדי להוציא, דחפו בעדינות את הכרטיס פנימה עד שייחלץ.
5.3. הפעלה / כיבוי
- כדי להפעיל: Press and hold the Scan button for approximately 2 seconds. The LCD display will illuminate.
- כדי לכבות: Press and hold the Scan button again for approximately 2 seconds. The display will turn off.
6. הפעלת הסורק
6.1. התאמת הגדרות
Before scanning, you can adjust the following settings using the Mode button and the Scan button for selection:
- DPI (נקודות לאינץ'): Select between 300 dpi (standard) or 600 dpi (high resolution). Higher DPI results in larger file sizes and more detail.
- מצב צבע: Choose between Color or Grayscale scanning.
- File פוּרמָט: Select JPEG (for images) or PDF (for multi-page documents).
6.2. Scanning a Document or Photo

תמונה 2: A user demonstrating the handheld scanning process with the Pandigital PANSCN08 scanner over a document.
- Place the document or photo on a flat, stable surface.
- Ensure the scanner is powered on and desired settings are selected.
- Position the scanner at the top edge of the document, ensuring the scanning head is fully over the content.
- Press the Scan button once to begin scanning. The scan indicator light will illuminate.
- Slowly and steadily glide the scanner downwards over the document. Maintain even pressure and a straight path. The dual rollers assist in keeping the scan straight.
- Once you reach the end of the document, press the Scan button again to stop scanning. The scan indicator light will turn off.
- The scanned image will be automatically saved to the microSD card.
6.3. העברה Files למחשב
- ודא שהסורק כבוי.
- חבר את הסורק למחשב שלך באמצעות כבל ה-USB המצורף.
- The scanner will appear as a removable storage device (like a USB drive) on your computer.
- Navigate to the scanner's drive and locate the scanned files (typically in a folder named 'DCIM' or 'SCAN').
- העתק את הרצוי files למחשב שלך.
- Safely eject the removable storage device from your computer before disconnecting the USB cable.
7. תחזוקה
7.1. ניקוי הסורק
- ראש סריקה: Use the included cleaning cloth or a soft, lint-free cloth to gently wipe the scanning head. Do not use abrasive cleaners or solvents.
- חִיצוֹנִי: נגבו את החלק החיצוני של הסורק בעזרת מטלית רכה ויבשה.
- Ensure the scanner is powered off before cleaning.
7.2. טיפול בסוללה
- Remove batteries if the scanner will not be used for an extended period to prevent leakage.
- השלך סוללות משומשות בצורה אחראית בהתאם לתקנות המקומיות.
8. פתרון תקלות
- הסורק לא נדלק: בדקו את התקנת הסוללה וודאו שהסוללות טעונות מספיק.
- Poor scan quality (blurry/streaky): Ensure the scanning head is clean. Scan slowly and steadily. Check DPI settings.
- הסורק לא מזוהה על ידי המחשב: Ensure the USB cable is securely connected and the scanner is powered off before connecting. Try a different USB port or cable.
- שגיאת כרטיס MicroSD: Ensure the card is inserted correctly. Try reformatting the card (this will erase all data).
- Scanner stops mid-scan: ודא שהסוללות אינן חלשות.
9. מפרטים
| מספר דגם | Panscn08 |
| סוג סורק | סורק שרביט כף יד |
| גודל מסמך מרבי | 8.5 x 14 אינץ' (Legal) |
| הַחְלָטָה | עד 600 dpi |
| עומק צבע | Color, Grayscale |
| File פורמטים | JPEG, PDF |
| אִחסוּן | MicroSD card (2GB included) |
| קישוריות | USB |
| מקור כוח | סוללות (לא כלולות) |
| דרישות מערכת מינימום | Windows 7 |
| משקל פריט | 1.4 פאונד |
10. אחריות ותמיכה
For warranty information and technical support, please refer to the documentation provided with your purchase or visit the official PanDigital webאתר. שמור את הוכחת הרכישה שלך לצורך תביעות אחריות.