Introduzione
This manual provides detailed instructions for the assembly, operation, and maintenance of your Cooler Master Elite 502 White ATX High Airflow Minimalist PC Case. Please read this manual thoroughly before beginning installation to ensure proper setup and optimal performance.
Prodotto finitoview
The Cooler Master Elite 502 is an ATX mid-tower PC case designed for high airflow and compatibility with modern components. It features a high-performance mesh front panel and supports a wide range of hardware configurations.
Caratteristiche principali:
- Compatibilità della scheda madre: Supporta schede madri ATX e Micro-ATX.
- Liquidazione GPU: Può ospitare schede grafiche lunghe fino a 410 mm.
- Supporto di raffreddamento: Supports up to a 360mm liquid cooler and seven fans for efficient thermal management.
- Spazio libero sui componenti: CPU coolers up to 170mm height, PSUs up to 170mm length.
- Progettazione del flusso d'aria: Large, unrestricted intake grill for superior airflow.
- I / O anteriore: Integrated USB Type-C port.

Figure 1: Motherboard Compatibility. This image illustrates the dimensions for ATX (12.0 in x 9.6 in) and Micro-ATX (9.6 in x 9.6 in) motherboards, demonstrating the case's support for both form factors.

Figure 2: GPU Clearance. Un interno view of the case showing the maximum GPU length of 410mm, indicating ample space for high-performance graphics cards.

Figure 3: Cooling Support. This image highlights the areas within the case that support liquid coolers up to 360mm and multiple cooling fans for optimal thermal efficiency.
Configurazione e installazione
Follow these steps for proper assembly of your PC components within the Elite 502 case.
- Preparare il caso:
Carefully remove the side panels. The tempered glass side panel is typically secured with thumb screws at the rear. The opposite side panel may also use thumb screws or a latch mechanism. Place the case on a stable, flat surface.

Figure 4: Case Interior. An unobstructed view of the case's interior, showing the motherboard tray, drive bays, and cable management cutouts, ready for component installation.
- Installare l'alimentatore (PSU):
Mount the PSU into its designated compartment at the bottom rear of the case. Secure it with screws. Ensure proper cable routing through the PSU shroud cutouts.

Figure 5: PSU Shroud. This image displays the ventilated PSU cover, designed to efficiently cool the power supply unit regardless of its orientation.
- Installare la scheda madre:
Align your ATX or Micro-ATX motherboard with the standoffs inside the case. Secure the motherboard with screws. Connect the front panel headers (power, reset, USB, audio) to the motherboard. The case includes a USB Type-C port on the front I/O panel.

Figure 6: Front I/O Panel. Un dettagliato view of the integrated USB Type-C port and other front panel connectors, facilitating modern connectivity.
- Installa unità di archiviazione:
Install 2.5-inch SSDs or 3.5-inch HDDs into the designated drive bays. Refer to the case's internal layout for specific mounting points, often located behind the motherboard tray or within the PSU shroud area.
- Installa la scheda grafica (GPU):
Insert your graphics card into the appropriate PCIe slot on the motherboard. Secure it with the retention clip and a screw to the case's expansion slots. Ensure the GPU length does not exceed 410mm.
- Installare i componenti di raffreddamento:
Install CPU cooler (up to 170mm height) and any additional case fans or liquid cooling radiators. The case supports up to a 360mm liquid cooler. Ensure fans are oriented for optimal airflow (intake at front/bottom, exhaust at rear/top).

Figure 7: Unrestricted Airflow. This image demonstrates the effective airflow through the front mesh panel, highlighting the case's design for optimal cooling performance.

Figure 8: Large Intake Grill. Un dettagliato view of the front panel's large intake grill, designed to maximize air intake for efficient cooling.
- Gestione dei cavi:
Route all cables neatly behind the motherboard tray using the provided cutouts and tie-down points. This improves airflow and aesthetics.
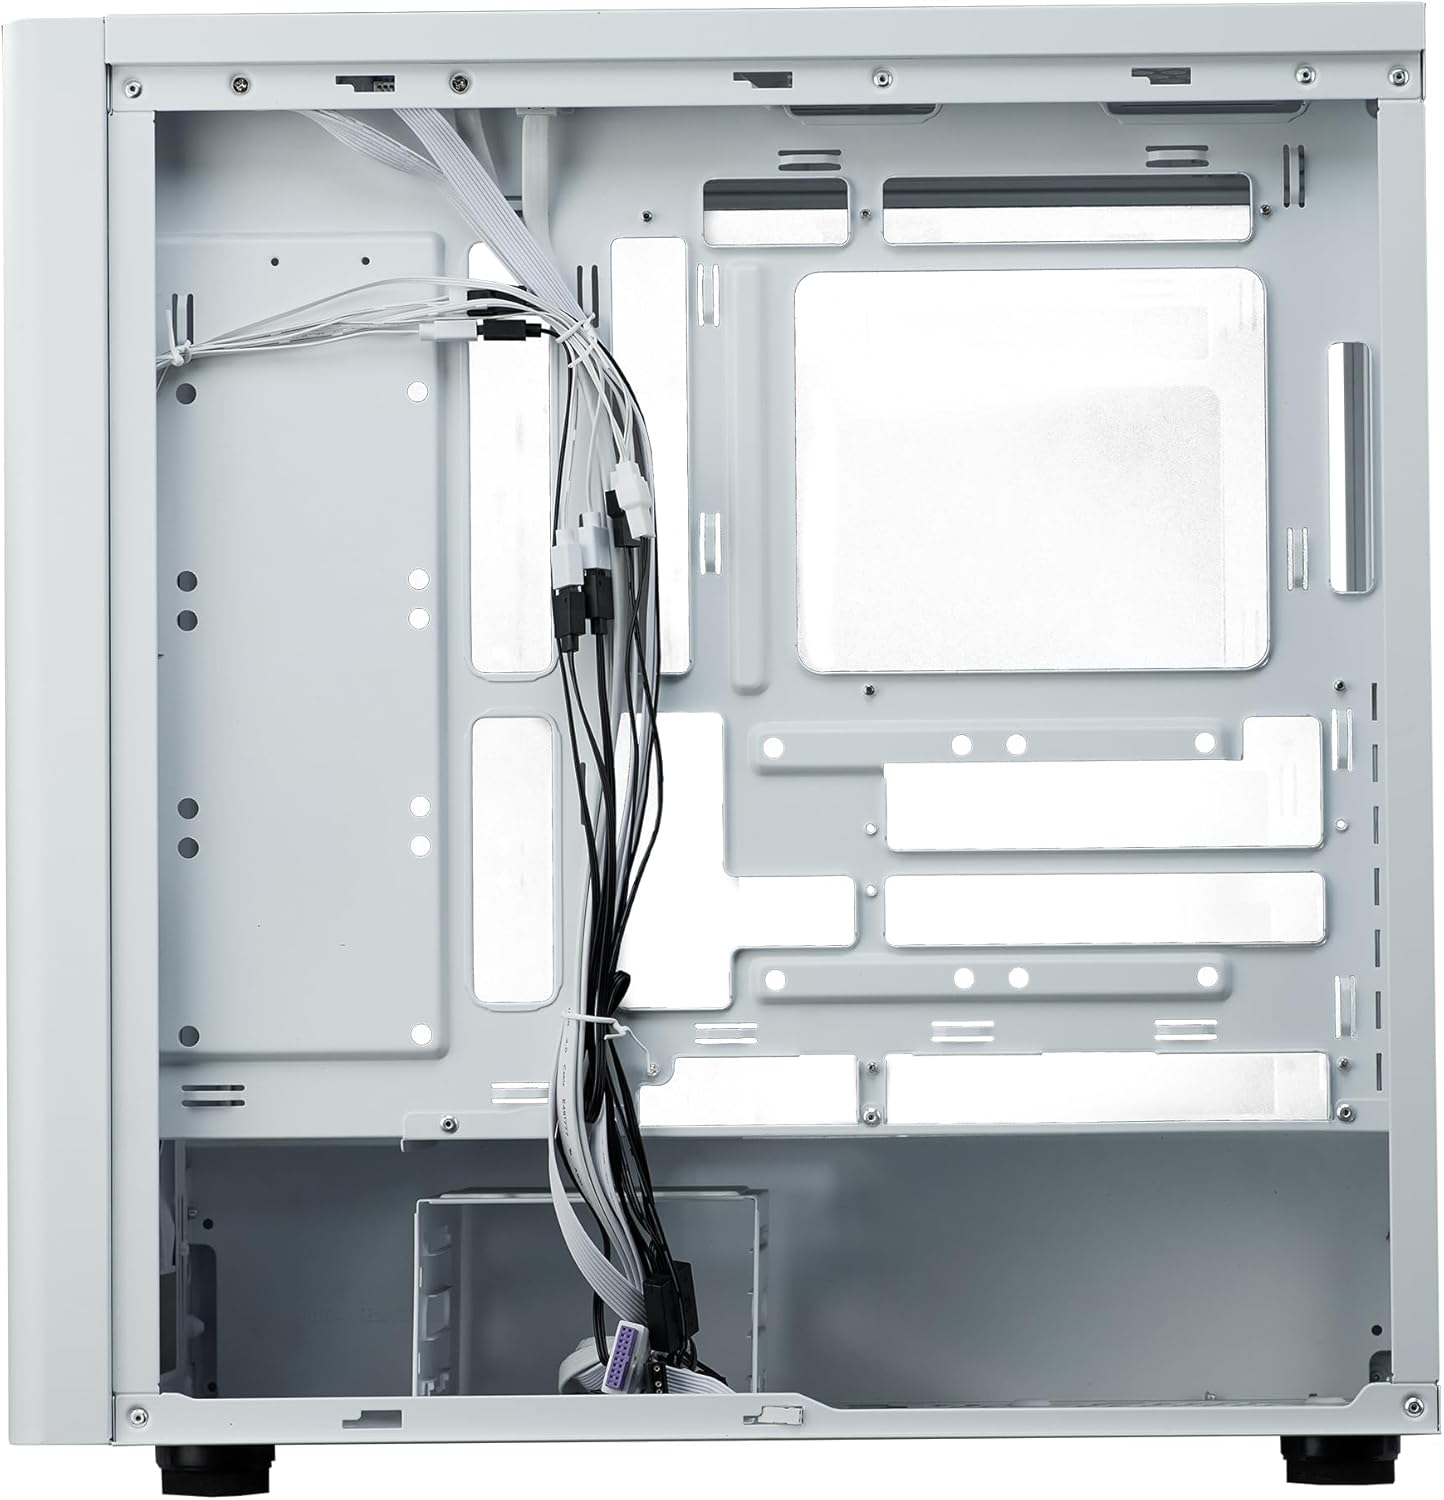
Figura 9: Gestione dei cavi. Un interno view from the rear side of the case, illustrating the space and tie-down points available for organized cable routing.
- Chiudi il caso:
Once all components are installed and cables are managed, reattach the side panels. Ensure they are securely fastened.
Istruzioni per l'uso
The Cooler Master Elite 502 is designed for continuous operation once components are properly installed. Ensure adequate ventilation around the case to maintain optimal temperatures.
- Accensione: Press the power button located on the front I/O panel to start your system.
- Flusso d'aria: The case's design prioritizes high airflow. Ensure the front mesh panel and any top/rear fan exhausts are not obstructed.
- Connettività: Utilize the front panel USB ports, including the USB Type-C, for convenient peripheral connections.
Manutenzione
Una manutenzione regolare contribuisce a garantire la longevità e le prestazioni del case e dei componenti del PC.
- Pulizia della polvere: Periodically clean dust filters (front, top, bottom) to maintain optimal airflow. The front mesh panel is removable for easy cleaning.
- Pulizia interna: Utilizzare aria compressa per rimuovere la polvere dai componenti interni e dalle pale della ventola. Assicurarsi che il sistema sia spento e scollegato prima di pulirlo.
- Controllo della gestione dei cavi: Occasionally verify that internal cables remain neatly routed and do not obstruct airflow or fan operation.
Risoluzione dei problemi
In caso di problemi, prendere in considerazione i seguenti passaggi comuni per la risoluzione dei problemi:
- Nessun potere:
Check all power connections, including the PSU to the wall outlet, PSU to motherboard, and front panel power switch header to the motherboard. Ensure the PSU switch is in the 'ON' position.
- Surriscaldamento:
Verify all case fans and CPU cooler fans are spinning correctly. Clean any dust filters or internal components that may be obstructing airflow. Ensure proper fan orientation (intake/exhaust).
- Pannello frontale USB/Audio non funzionante:
Confirm that the front panel USB and audio headers are correctly connected to the motherboard. Check motherboard manual for correct pin assignments.
- Componenti sciolti:
If experiencing intermittent issues, power down the system and check that all components (GPU, RAM, storage drives) are securely seated in their slots and properly fastened.
Specifiche
| Caratteristica | Dettaglio |
|---|---|
| Marca | Maestro del freddo |
| Nome del modello | Elite 502 Bianco |
| Numero modello articolo | E502-WGNN-SAZ |
| Tipo di caso | Mid Tower |
| Compatibilità della scheda madre | ATX, Micro-ATX |
| Liquidazione GPU | Fino a 410 mm |
| Altezza del dispositivo di raffreddamento della CPU | Fino a 170 mm |
| Lunghezza alimentatore | Fino a 170 mm |
| Supporto per il raffreddamento a liquido | Radiatore fino a 360 mm |
| Supporto per i fan | Fino a 7 fan |
| Porte I / O anteriori | 1x USB 3.0, 1x USB di tipo C |
| Materiale | Acciaio legato, vetro temperato |
| Colore | Bianco |
| Peso dell'articolo | 17.73 libbre (8.04 kg) |
| Dimensioni del prodotto (LxWxH) | 18.66 x 18.94 x 9.06 pollici (47.4 x 48.1 x 23.0 cm) |

Figura 10: Dimensioni del prodotto. An illustration detailing the length, width, and height of the Cooler Master Elite 502 case.
Garanzia e supporto
Per informazioni sulla garanzia e supporto tecnico, fare riferimento al sito ufficiale Cooler Master webo contattare direttamente il servizio clienti. Conservare la prova d'acquisto per eventuali reclami in garanzia.
- Ufficiale Websito: www.coolermaster.com
- Assistenza clienti: Fare riferimento alla sezione di supporto sul sito ufficiale websito per informazioni di contatto e FAQ.


