1. Introduzione e informazioni sulla sicurezza
This manual provides essential instructions for the safe and effective operation, maintenance, and troubleshooting of your VEVOR 200B Electric Drain Cleaner Machine. Please read this manual thoroughly before initial use and retain it for future reference. This machine is designed for clearing blockages in pipes ranging from 4 to 8 inches in diameter.
1.1 Avvertenze generali di sicurezza
- Always wear appropriate personal protective equipment (PPE), including heavy-duty gloves, eye protection, and sturdy footwear.
- Ensure the work area is well-lit and clear of obstructions. Keep bystanders and children away from the machine during operation.
- Never operate the machine in wet conditions or near flammable liquids or gases.
- Before connecting to power, ensure the power switch is in the "OFF" position.
- Always disconnect the power supply before performing any maintenance, changing cutters, or when the machine is not in use.
- Do not force the cable. Excessive force can cause the cable to kink or break.
- Be aware of the CW/CCW (clockwise/counter-clockwise) control for cable rotation and use it appropriately to prevent cable damage or injury.
- Controllare che il cavo di alimentazione non sia danneggiato prima di ogni utilizzo. Non utilizzare se danneggiato.
2. Prodotto finitoview E componenti
The VEVOR 200B Electric Drain Cleaner Machine is equipped with a powerful motor and durable steel cables designed for effective drain clearing. Key components and features include:
- 1100W Efficient Motor: Provides high speed and power for tackling tough clogs. Features a copper wire motor for superior conductivity and low resistance.
- 120 FT x 6/5 Inch Steel Cables: Durable, surface-hardened steel cables resist breakage, twisting, and corrosion. Designed to navigate curved pipes smoothly.
- Manual Feeding Control System: Allows the operator to control the cable feed speed and force.
- CW/CCW Control: Enables forward and reverse rotation of the cable for efficient cleaning and retrieval.
- 6 Interchangeable Cutters: A variety of quick-change cutters are included to address different types of blockages.
- Costruzione robusta: Built with high-strength industrial plastic for durability and reliability. Features a portable handle and wheels for easy transport.

Image: The VEVOR 200B Electric Drain Cleaner Machine in operation, demonstrating its use for various drain types.
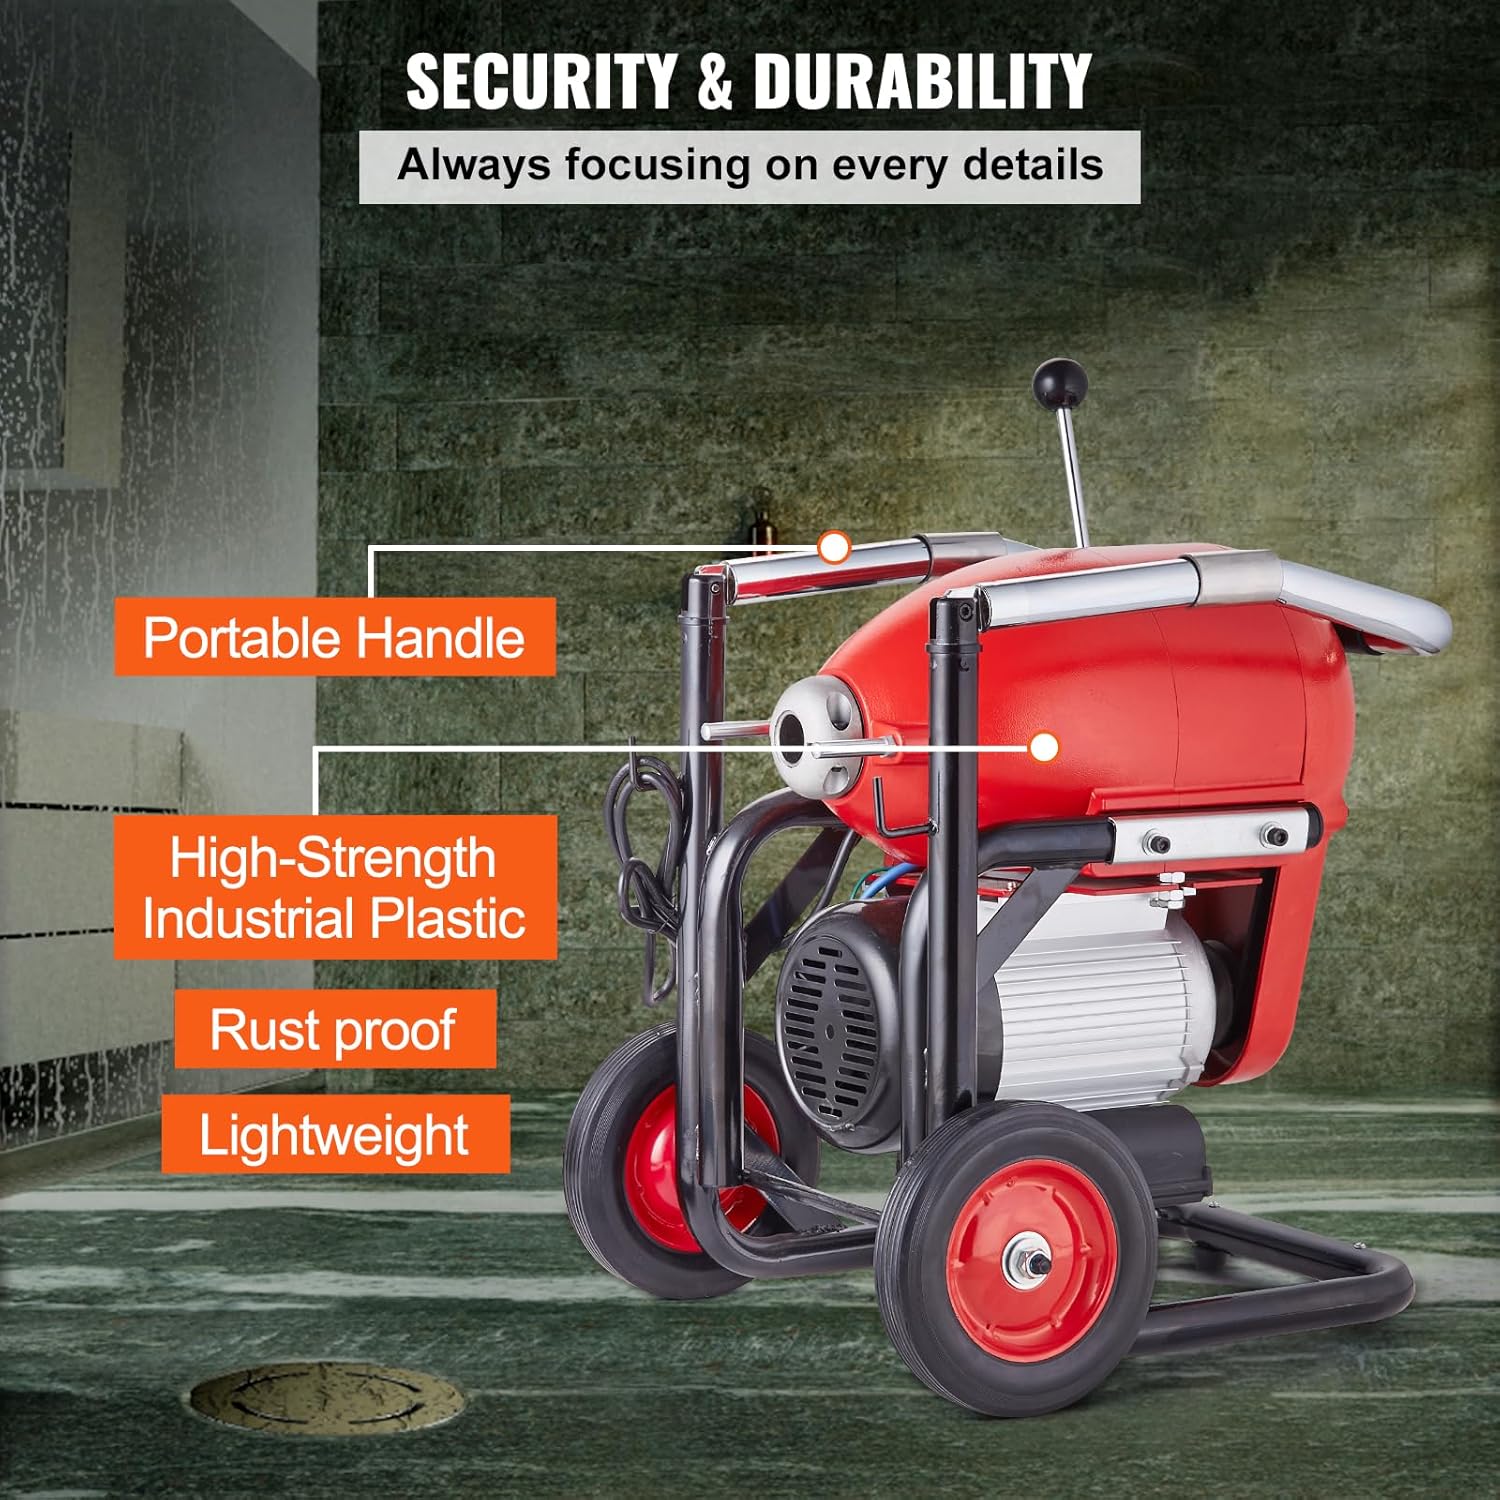
Immagine: Oltreview of the VEVOR 200B machine, highlighting its portable handle, high-strength industrial plastic construction, rust-proof design, and lightweight nature.
3. Assemblaggio e installazione
The VEVOR 200B machine typically arrives mostly assembled. Follow these steps for final setup:
- Disimballaggio: Rimuovere con attenzione tutti i componenti dall'imballaggio. Verificare che non vi siano danni dovuti al trasporto.
- Wheel Attachment (if not pre-assembled): Attach the wheels to the machine's frame using the provided hardware. Ensure they are securely fastened.
- Installazione della maniglia: Secure the portable handle to the main unit. Ensure all bolts are tightened.
- Cutter Selection: Choose the appropriate cutter for the type of clog you are addressing. Refer to Section 4.2 for cutter types.
- Accessorio taglierina: Securely attach the selected cutter to the end of the drain cable. Ensure it is firmly locked in place to prevent detachment during operation.
- Posizionamento: Place the machine on a stable, level surface near the drain opening. Ensure there is enough space to maneuver the cable.

Image: A user preparing the drain cleaner by attaching one of the six interchangeable cutters to the cable end.
4. Istruzioni per l'uso
Per una pulizia degli scarichi sicura ed efficace, segui questi passaggi:
4.1 Funzionamento di base
- Connetti alimentazione: Plug the machine into a grounded electrical outlet. Ensure the power switch is OFF before plugging in.
- Inserire il cavo: Manually feed the cable into the drain opening until it reaches the blockage.
- Potenza di attivazione: Portare l'interruttore di alimentazione in posizione "ON".
- Control Cable Feed: Use the manual feeding control system to advance the cable into the pipe. Apply gentle pressure.
- Elimina lo zoccolo: Once the cutter reaches the clog, use the CW (clockwise) rotation to break up the obstruction. Move the cable back and forth slightly to work through the blockage.
- Recupera cavo: After clearing the clog, switch the control to CCW (counter-clockwise) to retract the cable. Guide the cable back into the drum carefully.
- Spegni: Once the cable is fully retracted, turn the power switch to "OFF" and disconnect the machine from the power supply.

Image: A user demonstrating the manual feeding process of the drain cleaner into a floor drain.
4.2 Cutter Selection Guide
The machine includes 6 quick-change cutters for various applications:
- Straight Auger: For exploring and removing loose obstructions.
- Funnel Auger: For retrieving lost cables or small objects.
- Tagliapasta: For scraping and removing soft blockages like grease or mud.
- Sawtooth Cutter: For cutting through roots and stubborn debris.
- Grease Cutter: Specifically designed for heavy grease blockages.
- C-Cutter: For general purpose cleaning and removing various types of clogs.

Image: Illustration of the quick-change cutters and their suitability for residential, outdoor, and commercial plumbing applications.
5. Manutenzione e conservazione
Proper maintenance ensures the longevity and performance of your drain cleaner machine.
5.1 Dopo ogni utilizzo
- Cavo pulito: Thoroughly clean the drain cable to remove any debris, grease, or sludge.
- Dry Cable and Drum: Ensure the cable and the drum are completely dry to prevent rust and corrosion. You may need to run the machine for a short period to air dry the cable, or manually wipe it down.
- Lubrificare: Apply a light coat of oil to the cable and cutters to prevent rust.
- Ispezionare: Check the cable, cutters, and power cord for any signs of wear or damage. Replace worn parts as necessary.
5.2 Conservazione
- Store the machine in a dry, cool place, away from direct sunlight and moisture.
- Tenere la macchina fuori dalla portata dei bambini e del personale non autorizzato.
6. Risoluzione Dei Problemi
Questa sezione affronta i problemi più comuni che potresti incontrare:
| Problema | Possibile causa | Soluzione |
|---|---|---|
| La macchina non si avvia. | Nessuna alimentazione, interruttore difettoso, problema al motore. | Check power connection, ensure switch is ON. If problem persists, contact customer support. |
| I cavi si attorcigliano o si inceppano. | Excessive force, wrong cutter, sharp bend in pipe. | Reduce force, retract cable and try again. Ensure appropriate cutter is used. Do not force the cable. |
| Cutter gets stuck in pipe. | Severe blockage, pipe obstruction, incorrect cutter. | Switch to CCW rotation to try and retract. If unsuccessful, try rotating CW and CCW gently. If still stuck, professional assistance may be required. |
| La macchina vibra eccessivamente. | Unbalanced cable, loose components. | Inspect cable for damage or tangles. Check all fasteners for tightness. |
| Il cavo non scorre o non si riavvolge agevolmente. | Cable dirty or corroded, drum obstruction. | Clean and lubricate the cable. Inspect the drum for any foreign objects. |
7. Specifiche
Technical details for the VEVOR 200B Electric Drain Cleaner Machine:
- Numero modello: 200B
- Fonte di energia: Elettrico
- Potenza del motore: 1100W
- Lunghezza del cavo: 120 FT
- Diametro del cavo: 6/5 pollice
- Diametro del tubo applicabile: Da 4" a 8"
- Dimensioni del prodotto: 21.6 x 18.7 x 38.6 pollici (550 x 475 x 980 mm)
- Peso dell'articolo: 197.3 libbre
- Componenti inclusi: Pipe Unblocker, 6 Interchangeable Cutters
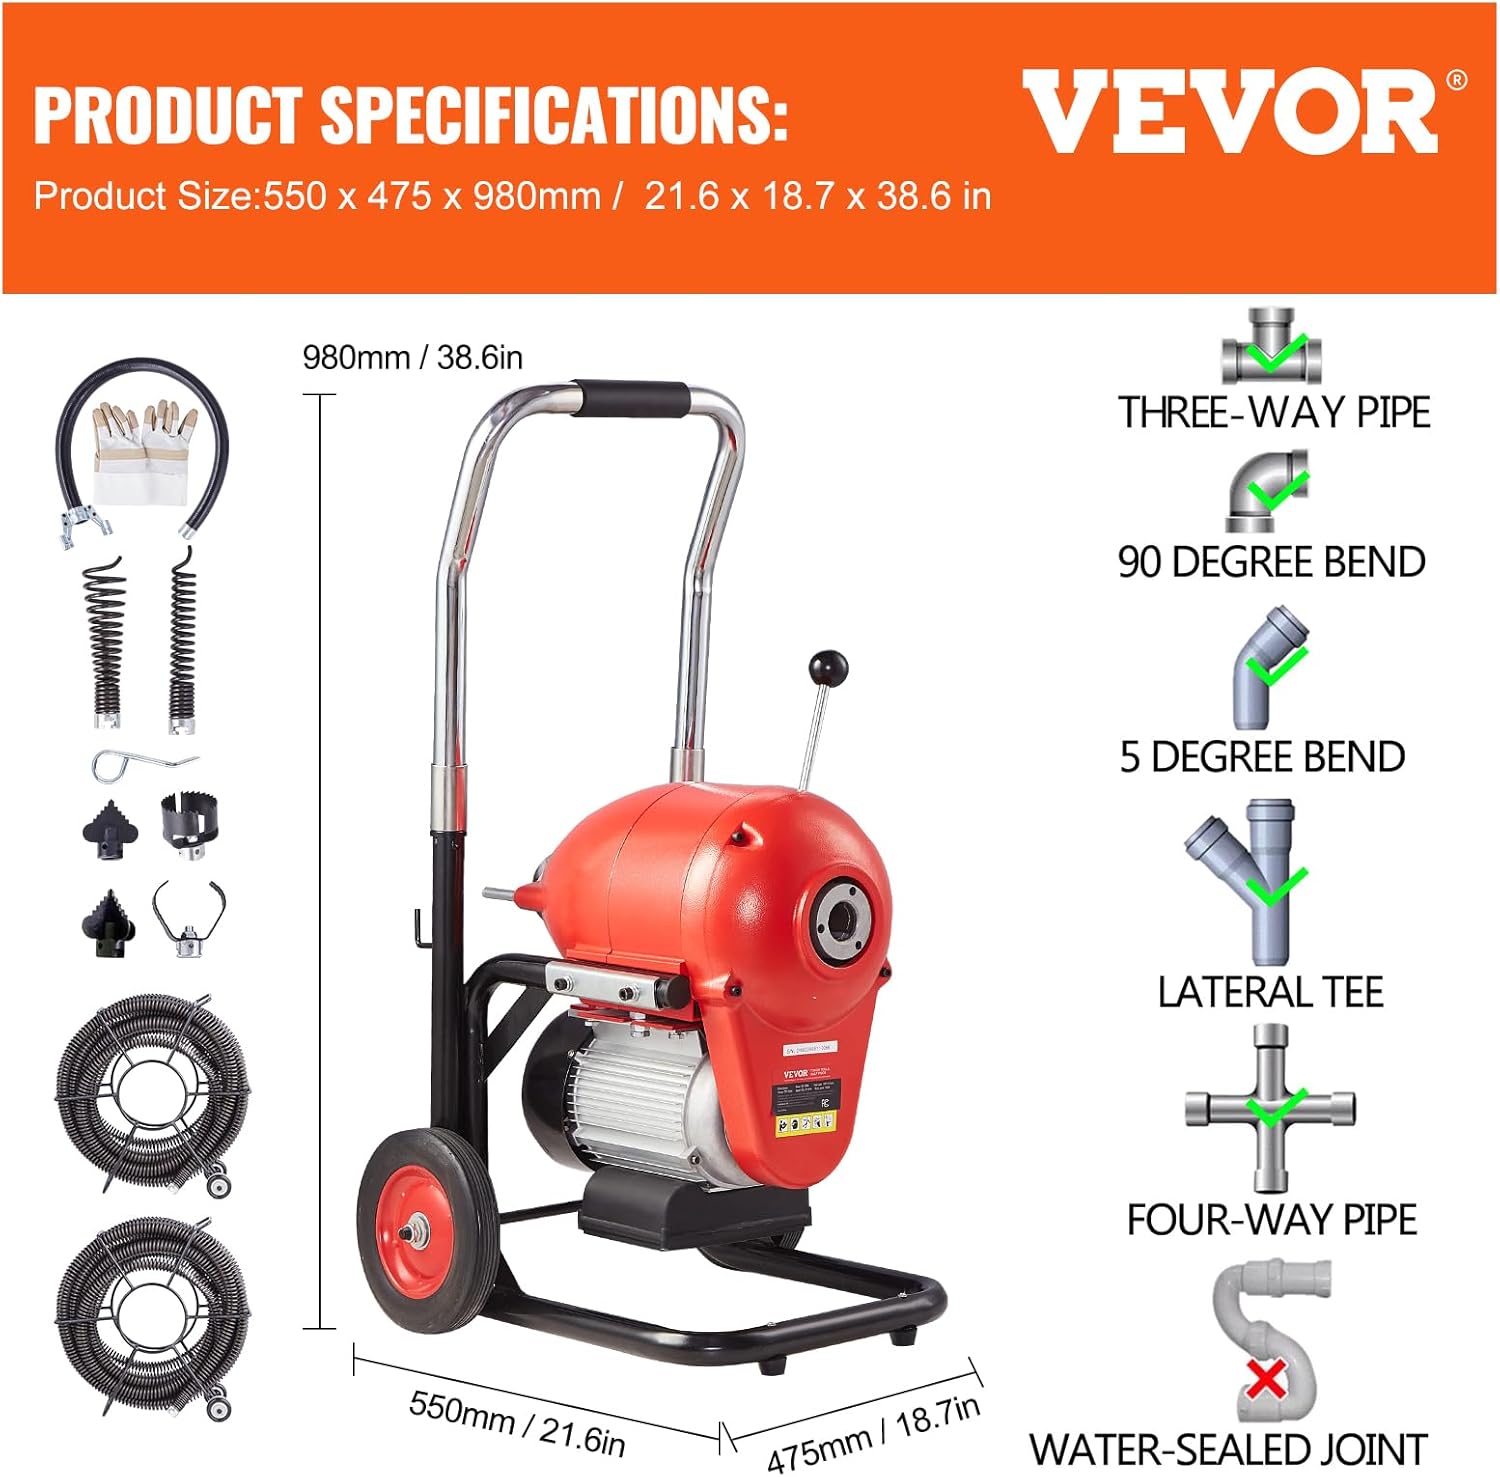
Image: Detailed product specifications including dimensions and compatible pipe configurations like three-way, 90-degree bend, 5-degree bend, lateral tee, and four-way pipes.
8. Assistenza clienti
For any questions, technical assistance, or to report issues with your VEVOR Drain Cleaner Machine, please contact VEVOR customer support. Refer to the contact information provided with your purchase or visit the official VEVOR websito per opzioni di supporto.
Supporto online: Visita lo Store VEVOR su Amazon


