Introduzione
This manual provides detailed instructions for the setup, operation, and maintenance of your FEELWORLD T10 10.1-Inch Camera Field Monitor. Please read this manual thoroughly before using the product to ensure proper function and to prevent damage.

Image: FEELWORLD T10 10.1-Inch Camera Field Monitor, front view.
Caratteristiche principali
- IPS 10.1-inch Touchscreen: Offers precise control via finger gestures.
- Clear Images: Features 500nit brightness, 1920x1200 resolution, 1500:1 contrast ratio, and a 16:10 aspect ratio for accurate image representation.
- Custom 3D LUT/Full Assist: Supports SD card loading of up to 32 LUTs for on-location color effects. Includes waveform, histogram, and vector range tools.
- 4K HDMI Transmission: Supports signals up to 4096x2160/60p with HDMI input and output, ensuring real-time audio and video synchronization.
- F970 Battery Plate: Compatible with NP-F series batteries (not included) to power the monitor and external accessories like wireless transmitters or lighting.
- Design durevole: Constructed with a sturdy aluminum alloy shell and resilient rubber corner guards for shock protection.
Cosa c'è nella scatola
Dopo aver disimballato il prodotto, verificare che siano presenti tutti i componenti:
- FEELWORLD T10 Camera Monitor
- F970 Battery Clasp Plate (pre-installed)
- Cavo micro HDMI
- Cavo HDMI standard
- Staffa a U.
- Parasole
- Manuale di istruzioni
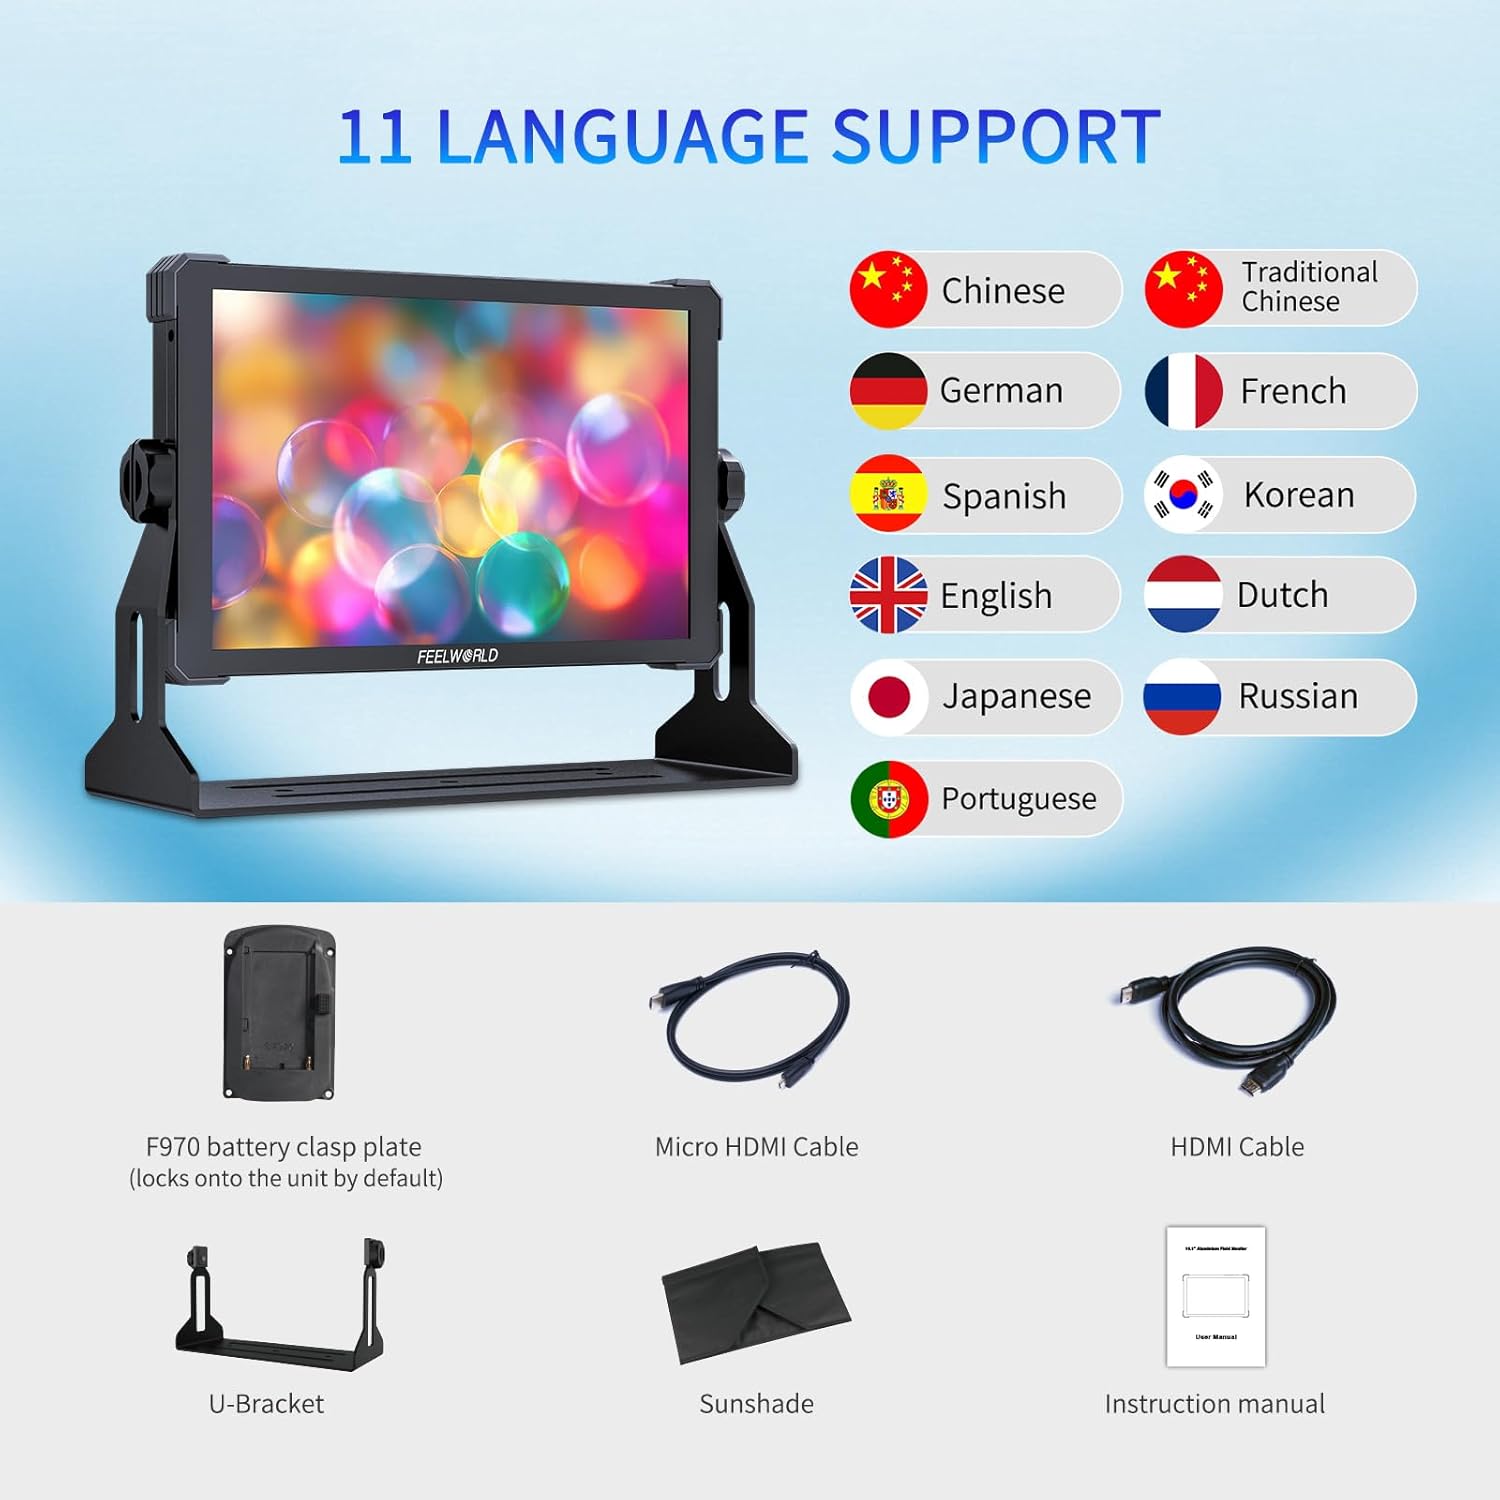
Image: Included accessories for the FEELWORLD T10 monitor, including cables, bracket, and sunshade.
Guida all'installazione
1. Accensione del monitor
The T10 monitor can be powered via a DC 12V input or an NP-F series battery.
- Using DC 12V: Connect the provided power adapter to the "DC IN 12V" port on the side of the monitor and plug it into a power outlet.
- Using NP-F Battery: Attach a compatible NP-F series battery (e.g., NP-F970, NP-F750, NP-F550) to the F970 battery plate on the back of the monitor. Ensure it clicks securely into place.

Immagine: Posteriore view of the FEELWORLD T10 showing the F970 battery plate and external power supply kit.
2. Connecting to a Camera (HDMI)
The T10 supports 4K HDMI input and output.
- Connect one end of the HDMI cable (Micro HDMI to HDMI or Standard HDMI to HDMI, depending on your camera's port) to your camera's HDMI output.
- Connect the other end of the HDMI cable to the "HDMI IN" port on the side of the T10 monitor.
- If you need to loop out the signal to another device, use another HDMI cable to connect the "HDMI OUT" port on the T10 to your desired device.

Immagine: Lato view of the FEELWORLD T10 highlighting the HDMI input and output ports.
3. Montaggio del monitor
The monitor features multiple 1/4-inch screw mounting points for versatile attachment.
- Attach the U-Bracket to the bottom of the monitor using the screw mount.
- Secure the monitor to a camera rig, tripod, or other support using the U-Bracket or any of the 1/4-inch screw mounting points located on the sides and bottom.
4. Attaching the Sunshade
For outdoor use or in bright conditions, attach the sunshade to improve visibility.
- Align the sunshade with the edges of the monitor screen.
- Secure the sunshade using the Velcro straps or integrated attachment points.
Istruzioni per l'uso
1. Accensione/spegnimento
Press and hold the power button located on the top edge of the monitor to turn it on or off.
2. Navigazione touchscreen
The T10 features an intuitive touchscreen interface. Swipe and tap to navigate menus and adjust settings.

Image: FEELWORLD T10 demonstrating multiple operation methods, including touchscreen and physical buttons.
3. Menu System Overview
The main menu is accessed via the touchscreen. It is organized into several categories:
- Assistenza: Contains various monitoring tools like Waveform, Vector, Histogram, Focus Assist, Embedded Audio, Over Exposure, Check Field, and False Colors.
- Marcatore: Allows selection of Grids, Safe Frames, Center Marker, and Ratio Marker.
- Immagine: Adjusts Scan Mode, Aspect Ratio, Anamorphic Mode, Image Flip, Zoom Mode, Image Freeze, and P2P (Pixel-to-Pixel).
- Opzione utente: Manages LUTs (import/selection), HDR settings, Display Adjustment (backlight, brightness, contrast, saturation), Color Adjustment (color temp, RGB gain), and Shortcut Key customization.
- Sistema: Includes User Switch, Language, OSD Option, EDID Settings, Volume, Reset, and Firmware Update.
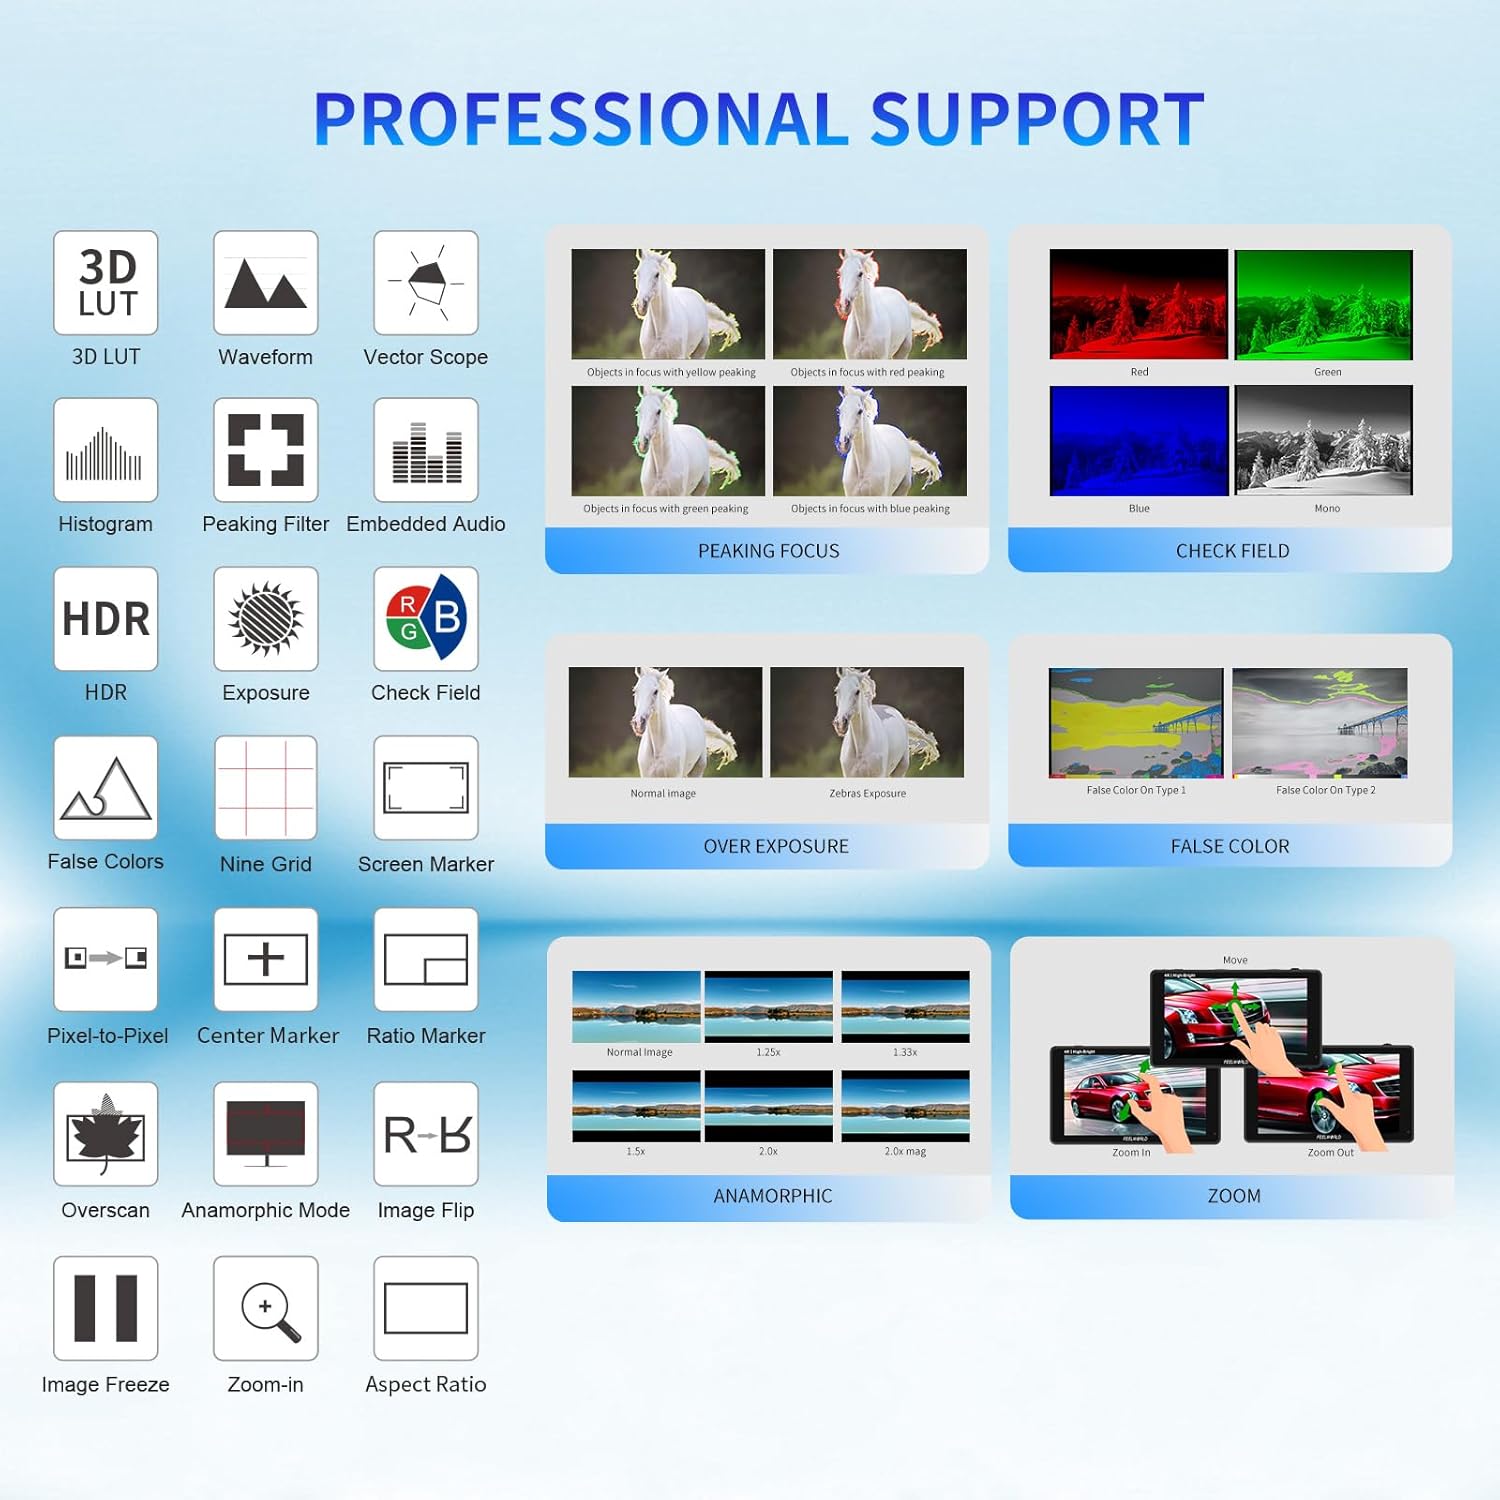
Image: Visual representation of the professional support features available on the FEELWORLD T10 monitor.
4. Using 3D LUTs
The T10 supports custom 3D LUTs for on-set color grading previews.
- Carica LUT files (.cube format) onto an SD card.
- Insert the SD card into the monitor's USB port (via an adapter if necessary).
- Vai a User Option > LUT > LUT Import to load your custom LUTs.
- Select the desired LUT from the list to apply it to your video feed.

Image: The 3D-LUT output feature of the FEELWORLD T10, showing before and after color grading effects.
5. HDR Monitoring
Enable HDR mode for enhanced dynamic range viewing.
- Vai a User Option > HDR.
- Toggle HDR to "On" and select the appropriate HDR mode (HLG1, HLG2, HLG3) if available.

Image: The 10.1-inch touchscreen of the FEELWORLD T10 displaying Full HD HDR monitoring capabilities.
6. Personalizzazione dei tasti di scelta rapida
The monitor features customizable function buttons (F1, F2, F3) for quick access to frequently used features.
- Vai a User Option > Shortcut Key.
- Assign desired functions (e.g., Waveform, Focus Assist, Grids) to F1, F2, or F3.
7. Aggiornamento del firmware
To ensure optimal performance and access new features, regularly check for and install firmware updates.
- Download the latest firmware from the official FEELWORLD website to a USB drive.
- Connect the USB drive to the monitor's USB port.
- Vai a System > Firmware Update e seguire le istruzioni sullo schermo.
Manutenzione
- Pulizia: Use a soft, dry cloth to clean the monitor screen and body. For stubborn marks, slightly dampPulisci il panno con acqua o con una soluzione detergente adatta allo schermo. Evita prodotti chimici aggressivi.
- Magazzinaggio: When not in use, store the monitor in a cool, dry place, away from direct sunlight and extreme temperatures. Use a protective case to prevent scratches and impacts.
- Cura della batteria: If using NP-F batteries, ensure they are charged regularly and stored properly to prolong their lifespan. Remove batteries if the monitor will not be used for an extended period.
- Gestione dei cavi: Avoid bending or crimping cables excessively to prevent damage to the internal wires and connectors.
Risoluzione dei problemi
| Problema | Possibile causa | Soluzione |
|---|---|---|
| Il monitor non si accende. | No power, low battery, or faulty power connection. | Check DC power adapter connection or ensure NP-F battery is charged and correctly installed. |
| Nessun segnale video. | Incorrect HDMI connection, camera output settings, or incompatible signal. | Verify HDMI cable is securely connected to "HDMI IN". Check camera's HDMI output settings (resolution, frame rate). Ensure signal is within supported range (up to 4K 60Hz). |
| Il touchscreen non risponde. | Temporary software glitch or screen calibration issue. | Restart the monitor. If the issue persists, perform a factory reset via the System menu. |
| Image appears distorted or incorrect aspect ratio. | Incorrect aspect ratio setting or anamorphic mode. | Adjust "Aspect Ratio" or "Anamorphic Mode" settings in the Image menu to match your source. |
Specifiche
| Caratteristica | Dettaglio |
|---|---|
| Dimensioni dello schermo | 10.1 pollici |
| Risoluzione | 1920x1200 |
| Luminosità | 500 nidi |
| Rapporto di contrasto | 1500:1 |
| Proporzioni | 16:10 |
| Ingresso video | HDMI (up to 4096x2160/60p) |
| Uscita video | Cavo HDMI |
| Fonte di alimentazione | DC 12V, NP-F Battery |
| Protocollo di connettività | Wi-Fi (for firmware updates via USB) |
| Peso dell'articolo | 2.64 libbre |
| Dimensioni | 10.63 x 8.27 x 4.33 pollici (confezione) |
| Materiale del guscio | Lega di alluminio |
Prodotto finitoview e dimostrazione delle funzionalità
Guarda questo video per una panoramica dettagliataview of the FEELWORLD T10 monitor, including unboxing, physical features, and a demonstration of its various monitoring tools and settings.
Video: Detailed review and feature demonstration of the FEELWORLD T10 10.1-Inch Camera Field Monitor.
Garanzia e supporto
Per informazioni sulla garanzia, supporto tecnico o richieste di assistenza, fare riferimento al sito ufficiale FEELWORLD webo contattare direttamente il servizio clienti. Conservare la ricevuta d'acquisto come prova d'acquisto per eventuali reclami in garanzia.
- Supporto online: Visitare il FEELWORLD Store on Amazon per informazioni sui prodotti e risorse di supporto.
- Piani di protezione: Potrebbero essere disponibili piani di protezione estesa per l'acquisto. Per maggiori dettagli, rivolgiti al tuo rivenditore.