1. Introduzione
Thank you for choosing the Hiwill HW210 Soundbar with Subwoofer. This 2.1 channel surround sound system is designed to enhance your audio experience for televisions, PCs, gaming consoles, and other compatible devices. This manual provides detailed instructions for setup, operation, and maintenance to ensure optimal performance and longevity of your product. Please read this manual thoroughly before use and retain it for future reference.

Image 1.1: The Hiwill HW210 Soundbar and Subwoofer system, shown with a television for illustrative purposes.
2. Informazioni sulla sicurezza
Per ridurre il rischio di scosse elettriche, incendi o danni all'unità, osservare le seguenti precauzioni di sicurezza:
- Non esporre questo apparecchio a pioggia o umidità.
- Non posizionare sull'apparecchio oggetti contenenti liquidi, come ad esempio vasi.
- Assicurare una ventilazione adeguata. Non ostruire le aperture di ventilazione.
- Non installare vicino a fonti di calore come radiatori, bocchette di riscaldamento, stufe o altri apparecchi (inclusi amplificatori) che producono calore.
- Proteggere il cavo di alimentazione dall'essere calpestato o schiacciato, in particolare in corrispondenza di spine, prese di corrente e nel punto in cui escono dall'apparecchio.
- Utilizzare solo accessori/componenti specificati dal produttore.
- Scollegare l'apparecchio durante i temporali o quando non viene utilizzato per lunghi periodi di tempo.
- Affidare tutti gli interventi di assistenza a personale di assistenza qualificato. L'assistenza è richiesta quando l'apparecchio è stato danneggiato in qualsiasi modo, ad esempio se il cavo di alimentazione o la spina sono danneggiati, se è stato versato del liquido o sono caduti degli oggetti nell'apparecchio, se l'apparecchio è stato esposto a pioggia o umidità, se non funziona normalmente o se è caduto.
3. Contenuto della confezione
Si prega di verificare che tutti gli articoli siano presenti e in buone condizioni:
- Hiwill Soundbar
- Subwoofer cablato
- Telecomando
- Adattatore di alimentazione
- Cavo ottico (può variare in base alla regione)
- AUX Cable (may vary by region)
- Kit di montaggio a parete (viti, tasselli)
- Manuale dell'utente (questo documento)
4. Prodotto finitoview
4.1 Caratteristiche della soundbar
- Ultra-slim design (3.8 cm height)
- Integrated orbital aluminum diaphragm speakers
- Built-in HiFi and DSP technology for immersive 3D surround sound
- Maximum output power: 120 Watts
- Livello di pressione sonora: 106 dB
- Bluetooth 5.3 for wireless streaming
- Multiple input options: HDMI ARC, Optical, AUX, USB
- 3 adjustable EQ modes: Game, Movie, Music
- Adjustable bass and treble levels
4.2 Caratteristiche del subwoofer
- 9-liter capacity for deep, resonant bass
- Wired connection to the soundbar for stable audio transmission
4.3 Controlli e Indicatori
The soundbar features an integrated display and control buttons, typically located on the top or front panel. The remote control provides full functionality.
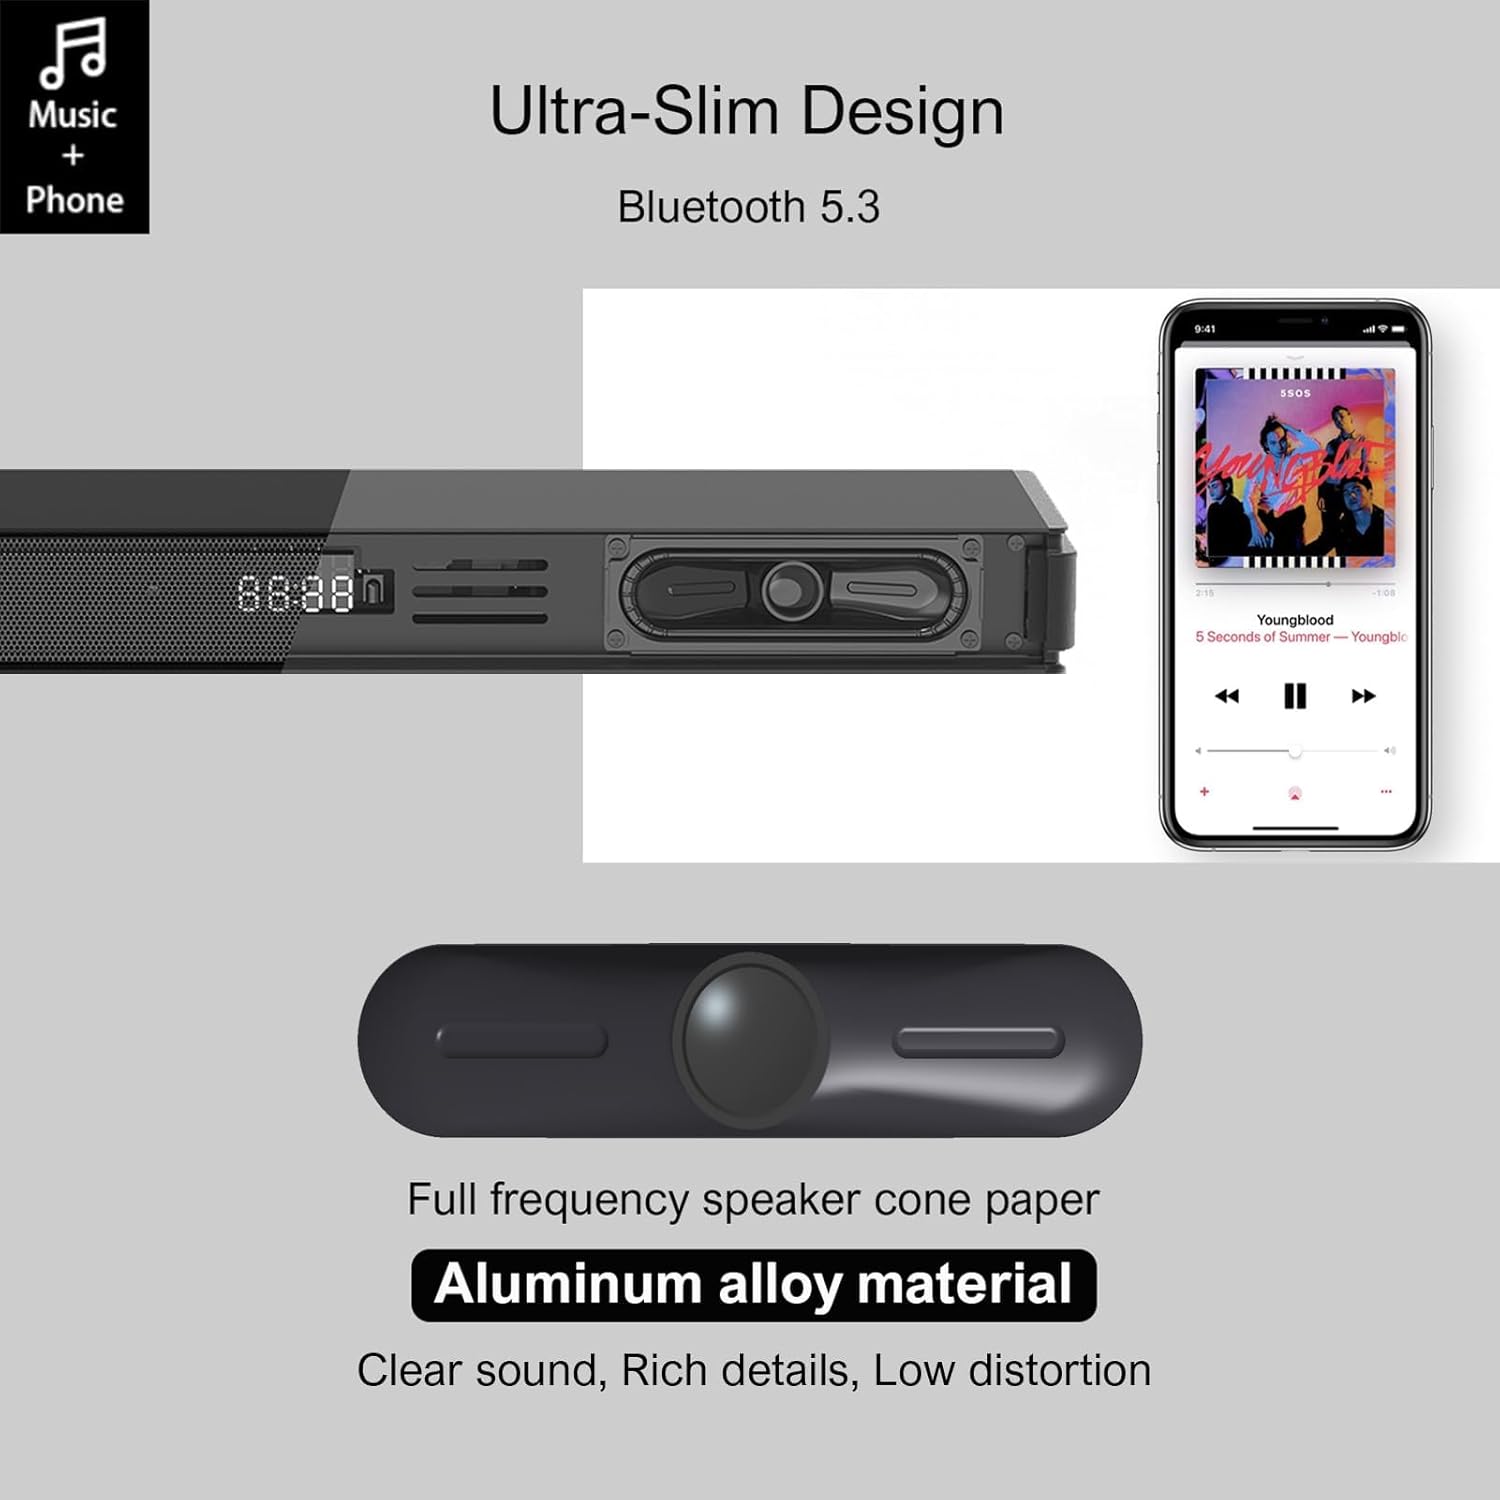
Image 4.1: Detail of the soundbar's ultra-slim design, showing the front display and integrated speakers.
4.4 Collegamenti del pannello posteriore
The rear panel of the soundbar provides various ports for connecting to your audio sources and power.

Immagine 4.2: posteriore view of the soundbar showing input ports: AUX, HDMI ARC, USB, Optical, Subwoofer Out, and DC In.
- AUX (3.5 mm): Per collegare dispositivi dotati di uscita audio da 3.5 mm.
- ARC (HDMI): For connecting to a TV's HDMI ARC port. Supports CEC for unified control.
- USB: Per riprodurre l'audio files da un'unità USB.
- OTTICO: For connecting to a TV or other device with an optical audio output.
- USCITA SUB: For connecting the wired subwoofer.
- DC IN: Per collegare l'adattatore di alimentazione.
5. Impostazione
5.1 Opzioni di posizionamento
The Hiwill HW210 soundbar offers flexible placement options to suit your home entertainment setup.

Image 5.1: Illustrates placing the soundbar on a tabletop in front of the TV or mounting it on the wall below the TV.
- Posizionamento sul tavolo: Place the soundbar on a stable, flat surface directly in front of your TV. Ensure it does not obstruct the TV's remote sensor.
- Montaggio a parete: The soundbar can be mounted on the wall below your TV. Use the provided wall mounting kit and follow these steps:
- Mark the desired mounting positions on the wall, ensuring the soundbar is centered with your TV.
- Praticare dei fori pilota nelle posizioni contrassegnate.
- Insert wall anchors (if necessary for your wall type).
- Secure the mounting brackets (if separate) or the soundbar directly using screws.
- Posizionamento del subwoofer: Place the subwoofer on the floor near the soundbar. Experiment with placement to find the best bass response for your room.
5.2 Collegamento all'alimentazione
- Connect the power adapter to the DC IN port on the soundbar's rear panel.
- Collegare l'altra estremità dell'alimentatore a una presa a muro.
- Connect the wired subwoofer cable to the SUB OUT port on the soundbar.
5.3 Collegamento a sorgenti audio
Scegli uno dei seguenti metodi di connessione in base al tuo dispositivo:
- HDMI ARC (consigliato per i televisori):
- Connect one end of an HDMI cable (not included) to the ARC port on the soundbar.
- Collegare l'altra estremità alla porta HDMI ARC del televisore.
- Ensure HDMI CEC is enabled in your TV's settings for unified control.
- Ottico:
- Connect the optical cable (included) to the OPTICAL port on the soundbar.
- Connect the other end to the optical audio output port on your TV or other device.
- Ensure your TV's audio output is set to "PCM" if you experience no sound.
- AUX (3.5 mm):
- Connect the 3.5mm AUX cable (included) to the AUX port on the soundbar.
- Collegare l'altra estremità al jack delle cuffie o all'uscita AUX del dispositivo.
- USB:
- Inserisci un'unità flash USB contenente audio filenella porta USB della soundbar.
6. Istruzioni per l'uso
6.1 Accensione/spegnimento
- Premere il tasto Energia pulsante sulla soundbar o sul telecomando per accendere o spegnere l'unità.
6.2 Selezione della sorgente di input
- Premere il tasto Ingresso button on the remote control or the soundbar to cycle through available input sources (ARC, OPT, AUX, USB, BT). The selected input will be displayed on the soundbar's screen.
6.3 Associazione Bluetooth
- Turn on the soundbar and select the "BT" input source. The soundbar will enter pairing mode, indicated by a flashing "BT" on the display.
- Sul tuo dispositivo mobile, attiva il Bluetooth e cerca i dispositivi disponibili.
- Select "Hiwill HW210" (or similar name) from the list of devices.
- Once paired, the soundbar will emit a confirmation tone, and "BT" will stop flashing.
- To disconnect, turn off Bluetooth on your device or select a different input source on the soundbar.
6.4 Controllo del volume
- Utilizzare il Volume su (+) E Volume basso (-) pulsanti sulla soundbar o sul telecomando per regolare il volume principale.
- Premere il tasto Muto pulsante sul telecomando per disattivare o riattivare l'audio.
6.5 EQ Modes and Tone Adjustment
The soundbar features three preset equalizer modes and adjustable bass/treble settings.

Image 6.1: Visual representation of the three equalizer modes: Game, Movie, and Music, optimized for different audio content.
- Premere il tasto EQ button on the remote control to cycle through the preset modes: Gioco, Film, E Musica.
- Utilizzare il Bassi +/- buttons on the remote control to adjust the bass level.
- Utilizzare il Alti +/- buttons on the remote control to adjust the treble level.
7. Manutenzione
- Pulizia: Use a soft, dry cloth to clean the surface of the soundbar and subwoofer. Do not use liquid cleaners or abrasive materials.
- Magazzinaggio: Se si conserva l'unità per un periodo prolungato, scollegarla dalla presa di corrente e conservarla in un luogo fresco e asciutto.
- Evitare ostacoli: Ensure that the speaker grilles and ventilation openings are not blocked by dust or other objects.
8. Risoluzione Dei Problemi
| Problema | Possibile causa | Soluzione |
|---|---|---|
| Nessun potere | Cavo di alimentazione non collegato; presa di corrente non attiva | Assicurarsi che il cavo di alimentazione sia collegato saldamente; provare una presa di corrente diversa. |
| Nessun suono | Sorgente di ingresso selezionata non corretta; Volume troppo basso; Cavi non collegati correttamente; Impostazioni di uscita audio TV errate. | Select the correct input source; Increase volume; Check all audio cables are securely connected; For Optical/ARC, ensure TV audio output is set to PCM. |
| L'associazione Bluetooth non riesce | Soundbar non in modalità di associazione; Dispositivo troppo lontano; Interferenza. | Ensure soundbar is in BT mode and flashing; Move device closer; Turn off other Bluetooth devices. |
| Il telecomando non funziona | Batterie scariche; ostruzione tra il telecomando e la soundbar. | Replace remote control batteries; Ensure clear line of sight to the soundbar's sensor. |
| Scarsa qualità del suono | Incorrect EQ mode; Source audio quality; Cable issues. | Adjust EQ modes and bass/treble settings; Try a different audio source; Check/replace audio cables. |
9. Specifiche
| Nome del modello | Hiwill HW210 Soundbar |
| Tipo di altoparlante | Soundbar con subwoofer cablato |
| Configurazione audio surround | 2.1 canali |
| Potenza massima di uscita dell'altoparlante | 120 Watt |
| Tecnologia di connettività | Bluetooth 5.3, HDMI ARC, AUX (3.5mm), USB, Optical |
| Modalità di uscita audio | Circondare |
| Caratteristiche speciali | High-resolution audio support, 3 EQ modes, Adjustable Bass/Treble, Wall-mountable |
| Usi consigliati | TV, Gaming Consoles, Computers, Smartphones, Tablets, Music Players, DVD Players, Home Theater |
10. Garanzia e supporto
Hiwill products are designed and manufactured to the highest quality standards. For detailed warranty information, please refer to the warranty card included in your package or visit the official Hiwill website. If you encounter any issues or require technical assistance, please contact Hiwill customer support through the contact information provided on the product packaging or websito.
Please have your model number (HW210) and purchase date ready when contacting support.


