Introduzione
The NEEWER GM15 Tripod Leveling Base is designed to provide precise and quick leveling for your camera setup on various terrains. This aluminum adjusting head plate offers a tilt range of -15° to +15° and 360° panning, making it ideal for panoramic photography and videography. It features an integrated bubble level for accurate alignment and compatibility with a wide range of photographic equipment.
Prodotto finitoview
Familiarize yourself with the components of your NEEWER GM15 Tripod Leveling Base:

Immagine: Labeled diagram of the NEEWER GM15 Tripod Leveling Base, highlighting its key parts such as the safety stop screw, 1/4" screw, nonslip rubber pad, bubble level, angle lock, and 3/8" screw hole.
- Safety Stop Screw: Prevents accidental detachment of mounted equipment.
- Vite da 1/4": Standard mounting screw for cameras, ball heads, and video fluid heads.
- Nonslip Rubber Pad: Provides grip and protects equipment from scratches.
- Livella a bolla: Assists in achieving precise horizontal alignment.
- Blocco dell'angolo: Knob to secure the tilt angle of the leveling base.
- Foro per vite da 3/8": For mounting the leveling base onto tripods or monopods.
Contenuto della confezione
Verifica che tutti gli articoli siano presenti nel tuo pacco:
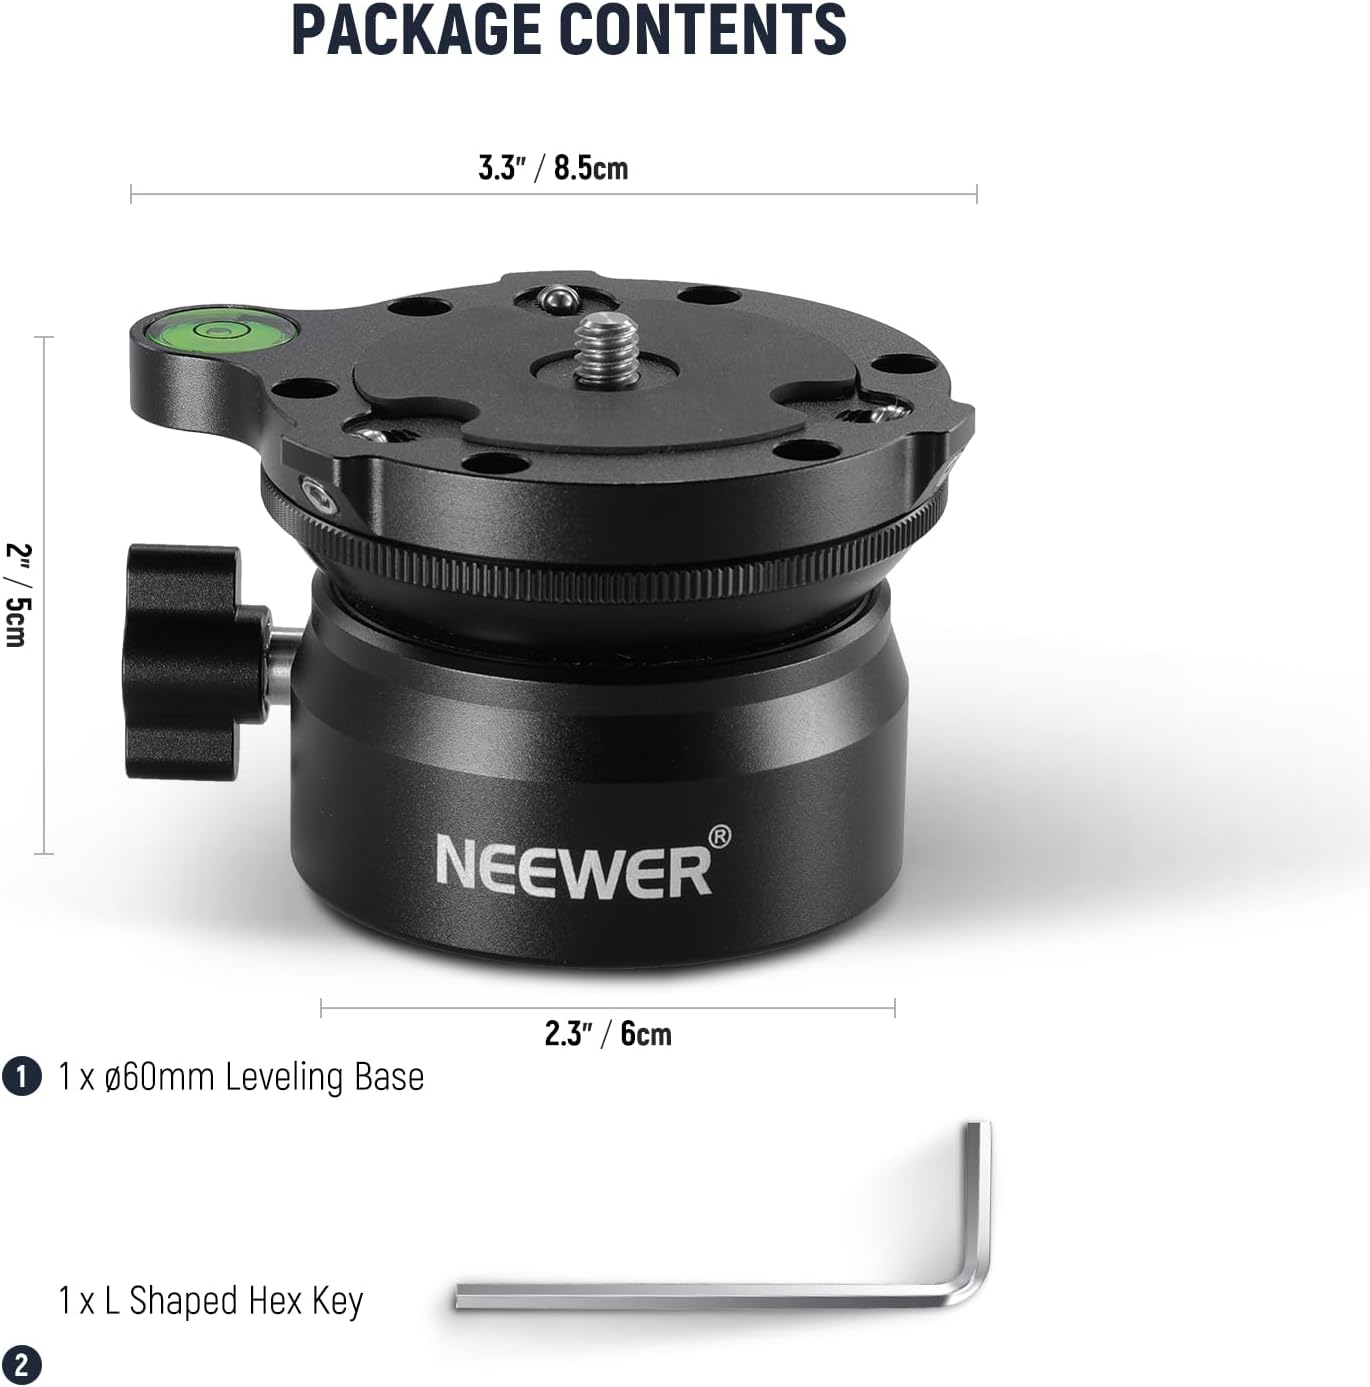
Immagine: The NEEWER GM15 Tripod Leveling Base and its included L-shaped hex key, along with product dimensions.
- 1 x NEEWER GM15 Leveling Base (Ø60mm)
- 1 chiave esagonale a L
- 1 x 1/4" to 3/8" Screw Adapter (pre-installed or separate)
Istruzioni di installazione
1. Attaching the Leveling Base to a Tripod or Monopod
The leveling base features a 3/8" screw hole at its bottom for mounting onto most standard tripods or monopods. If your tripod has a 1/4" screw, use the included 1/4" to 3/8" thread adapter.
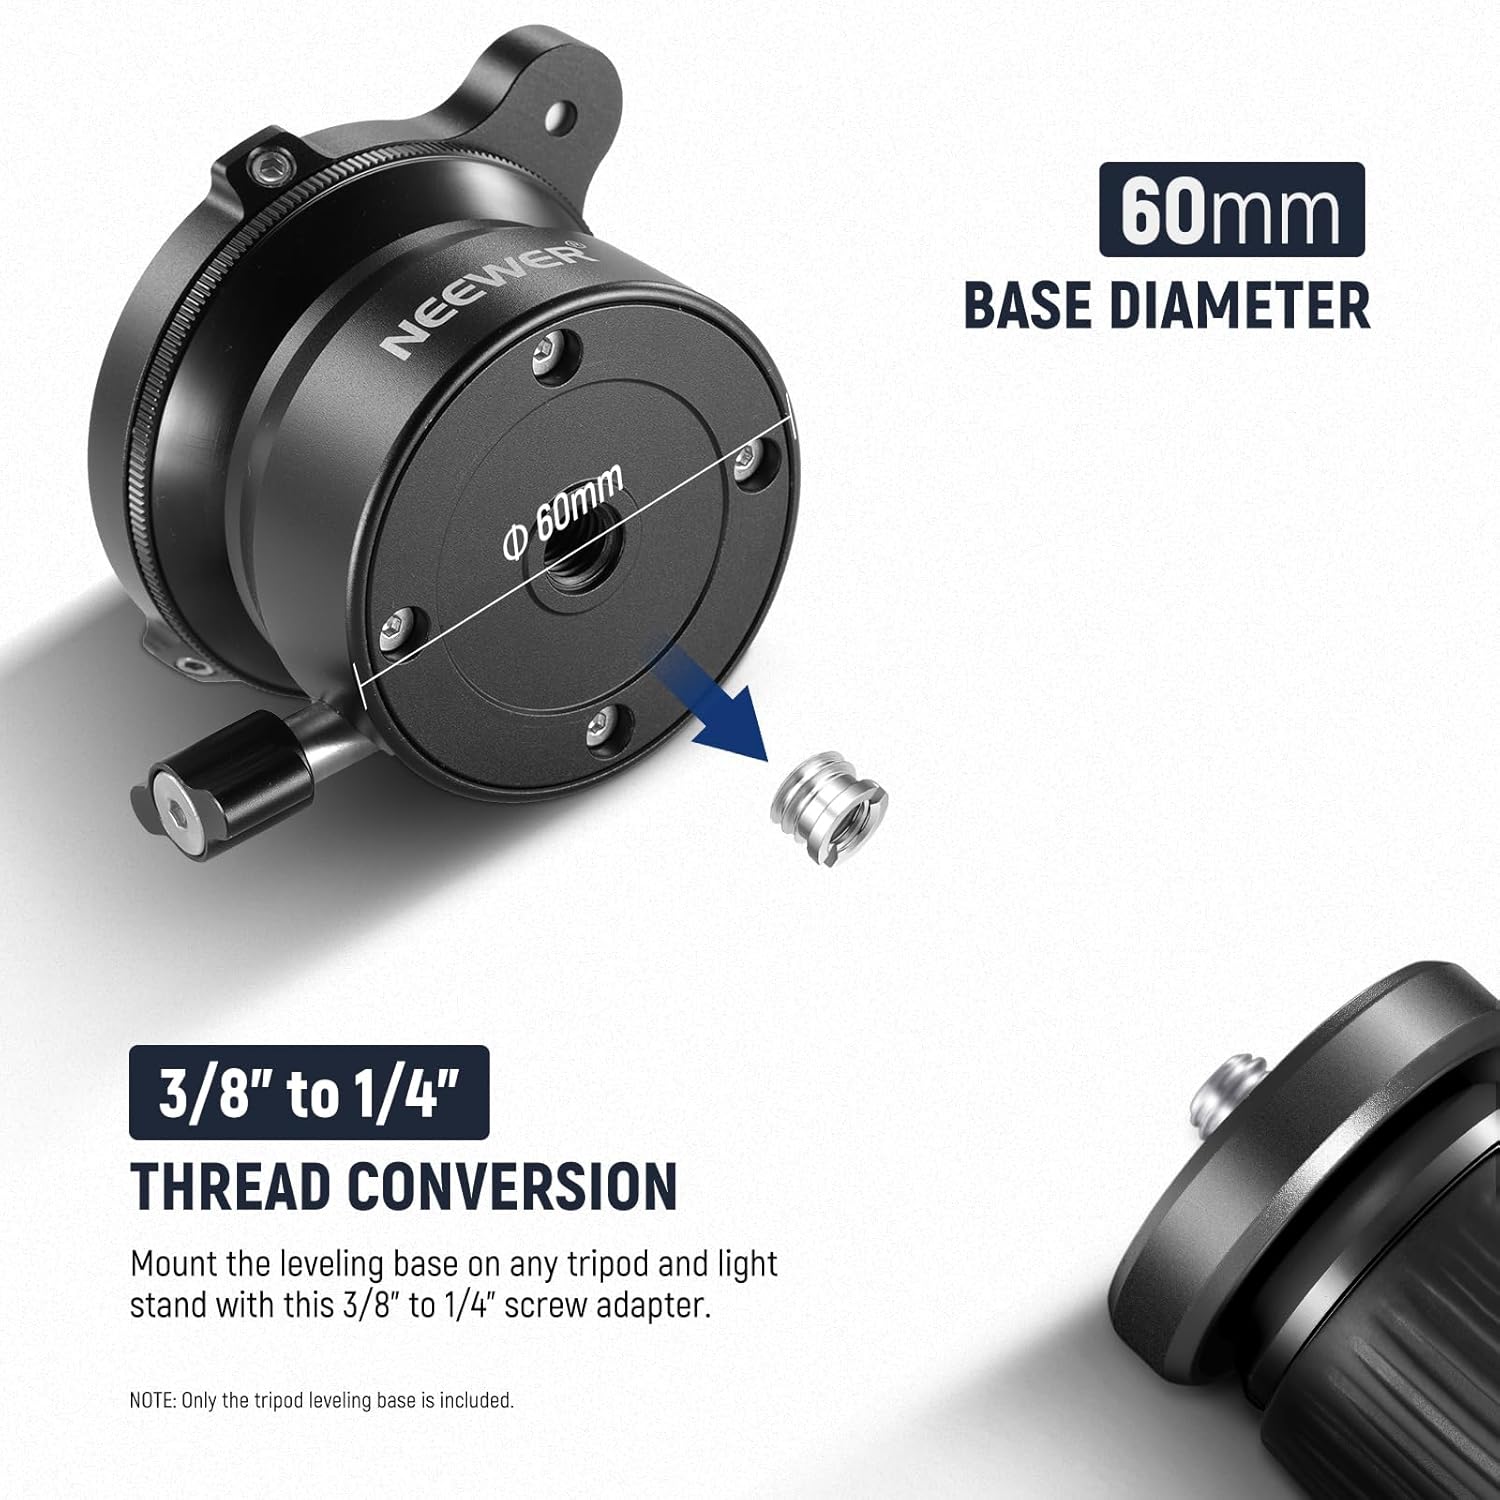
Immagine: Illustration of the 3/8" to 1/4" thread conversion, showing how to attach the leveling base to a tripod or light stand using the screw adapter.
- Locate the 3/8" screw hole on the bottom of the leveling base.
- If your tripod has a 1/4" screw, insert the 1/4" to 3/8" adapter into the leveling base's screw hole.
- Screw the leveling base onto your tripod or monopod until it is securely fastened.
2. Mounting Your Camera or Tripod Head
The top of the leveling base features a 1/4" screw for attaching your camera, ball head, or video fluid head.

Immagine: The 1/4" screw on the leveling base, illustrating its compatibility with various camera types (DSLR, video, action camera). Also shown is the use of an L-shaped hex key to tighten the safety stop screw for stability.
- Screw your camera, ball head, or video fluid head onto the 1/4" screw on top of the leveling base.
- Once mounted, use the provided L-shaped hex key to tighten the safety stop screws around the 1/4" screw. This prevents the mounted device from wobbling or accidentally unscrewing.
Istruzioni per l'uso
1. Leveling Your Camera
The leveling base allows for quick and precise adjustment of your camera's horizontal position, even on uneven surfaces.
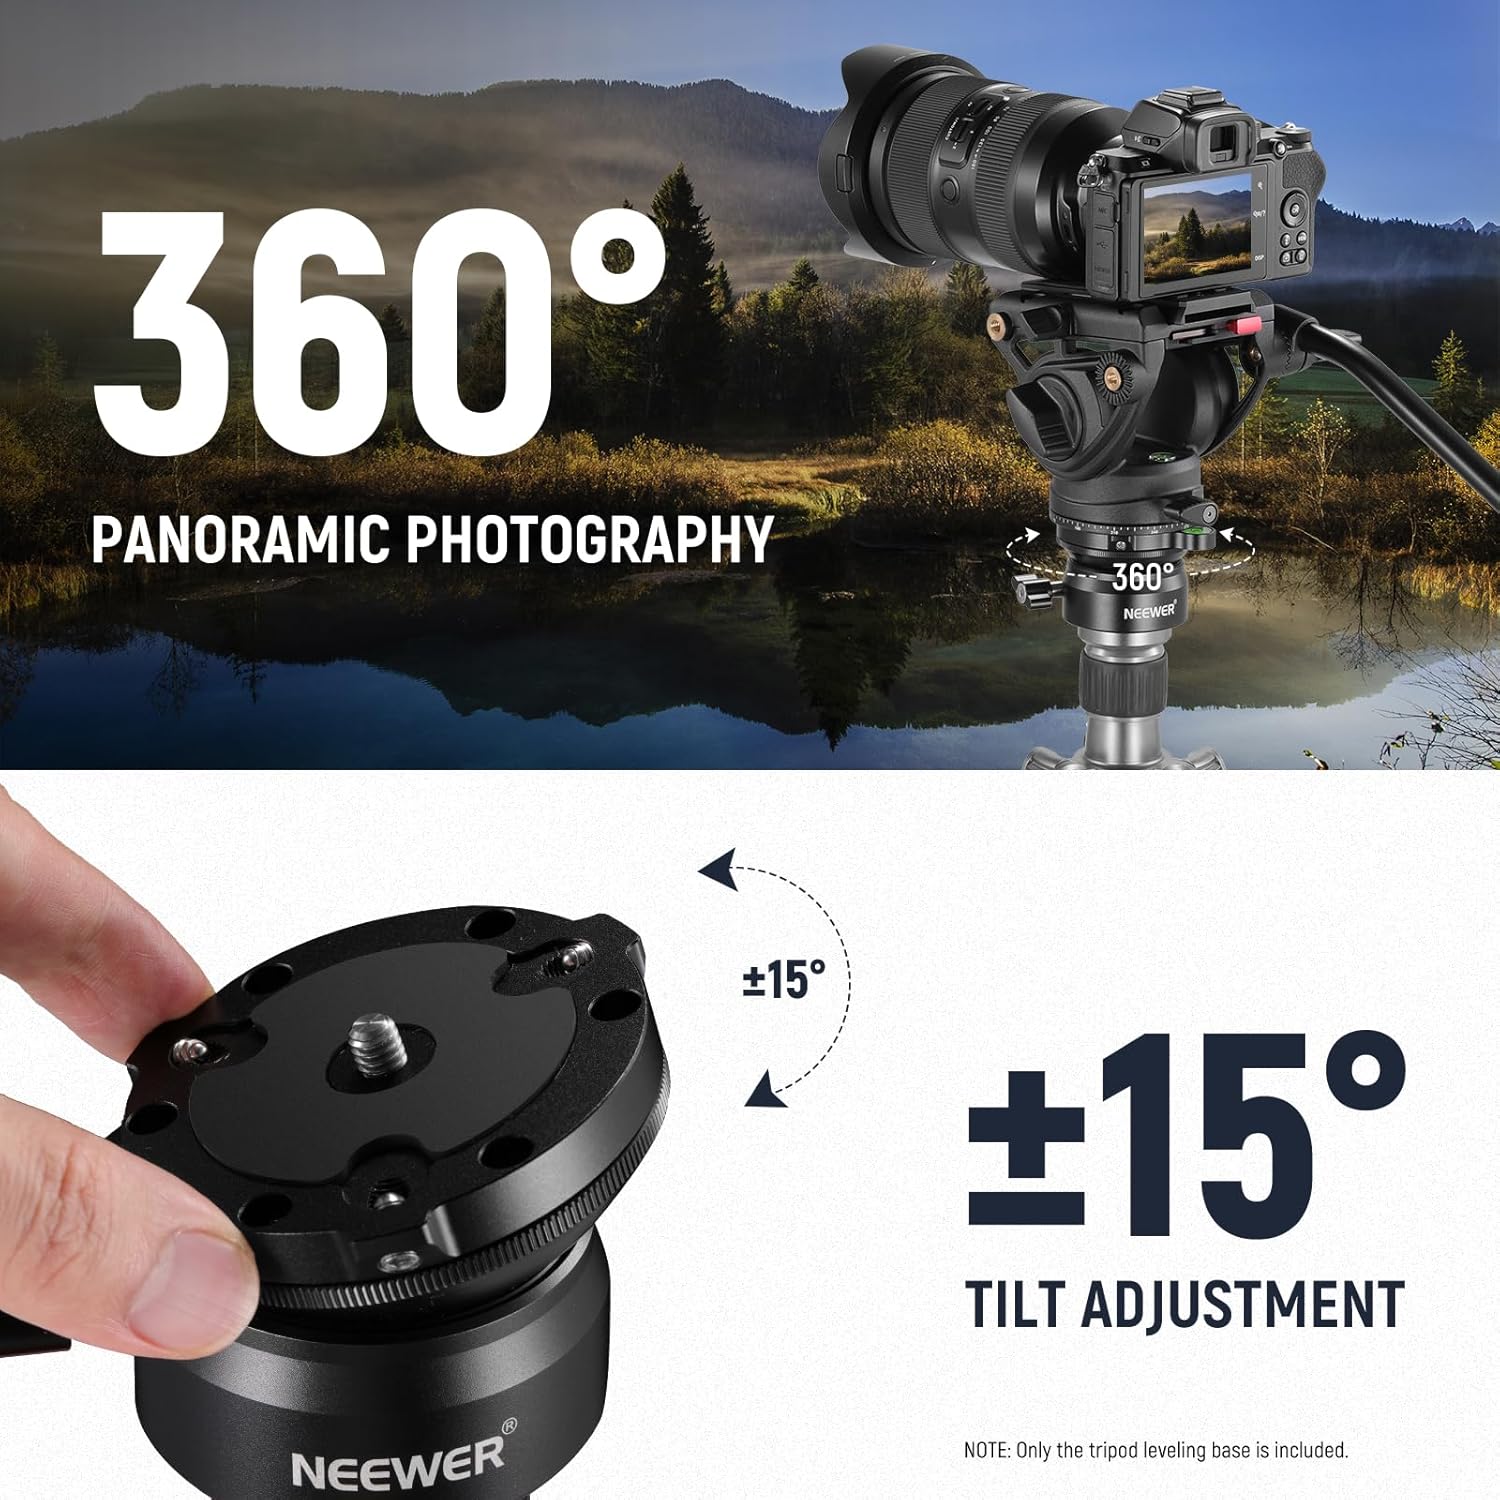
Immagine: A camera mounted on a tripod with the leveling base, illustrating the ±15° tilt adjustment capability for precise leveling and 360° panoramic photography.
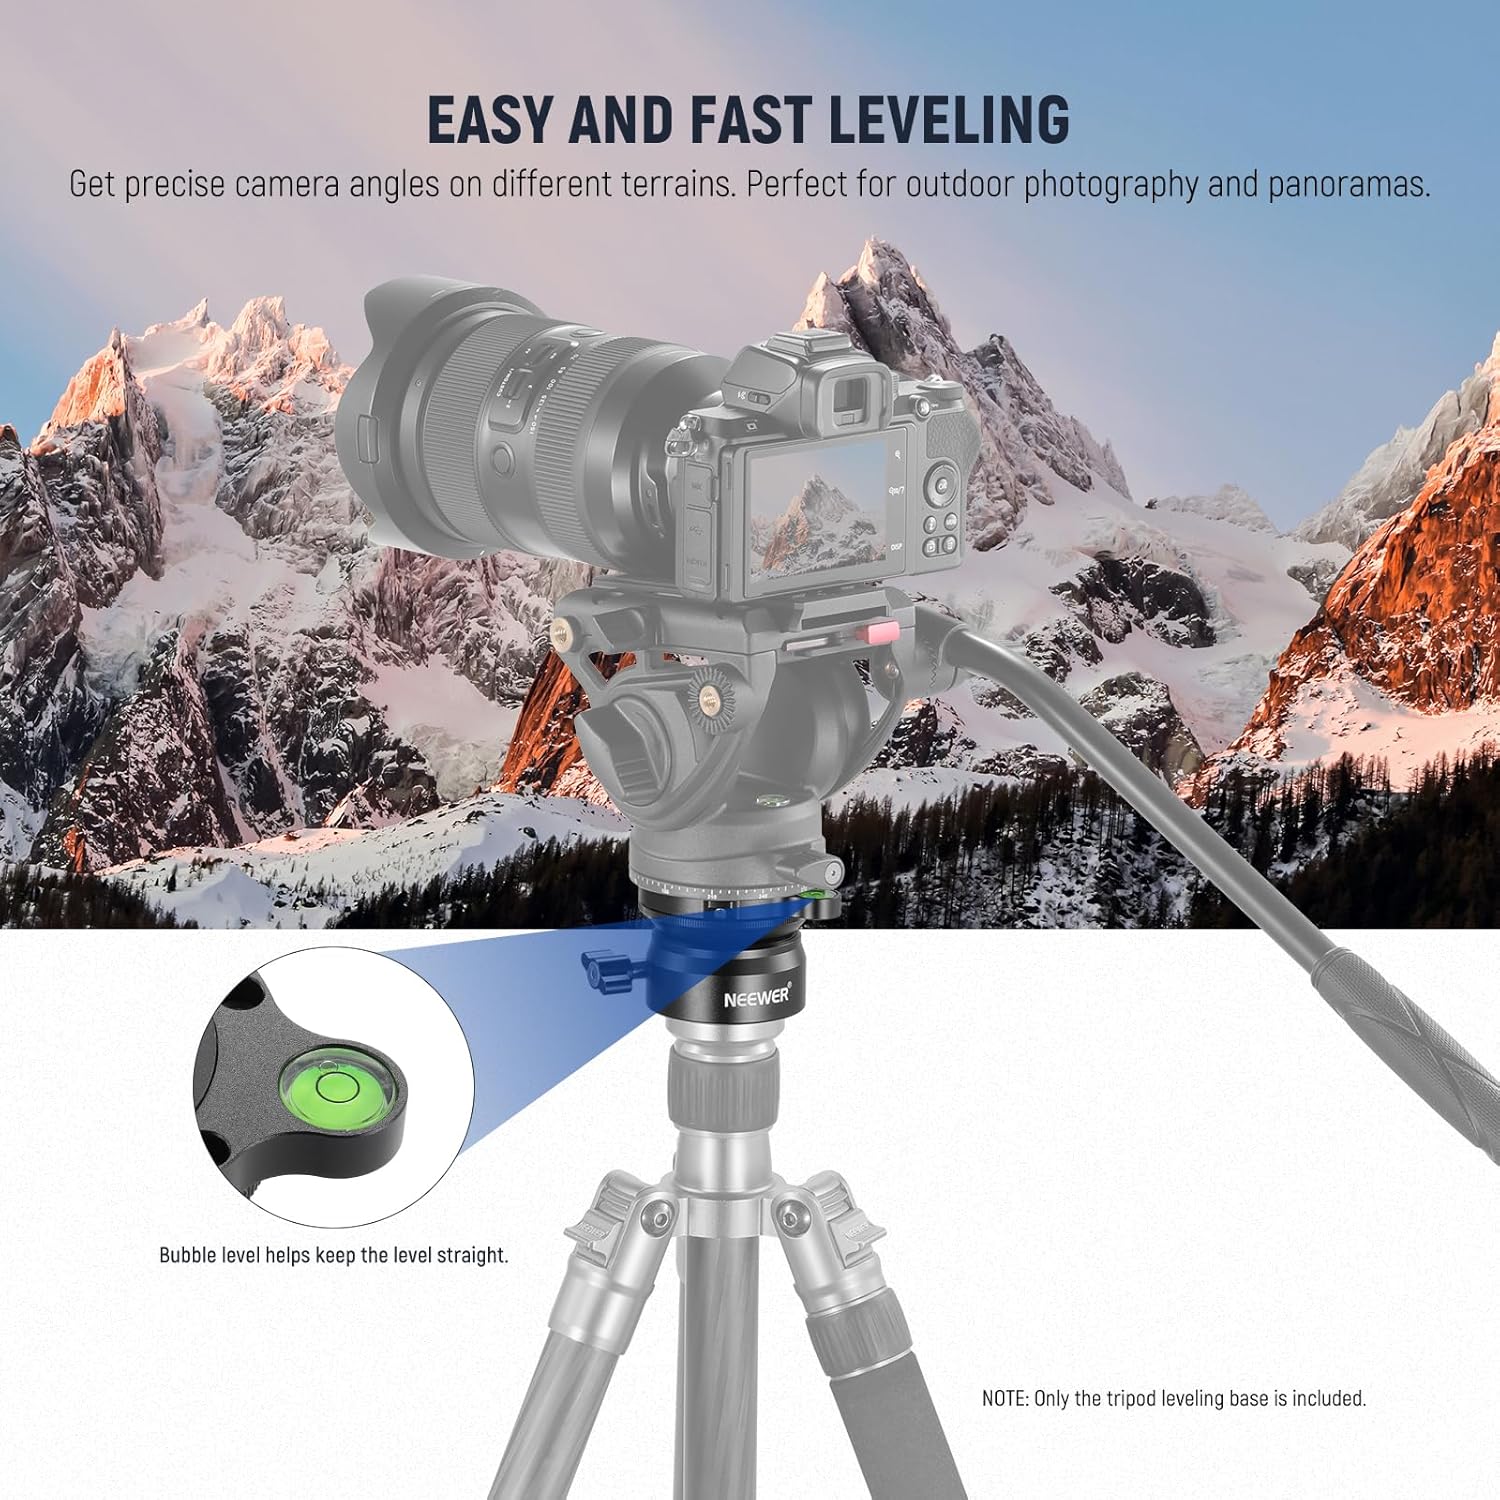
Immagine: A visual comparison showing how the leveling base allows for easy and fast camera leveling, contrasting an unlevel setup with a correctly leveled one, aided by the bubble level.
- Loosen the angle lock knob on the side of the leveling base.
- Adjust the camera's tilt within the -15° to +15° range until the bubble in the integrated level is centered.
- Tighten the angle lock knob to secure the desired level position.
2. 360° Panning
The leveling base also allows for smooth 360° panoramic rotation.
- Ensure the angle lock knob is tightened to maintain the level position.
- Rotate the entire leveling base assembly on your tripod for 360° panning.
3. High Locking Strength
The upgraded screw knob provides strong locking strength to keep your camera securely in place.
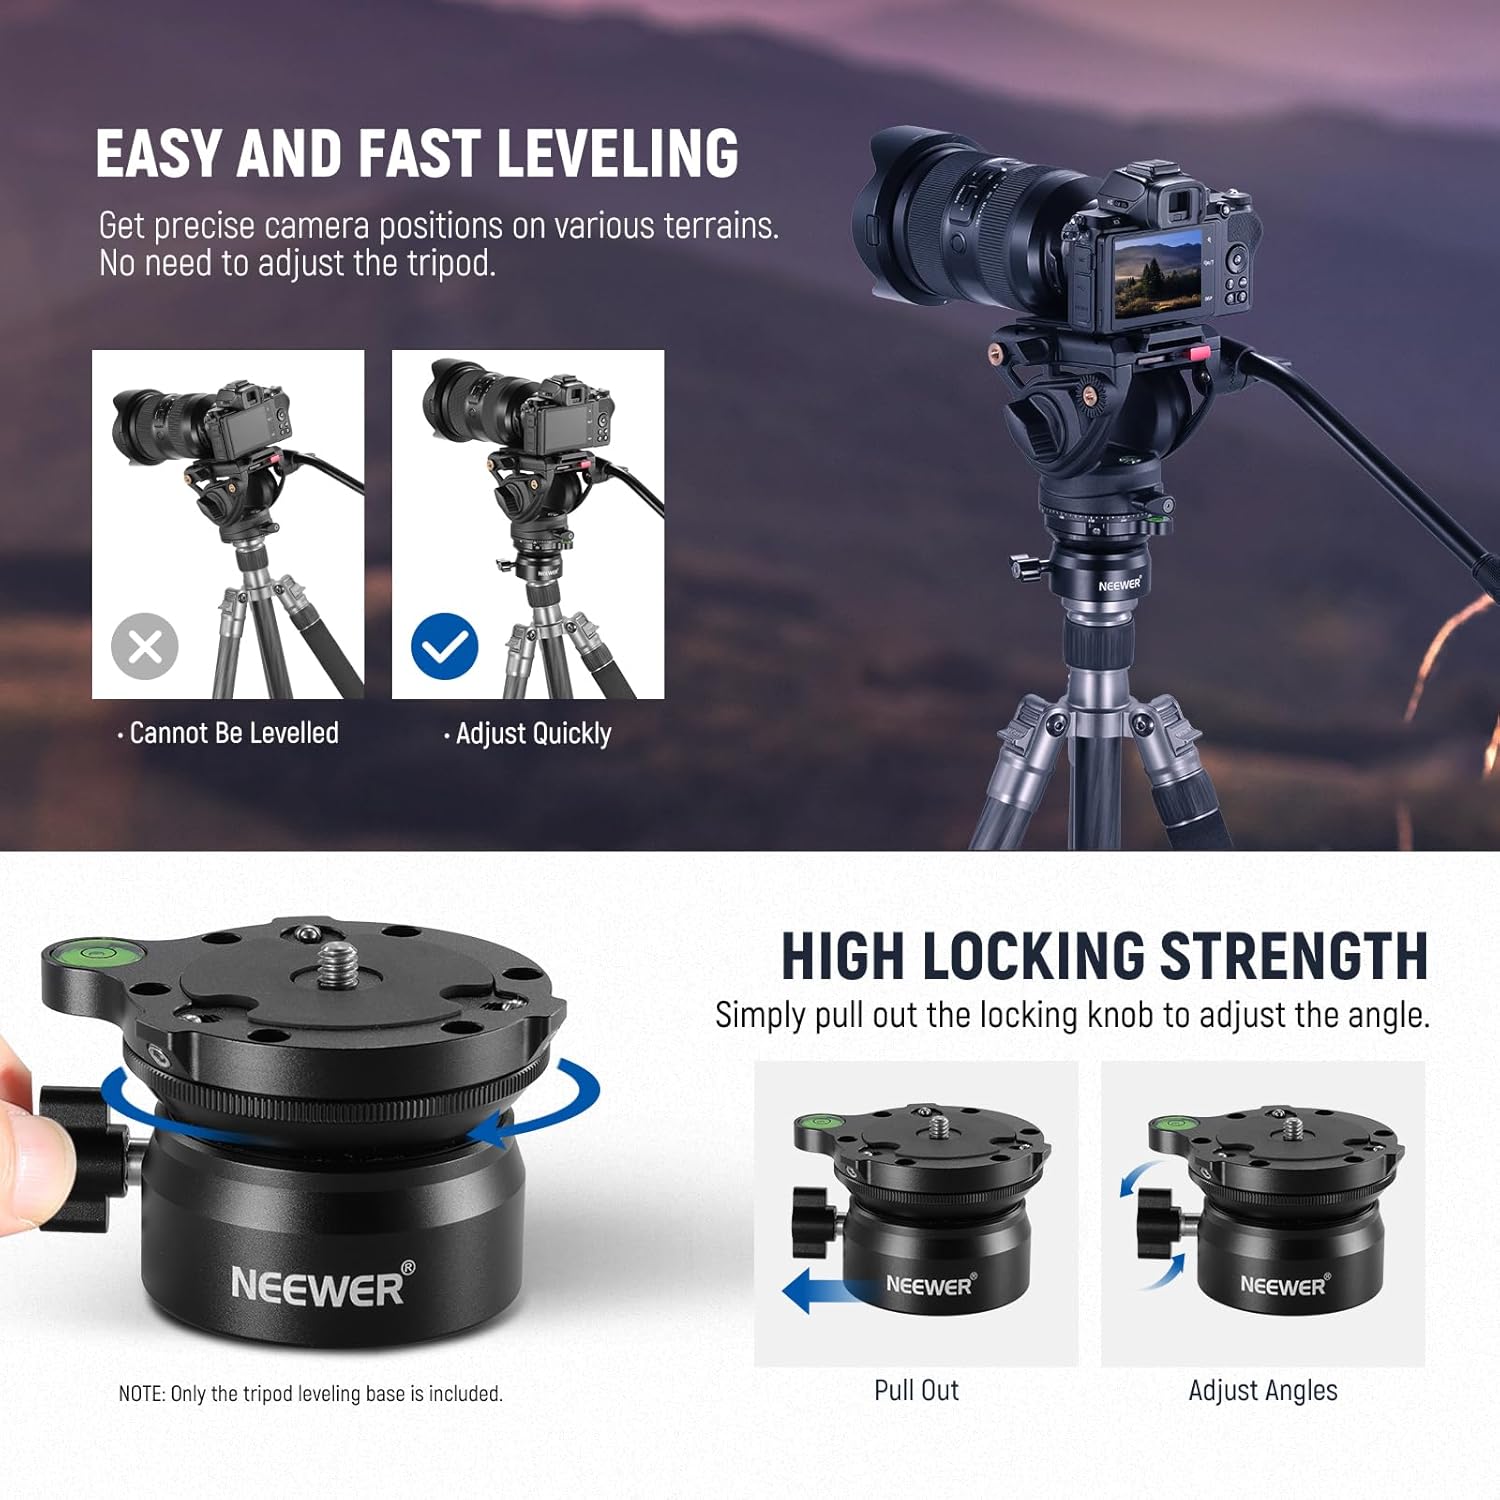
Immagine: Demonstration of the high locking strength mechanism. The knob can be pulled out to adjust the angle and then pushed back in to firmly lock the position.
- To adjust the angle, pull out the screw knob.
- Once the desired angle is set, push the knob back in and rotate it clockwise to tighten and secure the position.
Caratteristiche
- -15°/+15° Fast Leveling: Allows smooth and accurate camera leveling and 360° panning on uneven surfaces.
- Livella a bolla integrata: Provides instant and effortless horizontal alignment.
- Costruzione rinforzata: Made of black anodized aluminum alloy with CNC precision machining for durability and portability. Features nonslip rubber pads to protect against scratches.
- Adattatore per vite da 1/4" a 3/8": Ensures compatibility with a wide range of tripods, monopods, and camera sliders.
- Compatibilità universale: The top 1/4" screw is compatible with numerous tripod ball heads, video fluid heads, DSLR cameras, video cameras, action cameras, and vlogging cameras. Maximum load capacity: 22lb/10kg.
Specifiche
| Specificazione | Valore |
|---|---|
| Marca | PIÙ NUOVI |
| Numero di modello | GM15 (10102672) |
| Diametro di base | 60mm |
| Gamma di inclinazione | da -15° a +15° |
| Panoramica | 360° |
| Materiale | Lega di alluminio |
| Peso dell'articolo | 10.6 once (290 g) |
| Capacità di carico massima | 22 libbre (10 kg) |
| Top Screw Thread | 1/4" |
| Foro per vite inferiore | 3/8" (with 1/4" adapter included) |
| Colore | Nero |
Manutenzione
To ensure the longevity and optimal performance of your NEEWER GM15 Tripod Leveling Base, follow these maintenance guidelines:
- Pulizia: Wipe the leveling base with a soft, dry cloth after each use to remove dust, dirt, or moisture. For stubborn grime, use a slightly damp panno e asciugare accuratamente. Evitare prodotti chimici aggressivi o detergenti abrasivi.
- Magazzinaggio: Store the leveling base in a cool, dry place away from direct sunlight and extreme temperatures. If storing for an extended period, ensure it is clean and dry.
- Ispezione: Periodically check all screws and knobs to ensure they are tight. If any components appear loose or damaged, discontinue use and contact customer support.
Risoluzione dei problemi
If you encounter any issues with your NEEWER GM15 Tripod Leveling Base, refer to the following common solutions:
- Livellamento della difficoltà: Ensure the angle lock knob is sufficiently loosened before attempting to adjust the tilt. Check that the tripod or monopod is stable on the ground.
- Equipment Wobbles: Verify that your camera or tripod head is securely screwed onto the 1/4" screw and that the safety stop screws are tightened with the L-shaped hex key. Also, ensure the leveling base itself is firmly attached to your tripod.
- Knob is Stiff: If the angle lock knob feels stiff, ensure no dirt or debris is obstructing its movement. Do not force the knob; gently try to loosen it.
- Bubble Level Inaccurate: While the integrated bubble level provides a quick reference, for critical applications, consider using an external hot shoe bubble level for enhanced precision.
Se i problemi persistono, contattare l'assistenza clienti NEEWER per ulteriore assistenza.
Garanzia e supporto
I prodotti NEEWER sono progettati per garantire affidabilità e prestazioni. Per informazioni sulla garanzia, supporto tecnico o richieste di assistenza, consultare il sito ufficiale NEEWER. webo contattare direttamente il servizio clienti. Conservare la ricevuta d'acquisto come prova d'acquisto per eventuali reclami in garanzia.
NEEWER Customer Support: www.neewer.com/support