1. Introduzione
This manual provides detailed instructions for the installation, operation, and maintenance of your darkFlash Aquarius Mesh Computer Case. Please read this manual thoroughly before beginning installation to ensure proper setup and safe use of your new computer chassis.
2. Informazioni sulla sicurezza
Osservare sempre le seguenti precauzioni di sicurezza:
- Disconnect all power sources before installing or removing any components.
- Indossare un braccialetto antistatico per evitare danni ai componenti causati dalle scariche elettrostatiche (ESD).
- Maneggiare i componenti con cura per evitare danni fisici.
- Tenere le parti piccole e gli strumenti lontano dalla portata dei bambini.
- Ensure proper ventilation around the computer case.
3. Contenuto della confezione
Verifica che tutti gli articoli siano presenti nel tuo pacco:
- darkFlash Aquarius Mesh Computer Case
- Scatola degli accessori (viti, distanziatori, fascette, ecc.)
- Manuale dell'utente (questo documento)
4. Configurazione e installazione
Follow these steps for proper component installation.
4.1. Preparazione del caso
Before installing components, remove the side panels. The Aquarius Mesh case typically features a tempered glass side panel and a solid metal panel.
- Locate the thumbscrews on the rear of the case securing the side panels.
- Unscrew the thumbscrews and carefully slide the panels backward, then lift them off.

Figura 1: Frontale e laterale view of the darkFlash Aquarius Mesh case. Note the mesh front panel and tempered glass side panel.

Figura 2: Posteriore view of the darkFlash Aquarius Mesh case, showing expansion slots and rear fan mount.
4.2. Installazione della scheda madre
The Aquarius Mesh supports ATX, Micro-ATX, and Mini-ITX motherboards.
- Install the I/O shield into the cutout at the rear of the case.
- Align your motherboard with the pre-installed standoffs. Ensure the I/O ports align with the I/O shield.
- Fissare la scheda madre con le viti appropriate presenti nella scatola degli accessori.
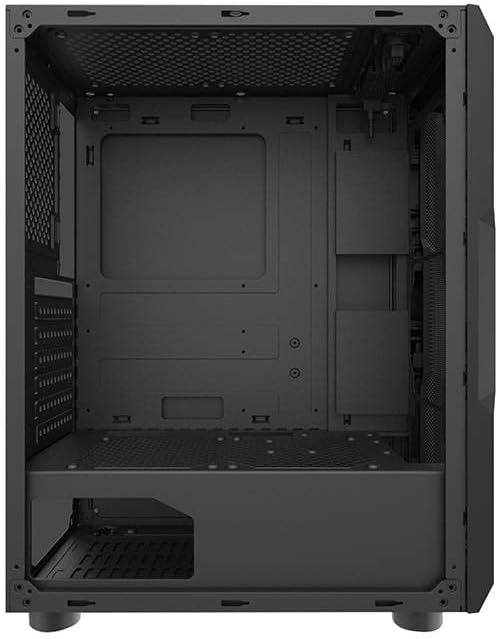
Figura 3: Interno view of the darkFlash Aquarius Mesh case, highlighting the motherboard tray and cable routing options.
4.3. Installazione dell'unità di alimentazione (PSU)
The PSU mounts at the bottom rear of the case.
- Slide the PSU into its designated compartment from the rear of the case.
- Align the screw holes and secure the PSU with screws.
4.4. Installazione dell'unità di archiviazione
The case provides mounting options for 3.5-inch HDDs and 2.5-inch SSDs.
- HDD da 3.5": Locate the drive cage usually beneath the PSU shroud or behind the motherboard tray. Slide the HDD into the bay and secure it with screws.
- SSD da 2.5": Mount SSDs to dedicated brackets behind the motherboard tray or on the PSU shroud. Secure with screws.

Figura 4: Interno posteriore view of the darkFlash Aquarius Mesh case, showing the motherboard cutout and potential SSD mounting points.
4.5. Expansion Card Installation (e.g., GPU)
- Rimuovere le coperture degli slot di espansione necessari dalla parte posteriore del case.
- Insert the expansion card into the appropriate PCIe slot on the motherboard.
- Secure the card with the provided screws or retention clips.
4.6. Gestione dei cavi
Utilizzare i fori per il passaggio dei cavi e i punti di fissaggio dietro il vassoio della scheda madre per organizzare i cavi. Questo migliora il flusso d'aria e l'estetica.
4.7. Reassembling the Case
Once all components are installed and cables are managed:
- Carefully reattach the side panels, ensuring they slide into place correctly.
- Secure the side panels with the thumbscrews.
5. Istruzioni per l'uso
After assembly, connect your peripherals and power cable.
- Connect your monitor, keyboard, mouse, and other peripherals to the motherboard's I/O ports.
- Collegare il cavo di alimentazione all'alimentatore e a una presa a muro.
- Press the power button located on the top panel of the case to start your computer.

Figura 5: in alto view of the darkFlash Aquarius Mesh case, showing the front I/O panel with power button, reset button, USB ports, and audio jacks.
6. Manutenzione
Una manutenzione regolare aiuta a garantire prestazioni ottimali e longevità dei componenti del computer.
- Filtri antipolvere: The Aquarius Mesh case features removable dust filters (e.g., on the front, top, and bottom). Regularly remove and clean these filters with water and mild soap, or by vacuuming, to maintain good airflow. Ensure they are completely dry before reinstallation.
- Pulizia interna: Periodically open the case and use compressed air to remove dust buildup from fans, heatsinks, and other components.
- Pulizia esterna: Pulire le superfici esterne con un panno morbido, damp stoffa. Evitare prodotti chimici aggressivi.
7. Risoluzione Dei Problemi
Se riscontri problemi, prendi in considerazione le seguenti soluzioni comuni:
- Nessun potere:
- Assicurarsi che l'interruttore dell'alimentatore sia in posizione "ON".
- Controllare tutti i collegamenti di alimentazione alla scheda madre e ai componenti.
- Verify the power cable is securely plugged into the wall outlet and PSU.
- I ventilatori non girano:
- Check fan connections to the motherboard or fan controller.
- Ensure fans are not obstructed by cables or dust.
- I/O del pannello frontale non funzionanti:
- Verify that the front panel connectors (USB, audio, power/reset switches) are correctly connected to the motherboard headers. Refer to your motherboard manual for header locations.
8. Specifiche
| Caratteristica | Dettaglio |
|---|---|
| Marca | Flash scuro |
| Numero di modello | Aquarius Mesh |
| Tipo di caso | Torre media |
| Materiale | Acciaio legato |
| Colore | Nero |
| Metodo di raffreddamento | Aria |
| Uso consigliato | Computer |
| Fattore di forma del disco rigido | 3.5 pollici |
9. Garanzia e supporto
For warranty information or technical support, please refer to the official darkFlash websito o contattare il servizio clienti. Conservare la prova d'acquisto per eventuali reclami in garanzia.
Per ulteriore assistenza, puoi visitare il darkFlash official websito.


