1. Introduzione e oltreview
The Escort EDM 1111A is a versatile digital multimeter designed for accurate measurement of various electrical parameters. This device is essential for electricians, technicians, and hobbyists for testing circuits, components, and power sources. It features a clear digital display and a rotary dial for selecting different measurement functions.

The Escort EDM 1111A Digital Multimeter with red and black test leads connected, ready for use.
Le funzioni principali includono:
- Volume DCtage (DCV) measurement
- Volume ACtage (ACV) measurement
- DC Current (DCA) measurement
- AC Current (ACA) measurement
- Misurazione della resistenza (Ω)
- Capacitance (CX) measurement
- Diode and Transistor (hFE) testing
2. Impostazione
2.1 Installazione della batteria
The Escort EDM 1111A requires a DC 9V 006P battery for operation. To install or replace the battery:
- Assicurarsi che il multimetro sia spento.
- Individuare il vano batterie sul retro dell'unità.
- Aprire o svitare con cautela il coperchio della batteria.
- Insert a new 9V 006P battery, observing the correct polarity (+/-).
- Riposizionare saldamente il coperchio della batteria.

La parte posteriore view of the Escort EDM 1111A Digital Multimeter, showing the battery compartment cover and the product label.
2.2 Collegamento dei puntali di prova
The multimeter comes with two test leads, typically one red (positive) and one black (negative/common). Proper connection is crucial for accurate and safe measurements.
- Per la maggior parte dei volumitage, resistance, and low current measurements, connect the black lead to the 'COM' (Common) jack.
- Connect the red lead to the 'V-Ω-mA' jack for voltage, resistenza e milliampmisurazioni attuali.
- For high current measurements (up to 10A), connect the red lead to the '10A' jack. Always ensure the correct jack is used to prevent damage to the meter or circuit.

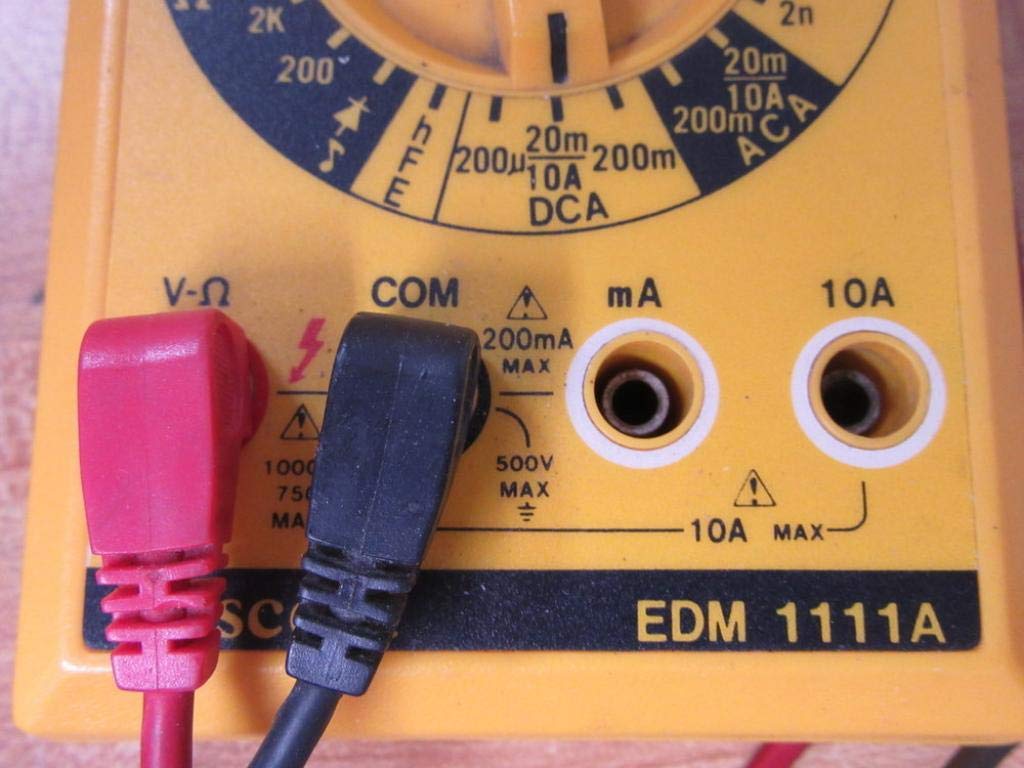
A closer look at the input jacks (V-Ω, COM, mA, 10A) and the lower portion of the rotary dial, indicating current measurement ranges.

The red and black test probes (leads) used with the Escort EDM 1111A Digital Multimeter, featuring pointed tips for electrical contact.
3. Istruzioni per l'uso
Before taking any measurements, ensure the test leads are correctly connected and the rotary dial is set to the appropriate function and range.

Dettagliato view of the rotary selector dial on the Escort EDM 1111A Digital Multimeter, displaying various measurement functions such as DCV, ACV, Ω, DCA, ACA, and CX.
3.1 Misurazione del volume CCtage(DCV)
- Set the rotary dial to the desired DCV range (e.g., 200m, 2, 20, 200, 1000). Choose a range higher than the expected voltage.
- Connect the red lead to the positive (+) side of the circuit and the black lead to the negative (-) side.
- Leggi il vol.tage valore sul display.
3.2 Misurazione del volume CAtage(ACV)
- Set the rotary dial to the desired ACV range (e.g., 200m, 2, 20, 200, 750). Choose a range higher than the expected voltage.
- Collegare i puntali di prova attraverso la tensione CAtage source. Polarity does not matter for AC voltage.
- Leggi il vol.tage valore sul display.
3.3 Misurazione della resistenza (Ω)
- Prima di misurare la resistenza, assicurarsi che il circuito o il componente siano disattivati.
- Set the rotary dial to the desired Ω range (e.g., 200, 2K, 20K, 200K, 2M, 20M, 200M).
- Collegare i puntali di prova al componente da misurare.
- Leggere il valore di resistenza sul display.
3.4 Misurazione della corrente continua (DCA)
- Assicurarsi che il circuito sia disattivato.
- Set the rotary dial to the desired DCA range (e.g., 200µ, 2m, 20m, 200m, 10A).
- Importante: For currents up to 200mA, use the 'V-Ω-mA' jack for the red lead. For currents up to 10A, use the '10A' jack.
- Break the circuit and connect the multimeter in series with the load. The current must flow through the multimeter.
- Riattivare il circuito e leggere il valore corrente.
3.5 Measuring AC Current (ACA)
- Assicurarsi che il circuito sia disattivato.
- Set the rotary dial to the desired ACA range (e.g., 200µ, 2m, 20m, 200m, 10A).
- Importante: For currents up to 200mA, use the 'V-Ω-mA' jack for the red lead. For currents up to 10A, use the '10A' jack.
- Interrompere il circuito e collegare il multimetro in serie con il carico.
- Riattivare il circuito e leggere il valore corrente.
3.6 Measuring Capacitance (CX)
- Prima di effettuare il test, assicurarsi che il condensatore sia completamente scarico.
- Set the rotary dial to the CX range (e.g., 2n, 20n, 200n, 2µ, 20µ).
- Collegare i puntali di prova ai terminali del condensatore.
- Leggere il valore della capacità sul display.
3.7 Diode and Transistor (hFE) Testing
Refer to the specific markings on the dial for diode and transistor testing functions. Typically, diode test mode allows checking the forward voltage drop of a diode, and hFE mode is used for measuring the DC current gain of transistors.
4. Manutenzione
4.1 Sostituzione della batteria
Replace the 9V 006P battery when the low battery indicator appears on the display or if the multimeter fails to power on. Follow the instructions in Section 2.1.
4.2 Pulizia
Per pulire il multimetro, utilizzare un panno morbido eamp panno. Non utilizzare detergenti abrasivi o solventi, poiché potrebbero danneggiare il casing or display. Ensure the device is turned off and disconnected from any circuits before cleaning.
4.3 Conservazione
When not in use for extended periods, store the multimeter in a cool, dry place, away from direct sunlight and extreme temperatures. Consider removing the battery to prevent leakage, which could damage the internal components.
5. Risoluzione Dei Problemi
| Problema | Possibile causa | Soluzione |
|---|---|---|
| Nessun display o display poco luminoso | Batteria scarica o scarica | Replace the 9V 006P battery. |
| Letture errate | Incorrect range selected Poor lead connection Cavi di prova danneggiati Incorrect input jack used | Seleziona l'intervallo appropriato. Ensure leads are firmly connected. Inspect and replace damaged leads. Verify leads are in the correct V-Ω-mA or 10A jack. |
| "OL" (sovraccarico) visualizzato | La misurazione supera l'intervallo selezionato | Passa a una gamma più alta. |
| Nessun segnale acustico di continuità | Funzione di continuità non selezionata Circuito aperto | Ensure dial is on continuity/diode test. Check the circuit for breaks. |
6. Specifiche
| Parametro | Valore |
|---|---|
| Modello | EDM 1111A |
| Dimensioni del prodotto (L x P x A) | 8 x 4 x 2 pollici |
| Peso dell'articolo | 1.84 libbre |
| Fonte di alimentazione | DC 9V 006P Battery |
| Tipo di misurazione | Multimetro |
| Produttore | Scorta |
| Data prima disponibilità | 21 novembre 2019 |
| Volume DCtage Intervalli | 200 mV, 2 V, 20 V, 200 V, 1000 V |
| Volume ACtage Intervalli | 200 mV, 2 V, 20 V, 200 V, 750 V |
| DC Current Ranges | 200µA, 2mA, 20mA, 200mA, 10A |
| AC Current Ranges | 200µA, 2mA, 20mA, 200mA, 10A |
| Intervalli di resistenza | 200Ω, 2KΩ, 20KΩ, 200KΩ, 2MΩ, 20MΩ, 200MΩ |
| Capacitance Ranges | 2nF, 20nF, 200nF, 2µF, 20µF |
7. Informazioni sulla garanzia
For specific warranty details regarding your Escort EDM 1111A Digital Multimeter, please refer to the documentation provided at the time of purchase or contact the manufacturer directly. Warranty terms typically cover defects in materials and workmanship under normal use.
8. Assistenza clienti
If you encounter any issues or have questions not covered in this manual, please contact Escort customer support. Have your product model number (EDM 1111A) and serial number (if applicable, found on the back label) ready when contacting support for faster assistance.
The product label on the back of the Escort EDM 1111A, indicating 'DIGITAL MULTIMETER DC 9V 006P BATTERY', serial number, and 'MADE IN TAIWAN R.O.C.'.