1. Introduzione
Thank you for choosing the Hama EWS-3200 Wireless Weather Station. This device provides accurate indoor and outdoor temperature and humidity readings, weather forecasts, moon phase display, and a radio-controlled clock with alarm functions. Please read this manual carefully to ensure correct setup and operation.
2. Istruzioni di sicurezza
- Proteggere il prodotto da sporco, umidità e surriscaldamento.
- Do not use the product in the immediate vicinity of heaters or other heat sources.
- Non far cadere il prodotto né esporlo a urti violenti.
- Do not open the product and do not operate it if it is damaged.
- Tenere questo prodotto, come tutti i prodotti elettrici, fuori dalla portata dei bambini.
- Smaltire immediatamente il materiale di imballaggio secondo le normative locali vigenti.
- Le batterie devono essere inserite rispettando la polarità corretta.
- Remove batteries from the product if it is not to be used for an extended period.
3. Contenuto della confezione
- 1 Hama EWS-3200 Weather Station (Base Unit)
- 1 Sensore esterno wireless
- 3 AA Mignon Batteries (for Base Unit)
- 2 AAA Micro Batteries (for Outdoor Sensor)
- 1 Manuale di istruzioni
4. Caratteristiche del prodotto
- Indoor and Outdoor Temperature/Humidity Display: Shows current conditions for both locations.
- DCF Radio Clock: Automatic time setting for the most accurate time display.
- Previsioni del tempo: Icons for sunny, partly cloudy, cloudy, rainy, and stormy conditions.
- Andamento della pressione atmosferica: Displays rising, stable, or falling air pressure.
- Visualizzazione delle fasi lunari: Mostra la fase lunare attuale.
- Funzione di allarme: Two adjustable alarms, including a weekday alarm.
- Allarme temperatura: Individually adjustable alarm for outdoor temperature.
- Funzione snooze: For temporary alarm interruption.
- Retroilluminazione blu: For improved readability in low light.
- Max/Min Data Memory: Records highest and lowest temperature/humidity values.
- Visualizzazione della capacità della batteria: For both base station and outdoor sensor.
- Opzioni di montaggio: Can be wall-mounted or freestanding.
5. Impostazione
5.1 Installazione della batteria
The base station and outdoor sensor require batteries for operation. Ensure correct polarity when inserting batteries.


- Sensore esterno: Open the battery compartment on the back of the outdoor sensor. Insert 2 AAA Micro batteries, observing the polarity markings (+/-). Close the compartment securely.
- Unità base: Open the battery compartment on the back of the base unit. Insert 3 AA Mignon batteries, observing the polarity markings (+/-). Close the compartment securely.
5.2 Posizionamento del sensore
Place the outdoor sensor in a location protected from direct sunlight and rain to ensure accurate temperature and humidity readings. The maximum wireless range is 50 meters. Avoid placing the sensor near large metal objects or other electronic devices that may cause interference.
5.3 Sincronizzazione iniziale
After inserting batteries into both units, the base station will automatically search for the outdoor sensor and the DCF radio signal. This process may take a few minutes. Once synchronized, the outdoor temperature and humidity will appear on the base station display, and the time will be set automatically.

6. Istruzioni per l'uso
6.1 Fine displayview
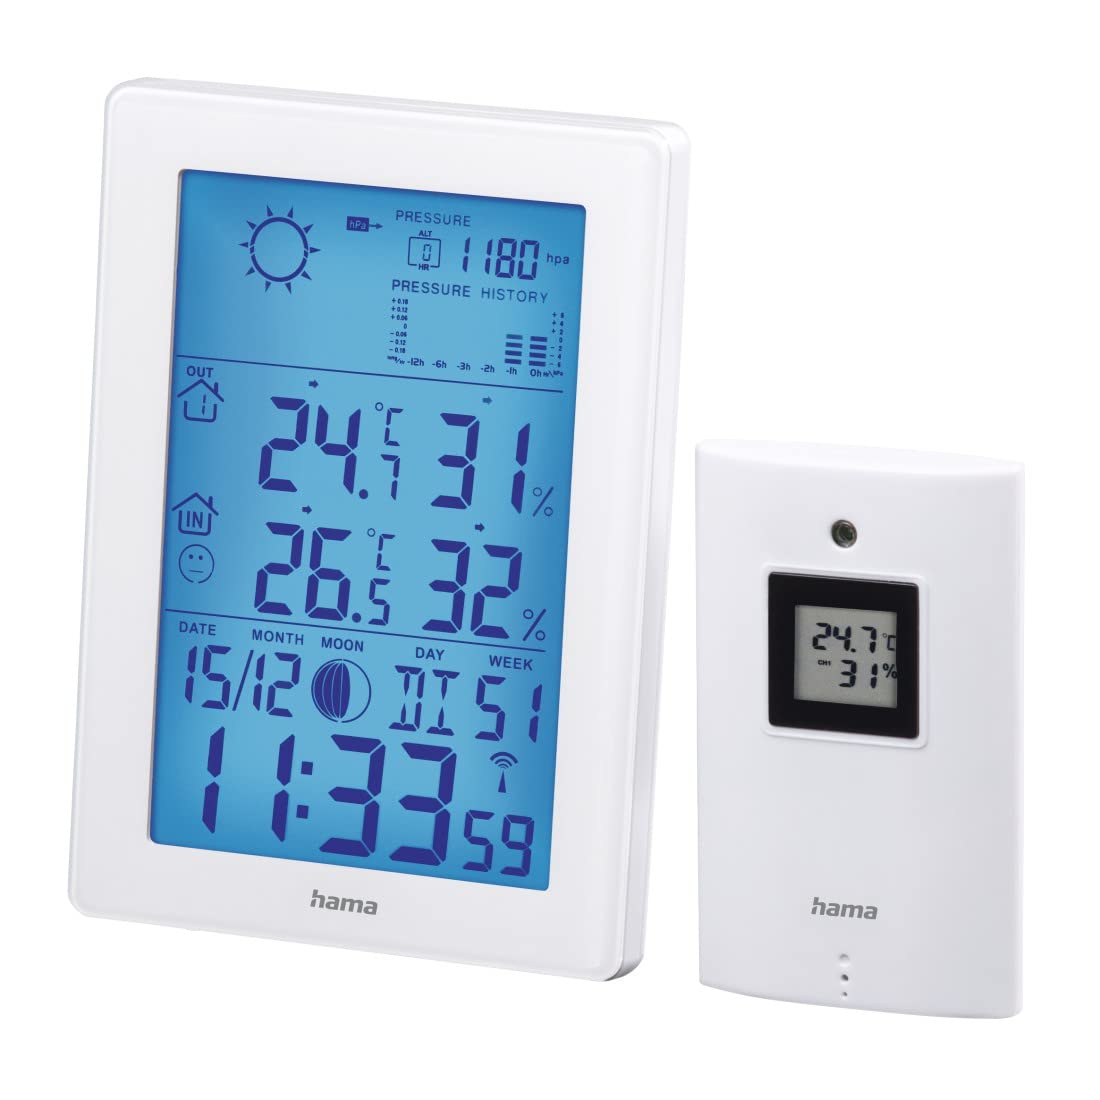
The main display of the base unit shows various information at a glance.

- Ora e data: Displays current time (12/24h format) and date.
- Temperatura e umidità interna: Current readings inside.
- Temperatura e umidità esterne: Letture attuali dal sensore wireless.
- Icone delle previsioni meteorologiche: Indicates predicted weather conditions.
- Cronologia della pressione atmosferica: Bar graph showing pressure trends over the last 12 hours.
- Fase lunare: Graphic representation of the current moon phase.
- Indicatori della batteria: Shows battery status for both units.
6.2 Impostazioni di ora e data
The weather station automatically sets the time via the DCF radio signal. If manual adjustment is needed (e.g., for different time zones):
- Premere e tenere premuto il tasto MODALITÀ pulsante per accedere alla modalità di impostazione dell'ora.
- Utilizzare il + E - pulsanti per regolare i valori.
- Premere MODALITÀ again to confirm and move to the next setting (e.g., 12/24h format, time zone, year, month, day, weekday language).
6.3 Visualizzazione della temperatura e dell'umidità
- Selezione unità: Premere il tasto - pulsante per passare dalla visualizzazione della temperatura in gradi Celsius (°C) a quella in gradi Fahrenheit (°F).
- Valori Max/Min: Premere il tasto MODALITÀ button repeatedly to cycle through current, maximum (MAX), and minimum (MIN) temperature and humidity readings. To clear MAX/MIN records, press and hold the STORIA pulsante mentre vengono visualizzati i valori MAX/MIN.
6.4 Previsioni del tempo
The weather station predicts weather conditions based on air pressure changes. The forecast icons (sunny, partly cloudy, cloudy, rainy, stormy) indicate the expected weather for the next 12-24 hours. The bar graph shows the air pressure trend over the last 12 hours.
6.5 funzioni di allarme
- Impostazione degli allarmi: Premere il tasto MODALITÀ button until the alarm time is displayed. Press and hold MODALITÀ per accedere alla modalità di impostazione della sveglia. Utilizzare + E - to adjust the hour and minute, and MODALITÀ to confirm. You can set two separate alarms, including a weekday alarm (Monday-Friday).
- Funzione snooze: Quando suona un allarme, premere il tasto SNOOZE / LIGHT button to activate the snooze function. The alarm will sound again after a few minutes.
- Allarme temperatura: An individually adjustable temperature alarm can be set to alert you when the outdoor temperature reaches a certain threshold (e.g., for frost warning). Refer to the manual for specific steps to set the temperature alarm.
6.6 Retroilluminazione
Premere il tasto SNOOZE / LIGHT button to activate the blue backlight for a few seconds, improving display visibility in dark conditions.
7. Manutenzione
- Pulisci questo prodotto solo con un damp, un panno privo di pelucchi e non utilizzare detergenti aggressivi.
- Assicurarsi che l'acqua non penetri nel prodotto.
- Sostituire le batterie quando sul display compare l'indicatore di batteria scarica.
8. Risoluzione Dei Problemi
| Problema | Possibile causa | Soluzione |
|---|---|---|
| Nessun display sull'unità base | Le batterie sono scariche o inserite in modo errato. | Controllare la polarità della batteria e sostituirla se necessario. |
| Letture esterne non visualizzate | Sensore fuori portata, interferenza o batterie scariche. | Move sensor closer to base unit, check for interference, replace sensor batteries. Initiate manual synchronization if needed. |
| Visualizzazione dell'ora errata | DCF signal interference or manual time zone setting needed. | Relocate the base unit away from electronic devices. Manually set the time zone if the DCF signal is received but the time is incorrect. |
| Previsioni meteo imprecise | Weather forecast is based on air pressure trends and is an estimation. | This is normal. The forecast is a prediction and may not always match actual conditions perfectly. |
9. Specifiche
- Numero modello: 00186307
- Tipo di visualizzazione: LCD, Digital
- Colore: Bianco
- Materiale: Metallo o plastica
- Fonte di energia: Alimentato a batteria
- Base Unit Batteries: 3 x AA Mignon (inclusa)
- Batterie del sensore esterno: 2 x AAA Micro (included)
- Intervallo di temperatura interna: Da 0 °C a +50 °C (da 32 °F a 122 °F)
- Intervallo di temperatura esterna: da -20 °C a +60 °C
- Wireless Range (Outdoor Sensor): Fino a 50 metri
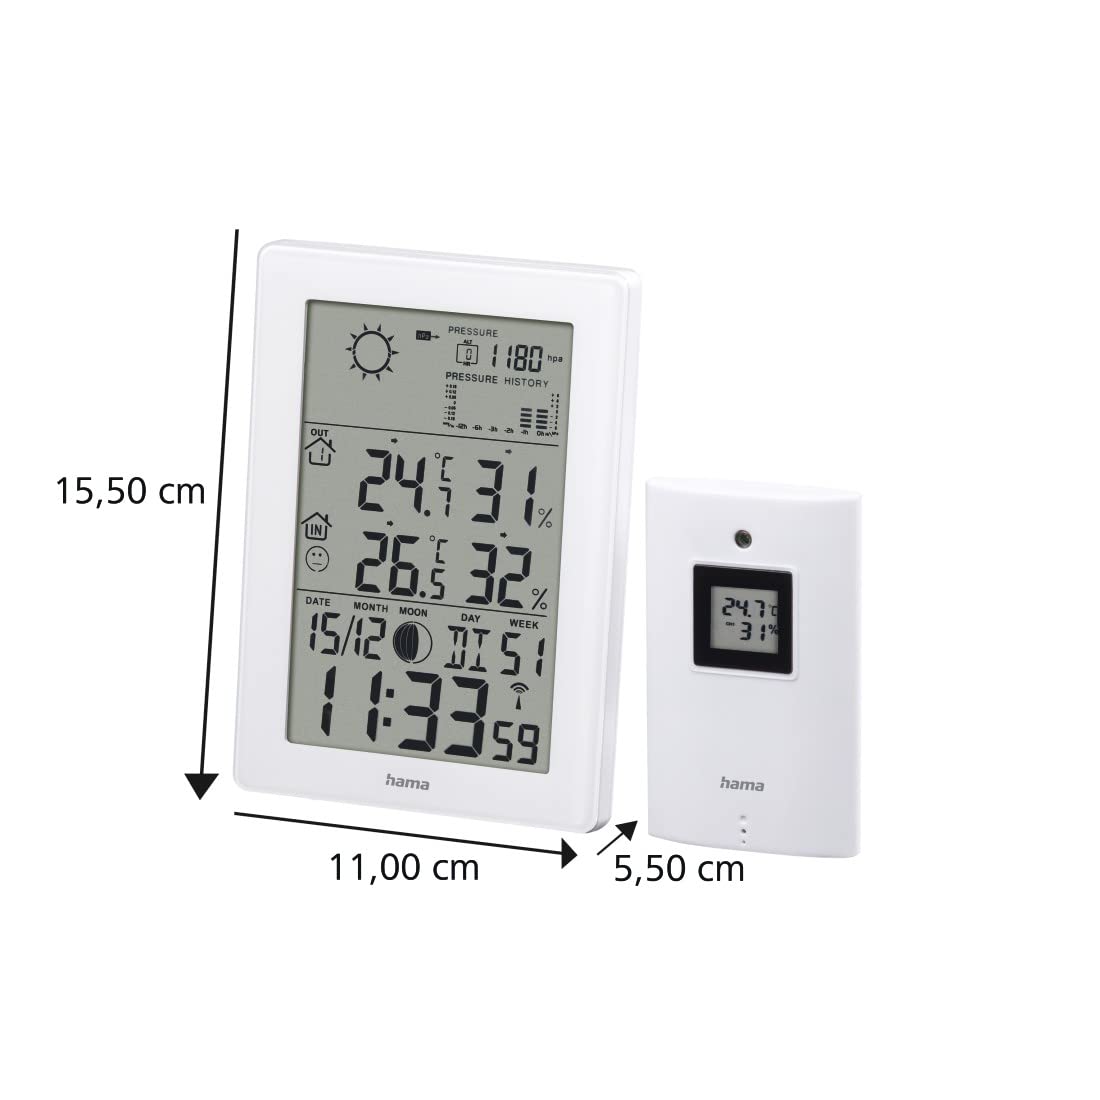
- Base Unit Dimensions (L x W x H): Dimensioni: 15.5 x 11 x 5.5 cm
- Peso: 530 grammi
- Tecnologia di connettività: Frequenza Radio
- Caratteristiche speciali: Temperature Alarm, Snooze Function, Moon Phase Display, Backlight
10. Garanzia
Hama GmbH & Co KG non si assume alcuna responsabilità e non fornisce alcuna garanzia per danni derivanti da installazione/montaggio improprio, uso improprio del prodotto o dalla mancata osservanza delle istruzioni per l'uso e/o delle note di sicurezza.
11. Supporto
For technical support or warranty claims, please contact your local Hama customer service or visit the official Hama websito per ulteriori informazioni.
Websito: www.hama.com


