Prodotto finitoview
The ADORIC Digital Alarm Clock (Clear) is a versatile bedside alarm clock featuring a large mirror screen LED display, adjustable brightness, snooze function, and dual USB charging ports. It is designed for ease of use and clear visibility.

Figura 1: Fronte view of the ADORIC Digital Alarm Clock displaying the time.
Impostare
Contenuto della confezione
- ADORIC Digital Alarm Clock
- Cavo di alimentazione USB
- Adattatore di alimentazione (se incluso)
- CR2032 Button Cell (pre-installed or for backup)
Accensione del dispositivo
The alarm clock can be powered via a USB device or directly plugged into a wall socket using the provided adapter. A CR2032 button cell battery is included to retain settings during a power outage.
- Connect the USB power cable to the input port on the back of the alarm clock.
- Plug the other end of the USB cable into a USB power source (e.g., computer, USB wall adapter).
- Ensure the CR2032 button cell is correctly installed in its compartment for backup power.
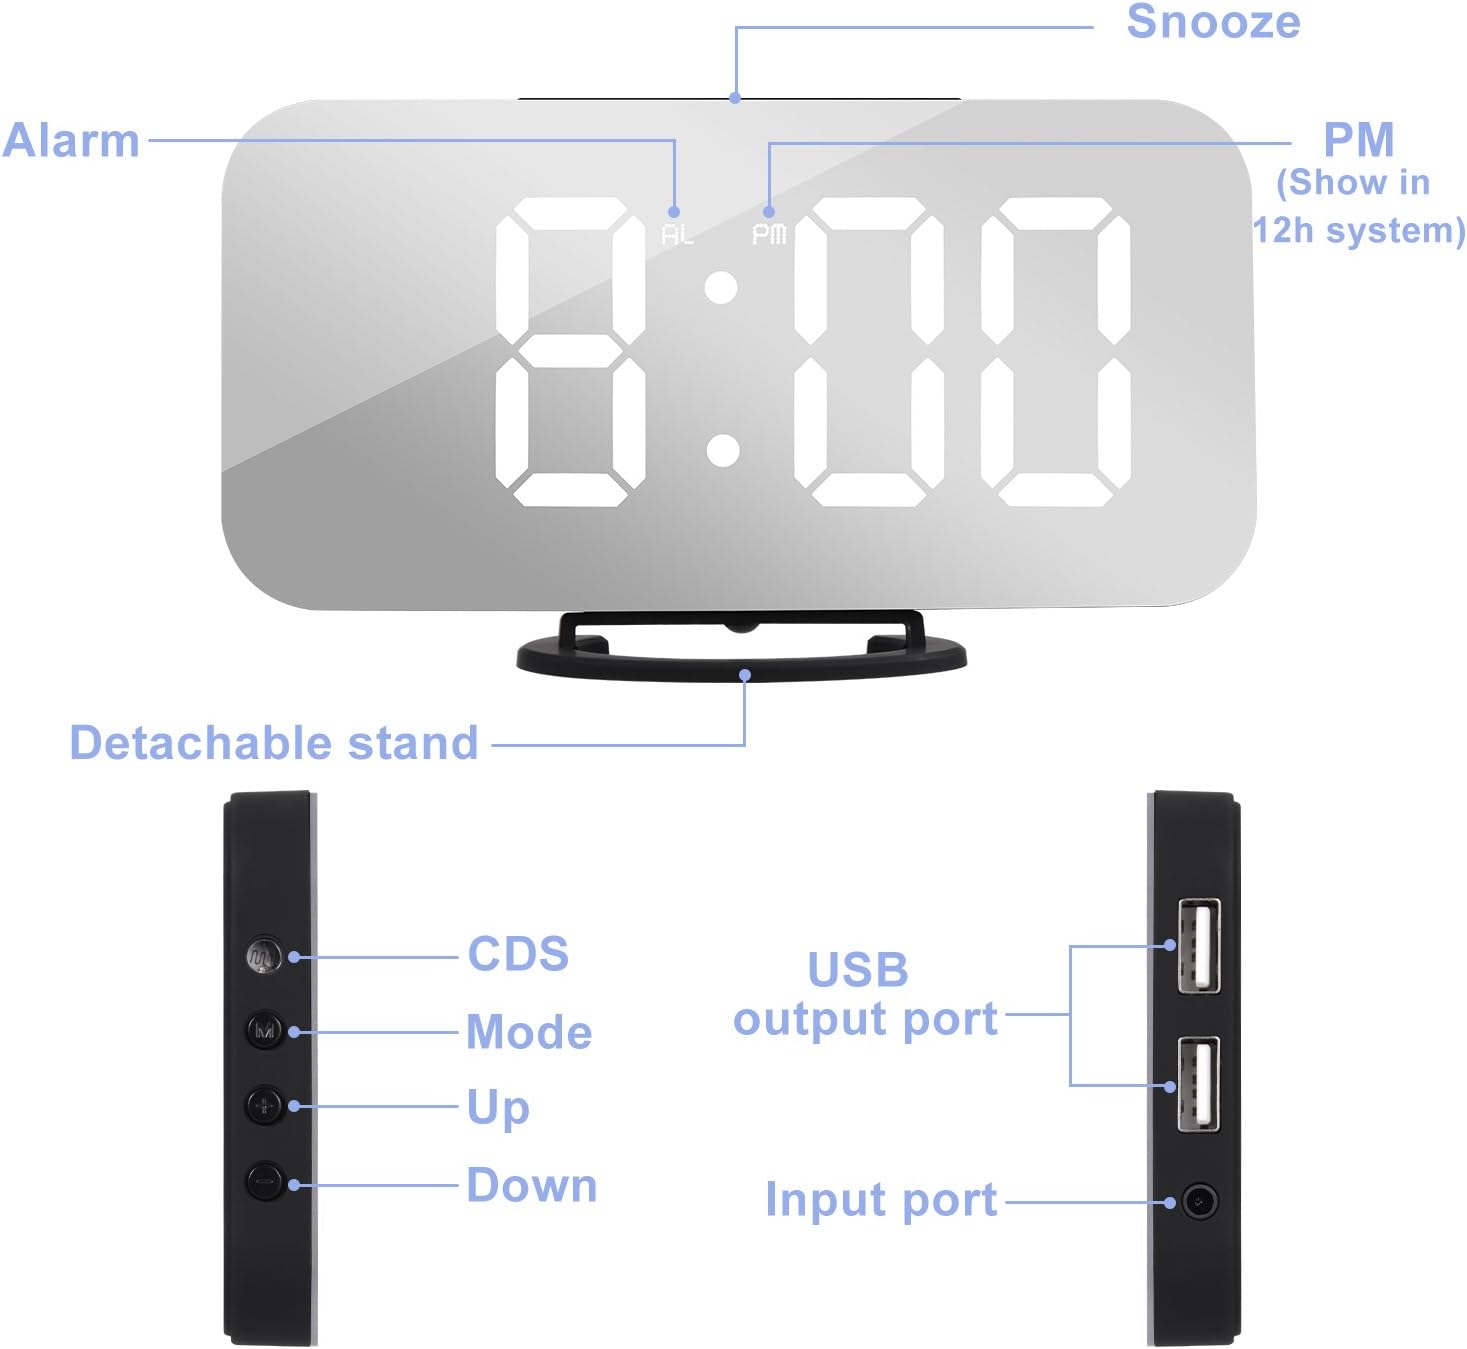
Figure 2: Labeled diagram of the alarm clock's components, including the detachable stand, CDS sensor, Mode button, Up/Down buttons, USB output ports, and input port.
The alarm clock features a detachable stand for stable placement. Its compact and slim design allows for flexible positioning.

Figure 3: Dimensions of the ADORIC Digital Alarm Clock: 15.8cm length, 8.6cm height (with stand), 7.8cm height (without stand), and 1.2cm thickness.
Istruzioni per l'uso
Regolazione del tempo
- Press and hold the "M" button for 3 seconds to enter the time setting mode. The "AL" indicator will not be displayed.
- The current adjustment object (e.g., 12/24 hour format, hour, minute) will flash.
- Use the "+" O "-" buttons to adjust the data.
- Premere il tasto "M" button to switch between setting objects in the following order: 12/24 hour format → Hour → Minute.
Alarm Clock Adjustment
- Premere il tasto "M" button once. The alarm time will display with the "AL" indicator.
- Press and hold the "M" button for 3 seconds to enter the alarm clock setting mode.
- The adjustment object will flash. Use the "+" O "-" buttons to adjust the data.
- Premere il tasto "M" button to switch between setting objects.
- To turn the alarm on/off: Press the "-" button. When "AL" is displayed, the alarm is activated. When "AL" is not displayed, the alarm is off.
Funzione snooze
The snooze duration is 2 minutes.
- When the alarm sounds, press the "POSTICIPARE" button to activate the snooze function. In this mode, the "AL" indicator will flash until the next alarm rings.
- To turn off the alarm without activating snooze, press any other button (except "POSTICIPARE") when the alarm sounds.
Brightness Intensity Adjustment
There are three intensity levels: Highlight, Medium, and Dim.
- Premere il tasto "+" O "-" button to manually adjust the display brightness.

Figure 4: Visual representation of the three adjustable brightness levels: Highlight, Medium, and Dim.
Regolazione automatica della luminosità
- Press and hold the "+" button for 3 seconds to toggle the automatic brightness adjustment function on or off.
- "ON" will display for 3 seconds when the function is activated. "OFF" will display for 3 seconds when the function is deactivated.
Modalità notturna
Night mode automatically switches the screen to low brightness during a user-defined period.
- Premere il tasto "M" button twice. (First press enters time setting mode, second press enters Night Mode setting).
- Use the "+" O "-" buttons to turn Night Mode ON or OFF. "ON" or "OFF" will display.
- While "ON" is displayed, press and hold the "M" button for 3 seconds to set the Night Mode period. The setting order is: Start Time → End Time.
Doppia porta di ricarica USB
The alarm clock is equipped with two USB output ports, allowing simultaneous charging of two electronic devices (e.g., smartphones, tablets, MP3 players) with a total output of 2.1A.

Figure 5: The alarm clock's dual USB ports in use, charging two mobile devices simultaneously.
Mirror Surface Functionality
The large screen of the alarm clock also functions as a mirror, providing added utility for daily use.

Figure 6: The mirror surface of the alarm clock can be used for personal grooming.
Manutenzione
Pulizia
To maintain the appearance and functionality of your alarm clock, regularly wipe the surface with a soft, dry cloth. Avoid using abrasive cleaners or solvents, as these may damage the mirror finish or plastic components.
Sostituzione della batteria
The CR2032 button cell battery is primarily for memory backup during power interruptions. If the clock loses time or settings after a power cut, the battery may need replacement.
- Individuare il vano batterie, solitamente sul retro o sul fondo dell'unità.
- Aprire il coperchio del vano.
- Rimuovere la vecchia batteria CR2032.
- Insert a new CR2032 battery with the correct polarity (+ side up).
- Chiudere saldamente il coperchio del vano batterie.
Risoluzione dei problemi
| Problema | Possibile causa | Soluzione |
|---|---|---|
| Il display è scuro o spento. | Power not connected, brightness set too low, or night mode active. | Ensure power cable is securely connected. Adjust brightness manually using the "+" button. Check Night Mode settings. |
| L'allarme non suona. | Alarm is not activated, alarm volume is too low, or incorrect alarm time set. | Verify "AL" indicator is displayed. Re-check alarm time settings. |
| Clock loses time or settings after power outage. | CR2032 backup battery is dead or not installed. | Replace the CR2032 button cell battery. Ensure it is installed correctly. |
| Clock runs fast/gains time. | Internal clock drift (observed in some units). | Manually reset the time as needed. This may require periodic adjustment. |
| Le porte di ricarica USB non funzionano. | Device not properly connected, or total current draw exceeds 2.1A. | Ensure devices are properly connected. Try charging one device at a time. Verify the alarm clock is powered. |
Specifiche
| Marca | ADORIC |
| Numero di modello | NZ-881B3EN |
| Colore | Chiaro |
| Dimensioni del prodotto | Dimensioni: 15.8 x 0.03 x 8.6 cm |
| Peso dell'articolo | 240 grammi |
| Materiale | Plastica |
| Tipo di visualizzazione | Digitale |
| Caratteristiche speciali | Alarm, Charging Port |
| Fonte di alimentazione | Elettrico con cavo |
| Batteria di backup | CR2032 Button Cell (for memory retention) |
Garanzia e supporto
For warranty information and customer support, please refer to the product packaging or contact ADORIC customer service directly. You can also visit the official ADORIC store on Amazon for more information and product updates.
Official ADORIC Store: Visit the ADORIC Store


