
Figura 1.0: Fronte view of the DIRECTV HR54 Genie Server, a black rectangular device with a power button and DIRECTV logo.
1. Introduzione
The DIRECTV HR54 Genie Server is an advanced satellite receiver and digital video recorder designed to enhance your television viewing experience. This model is engineered to support 4K UHD broadcasts and features a built-in Single Wire Multiswitch (SWM) power inserter, which simplifies installation by reducing cable clutter. It offers improved processing speed and a streamlined internal design compared to previous models.
Please note that while this unit does not include traditional component or composite outputs, these functionalities can be achieved using appropriate breakout cables connected to its AV port.
Important Service Information: If you experience any service issues such as crackling, flickering, or intermittent loss of picture on your television, it is advised to contact your service provider immediately. They can reset satellite receiver codes and troubleshoot any configuration errors. For further assistance, contact your provider's support team.
2. Cosa c'è nella scatola
Upon unpacking your DIRECTV HR54 Genie Server, verify that all the following components are included:
- DIRECTV HR54 Genie Server Receiver
- RC7X RF Remote Control
- Cavo HDMI
Additionally, the remote control requires 2 AA batteries, which may or may not be included depending on the package.
3. Guida all'installazione
Follow these steps to properly set up your DIRECTV HR54 Genie Server:
3.1 connessione fisica
- Posizionamento: Place the HR54 Genie Server in a well-ventilated area, away from direct sunlight or heat sources. Ensure adequate space around the unit for airflow.
- Collegamento del cavo coassiale: Connect the coaxial cable from your SWM (Single Wire Multiswitch) dish setup to the "SAT. IN" port on the back of the HR54 receiver. This unit requires a SWM dish setup with at least five open tuners, even though it uses a single coax line.
- Connessione HDMI: Connect one end of the provided HDMI cable to the "HDMI" port on the HR54 receiver and the other end to an available HDMI input on your television.
- Collegamento elettrico: Connect the power cord to the "12V DC POWER INPUT" port on the receiver and then plug it into a wall outlet. The HR54 has a built-in power inserter, eliminating the need for an external one.
- Connessioni opzionali:
- Collegamento Ethernet: For a wired internet connection, connect an Ethernet cable to the "ETHERNET" port. The HR54 also features built-in Wi-Fi for wireless connectivity.
- USB: Two USB ports are available for future use or compatible accessories.
- SATA: An eSATA port is available for connecting an external hard drive for expanded storage.
- Uscita audio digitale: For digital audio, connect an optical audio cable to the "DIGITAL AUDIO OUT" port.
- A/V Out: For older televisions requiring analog audio/video, use an appropriate breakout cable (not included) with the "A/V OUT" port.
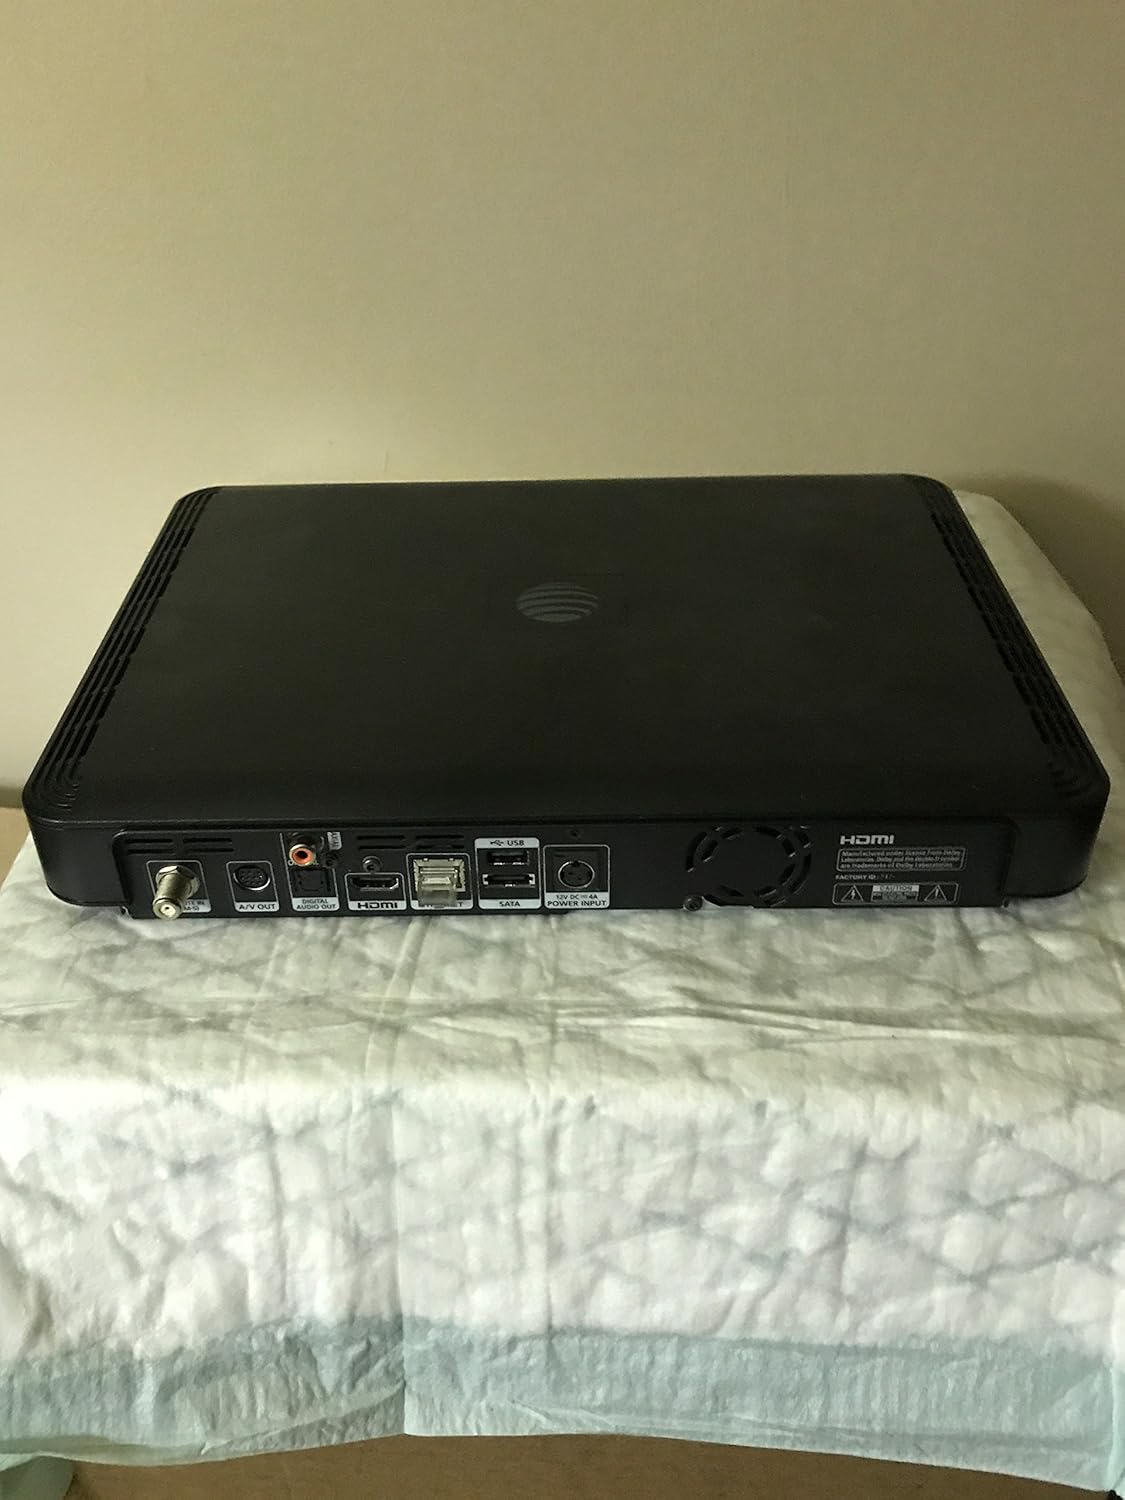
Figure 3.1: Rear panel of the HR54 Genie Server, illustrating the various input and output ports including SAT. IN, A/V OUT, Digital Audio Out, HDMI, Ethernet, USB, SATA, and Power Input.

Figure 3.2: A detailed close-up of the HR54's rear connectivity, highlighting the SAT. IN, A/V OUT, Digital Audio Out, HDMI, Ethernet, USB, SATA, and 12V DC Power Input ports for clear identification during setup.
3.2 Accensione iniziale e attivazione
- Accensione: Turn on your television and select the correct HDMI input. The HR54 receiver should power on automatically once connected to power.
- Istruzioni sullo schermo: Follow any on-screen instructions that appear. The system will typically guide you through initial setup steps.
- Attivazione: The receiver will prompt you to activate it. You will need to contact DIRECTV customer service to complete the activation process. Provide them with your account information and the Receiver ID (e.g., 0232 5909 0795) and Serial Number (e.g., C54BD6RT302353) found on the label at the bottom of the unit. If replacing an existing Genie, inform them to deactivate your old receiver.
- Accoppiamento telecomando: Once activated, pair your RC7X RF Remote Control with the HR54 Genie Server. Follow the instructions provided with the remote or on-screen. You may also need to program the remote to control your television's power and volume.
- Client Setup (if applicable): If you have additional DIRECTV client boxes (e.g., H25), ensure they are connected and powered on. After the HR54 is fully activated, reboot your client boxes to allow them to connect to the new Genie Server.

Figure 3.3: The product label located on the underside of the HR54 Genie Server, displaying the Receiver ID (0232 5909 0795), Serial Number (C54BD6RT302353), Model (HR54-200), and Manufacturing Date (12/14/16).
4. Istruzioni per l'uso
The DIRECTV HR54 Genie Server is designed for intuitive operation. Use your RC7X RF Remote Control to navigate the on-screen menus and control your viewesperienza di acquisizione.
4.1 Registrazione e riproduzione
- Five Tuners: The HR54 features five tuners, allowing you to record up to five programs simultaneously while watching a sixth live program or a previously recorded show.
- Disco rigido da 1 TB: The integrated 1TB hard drive provides substantial storage capacity for recorded content.
- Scheduling Recordings: Access the Guide or Menu to browse programs and schedule single recordings or series recordings.
- Accesso alle registrazioni: Navigate to the "List" or "Playlist" section in the menu to view and play your recorded programs.
4.2 Whole Home Access
The HR54 Genie Server supports DIRECTV's Whole Home DVR service, which requires a small monthly fee. This feature allows you to:
- Watch recorded programs from your HR54 on any connected client box (e.g., Genie Mini, H25) in other rooms.
- Pause live TV in one room and resume watching in another.
- Schedule recordings from any connected client box.
For Whole Home Access to function, all receivers and client boxes must be connected to the same network, either via a DECA (DIRECTV Ethernet Coaxial Adapter) or a hard-wired Ethernet connection.
5. Manutenzione
Proper care and maintenance will ensure the longevity and optimal performance of your DIRECTV HR54 Genie Server.
- Pulizia: Gently wipe the exterior of the receiver with a soft, dry cloth. Avoid using liquid cleaners or abrasive materials.
- Ventilazione: Ensure that the ventilation slots on the unit are not blocked. Adequate airflow is crucial to prevent overheating, as the HR54 is designed to run cooler than older models.
- Aggiornamenti del firmware: The HR54 Genie Server automatically receives firmware updates from DIRECTV. Ensure the unit remains connected to power and the satellite signal to receive these updates.
- Ciclismo di potenza: If you experience minor issues, a simple power cycle (unplugging the unit from power for 15 seconds and then plugging it back in) can often resolve them.
6. Risoluzione Dei Problemi
This section addresses common issues you might encounter with your HR54 Genie Server.
6.1 Problemi comuni e soluzioni
- Nessuna immagine/suono:
- Verify all cable connections (HDMI, coaxial, power) are secure.
- Assicurati che il televisore sia impostato sull'ingresso HDMI corretto.
- Perform a power cycle on the HR54 receiver.
- Crackling/Flickering/Intermittent Loss of Picture:
- This often indicates a service issue. Contact your DIRECTV service provider immediately for diagnosis and resolution. They can reset receiver codes and troubleshoot configuration errors.
- Il telecomando non risponde:
- Check and replace the batteries in your RC7X remote control.
- Re-pair the remote with the HR54 receiver according to the remote's instructions.
- Problemi di attivazione:
- If you encounter issues during activation, ensure you have the correct Receiver ID and Serial Number.
- Contact DIRECTV customer service directly. Be prepared to provide your account details and the receiver's identification numbers.
- Client Boxes Not Connecting:
- Ensure the HR54 Genie Server is fully activated and operational.
- Reboot all client boxes after the HR54 is online.
- Verify that Whole Home Access is enabled on your DIRECTV account.
For persistent issues not covered here, refer to the official DIRECTV support resources or contact their customer service.
7. Specifiche
| Caratteristica | Dettaglio |
|---|---|
| Numero di modello | HR54 |
| Marca | DIRETTIVA |
| Colore | Nero |
| Capacità di archiviazione | Disco rigido 1 TB |
| Sintonizzatori | 5 |
| Tecnologia di connettività | HDMI, Wired Ethernet, Built-in Wi-Fi |
| Porte USB totali | 2 |
| Potenza in ingresso | 12V DC (Built-in Power Inserter) |
| Peso dell'articolo | 6.6 libbre (circa 3 kg) |
| Dimensioni del pacco | 15.5 x 15.25 x 4.5 pollici (circa 39.4 x 38.7 x 11.4 cm) |
| Batterie richieste (per il telecomando) | 2 batterie AA |
| Data prima disponibilità | 3 settembre 2015 |
8. Garanzia e supporto
For information regarding product warranty, please refer to the terms and conditions provided by DIRECTV at the time of service activation or purchase. As this device is typically leased as part of a DIRECTV service agreement, warranty and support are generally handled directly by DIRECTV.
Assistenza clienti: For technical assistance, service issues, or activation support, please contact DIRECTV customer service. Their contact information can be found on your monthly billing statement or on the official DIRECTV websito.
Returning Equipment: If you are replacing an older DIRECTV receiver, DIRECTV typically requires the return of the old equipment. Failure to return equipment within a specified timeframe (e.g., 7 days) may result in charges. Always inquire about the return process for old equipment when activating a new receiver.


