Okwu mmalite
This manual provides essential instructions for the installation, operation, and maintenance of your Weiser Elements Satin Nickel Square Deadbolt Lock. Please read these instructions carefully before beginning installation to ensure proper function and security. This deadbolt is designed for exterior doors where keyed entry and security are required, featuring ANSI/BHMA Grade 3 certification and Weiser's SmartKey Technology.
Ngwaahịa gafereview
The Weiser Elements Satin Nickel Square Deadbolt Lock offers a blend of style and security. It is a single cylinder deadbolt, meaning it can be locked or unlocked using a key from the outside, and a turn piece from the inside. The satin nickel finish provides a clean, modern aesthetic.
Akụkụ ndị bụ isi:
- Single Cylinder Deadbolt: Keyed entry from the exterior, turn piece operation from the interior.
- ANSI/BHMA Grade 3 Certified: Meets industry standards for residential security.
- SmartKey Technology: Allows you to re-key the lock yourself in seconds, enhancing security and convenience.
- Nwụnye dị mfe: Designed for quick installation with basic tools.
- Latch enwere ike ịgbanwe: Fits standard door preparations.
- Ihe owuwu na-adịgide adịgide: Made from metal with a brushed finish.
- Akwụkwọ ikike maka igwe na ngwụcha ndụ: Provides long-term assurance of quality.
Kedu ihe dị na igbe:

Figure 1: Contents of the product packaging.
- Exterior Deadbolt
- Interior Turnpiece
- Latch nwere ike idozi
- Efere efere
- Olu akwa
- Efere arịọnụ
- Installation Hardware (screws)
- 2 Weiser Keys
- Ngwa SmartKey
- Ntuziaka ntinye (akwụkwọ dị iche)
Ntọala na nwụnye
The Weiser Elements deadbolt is designed for easy installation, typically requiring only a screwdriver. For detailed, step-by-step instructions, please refer to the dedicated Installation Guide included in your product packaging. This section provides general requirements and an overview.
Door Specifications:
- Ọkpụrụkpụ ọnụ ụzọ: 1-3/8" ruo 1-3/4" (35mm ruo 44mm)
- Latch Backset: Mgbanwe maka 2-3/8" (60mm) ma ọ bụ 2-3/4" (70mm)
- Cross Bore: 2-1/8" (54mm)
Nwụnye gafereview:
- Prepare the door and frame according to the provided template in the Installation Guide.
- Install the latch into the door edge. Ensure the adjustable latch is set to the correct backset.
- Install the exterior deadbolt assembly.
- Install the interior turnpiece assembly, securing it with the provided screws.
- Test the deadbolt operation with both the key and the interior turnpiece.

Foto 2: Mpụga view of the installed deadbolt.

Ọgụgụ 3: Ime view of the turnpiece.
Ntuziaka ọrụ
Locking the Deadbolt:
- Site na Mputa: Insert the key into the keyway and turn it clockwise until the deadbolt extends fully into the door frame. Remove the key.
- Site na ime obodo: Rotate the turn piece clockwise until the deadbolt extends fully into the door frame.
Unlocking the Deadbolt:
- Site na Mputa: Insert the key into the keyway and turn it counter-clockwise until the deadbolt retracts fully. Remove the key.
- Site na ime obodo: Rotate the turn piece counter-clockwise until the deadbolt retracts fully.
Nlekọta
To ensure the longevity and smooth operation of your Weiser deadbolt, periodic maintenance is recommended:
- Nhicha: Jiri nwayọ hichaa elu mpụta, damp ákwà. Zere ihe nhicha ma ọ bụ ihe mgbaze, n'ihi na ihe ndị a nwere ike imebi njedebe.
- mmanu mmanu: If the key turns stiffly or the deadbolt mechanism feels rough, apply a small amount of graphite-based lubricant into the keyway and the latch mechanism. Do not use oil-based lubricants.
- Mechie skru: Periodically check and tighten any loose mounting screws to maintain security and stability.
SmartKey Technology
Weiser's SmartKey Technology provides advanced security features and the convenience of re-keying your lock yourself in seconds. This is particularly useful if you lose a key, move into a new home, or wish to have multiple Weiser locks operate with a single key.
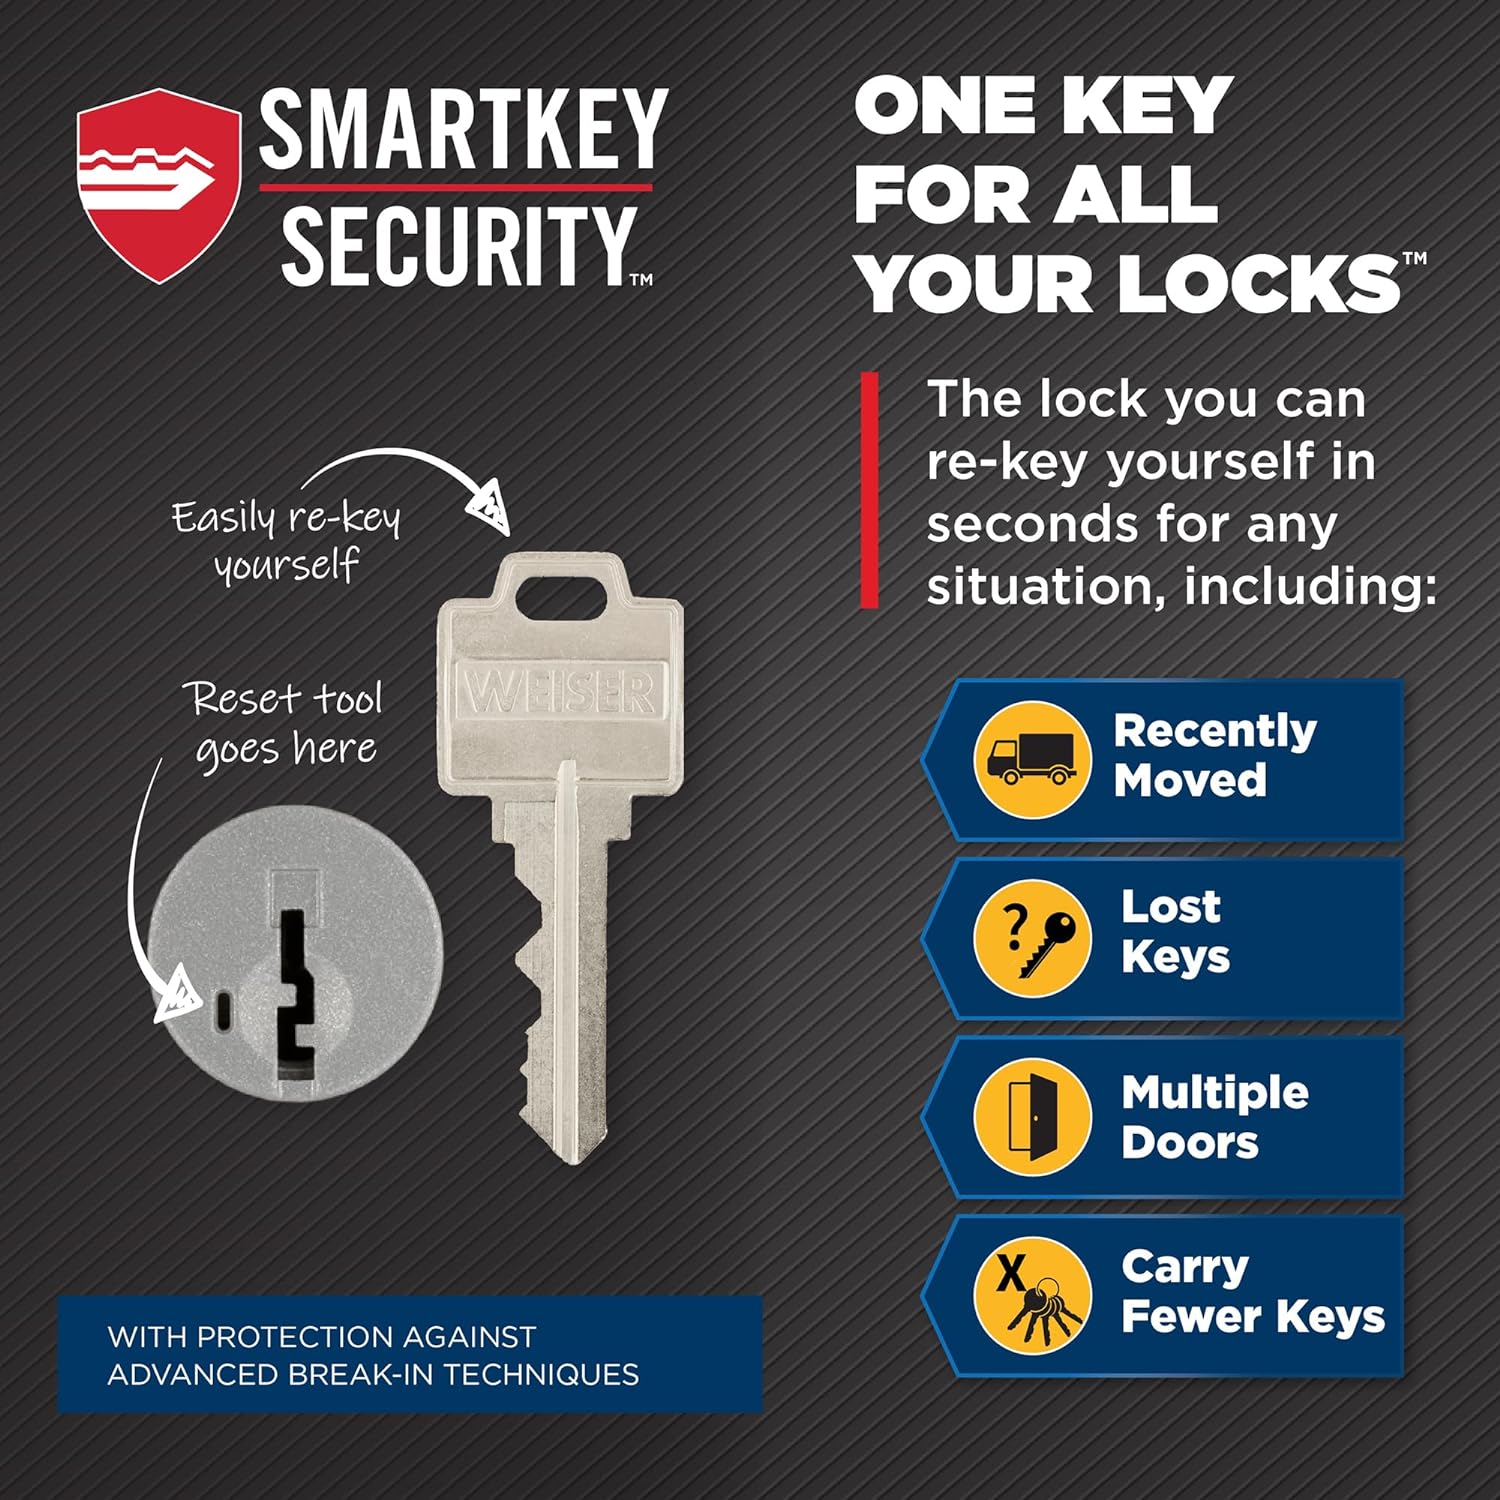
Figure 4: SmartKey Security features.
How to Re-key Your Lock:
- Tinye igodo arụ ọrụ gị wee tụgharịa ya n'ogo 90 n'akụkụ elekere.
- Insert the SmartKey tool fully into the small hole next to the keyway. Apply firm pressure and remove the SmartKey tool.
- Remove the functioning key.
- Insert your new key fully into the keyway and turn it 90 degrees counter-clockwise.
- Remove the new key. Your lock is now re-keyed to the new key.
SmartKey Demo Video:
Video 1: A demonstration of the Weiser SmartKey re-keying process.
Nchọpụta nsogbu
If you encounter issues with your deadbolt, consider the following common solutions:
- Igodo siri ike itinye ma ọ bụ tụgharịa: Check the key for damage or debris. Apply graphite lubricant to the keyway. Ensure the key is fully inserted before turning.
- Deadbolt does not extend or retract fully: Check for obstructions in the door frame strike plate. Ensure the mounting screws are not overtightened, which can bind the mechanism. Verify the latch backset is correctly set.
- Interior turn piece is loose: Tighten the interior mounting screws.
- Lock feels insecure: Ensure all screws are tightened and the deadbolt extends fully into the strike plate.
If problems persist, consult the full Installation Guide or contact Weiser customer support.
Nkọwapụta
| Njirimara | Nkọwa |
|---|---|
| Ụdị | Weiser |
| Nọmba nlereanya | 9GDC94710-062 |
| Akụkụ ngwaahịa | 2.69 x 6.2 x 6.2 cm; 635.03 g |
| Agba | Nickel Nickel |
| Ụdị | Square |
| Mechaa | Ahịhịa |
| Ihe onwunwe | Ọla |
| Ụkpụrụ | Mbido |
| Ụdị mkpọchi | Mkpọchi Igodo (Silinda Otu) |
| Asambodo | ANSI/BHMA Ọkwa 3 |
| Atụmatụ pụrụ iche | SmartKey Technology, Universal Fitment |
| Eji akwadoro | Entry Door, Exterior Door, Garage Door |
Akwụkwọ ikike na nkwado
Ozi akwụkwọ ikike:
This Weiser Elements deadbolt comes with a Lifetime Limited Mechanical and Finish Warranty. This warranty covers defects in material and workmanship for the lifetime of the original residential user. For full details regarding warranty coverage and claims, please refer to the warranty documentation included with your product or visit the official Weiser websaịtị.
Nkwado ndị ahịa:
For further assistance, technical support, or to inquire about replacement parts, please visit the official Weiser website or contact their customer service department. Contact information can typically be found on the product packaging or the Weiser websaịtị.


