IAN CANADA Multi-Functional Raspberry Pi EMI Shield

Specifications
- Product Name: ShieldPi Pro MkIII
- Type: Multi-functional Raspberry Pi EMI shield/power cleaner HAT
- Manufacturer: IanCanada
- Date: Jul. 8, 2024
- Version: 1.0
Product Usage Instructions
A. Introduction
The ShieldPi Pro MkIII is a multi-functional Raspberry Pi EMI shield and power cleaner HAT designed to enhance the performance of your Raspberry Pi system.
B. Getting Started
- Make sure your Raspberry Pi system hardware and software are configured correctly.
- Install the ShieldPi Pro MkIII GPIO socket J3 into the GPIO connector of the Raspberry Pi using the supplied 16mm standoffs.
- Install other HATs on top of the GPIO port J1 of the ShieldPi Pro MkIII.
- Optional: Install the MonitorPi/Pro into the AUX GPIO J2 of the ShieldPi Pro MkIII.
- Power on the system as usual.
- Enjoy the enhanced performance.
C. Connectors and Resources
- J3: GPIO socket
- J1: GPIO connector for HATs
- J2: AUX GPIO connector for accessories
D. Operating Principle
The ShieldPi Pro MkIII operates by providing clean power and enhancing the functionality of your Raspberry Pi system through its various connectors and features.
E. How to Enable Functions
To enable specific functions like safe shutdown, power status LED, external power supply control, or IR remote controller, follow the instructions provided in the user manual. For example, editing the /boot/config.txt file to add necessary configurations.
Introduction
ShieldPi Pro MkIII is not only a powerful Raspberry Pi EMI shield HAT, but also:
- A high-performance power supply cleaner/filter
- Raspberry Pi safe ON/OFF button
- A GPIO extender/multiplier
- An ultra-low noise 3.3V power supply
- An IR-remote control Receiver
- Power a Raspberry Pi from GPIO
- Power ON/OFF indication and signal
- Zero current single-point grounding shield plate to eliminate EMI noise of the Raspberry Pi
- Ultra-low ESR wide bandwidth 5V power supply filtering networks cover the frequency range up to GHz.
ShieldPi Pro MkIII is suitable to all RespberryPi applications to reduce EMI noise and improve power supply performance. Improvement can be made right away by just installing it into the GPIO connector of a RaspberryPi.
Highlighted Features and Specifications
- Zero current single-point grounding shield plate to eliminate EMI noise of the Raspberry Pi
- Ultra-low ESR wide bandwidth 5V power supply filtering networks cover the frequency range up to GHz ESR: 2mΩ@200KHz, 0.3mΩ/@2Mhz, 1mΩ@20MHz, 4mΩ/@200MHz
- Full 40-pin GPIO extender
- Full 40 pins GPIO multiplier (AUX GPIO)
- Has a Raspberry Pi GPIO power ON/OFF button and a connector to an external power button
- Has an optional power-on indication LED and a power-on/off control signal output
- Can implement Raspberry Pi’s IR-remote control function when working with a MonitorPi
- Reduce both EMI noise and power supply noise
- Improve the Raspberry Pi application’s performance to a higher level
- Full-size shield HAT that can cover the whole Raspberry Pi PCB area
- Better EMI suspension performance will be expected
- High-profile GPIO connector makes it possible to work with the RPi that is equipped with a heatsink
- DIY friendly and plug and play
ShieldPi Pro MkIII new features
- Built-in ultra-low noise 3.3V/500mA power supply, capable of powering FifoPi, DAC, or other devices without using an additional 3.3V power supply
- Optical receiver makes the IR remote controller work for Raspberry Pi
- 5V input/output connector can power a Raspberry Pi directly from GPIO with bypassing the USB power
- Optimized PCB layout
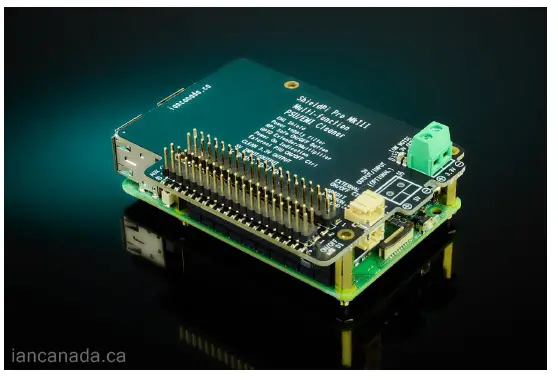
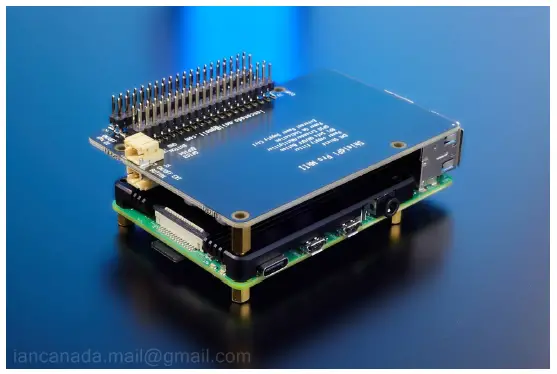
Pictures

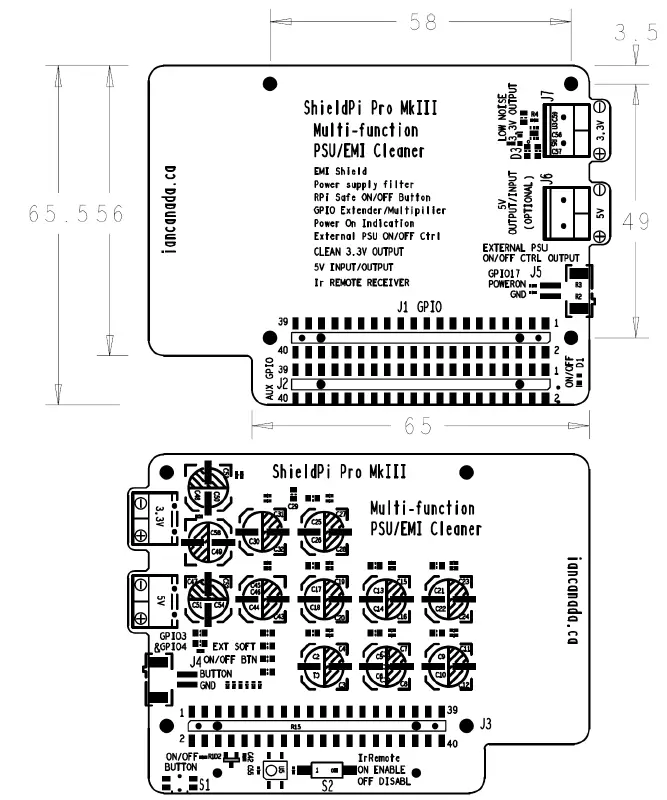
Layout and Dimensions in mm
Getting start
- Make sure your Raspberry Pi system hardware and software are configured well and working properly.
- Install the ShieldPi Pro MkIII GPIO socket J3 into the GPIO connector of the RaspberryPi. Please use the supplied 16mm standoffs.
- Install the rest of the HATs on top of the GPIO port J1 of the ShieldPi Pro MkIII.
- Install the MonitorPi/Pro into the AUX GPIO J2 of the ShieldPi Pro MkIII(optional).
- Power on the system as usual.
- Enjoy the music.
Connectors and other resources
- J3: GPIO socket J1 needs to be installed into the Raspberry Pi GPIO connector.
- J1: GPIO connector
- J2 is the extension of the Raspberry Pi GPIO port. DAC or other HATs need to be installed into this GPIO connector.
- J2: AUX GPIO connector
- J2 is a duplicated Raspberry Pi GPIO port. A MonitorPi/pro or other accessories can be installed into this connector.
- J7: Ultra-low noise 3.3V/500mA output
- J7 can be used to power FifoPi, DAC, or other audio devices that need a clean 3.3V power supply.
- J4: External ON/OFF button connector
- J4 is functionally equivalent to S1. An external button can be connected to this connector to perform the same ON/OFF control function. J4 is a 2-pin PH2.0mm connector.
- J5: External power supply ON/OFF control signal output
- J5 is designed to control the on/off of an external power supply, such as a DAC power supply. J5 is logically equivalent to power status LED D1. It should keep logic high when power is on. J5 is a 2-pin PH2.0mm connector.
- J6: Optional 5V input/output
You can connect an external 5V power supply to this connector to power the Raspberry Pi from GPIO. The USB power needs to be unconnected to bypass. This connector can also be used as a 5V output (filtered), just in case you need a 5V power supply. J6 is not assembled by default. - S1: Power ON/OFF button
Raspberry Pi can be turned on or safe shutdown by just pressing this button (may need software support). - S2: IR receiver enable/disable
- ON: Enable IR receiver
- OFF: Disable IR receiver
- D1: Power status LED
- D1 is designed to indicate the power on/off status. This function needs to be enabled by the software.
- D2: 3.3V power supply indicator
Operating principle
- ShieldPi Pro MkIII is designed with two side surface-mounted PCBs.
- The top side, or we call it the audio side is a pure shield layer. This layer is a whole piece of single-point grounded copper plate. Because of there is no any current going through this shield layer, the EMI noise from Raspberry Pi will be blocked without introducing into the audio HATs through the space in between.
- The bottom side, or what we call the Pi side, is the wide bandwidth power supply filtering network to improve Raspberry Pi power supply dynamic response and lower the noise. This filtering network uses the combination of polymer and NP0 capacitor groups to achieve an ultra-low ESR performance over a wide frequency range, extending intththe e o GHz range.
- With a ShieldPi Pro MkIII installed in the system, both EMI noise and power supply noise will be reduced. Therefore, improvements can be expected.
- To perform a safe power-on and shut-down function, ShieldPii Pro MkIII is integrated with a Raspberry Pi GPIO power-on/off button and power status LED. The power on control wire is connected to GPIO3 (or PIN5, the Raspberry Pi default power-on GPIO pin), while the power off control wire is connected to GPIO4 (PIN7). The power indication LED D1 is connected to GPIO17 (PIN11)
- The Raspberry Pi IR-remote control function can also be implemented if the onboard IR receiver is enabled. The IR receiver output will be connected to pin 22 (GPIO25) of a Raspberry Pi.
How to enable the Raspberry Pi’s safe shutdown button?
- The GPIO power on function is enabled by default. The Raspberry Pi can be turned on at any time when press the button S1 after it was shutdown.
- However, the S1 safe shutdown button function has to be enabled in the software. To implement, you will need to edit the file /boot/config.txt on the SD image, adding a new line to the end, then save the config.txt file. dtoverlay=gpio-shutdown,gpio_pin=4
- There are many ways to edit the config.txt, but the simplest way is directly open the config.txt file on a PC using a SD card reader.
Note: Please use the latest version of Raspberry Pi with the most updated bootloader to ensure this function.
How to enable the power status LED and external power supply on/off control signal?
- To enable this function, you just need to edit the /boot/config.txt again, adding a new line to the end, then save the config.txt file. gpio=17=op,dh
- Once enabled, we can use J5 to control the external power supply, such as LifePO4 power supply, LifePO4 Mini, LinearPi, UcPure, and so on.
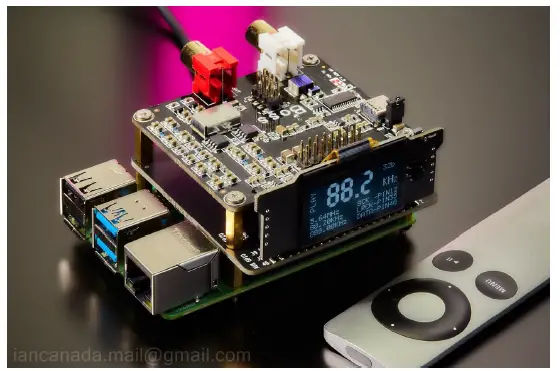
How to enable the IR-remote controller function
- Switch S2 to the ON position.
- If you see the Volumio software, we need to install the IR Remote Controller plugin.
Configure this plugin’s settings as below.
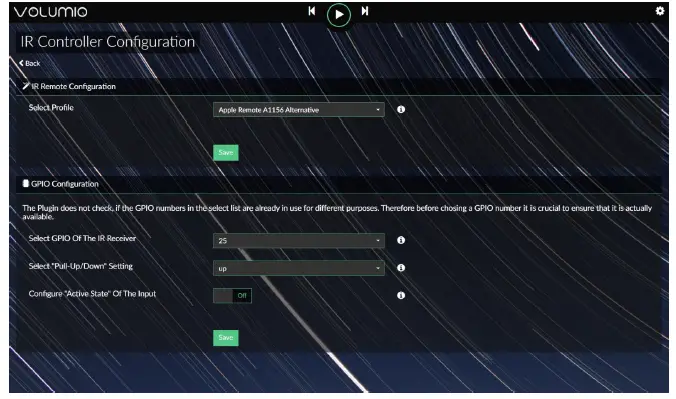
Please note, the IR-remote controller will not work if wrong profile is selected. For the Apple aluminum remote controller, we need to select the A1156 Alternative. For other remote controller, we need to select the profile accordingly. You can also try different profiles until the remote controller works.
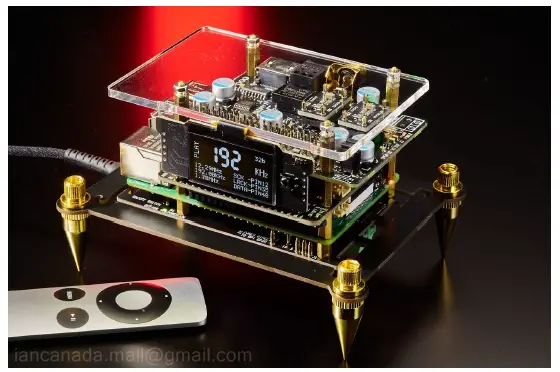
Application examples
Upgrade the high-performance Audiophonics I-Sabre ES9038Q2M DAC
Components
- Audiophonics I-Sabre ES9038Q2M DAC
- ShieldPi Pro MkIII
- MonitorPi (optional)
- Raspberry Pi
Power supply
UCPi 5V ultracapacitor power supply (optional)

Improve the ultra-low jitter TransportPi Digi/II network streamer transport.
Components
- TransportPi Digi/II
- ShieldPi Pro MkIII
- MonitorPi (optional)
- Raspberry Pi
Power supply
UCPi 5V ultracapacitor power supply (optional)
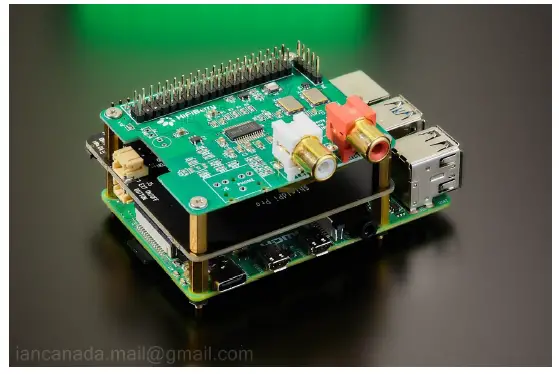
Upgrade a standard Raspberry Pi DAC.
Components
- BOSS PCM5122 DAC or other Pi DACs
- ShieldPi Pro MkIII
- MonitorPi (optional)
- Raspberry Pi
Upgrade a basic Raspberry Pi DAC or digi interface
- Hifiberry DAC+ Pro (or Hifiberry Digi+)
- ShieldPi Pro MkIII
- Raspberry Pi
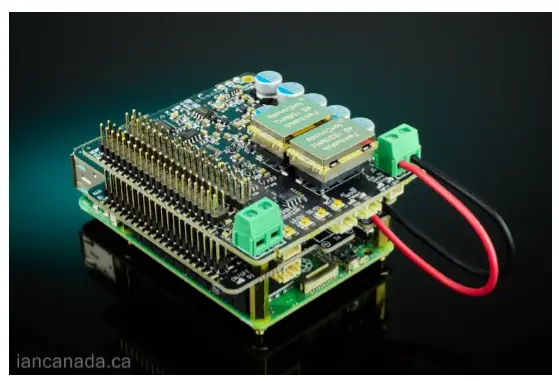
Run a FifoPiQ7 or FifoPi MA directly without using an additional 3.3V power supply.
- FifoPiQ7 or FifoPi MA
- ShieldPi Pro MkIII
- Raspberry Pi
- MonotorPi/Pro (optional)
Power supply
Standard USB power adapter or UcPi 5V ultracapacitor power supply
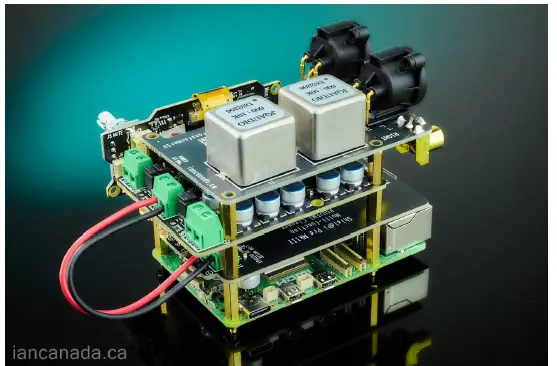
Run an IanCanada ESS DAC directly without using an additional 3.3V power supply.
- ES9038Q2M Dual Mono DAC (2). Transformer I/V
- ShieldPi Pro MkIII
- Raspberry Pi
- MonotorPi Pro as controller
Power supply
Standard USB power adapter or UcPi 5V ultracapacitor power supply
ShieldPi Pro MkIII works with a Raspberry Pi that is equipped with a heatsink.
Note: special size standoffs that come with the heatsink could be required to install
© 2024 IanCanada. The firmware code embedded in the ShieldPi Pro MkIII is the property of IanCanada Inc. You are granted a non-exclusive, non-transferable, non-sublicenseable, royalty-free right to use the ShieldPi Pro MkIII board solely for your own, non-commercial purposes. You may not distribute, sell, lease, transfer, modify, adapt, translate, reverse engineer, prepare derivative works of, decompile, or disassemble the software provided. All rights reserved.
FAQ
Q: How do I enable the IR-remote controller function?
A: Switch S2 to the ON position and configure the settings as specified in the user manual, especially if using Volumio software.
Documents / Resources
 |
IAN CANADA Multi Functional Raspberry Pi EMI Shield [pdf] Instruction Manual ShieldPiProMkIII, Multi Functional Raspberry Pi EMI Shield, Raspberry Pi EMI Shield, Pi EMI Shield, EMI Shield |