1. Ներածություն
This manual provides essential information and instructions for operating your Sony ZV-E10 II Mirrorless Vlogging Camera Kit with the 16-50mm OSS Lens. Designed for content creators and vloggers, this camera combines a 26 MP APS-C sensor with advanced features for high-quality video and stills. Please read this manual thoroughly before using the camera to ensure proper and safe operation.
2. Ի՞նչ կա տուփի մեջ
Your Sony ZV-E10 II kit includes the following items:
- Sony Alpha ZV-E10 II Mirrorless Camera (Black)
- Sony E PZ 16-50mm f/3.5-5.6 OSS II Lens
- Sony NP-FZ100 լիցքավորվող լիթիում-իոնային մարտկոց (2280 մԱժ)
- Sony ALC-B1EM մարմնի կափարիչ E-Mount տեսախցիկների համար
- Ուսադիր
- Քամու էկրան
- 64 ԳԲ Հիշողության քարտ
- Փափուկ պայուսակ
- Հիշողության քարտի ընթերցող
- Micro HDMI մալուխ
- 12 դյույմանոց ճկուն եռոտանի
- Ձեռքի ժապավեն
- Հիշողության քարտի դրամապանակ
- Մաքրման հավաքածու
3. Ապրանքը ավարտված էview
The Sony ZV-E10 II is a compact and lightweight mirrorless camera designed for ease of use and high-quality content creation. It features a 26 MP APS-C Exmor R CMOS sensor and a BIONZ XR processor for stunning image and video performance.

Նկար 3.1. Առջև view of the Sony ZV-E10 II camera with the 16-50mm lens and an external microphone attached.
Հիմնական բաղադրիչներ.
- Ոսպնյակի ամրացում. E-mount for interchangeable lenses.
- Vari-angle LCD Screen: A 3-inch touchscreen that can be articulated for flexible framing, especially useful for vlogging.
- Ներկառուցված խոսափող. Features a 3-capsule microphone with an included windscreen for clear audio.
- Բազմամիջերեսային կցորդիչ։ Allows attachment of external accessories like microphones and lights.
- Control Buttons and Dials: Ergonomically placed for intuitive operation.

Նկար 3.2. Հետևի view of the Sony ZV-E10 II camera, showing the fully articulating LCD touchscreen and control buttons.

Նկար 3.3. Վերև view of the Sony ZV-E10 II camera, highlighting the power switch, shutter button, and mode dial.
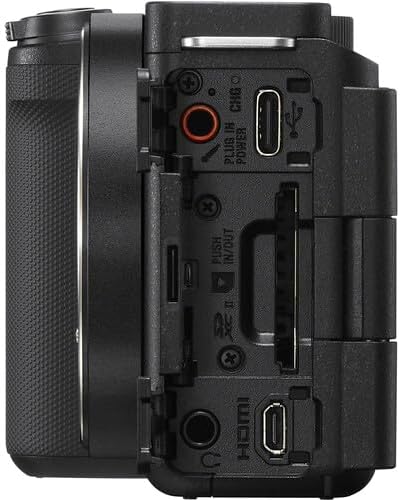
Նկար 3.4. Կողք view of the Sony ZV-E10 II camera, displaying the various ports including USB-C, HDMI, and microphone/headphone jacks.
4. Կարգավորում
4.1. Մարտկոցի և հիշողության քարտի տեղադրումը
- Բացեք մարտկոցի/հիշողության քարտի կափարիչը, որը գտնվում է տեսախցիկի ներքևի մասում։
- Insert the NP-FZ100 battery with the arrow pointing into the camera until it locks into place.
- Insert the memory card (SD card) into the slot with the contacts facing the correct direction until it clicks.
- Ապահով փակեք ծածկը:

Նկար 4.1. Ներքևում view of the camera with the battery and memory card compartment open.
4.2. Ոսպնյակի ամրացում
- Հեռացրեք տեսախցիկի մարմնի կափարիչը և օբյեկտիվի հետևի կափարիչը՝ օբյեկտիվից։
- Հավասարեցրեք օբյեկտիվի վրայի սպիտակ ցուցիչը տեսախցիկի կորպուսի վրայի սպիտակ ցուցիչի հետ։
- Տեղադրեք ոսպնյակը՝ այն ժամացույցի սլաքի ուղղությամբ պտտելով, մինչև այն ամրանա իր տեղում։

Նկար 4.2. Առջև view of the camera body with the lens removed, showing the E-mount sensor.
5. Տեսախցիկի շահագործում
5.1. Միացնել/անջատել
Տեսախցիկը միացնելու կամ անջատելու համար սահեցրեք ON/OFF switch located on the top plate.
5.2. Նկարահանման հիմնական ռեժիմներ
The camera offers various shooting modes accessible via the mode dial or menu. Common modes include:
- Խելացի ավտոմատ. Automatically detects the scene and adjusts settings.
- Ավտոմատ ծրագիր (P): Տեսախցիկը կարգավորում է դիաֆրագման և փակման արագությունը, մինչդեռ դուք կառավարում եք մյուս կարգավորումները։
- Դիաֆրագմայի առաջնահերթություն (A): Դուք եք կարգավորում դիաֆրագման, տեսախցիկը՝ փակիչի արագությունը։
- Փակիչի առաջնահերթություն (S): Դուք եք սահմանում փակման արագությունը, տեսախցիկը՝ դիաֆրագման։
- Ձեռնարկ (M): Full control over aperture and shutter speed.
- Ֆիլմի ռեժիմ. Հատուկ ռեժիմ՝ տեսանկարահանման համար։
5.3. Ավտոֆոկուսի համակարգ
The ZV-E10 II features an advanced autofocus system with 759 phase-detection points and Real-Time Eye AF for both humans and animals, ensuring sharp focus on your subjects during photos and videos.
- Իրական ժամանակի հետևում. Select a subject on the screen, and the camera will continuously track its movement.
- Սենսորային ֆոկուս՝ Tap on the LCD screen to set the focus point.
6. Ընդլայնված առանձնահատկություններ
6.1. Product Showcase Setting
This mode is ideal for product reviews. When activated, the camera automatically shifts focus from your face to a product held up to the lens, then back to your face when the product is removed.
6.2. Background Defocus
Achieve a professional-looking blurred background (bokeh) with a single button press. This feature is perfect for isolating your subject and adding a cinematic touch to your content.
6.3. Cinematic Vlog Setting
This setting optimizes video capture for a cinematic look by automatically adjusting frame rate to 24fps and adding black letterbox bars. You can also choose from various "Looks" (e.g., Clean, Chic, Fresh) and "Moods" (e.g., Auto, Gold, Ocean, Forest) to customize the aesthetic.
Video 6.1: This video demonstrates the Cinematic Vlog Setting, showcasing how it locks the frame rate to 24fps, adds letterbox bars, and allows selection of various "Looks" and "Moods" for a cinematic video aesthetic (from 8:57 to 9:30 in the comparison video).
6.4. Creative Looks and S-Cinetone
The camera offers 10 Creative Look presets (e.g., FL, IN, SH, VV2) that allow you to fine-tune saturation, contrast, sharpness, and clarity directly in-camera. Additionally, the S-Cinetone picture profile (PP11) provides a cinematic look optimized for skin tones without extensive post-production grading.
6.5. In-Camera Time-lapse
Create stunning time-lapse videos directly within the camera without needing external intervalometers or complex software. You can set the frame rate and interval time to capture dynamic scenes like moving clouds or changing light conditions.
Video 6.2: This video demonstrates the in-camera time-lapse feature, showing how to access settings for frame rate and interval time to create time-lapse sequences (from 5:16 to 5:34 in the comparison video).
7. Աուդիո հատկանիշներ
7.1. Internal Microphone and Directivity
The ZV-E10 II features an improved internal 3-capsule microphone with adjustable directivity. You can select between Ճակատ, Հետևի, կամ Բոլոր ուղղությունները to optimize audio pickup based on your shooting scenario, effectively isolating your voice from ambient noise.
7.2. Multi-Interface Shoe for External Microphones
For enhanced audio quality, the camera's Multi-Interface (MI) Shoe allows for direct digital audio input from compatible Sony microphones (e.g., Sony ECM-M1) without the need for additional cables. This provides a clean, high-quality audio signal.
Video 7.1: This video illustrates the audio capabilities of the Sony ZV-E10 II, including the internal microphone's directivity settings (Front, Rear, All Directions) and the use of the Multi-Interface Shoe for external microphones like the Sony ECM-M1 (from 11:41 to 14:17 in the comparison video).
8. Պատկերի կայունացում
The ZV-E10 II incorporates Optical SteadyShot image stabilization, particularly effective with the bundled 16-50mm OSS lens. This feature helps to reduce camera shake, resulting in smoother and more stable footagե, հատկապես ձեռքով կրակելու ժամանակ։
Video 8.1: This video compares the image stabilization performance between the original Sony ZV-E10 and the ZV-E10 II, demonstrating the improved stability of the newer model's Active SteadyShot (from 14:18 to 15:10 in the comparison video).
9. Պահպանում
9.1. Տեսախցիկի և օբյեկտիվի մաքրում
- Օգտագործեք փափուկ, թել չթողնող կտոր՝ տեսախցիկի կորպուսը մաքրելու համար։
- For the lens, use a lens brush to remove dust, then a lens cleaning solution and a microfiber cloth. Avoid touching the lens surface with your fingers.
- Never use organic solvents such as alcohol, benzene, or thinner to clean the camera.
9.2. Մարտկոցի խնամք
- Մարտկոցն ամբողջությամբ լիցքավորեք նախքան առաջին օգտագործումը:
- Պահպանեք մարտկոցները զով, չոր տեղում, երբ դրանք չեն օգտագործվում:
- Խուսափեք մարտկոցը ծայրահեղ ջերմաստիճանի ենթարկելուց:
10: Անսարքություն
Եթե ձեր տեսախցիկի հետ կապված խնդիրներ ունեք, դիմեք հետևյալ տարածված լուծումներին.
- Տեսախցիկը միացված չէ. Համոզվեք, որ մարտկոցը լիովին լիցքավորված է և ճիշտ տեղադրված։
- Մարտկոցը չի լիցքավորվում. Check the charging cable and adapter. If the charging indicator light is yellow, it may indicate a fault with the battery or charging system. Try a different charging cable or contact support.
- Պատկերները մշուշոտ են. Check focus settings (autofocus mode, focus area). Ensure the lens is clean and properly attached.
- Տեսաձայնագրումը անսպասելիորեն դադարեցվում է. Ensure the memory card has sufficient space and is of a high-speed class suitable for 4K recording. Check battery level.
- Menu navigation issues: The ZV-E10 II features an updated, fully touchscreen-enabled menu. Ensure touch operation is enabled in settings if you prefer it.
For more detailed troubleshooting, please visit the Sony support webկայք կամ կապվեք հաճախորդների սպասարկման հետ:
11. Տեխնիկական պայմաններ
| Առանձնահատկություն | Մանրամասն |
|---|---|
| Ապրանքի չափերը | 1.8 x 4.5 x 2.5 դյույմ |
| Նյութի քաշը | 4.4 ֆունտ |
| ASIN | B0DFJTWDK6 |
| Նյութի մոդելի համարը | ZVE10M2KB |
| Մարտկոցներ | 1 ոչ ստանդարտ մարտկոց (ներառված է) |
| Ամսաթիվ առաջին հասանելի | 28 օգոստոսի, 2024 թ |
| Արտադրող | Sony |
| Համատեղելի ամրացումներ | Sony E |
| Ասպեկտների հարաբերակցություն | 4։3 |
| Ֆոտո սենսորային տեխնոլոգիա | BSI CMOS |
| Աջակցված է File Ձևաչափ | JPEG, MP4 |
| Պատկերի կայունացում | Հիբրիդ |
| Առավելագույն կիզակետային երկարություն | 50 Միլիմետր |
| Բրենդ | Sony |
| Մոդելի անվանումը | ZVE10M2KB |
| Առավելագույնը Webտեսախցիկի պատկերի լուծում | 26 պատգամավոր |
| Լուսանկարի սենսորի չափը | 23.6 x 15.6 մմ |
12. Երաշխիք և աջակցություն
Your Sony ZV-E10 II camera is covered by a manufacturer's warranty. For specific warranty terms and conditions, please refer to the documentation included with your product or visit the official Sony support webկայք։
For technical support, product registration, or service inquiries, please contact Sony Customer Support through their official channels.


