Hornady Security 98196WIFI Ready Vault
with WiFi Instruction Manual

⚠ READ THIS FIRST
Warning: NEVER store a loaded firearm in the Hornady Security® RAPiD® Safe Ready Vault™ under any circumstances. The risks associated with storage of a loaded firearm include, but are not limited to, unintentional discharge upon insertion or removal of the firearm. Unintentional discharge may result in bullet and safe fragments dispersing in multiple directions, which may cause serious injury or death. Hornady Security® is not liable for any misuse of the RAPiD® Safe.
Warning: No vault is entirely secure. The RAPiD® Safe is only as secure as your maintenance of the keys, code and RFID tags. You are solely responsible for maintaining your keys, code and RFID tags. Keep your keys and RFID tags in a secure location at all times. Store your RAPiD® Safe in a secure location away from your keys and RFID tags. Hornady Security® is not liable for unauthorized access, including damage to, or loss of property, or personal injury. Again, NEVER store a loaded firearm in your Hornady® RAPiD® Safe, as this may result in unauthorized access to the loaded firearm.
Warning: Except as expressly provided in the RAPiD® Safe Limited Warranty, Hornady Security® is not liable for any expense or damage associated with your inability to open the RAPiD® Safe. Electronic systems may fail. Verify that the keys furnished operate the lock. Keep your keys in a secure location at all times. For your security, Hornady Security® WILL NOT send replacement keys.
Warning: Hornady Security® is not liable for any loss, theft, or damage to personal property. The RAPiD® Safe is not intended to protect the contents from fire, water, humidity, or other environmental conditions. Do not, under any circumstances, return the RAPiD® Safe to Hornady Security® with any personal property inside.
Important Information
- RFID Tag refers to the chip in any of the RFID “keys” included with the RAPiD® Safe (watchband tag, key fob or decals). You may also purchase additional RFID tags.
- For trouble-free operation of your RAPiD® Safe, please read and understand all instructions before use.
- Questions? Call our tech line at 800-338-3220.
- Never store loaded firearms in the RAPiD® Safe. Follow local laws for firearm storage.
Items Included
RAPiD® SAFES
Ready VaultTM w/WiFi
Item No. 98195WIFI
Exterior: 52.2″H x 20.0″W x 15.1″D (*add 1.7″ for handle)
Interior: 51.8″H x 19.0″W x 12.7″D
Weight: 170 lbs.
Power: 12V 1.0A or four (4) AA batteries (not included)
Compact Ready VaultTM w/WiFi
tem No. 98196WIFI
Exterior: 52.2″H x 10.0″W x 10.0″D
(*add 1.7″ for handle)
Interior: 51.8″H x 9.0″W x 8.0″D
Weight: 70 lbs.
Power: 12V 1.0A or four (4) AA batteries (not included)
Included with your RAPiD® Safe:
- RAPiD® Safe Ready VaultTM w/WiFi
- Wall Power Supply
- One (1) RFID Watchband Tag (No. 98159)
- Two (2) RFID Adhesive Decals (No. 98168)
- One (1) RFID Key Fob Tag (No. 98161)
- Two (2) Circular Barrel Keys
- Three (3) Square-LokTM Gun Racks
- Adjustable Square-LokTM Shelf (No. 98252)
- Padded Floor Mat
Included with your RAPiD® Safe:
- RAPiD® Safe Ready VaultTM w/WiFi
- Wall Power Supply
- One (1) RFID Watchband Tag (No. 98159)
- Two (2) RFID Adhesive Decals (No. 98168)
- One (1) RFID Key Fob Tag (No. 98161)
- Two (2) Circular Barrel Keys
- Three (3) Square-LokTM Gun Racks
· One (1) 4-Gun Rack for Long Guns · Two (2) Patent Pending 2-Gun Racks for Handguns and Long Guns - Adjustable Square-LokTM Shelf (No. 98253)
- Padded Floor Mat

Not Pictured:
- Ready VaultTM w/WiFi
- Square-LokTM Gun Racks
- Adjustable Square-LokTM Shelf
- Padded Floor Mat
- Owner’s Manual
- Warranty Card
RAPiD® Safe Setup and Operation
Congratulations on purchasing the technologically advanced RAPiD® Safe Ready VaultTM. You have taken a significant step in securing the safety of your firearms.
To achieve the best experience with your RAPiD® Safe, please read all instructions carefully, and understand its operation.
WiFi Connectivity
Keep tabs on your Ready VaultTM safe through your smartphone by downloading the Hornady Security® app to receive alerts when the safe is locked or unlocked. For instructions for downloading the app and connecting the safe to WiFi, go to www.hornadysecurity.com/app.

Key Lock Override
Find circular barrel keys and check to be sure both keys fit and unlock your RAPiD® Safe. Contact Hornady® at 800-338-3220 if the keys do not work. Store keys in a secure location outside the vault.
Access the key lock:
The key lock can be found behind the cover under the handle.
To access the key lock, press the recessed area at the top of the cover and slide it downward to remove.

AC Power
The RAPiD® Safe is designed to be powered by either the AC power supply or four AA batteries.
To connect the AC power supply, first open the vault with the circular barrel key. Locate the square hole in the back of the vault and insert the power cord into this hole. Route the power cord under the floor mat and toward the front of the safe. Plug the power cord into the jack on the back of the door. Use the integrated cord hook in the door to help retain the power cord.

Batteries
To install batteries, open door with barrel keys and locate battery compartment on the back of the door. Remove battery cover and insert four (4) high quality AA batteries. Replace all batteries at the same time.
To check battery level:
- Disconnect from AC power source.
- Press and release “H” button on the keypad.
- The LED light on the “H” button will flash.
a. Flashing Green Good battery
b. Flashing Yellow Low battery
c. Flashing Red Dead battery - After 10 seconds the vault will return to normal operation.
NOTE: Replace batteries every twelve months or as needed.

Battery Power Mode
When the RAPiD® Safe is unplugged, and is operating on battery power, you must press any button on the keypad to activate the reader.
Pressing any button on the keypad causes the system to go from battery saving mode to ready status.
For example: To open your vault with an RFID tag, while the system is running on battery power, first press any button on the keypad to bring it to ready status. Place your RFID tag within 1″ of the center of the RFID reader to open the vault.

Keypad Tones On/Off
With the door open and unlocked, press and hold the “H” button on the keypad for 5 seconds until the light turns off to toggle sound on and off.
How to Program Your RFID Tags
Your RAPiD® Safe includes three (3) styles of RFID tags, including:
- 1 Watchband tag
- 1 Key Fob
- 2 Decals
*Additional styles can be purchased separately.
The RAPiD® Safe can store up to 5 tags. To program these tags:
- Open the RAPiD Safe with either the key or a previously programmed RFID tag or key code. (The vault does not ship with pre-programmed RFID tags. A RFID tag must be programmed to work with this vault.)
- Locate the red program button. Press and release the button to begin programming a RFID tag. The first available program location will begin to blink.
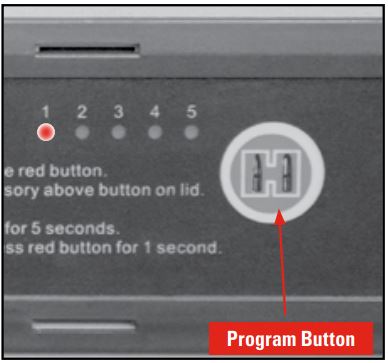
- Hold the RFID tag within 1″ of the illuminated RFID reader area on the vault door. If the programming was successful, the vault should beep two times and the available slot should go from blinking to solid red for approximately ten seconds.
NOTE: If the user attempts to program a RFID tag that is already stored in the vault it will beep three times and the RFID tag will not be programmed into the duplicate slot. The RFID tag can only be programmed into one location. - Verify the RFID tag is programmed by holding the tag over the RFID reader with the door open. The motor should cycle after each scan.
- If the RFID tag is not programmed, the program function will time out after ten seconds and the vault will return to normal operation. If multiple attempts to program a RFID tag fails, please contact Hornady® at 800-338-3220.
- One to five RFID tags can be programmed into the vault.

NOTE: Due to potential interference from the body (attenuation), the RFID watchband tag should be worn on the outside or bottom of the wrist and may need to be brought within 1-inch of the reader to activate the safe. The RFID reader will likely not read through the wrist.
NOTE: The RFID decal can be placed on a variety of objects. However, metal surfaces may cause interference and reduce the read distance. The integrated metal housing on some cell phones combined with potential interference from other wireless signals such as Bluetooth, NFC, etc., may reduce the read distance of the RFID decal.
Before adhering the RFID decal to a mobile phone, we recommend trying different locations on the back of the device to find the optimum read distance. Placing the decal on the outside of an accessory cover will also improve the read distance, but may cause excessive wear, resulting in a shortened life of the decal. When placing the decal on the inside of an accessory cover, DO NOT face it toward the mobile phone. The decal must face outward (away from the phone) to work optimally.

Before placing the RAPiD Safe into service, verify the decal works properly under various conditions (i.e. the wireless apps on your mobile phone are on).
How to Program Your Key Code
A single user defined 4 to 6 digit code can be entered into the RAPiD® Safe Ready Vault™.
- Open the RAPiD Safe with either the key, a previously programmed RFID tag, or key code. The vault ships with a default code and should be reprogrammed before first use.
- Locate the red program button to begin programming your key code. The first available tag location will begin to blink to indicate program mode.
- With the door open, enter a 4 to 6 digit code on the keypad. Press the “H” after entering your code. Verify your code is correct by re-entering your code and pressing “H”. The motor should cycle.
- Your key code can now be used to open the vault.
NOTE: Only one key code can be entered into the vault. If a second code is entered, it will override the previous code. **A total of 5 RFID tags and 1 key code can be entered into the vault.
How to Remove All Tags From Vault
- Open the RAPiD® Safe with either the key, a previously programmed RFID tag, or key code. Locate the red program button. Press and hold the button for five seconds to erase all previously programmed tags. All five red LEDs will begin to blink in sequence. The vault does not allow individual tags to be removed. They must all be erased at one time. The intended RFID tags can then be reprogrammed with the instructions above. NOTE: To abort the erase procedure, press the “H” button on the door of the vault or do not touch anything and the erase procedure will automatically abort after 10 seconds and return to normal operation. Test RFID tags and the key code to confirm they are operational.
- To confirm erasing procedure, press and release the program button again. All five LEDs will blink three times to visually confirm all RFID tags have been removed. The RFID tags will no longer work until they are reprogrammed with the instructions in the “How to Program Your RFID Tags” section.
Closing the Ready Vault
The vault has a latch closure sensor that will illuminate the LED in the keypad when the door is closed. Green Latch has fully closed. Blinking Red Latch has NOT fully closed. To close the vault, hold the door closed while rotating the handle on the front to the vertical position. Verify green light appears on the keypad.
Installing Square-LokTM Gun Racks
The metal interior Square-LokTM panels and included patent pending gun racks are designed to maximize space and organize your safe. The dual-purpose gun racks use space between barrels to accommodate up to 8 long guns and 14 handguns in the Ready Vault, and up to 4 long guns and 4 handguns in the Compact Ready Vault.
To install gun racks:
Place top hooks into the holes in the wall panel, rotate the gun rack down so the bottom hooks also enter a hole, and then slide the gun rack down to lock into place.
To remove gun racks:
Lift the gun rack vertically, rotate the bottom hooks out of the holes in the peg wall panels, and then slide top hooks out.

Installing Adjustable Square-Lok™ Shelf

To install Ready Vault shelf:
Place the four shelf brackets into the holes in the Square-Lok™ panel at desired shelf height by inserting the bracket hook and then sliding downward until the tab on the bottom of the bracket snaps into the next hole. Place shelf on top of brackets. Secure the shelf to the brackets with included nuts and bolts.
To remove shelf: Remove the nuts and bolts and lift shelf off the brackets. Pull out on bottom of bracket to unlock before lifting up and out of the hole in the wall panel.

To install Compact Ready Vault shelf:
Place top hooks into the holes in the Square-LokTM panel, rotate the shelf down so the bottom hooks also enter a hole, and then slide the shelf down to lock into place.
To remove shelf: Lift the shelf vertically, rotate the bottom hooks out of the holes in the wall panel, and then slide top hooks out.
The Square-Lok™ panel is compatible with the Hornady Security Dehumidifiers, LED Lights, Hygrometer, and other accessories (sold separately).
RAPiD® Safe Limited Warranty
Hornady Security® warrants the RAPiD® Safe will, in normal use and service, be free from defects in workmanship or materials for one (1) year from date of purchase. This Limited Warranty does not cover any of the following:
(a) Damage, deterioration, or malfunction resulting from accident, negligence, misuse, improper installation, or lack of maintenance;
(b) Any defects not discovered and reported to Hornady Security® during the one (1) year warranty period;
(c) Usual and customary deterioration or wear resulting from normal use.
This Limited Warranty is not transferable and is enforceable by the original owner only. In the event that Hornady Security® receives notice from the original purchase of a warranty claim in conformity herewith, Hornady Security® will promptly undertake an investigation of such claim. If the warranty claim is covered by the Limited Warranty, Hornady Security® will, in its sole discretion, repair the defect(s) or replace RAPiD® Safe at the expense of Hornady Security.®
Disclaimer of Implied Warranties. EXCEPT AS IS OTHERWISE EXPRESSLY SET FORTH IN THE ABOVE LIMITED WARRANTY, HORNADY SECURITY® MAKES NO OTHER REPRESENTATIONS OR WARRANTIES OF ANY KIND, WHETHER EXPRESSED OR IMPLIED, BY OPERATION OF LAW OR OTHERWISE WITH RESPECT TO THE RAPiD® SAFE OR ANY COMPONENT PART THEREOF, INCLUDING WITHOUT LIMITATION ANY REPRESENTATION OR WARRANTY WITH RESPECT TO MERCHANTABILITY OR FITNESS FOR ANY PARTICULAR PURPOSE OR USE.
Limitation on Liability. THE OBLIGATION OF HORNADY SECURITY® TO REPAIR OR REPLACE AS PROVIDED ABOVE SHALL BE THE SOLE AND ONLY REMEDY RESPECTING ANY DEFECT IN THE RAPiD® SAFE, OR ANY COMPONENT PART THEREOF. IN THE EVENT THAT THE FOREGOING REMEDY FAILS OF ITS ESSENTIAL PURPOSE, THE LIABILITY OF HORNADY SECURITY® TO PURCHASER SHALL NOT, IN ANY EVENT, EXCEED THE ACTUAL PURCHASE PRICE OF THE NON-CONFORMING GOODS; AND
Limitation on the Nature of Damages. HORNADY SECURITY® SHALL NOT, UNDER ANY CIRCUMSTANCES, BE LIABLE TO THE PURCHASER OR ANY THIRD PARTY FOR ANY SPECIAL, INDIRECT, INCIDENTAL, CONSEQUENTIAL, LIQUIDATED OR PUNITIVE DAMAGES OF ANY NAME, NATURE OR DESCRIPTION. HORNADY SECURITY® IS NOT RESPONSIBLE FOR DAMAGE TO OR THEFT OF THE RAPiD® SAFE, OR ITS CONTENTS.
Frequently Asked Questions
Contact Hornady Security® at 800-338-3220 and one of our technicians will assist you.
The serial number is located on the back of the safe. Prior to mounting the safe, record the serial number for future reference.
Quality batteries should last approximately 12 months, depending on use.
Call Hornady® at 800-338-3220 and one of our technicians will assist you.
· Be sure the RFID tag is programmed to your vault. The RAPiD® Safe allows five (5) RFID tags to be programmed for use.
· Check the power source. If the unit is plugged into an electrical outlet, the green LED light should be on. If the unit is on battery power, press the button on the top of the vault to bring the system to ready before placing the RFID tag on the reader.
Product Registration and Service
You must register your product to obtain Warranty Service. Complete the registration form at hornady.com/warranties.
To Receive Warranty Service To report a warranty claim, call Hornady® at 800-338-3220 to request a return authorization number. Returns will not be accepted without prior return authorization by Hornady.® When a return authorization number has been obtained, be sure all contents have been removed from the RAPiD® Safe before sending it for service. Hornady® is not liable for any loss, theft, or damage to personal property.
Post-Warranty Service Information For issues concerning service after the Limited Warranty expires, contact Hornady® at 800-338-3220.

Product Serial Number and Key Number Reference
You must register your RAPiD® Safe in order to obtain warranty service. In the event you should need service for your product, please note the following information:
Serial Number _______________________________________________________ (see the back or bottom of safe)
Key Number _________________________________________________________ (see the face of the lock)
After recording the information, store user manual and spare keys in a secure location outside the safe.
This is a California-approved Firearm Safety Device that meets the requirements of Penal Code section 23655 and the regulations issued thereunder.
This device complies with part 15 of the FCC Rules. Operation is subject to the following two conditions: (1) This device may not cause harmful interference, and (2) this device must accept any interference received, including interference that may cause undesired operation. Changes or modifications not expressly approved by the party responsible for compliance could void the user’s authority to operate the equipment.
Hornady Manufacturing Company P.O. Box 1848, Grand Island, Nebraska 68802-1848 hornady.com/contact
Documents / Resources
 |
Hornady Security 98196WIFI Ready Vault with WiFi [pdf] Instruction Manual 98196WIFI Ready Vault with WiFi, 98196WIFI, Ready Vault with WiFi, with WiFi, WiFi |


