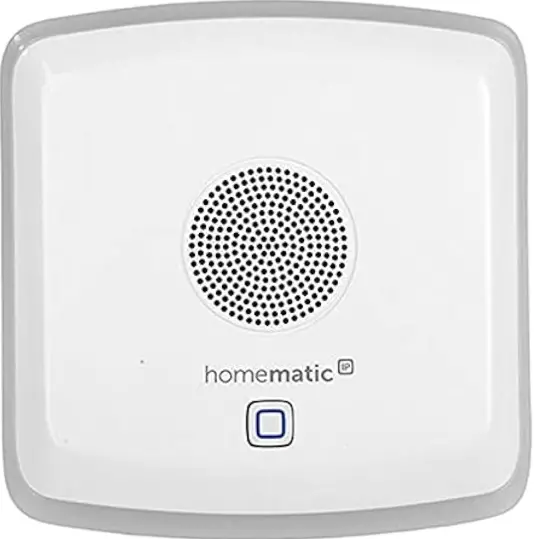
homematic IP HmIP-MP3P Combination Signalling Device
Product Information
Specifications
- Product Name: Kombisignalgeber
- Model: HmIP-MP3P
- Languages: DE, EN, FR, ES, IT, NL
Product Usage Instructions
Installation
To mount the Homematic IP Combination Signalling Device on a wall, follow these steps
- Make sure the microSD card is not inserted or removed while the device is operational. Remove a battery or unplug the power cable first.
- To insert new batteries, follow the steps provided in the manual.
Troubleshooting
If you encounter issues with the device, refer to the error codes and troubleshooting section in the manual for guidance on resolving common problems.
Factory Reset
To restore the factory settings of the Homematic IP Combination Signalling Device, follow the steps outlined in the manual based on whether the device is battery-powered or mains-powered.
FAQ
- Q: What should I do if I see a long red light followed by short orange blinking?
- A: This indicates a process failure or reaching the Duty Cycle limit. Wait for the update to complete or replace the batteries if needed.
- Q: How do I avoid damaging the microSD card?
- A: Ensure that the microSD card is not inserted or removed while the device is operational. Always remove a battery or unplug the power cable before handling the microSD card.
Package contents
- 1x Homematic IP Combination Signalling Device
- 2x Screws, 3.0 x 30 mm
- 2 wall plugs, 5 mm
- 3x 1.5 V LR14/baby/C batteries
- 1x Operating manual
Information about this manual
Please read this manual carefully before operating your Homematic IP components. Keep the manual so you can refer to it at a later date if you need to. If you hand over the device to other persons for use, please hand over this manual as well.
Symbols used
![]() Important! This indicates a hazard.
Important! This indicates a hazard.
![]() Note. This section contains important additional information!
Note. This section contains important additional information!
Hazard information
- We do not assume any liability for damage to property or personal injury caused by improper use or the failure to observe the hazard information. In such cases, all warranty claims are void. We accept no liability for any consequential damage.
- Do not use the device if there are signs of damage to the housing, control elements or connecting sockets, for example, or if it demonstrates a malfunction. If you have any doubts, please have the device checked by an expert.
- Do not open the device. It does not contain any parts that need to be maintained by the user. In the event of an error, please have the device checked by an expert.
- For safety and licensing reasons (CE), unauthorised changes and/or modifications to the device are not permitted.
- The device may only be operated indoors and must be protected from the effects of moisture, vibrations, solar or other methods of heat radiation, cold and mechanical loads.
- The device is not a toy: do not allow children to play with it. Do not leave packaging material lying around. Plastic films, plastic bags, pieces of polystyrene, etc., can be dangerous in the hands of a child.
- Only use a suitable plug-in mains adapter (5 VDC, min. 1 A with 5.5 mm x 2.1 mm DC plug) for the power supply to the device.
- The device may only be connected to an easily accessible power socket outlet. The mains plug must be pulled out if a hazard occurs.
- Always lay cables in such a way that they do not become a risk to people and domestic animals.
- The device is only suitable for use in residential environments.
- Using the device for any purpose other than that described in this operating manual does not fall within the scope of intended use and will invalidate any warranty or liability.
Function and device overview
Thanks to its integrated loudspeaker and an LED light ring, the Homematic IP Combination Signalling Device for indoor use enables acoustic and/or visual signalling of a wide range of statuses within the smart home system.
For example, the signalling device can signal the following states and events:
General
The batteries of the Homematic IP Combination Signalling Device are almost empty, please change the batteries.
Shutter control
- Activating partial shading
- Partial shading is active
- Activating full shading
- Full shading is active
Security
- Alarm is triggered
- System could not be armed.
- The alarm system is not armed
- Attention – One or more smoke detectors have tripped, please leave the building immediately
- Attention – One or more water detectors have tripped
Access
- Welcome home
- Goodbye
- The doors were locked automatically
- The doors were unlocked automatically
- Door was opened
- Door was closed
The system offers a choice of 20 languages and 12 signal tones. Voice announcements can be made with a female or male voice and in the languages English, German, French, Dutch, Italian and Spanish.
The colours white, blue, green, turquoise, red, violet and yellow can be chosen for the light ring.
Device overview
- (A) Light ring
- (B) Loudspeaker
- (C) System button (pairing button and LED)
- (D) Screw brackets
- (E) Cable guide
- (F) Battery compartment
- (G) Plug-in mains adapter socket
- (H) micro SD card slot
- (I) Battery compartment cover
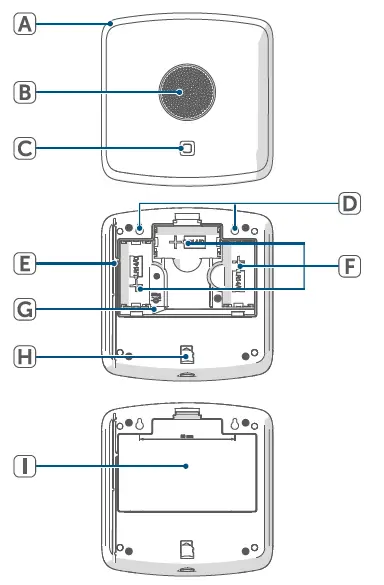
Figure 1
General system information
This device is part of the Homematic IP Smart Home system and communicates via the Homematic IP wireless protocol. All devices in the Homematic IP system can be configured easily and individually with a smartphone using the Homematic IP app. The functions provided by the system in combination with other components are described in the Homematic IP User Guide. All current technical documents and updates can be found at
www.homematic-ip.com .
Start-up
Pairing
- Please read this entire section before starting the pairing procedure.
- First set up your Homematic IP Access Point or Home Control Unit via the Homematic IP app to enable operation of other
- Homematic IP devices within your system. For further information, please refer to the operating manual of the Access Point or Home Control Unit.
In order that the Homematic IP Combination Signalling Device can be integrated into your system and can communicate with other Homematic IP devices, it first has to be paired with the Homematic IP Access Point or the Home Control Unit.
To pair the device, proceed as follows
- Open the Homematic IP app on your smartphone.
- Select “Add device”.
- Open the battery compartment (F) by pulling the latch back slightly and remove the battery compartment cover (I).
- Pull the insulating strip out of the battery compartment of the Homematic IP Combination Signal-ling Device. Pairing mode is active for 3 minutes.
You can start pairing mode manually for another 3 minutes by briefly pressing the system button (C).
The device appears automatically in the Homematic IP App.
- To confirm, enter the last four digits of the device number (SGTIN) in your app, or scan the QR code. The device number can be found on the sticker supplied or attached to the device.
- Wait until pairing is completed.
- If pairing was successful, the LED lights up green. The device is now ready for use. If the LED lights up red, please try again.
- In the app, give the device a name and allocate it to a room.
- Close the battery compartment (F).
Power supply
You have the option of supplying the Homematic IP Combination Signal-ling Device with power using the 1.5 V LR14/Baby/C batteries already inserted or using a suitable plug-in mains adapter (5 VDC/1.5 A/7.5 W max.).
- To operate with batteries, proceed as follows
Remove the insulating strip from the battery compartment (F). - To operate with a plug-in mains adapter, proceed as follows
Open the battery compartment (F) by pulling the latch back slightly and remove the battery compartment cover (I).
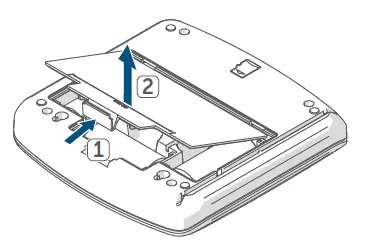 Figure 2
Remove the batteries from the battery compartment (F).
Installation
You can operate the Homematic IP Combination Signalling Device as a free-standing unit or you can fasten it to the wall using the screws and dowels supplied.
- To fasten the Homematic IP Combination Signalling Device to a wall, proceed as follows
Select the desired installation location on a wall. - Ensure that there are no electricity cables or pipes in the wall at this location!
- Use a pen to mark the positions of the two drill holes for the screw brackets (D) 80 mm apart on the wall.
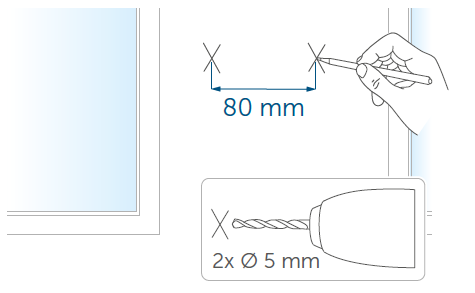
Figure 3
- Use an appropriate drill to make the 5 mm holes as illustrated.
- Insert the plugs in the holes.
- Turn the screws into the plugs so that they protrude from the wall by approx. 5.5 mm.
- Hang the device using the brackets on the back behind the screw heads.
Memory card
- The voice texts and signal tones are stored on a micro SD card that is inserted into the Homematic IP Combination Signalling Device.
- The micro SD card must not be inserted or removed while the device is in operation. Remove a battery or pull out the mains cable first.
Changing the batteries
If the error code for empty batteries (see „9.4 Error codes and flashing sequences“ on page 21) appears, replaced the old batteries with three LR14/Baby/C batteries. Pay attention to the correct battery polarity.
To insert new batteries, proceed as follows
- Turn the device on its back.
- Open the battery compartment (F) by pulling the latch back slightly and remove the battery compartment cover (I).
- Remove the empty batteries from the battery compartment (F).
- Insert three new LR14/Baby/C batteries into the battery compartment, observing the polarity shown.
- Close the battery compartment (F) again.
Once the batteries have been inserted, the Homematic IP Combination Signalling Device first performs a self-test for approx. 2 seconds.
- Afterwards, initializations is carried out.
- The LED test display will indicate that initialization is complete by lighting up orange and green.
- Pay attention to the flashing sequence of the device LED (C) (see „9.4 Error codes and flashing sequences“ on page 21) after inserting the batteries.
Caution! Risk of explosion if batteries are replaced incorrectly. Replace only with the same or an equivalent battery type. Batteries must never be recharged. Never throw batteries into a fire. Do not expose batteries to excessive heat. Do not short-circuit batteries. There is a risk of explosion!
Troubleshooting
Weak batteries
- Provided that the voltage value permits it, the Homematic IP Combination Signalling Device will remain ready for operation even if the battery voltage is low. Depending on the particular load, it may be possible to send transmissions again repeatedly once the batteries have been allowed a brief recovery period.
- If the voltage drops too far again during transmission, the error code (see „9.4 Error codes and flashing sequences“ on page 21) will be displayed on the device. In this case, replace the used batteries with three new ones (see „8 Changing the batteries“ on page 19).
Command not confirmed
If at least one receiver does not confirm a command, this may be caused by radio interference (see „12 General information about radio operation“ on page 23). The transmission error will be displayed in the app and may have the following causes
- Receiver cannot be reached
- Receiver is unable to execute the command (load failure, mechanical blockade, etc.)
- Receiver is defective
Duty cycle
- The duty cycle is a legally regulated limit of the transmission time of devices in the 868 MHz range. The aim of this regulation is to safeguard the operation of all devices working in the 868 MHz range.
- In the 868 MHz frequency range used by us, the maximum transmission time of any device is 1% of an hour (i.e. 36 seconds in an hour). Devices must cease transmission when they reach the 1% limit until this time restriction ends. Homematic IP devices are designed and produced with 100% conformity to this regulation.
- During normal operation, the duty cycle is not usually reached. However, repeated and radio-intensive pairing processes mean that it may be reached in isolated instances during start-up or initial installation of a system. If the duty cycle limit is exceeded, the device may stop working for a brief period.
Error codes and flashing sequences
| Flashing code | Meaning | Solution |
| Short orange flashes | Radio transmission / attempting to transmit / data transmission | Wait until the transmission is completed. |
| 1x long green flash | Transmission confirmed | You can continue operation. |
| 1x long red flash | Transmission failed or duty cycle limit reached | Please try again (see „9.2 Command not confirmed“ on page 20) or (see „9.3 Duty cycle“ on page 20). |
| Short orange flashes (every 10 seconds) | Pairing mode active (pairing with the Access Point or Central Control Unit) | Enter the last four digits of the device serial number to confirm (see „6.1 Pairing“ on page 17). |
| 6x long red flashes | Device defective | Please contact your retailer |
| 1x orange and 1x green light up | Test display | You can continue once the test display has stopped. |
| Alternating long and short orange flashing | Update in progress. | Please wait until the update has been completed. |
| Brief steady orange light (after green or red reception confirmation) | Low battery | Replace the batteries (see „8 Changing the batteries“ on page 19). |
Restoring factory settings
The factory settings of the Homematic IP Combination Signalling Device can be restored. The operations differ as follows
Restoring with battery operation
To restore the factory settings of the Homematic IP Combination Signalling Device, proceed as follows
- Turn the device on its back.
- Open the battery compartment (F) by pulling the latch back slightly and remove the battery compartment cover (I).
- Remove one battery from the battery compartment (F).
- Please wait a minute.
- Insert the battery in the
Homematic IP Combination Signalling Device again, ensuring that the polarity is correct, holding down the system button (C) at the same time for 4 seconds until the LED (A) starts to flash orange fast.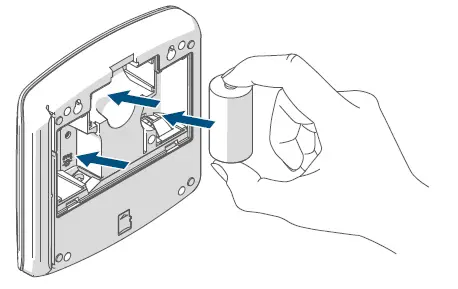
Figure 4
- Release the system button.
- Press and hold the system button again for 4 seconds until the LED lights up green.
- Release the system button to conclude restoring of the factory settings.
- Close the battery compartment (F).
The device performs a restart and the Homematic IP Combination Signalling Device is reset. After the restart, you can integrate your device into your Homematic IP system again.
Restoring with mains power supply
To restore the factory settings of the Homematic IP Combination Signalling Device, proceed as follows
- Turn the device on its back.
- Open the battery compartment (F) by pulling the latch back slightly and remove the battery compartment cover (I).
- Unplug the plug-in mains adapter.
- Please wait a minute.
- Plug the plug-in mains adapter into the mains adapter socket (G) again, holding down the system button (C) at the same time for 4 seconds until the LED (A) starts to flash orange fast.
- Release the system button.
- Press and hold the system button again for 4 seconds until the LED lights up green.
- Release the system button to conclude the procedure.
The device performs a restart and the Homematic IP Combination Signalling Device is reset. After the restart, you can integrate your device into your Homematic IP system again.
Restoring files on the memory card
To restore the files on the micro SD card, proceed as follows
- Go to the Internet website www.homematic-ip.com .
- Search in the device search for HmIP-MP3P.
- Click “Downloads”.
- Download the file “mp3p.zip”.
- Unzip the file on the micro SD card of your HmIP-MP3P device. Follow the instructions (see „7 Memory card“ on page 19).
Maintenance and cleaning
The device does not require you to carry out any maintenance other than replacing the battery when necessary. Leave any maintenance or repair to a specialist.
Clean the device using a soft, clean, dry and lint-free cloth. The cloth can be slightly dampened with lukewarm water to remove more stubborn marks. Do not use any detergents containing solvents, as they could corrode the plastic housing and label.
General information about radio operation
- Radio transmission is performed on a non-exclusive transmission path, which means that there is a possibility of interference occurring. Interference can also be caused by switching operations, electrical motors or defective electrical devices.
- The transmission range within buildings can differ greatly from that in open spaces. Besides the transmitting power and the reception characteristics of the receiver, environmental factors such as humidity in the vicinity play an important role, as do on-site structural/screening conditions.
- eQ-3 AG, Maiburger Strasse 29, 26789 Leer, Germany, hereby declares that the radio equipment type Homematic IP HmIP-MP3P is compliant with Directive 2014/53/EU. The full text of the EU declaration of conformity can be found at: www.homematic-ip.com
Disposal
Instructions for disposal
![]() This symbol means that the device and the single-use or rechargeable batteries must not be disposed of with household waste, the residual waste bin or the yellow bin or yellow bag.
This symbol means that the device and the single-use or rechargeable batteries must not be disposed of with household waste, the residual waste bin or the yellow bin or yellow bag.
- For the protection of health and the environment, you must take the product, all electronic parts included in the package contents, and the batteries to a municipal collection point for waste electrical and electronic equipment to ensure correct disposal of the same. Distributors of electrical and electronic equipment or batteries must also take back waste equipment or used batteries free of charge.
- By disposing of them separately, you are making a valuable contribution to the reuse, recycling and other methods of recovery of used devices and used batteries.
- You must separate any used single-use and rechargeable batteries found in used electrical and electronic devices from the used device if they are not enclosed by the used device before handing it over to a collection point and dispose of them separately at the local collection points.
- Please also remember that you, the end user, are responsible for deleting personal data on any used electrical and electronic equipment before disposing of it.
Information about conformity
![]() The CE mark is a free trademark that is intended exclusively for the authorities and does not imply any assurance of properties.
The CE mark is a free trademark that is intended exclusively for the authorities and does not imply any assurance of properties.
For technical support, please contact your retailer.
Technical specifications
- Device short description: HmIP- MP3P
- Battery power supply: 3x 1.5 V LR14/Baby/C
- Plug-in mains adapter power supply: 5 VDC
- Current consumption: 1 A max.
- Current consumption in stand-by mode: 90 μA
- Battery life: 2 years (typical)
- Power output (max.): 2.1 W 8 ohms
- File formats supported: MP3 (CBR, VBR, ABR)
- Supported MP3 bit rates: 32-320 kbit/s
- Memory cards supported: FAT32 file system-formatted micro SD/micro SDHC memory card
- Protection rating: IP20
- Ambient temperature: 5 to 35°C
- Dimensions (W x H x D): 144 x 145 x 36 mm
- Weight (including batteries): 500 g
- Radio frequency band: 868.0-868.6 MHz 869,4-869,65 MHz
- Max. radio transmission power: 10 dBm
- Receiver category: SRD category 2
- Typical range in open space: 380 m
- Duty cycle: < 1 % per h/< 10 % per h
Subject to modifications
Kostenloser Download der Homematic IP App!
Free download of the Homematic IP app!

- eQ-3 AG
- Maiburger Straße 29 26789 Leer
- GERMANY
- www.eQ-3.de
Documents / Resources
 |
homematic IP HmIP-MP3P Combination Signalling Device [pdf] Instruction Manual HmIP-MP3P Combination Signalling Device, HmIP-MP3P, Combination Signalling Device, Signalling Device |
 |
homematic IP HmIP-MP3P Combination Signalling Device [pdf] Installation Guide HmIP-MP3P Combination Signalling Device, HmIP-MP3P, Combination Signalling Device, Signalling Device, Device |
 |
homematic IP HmIP-MP3P Combination Signalling Device [pdf] Installation Guide HmIP-MP3P Combination Signalling Device, HmIP-MP3P, Combination Signalling Device, Signalling Device, Device |


