Taw qhia
The Monster Mini M2 Electric Scooter is a high-quality, versatile personal mobility device designed for both adults and children. Featuring a robust aluminum alloy frame, powerful motor, and comfortable design, it offers an efficient and enjoyable riding experience. This manual provides essential information for the safe operation, maintenance, and troubleshooting of your scooter.
Cov ntaub ntawv kev nyab xeeb
Always prioritize safety when operating the scooter. Failure to follow safety guidelines can result in injury or damage to the product.
- Yuav tsum hnav lub kaus mom hlau thiab cov iav kev nyab xeeb tsim nyog (lub hauv caug, lub luj tshib, lub dab teg) thaum caij tsheb.
- Tsis txhob caij nyob rau hauv tej yam kev mob ntub dej, nag hnyav, los yog los ntawm cov av nkos.
- Xyuas kom tag nrho cov bolts thiab fasteners raug nruj ua ntej txhua lub caij.
- Tsis txhob tshaj qhov hnyav tshaj plaws ntawm 100 kg (220 lbs).
- Avoid riding on uneven surfaces, steep inclines, or slippery terrain.
- Be aware of your surroundings and other pedestrians or vehicles.
- Do not allow children to operate the scooter without adult supervision.
- Paub koj tus kheej nrog cov cai hauv zos thiab cov kev cai hais txog kev siv hluav taws xob scooter.
- Do not modify the scooter in any way.
Ntim Cov Ntsiab Lus
Xyuas kom tseeb tias txhua yam khoom muaj nyob hauv pob:
- Monster Mini M2 Electric Scooter
- Fast Charger (2A)
- Cov neeg siv phau ntawv
- Tools for assembly (if required, not explicitly mentioned but common)
Teeb tsa
Follow these steps to prepare your Monster Mini M2 Scooter for its first use:
- Unfolding the Scooter:
Carefully remove the scooter from its packaging. Locate the folding mechanism, usually near the base of the steering column. Release the latch and unfold the scooter until it locks securely into place. Ensure the locking mechanism is fully engaged before proceeding.

Image: The Monster Mini M2 Electric Scooter in its fully unfolded state, showing the main body, handlebars, and seat.
- Kho Handlebar Qhov siab:
The handlebar height is adjustable for rider comfort. Loosen the quick-release clamp on the steering column, extend or retract the handlebar to your desired height, and then securely tighten the clamp. Ensure the handlebar is firm and does not wobble.

Image: Ib qho kev sib ze view of the front wheel, suspension, and LED headlight of the Monster Mini M2 Electric Scooter. The handlebar stem is visible.
- Attaching/Adjusting the Seat:
The scooter comes with a comfortable leather seat that can be attached or removed. If attaching, insert the seat post into the designated slot and adjust its height for optimal comfort. Secure it with the quick-release lever. If you prefer to ride standing, the seat can be easily removed.

Duab: Ib qho ntxaws view of the comfortable leather seat and its adjustable post on the Monster Mini M2 Electric Scooter.
- Kev them nqi pib:
Before first use, fully charge the scooter's battery. Connect the charger to the charging port on the scooter and then plug it into a power outlet. The charger indicator light will typically change from red to green when fully charged. Refer to the "Charging the Battery" section for more details.
Cov lus qhia ua haujlwm
Lub hwj chim On / Off
Press and hold the power button on the digital display to turn the scooter on or off. The display will illuminate, showing speed, battery level, and other information.
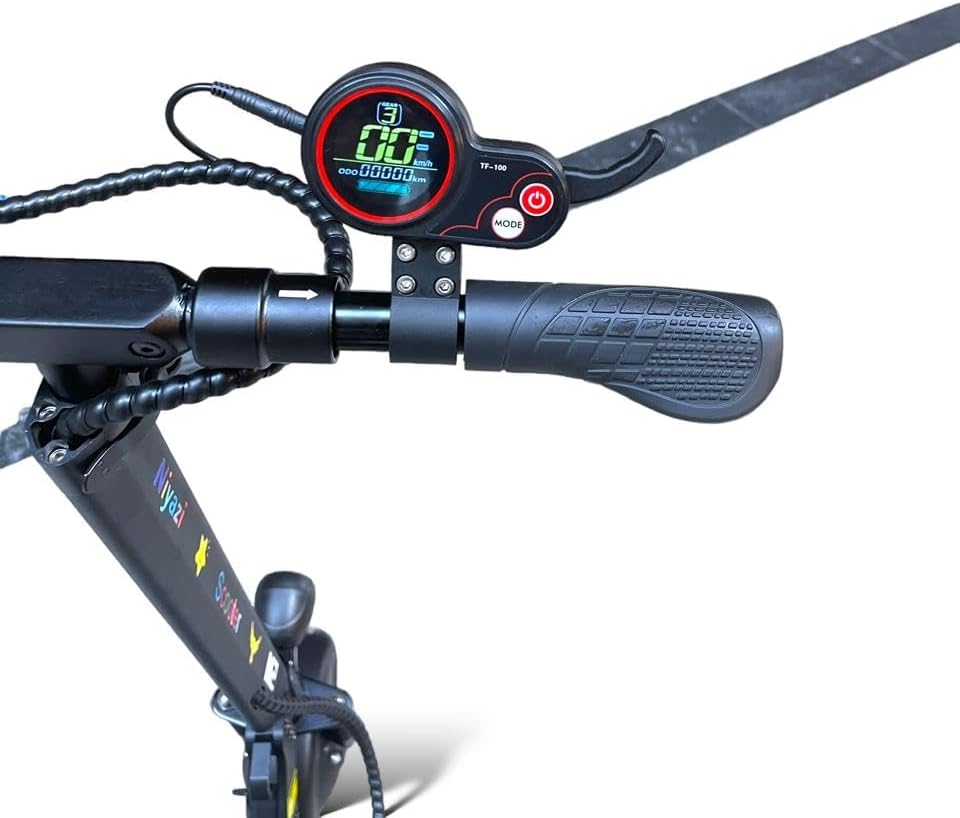
Image: A close-up of the digital display and handlebar controls, including the power button and mode button, on the Monster Mini M2 Electric Scooter.
Caij Scooter
- Pib: Place one foot on the deck and push off with the other foot to gain some initial momentum. Once moving, gently press the throttle to engage the motor.
- Hom Ceev: The scooter features three speed modes. Use the mode button on the display to cycle through them and select the appropriate speed for your riding conditions. The maximum speed is 40-45 KM/H.
- Braking: The scooter is equipped with front and rear disc brakes. Apply the brake levers gently and evenly to slow down or stop. The rear brake light will illuminate when braking.
- Tig: Lean into turns and use the handlebars to steer.
- Horn thiab Lights: Use the horn for signaling and the powerful front LED headlight for visibility, especially in low-light conditions. Side turn signals are also available.
Digital Display Functions
The digital display provides real-time information:
- Qhov taw qhia ceev: Qhia koj qhov ceev tam sim no.
- Roj teeb theem: Qhia cov roj teeb uas tseem tshuav.
- Lub Odometer/Lub Thawv Mus Ncig: Taug qab tag nrho qhov deb lossis qhov deb tam sim no.
- Speed Mode Indicator: Shows the currently selected speed mode.
Them lub roj teeb
To ensure optimal battery life and performance, follow these charging guidelines:
- Only use the provided 2A fast charger.
- Ensure the scooter is turned off before charging.
- Connect the charger to the scooter's charging port, then plug it into a standard wall outlet.
- The charger indicator light will typically be red during charging and turn green when the battery is fully charged.
- Do not overcharge the battery. Disconnect the charger once charging is complete.
- A single charge can cover a distance of up to 40 km (25 miles), depending on riding conditions and terrain.
Kev tu
Regular maintenance helps prolong the life of your scooter and ensures safe operation.
- Ntxuav: So lub scooter nrog adamp cloth after each use. Do not use high-pressure water or immerse the scooter in water.
- Log tsheb: The scooter uses 6.5-inch solid rubber tires, which do not require inflation. Periodically inspect them for wear and tear.
- Nres: Regularly check the front and rear disc brakes for proper function. Ensure the brake levers engage smoothly and the brakes provide adequate stopping power. Adjust if necessary, or consult a professional.
- Fasteners: Periodically check all screws, bolts, and quick-release mechanisms to ensure they are tight and secure.
- Cia: When not in use, store the scooter in a cool, dry place, away from direct sunlight and extreme temperatures. The foldable design allows for easy storage.
Kev daws teeb meem
Nov yog qee qhov teeb meem tshwm sim thiab lawv cov kev daws teeb meem:
| Teeb meem | Ua Tau | Kev daws |
|---|---|---|
| Scooter tsis qhib. | Low battery; loose connection; power button issue. | Charge the battery fully. Check all connections. Press and hold the power button firmly. |
| Motor not engaging. | Throttle not pressed correctly; low battery; motor fault. | Ensure you push off to gain initial speed before pressing the throttle. Check battery level. If issue persists, contact support. |
| Brakes are not effective. | Brake pads worn; cable loose; disc dirty. | Inspect brake pads and disc. Adjust brake cable tension. Clean disc. If unsure, seek professional assistance. |
| Reduced range/battery life. | Battery not fully charged; riding conditions (hills, heavy load); battery degradation. | Ensure full charge. Avoid continuous uphill riding or carrying excessive weight. Battery life naturally degrades over time. |
Specifications
| Feature | Paub meej |
|---|---|
| Qauv Lub Npe | Monster Mini M2 Original |
| Hom | General (Niyazi Manufacturer) |
| Xim | Dub |
| Lub cev muaj zog | 500 W |
| Roj teeb | 36 V 8 AW |
| Max Range per Charge | Mus txog 40 km (25 mais) |
| Max Ceev | 40 - 45 KM/H (25 - 28 MPH) |
| Nres Hom | Pem Hauv Ntej thiab Tsheb Disc Brakes |
| Ncej Khoom | Aluminium Alloy |
| Kev ncua | Front and Rear Shock Absorbers |
| Log tsheb | 6.5-inch Solid Rubber (Non-inflatable) |
| Zaub | Digital Display (Speed, Battery, etc.) |
| Teeb pom kev zoo | Powerful Front LED Headlight, Rear Brake Light, Side Turn Signals |
| Rooj | Adjustable Height Leather Seat (Removable) |
| Max Load Capacity | Mus txog 100 kg (220 lbs) |
| Khoom Dimensions (L x W x H) | 180 x 26 x 140 cm (70.9 x 10.2 x 55.1 nti) |
| Yam Nyhav | 38 kg (83.8 lbs) |
| Foldable | Yog, kom yooj yim cia |
Note: The maximum weight limit for rider capacity is 100 kg, while the item weight of the scooter itself is 38 kg.
Warranty thiab Support
For warranty information, technical support, or service inquiries, please contact the manufacturer or your point of purchase. Keep your purchase receipt as proof of purchase.
- Manufacturer: Niyazi
- For assistance, refer to the contact information provided with your product packaging or visit the official Niyazi webqhov chaw.


