1. महत्वपूर्ण सुरक्षा जानकारी
Please read all safety instructions carefully before using the Makeid E1 Label Printer. Failure to follow these instructions may result in product damage or personal injury.
- This label printer is designed to be used exclusively with official Makeid labels. Using labels from other brands may cause damage to the device and void the warranty.
- Avoid touching the print head with your fingers. If the print head becomes dirty, gently wipe it with a soft, lint-free cloth.
- Do not place foreign objects into the label slot or any other opening of the machine to prevent damage.
- Do not expose the label printer to direct sunlight, rain, high humidity, or excessive dust.
- Keep the device away from heat sources such as radiators, heaters, or the dashboard/tail of a car, and avoid environments with extremely high or low temperatures.
- The standard operating temperature range for this device is 5 °C to 35 °C (41 °F to 95 °F).
2. उत्पाद खत्मview
Familiarize yourself with the components of your Makeid E1 Label Printer.

चित्र 1: सामने view of the Makeid E1 Label Printer, showing the label output slot and control buttons.
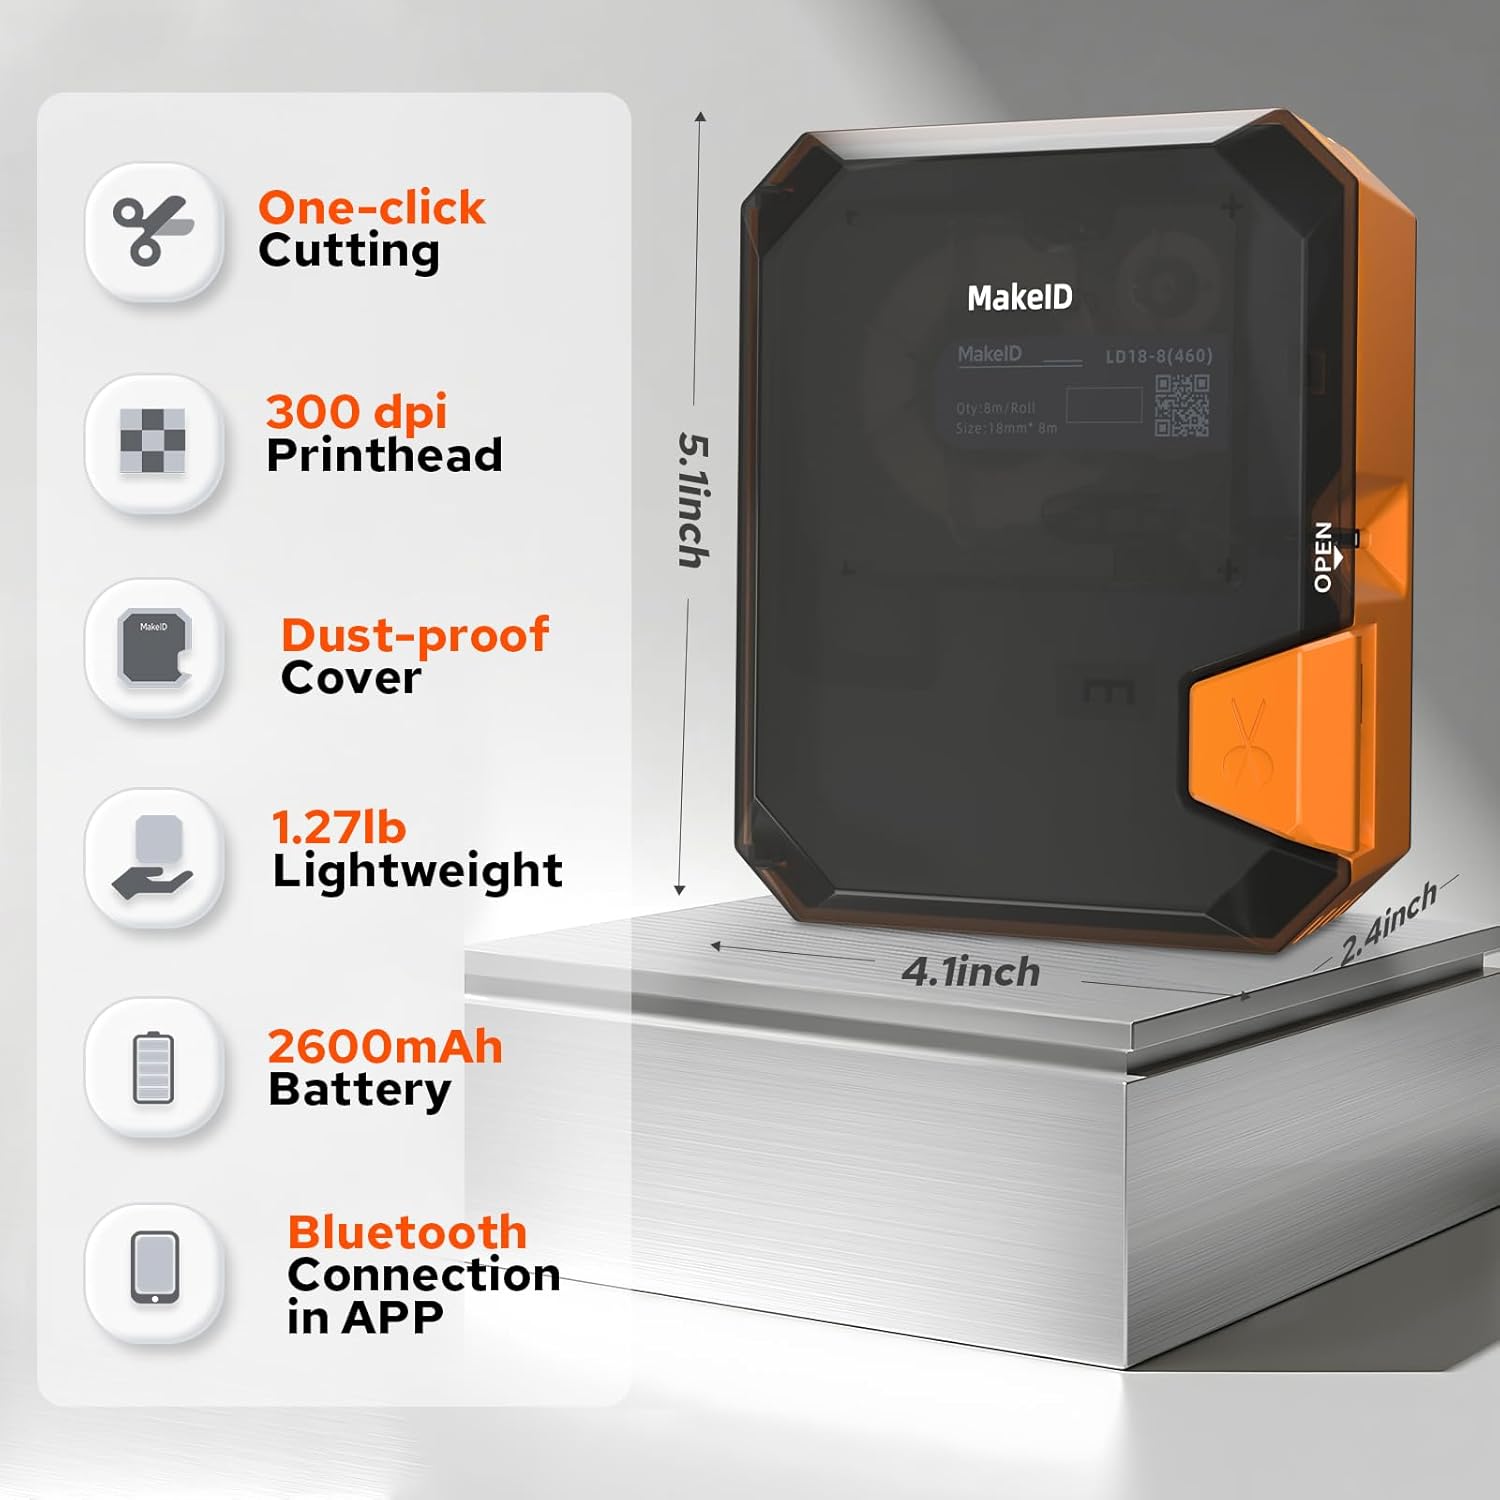
Image 2: Diagram illustrating key features and dimensions of the Makeid E1 Label Printer. Features include one-click cutting, 300 dpi printhead, dust-proof cover, lightweight design (1.27 lbs), 2600mAh battery, and Bluetooth connectivity via app. Dimensions are approximately 5.1 inches (height), 4.1 inches (width), and 2.4 inches (depth).
3. सेटअप
3.1 डिवाइस को चार्ज करना
The Makeid E1 Label Printer is equipped with a rechargeable Lithium-ion battery (1000 mAh). Before first use, fully charge the device using the provided USB cable.
- Connect the USB cable to the printer's charging port and to a standard USB power adapter (not included) or a computer's USB port.
- The charging indicator light will show the charging status. Refer to the device's display or indicator for full charge notification.
- A full charge cycle can last over 500 times, ensuring long-term use.
3.2 Loading Labels
Ensure you use official Makeid labels for optimal performance.
- Locate the label compartment on the printer.
- कम्पार्टमेंट कवर खोलें।
- Insert the label roll with the printing surface facing the correct direction, as indicated by a diagram inside the compartment.
- Pull a small portion of the label out past the print head.
- डिब्बे का ढक्कन सुरक्षित रूप से बंद करें।
The printer supports label widths of 9 mm, 12 mm, and 16 mm.
3.3 Connecting via Bluetooth (for App Use)
To utilize advanced features and design options, connect your printer to a smartphone via the Makeid app.
- Download the official Makeid app from your device's app store (compatible with Android and iOS).
- सुनिश्चित करें कि आपके स्मार्टफ़ोन पर ब्लूटूथ सक्षम है।
- Turn on the Makeid E1 printer.
- Open the Makeid app and follow the on-screen instructions to search for and pair with your printer.
4. संचालन निर्देश
The Makeid E1 offers two primary modes of operation: direct input via the QWERTY keyboard and advanced design via the mobile application.
4.1 Using the QWERTY Keyboard
The integrated QWERTY keyboard allows for quick and convenient label creation without a smartphone.
- डिवाइस को चालू करें.
- Use the QWERTY keys to type your desired text. The 3.4-inch LCD screen will display your input.
- Utilize the dedicated keys for various functions, including prototypes, squares, and clear instructions. The device features over 40 keys for ease of use.
- Access a variety of fonts and symbols directly from the keyboard interface.
- The printer supports up to 4 lines of text printing.
- Press the 'Print' button to print your label. The manual cutting blade allows for precise label separation.
4.2 मोबाइल एप्लिकेशन का उपयोग करना
The Makeid app provides extensive customization options and advanced printing features.

Image 3: Screenshot of the Makeid app interface, highlighting versatile templates, over 200 stickers, more than 40 fonts, and additional features like text, barcode, QR code, date, picture, sticker, shape, and scan options.
- After connecting the printer via Bluetooth (Section 3.3), open the Makeid app.
- पाठ इनपुट: Type your text directly into the app.
- Multi-line Printing: The app supports printing up to 4 lines of text.
- Special Content: Generate timestamps, QR codes, and barcodes with a single click.
- अनुकूलन: Access a rich library of materials, including 16 types of frames, 600 stickers and symbols, and over 54 templates.
- DIY & Images: Support for DIY designs and uploading images/icons to personalize your labels.
- Saving Templates: Store up to 9 customized label templates for future use.
- बैच मुद्रण: Print up to 9 copies of a label in a single batch.
- Once your design is complete, tap the 'Print' button in the app to send it to the printer.
5. रखरखाव
5.1 प्रिंट हेड की सफाई
Regular cleaning of the print head ensures optimal print quality and extends the life of your printer.
- Ensure the printer is turned off before cleaning.
- Gently open the label compartment to access the print head.
- Using a soft, lint-free cloth lightly dampened with isopropyl alcohol, carefully wipe the print head. Do not use abrasive materials or excessive force.
- Allow the print head to dry completely before closing the compartment and resuming use.
5.2 बैटरी केयर
बैटरी जीवन और प्रदर्शन को अधिकतम करने के लिए:
- बैटरी को बार-बार पूरी तरह डिस्चार्ज करने से बचें।
- Store the printer in a cool, dry place if not used for extended periods.
- Recharge the battery periodically if stored for a long time to prevent deep discharge.
6। समस्या निवारण
If you encounter issues with your Makeid E1 Label Printer, refer to the following common problems and solutions.
- शक्ति नही हैं: Ensure the device is charged. Connect it to a power source using the USB cable.
- खराब प्रिंट गुणवत्ता: Check if the print head is clean (refer to Section 5.1). Ensure you are using official Makeid labels. Verify the label roll is inserted correctly.
- ब्लूटूथ कनेक्शन समस्याएँ: Make sure Bluetooth is enabled on your smartphone and the printer is turned on. Restart both the printer and your smartphone, then try pairing again. Ensure the Makeid app is up to date.
- Label Jam: Turn off the printer, open the label compartment, and carefully remove any jammed labels. Ensure the label roll is properly seated and not creased.
- प्रिंटर प्रतिक्रिया नहीं दे रहा है: Try resetting the device by turning it off and on again. If the issue persists, contact customer support.
7. विनिर्देश
| विशेषता | विनिर्देश |
|---|---|
| ब्रांड | Makeid |
| मॉडल नाम | E1 |
| मॉडल संख्या | पी31एस |
| मुद्रण प्रौद्योगिकी | थर्मल |
| कनेक्टिविटी प्रौद्योगिकी | ब्लूटूथ, यूएसबी |
| संगत डिवाइस | स्मार्टफ़ोन (एंड्रॉइड, आईओएस) |
| अधिकतम प्रिंट रिज़ॉल्यूशन (ब्लैक एंड व्हाइट) | 203 डीपीआई |
| अधिकतम प्रिंट रिज़ॉल्यूशन (रंग) | 203 dpi (Monochrome output) |
| अधिकतम मोनोक्रोम प्रिंट गति | 24 (units unspecified, typical for label printers) |
| अधिकतम मीडिया आकार | 110 x 50 मिमी |
| Supported Label Widths | 9 मिमी, 12 मिमी, 16 मिमी |
| अधिकतम शीट क्षमता | 100 |
| डुप्लेक्स प्रिंटिंग | नहीं |
| Max Copies per Series | 9 |
| शक्ति | 1000 mAh (Lithium-ion battery) |
| उत्पाद आयाम | 10D x 20W x 8H cm (approx.) |
| विशेष लक्षण | Portable, QWERTY Keyboard, App Control |
| शामिल घटक | Labels (typically one roll) |
8. वारंटी और समर्थन
For warranty information and technical support, please refer to the documentation included with your purchase or visit the official Makeid webवारंटी दावों के लिए अपनी खरीद का प्रमाण संभाल कर रखें।
If you require further assistance or have questions not covered in this manual, please contact Makeid customer service.


