HBN U205R Sensing Countdown Timer Remote Control

SAFETY INFORMATION & SPECIFICATIONS
FOR USE OUTDOORS AND MUST BE PLUGGED INTOAGFCI (GROUND FAULT CIRCUIT INTERRUPTER).
This is a “GROUNDED” device. The male plug contains a ground pin and is only intended for use with a three-pronged grounded outlet.
This device is for use with a 125 VAC power source.

Electrical Ratings:
125VAC/60Hz 15A 1875W Resistive
10A 1250W Tungsten 1/2HP
Works with CFL, LED & Incandescent light sources

 WARNING
Risk of Electric Shock
- Keep children away
- Unplug timer before cleaning
- Fully insert plug
- Do not use near standing water
Risk of Fire
- Do not use to control appliances that contain heating elements (cooking appliances, heaters, irons, etc.)
- Do not exceed electrical ratings
Choking Hazard
- Small parts
- Not for children under 3 years old
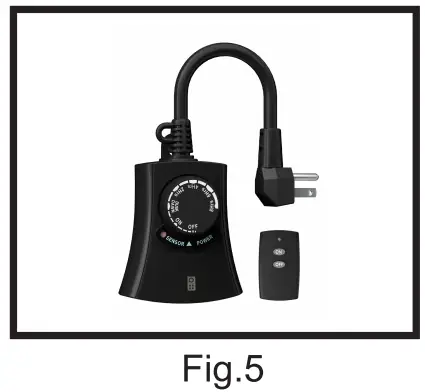
INSTALLATION INSTRUCTIONS
- Install the unit on a flat surface.
Using a screw or hook (not included), secure the mounting tab at the top of the timer to a wall or post.

Note: The unit should be Installed 211 above the ground. - Plug the unit into an electrical outlet.
Use an outdoor-rated, 3-pronged grounded electrical outlet. Do not use extension cords to connect the timer to the power source.

- Set the desired operating mode.
Rotate the dial either clockwise or counterclockwise to align the white arrow with the desired mode.

OPERATING MODES
OFF – Power is OFF to attached devices
ON – Power is ON to attached devices
Photocell Control – Power will tum on at dusk and remain on until dawn
2 Hrs – Power will tum on at dusk and remain on for 2 hours
4 Hrs – Power will tum on at dusk and remain on for 4 hours
6 Hrs – Power will tum on at dusk and remain on for 6 hours
8 Hrs – Power will tum on at dusk and remain on for 8 hours - Attach up to two devices to unit.
Plug the devices into the outlets on the bottom of the timer.

PAIRING
- Press and hold both ON and OFF buttons on the remote control handset.
- Plug the timer into an electrical outlet.
- Keep holding both buttons on the remote control handset.
- The power output indicator on the timer will flash for about 2 seconds and then go off.
- The pairing is now successful.
USING THE REMOTE CONTROL
You can temporarily turn on or off the device attached to the timer by pressing the ON or OFF button on the remote control handset.
a. When the dial is in OFF position.
Press ON to turn on the device; Press OFF to tum off the device.
b. When the dial is in ON position.
Press OFF to tum off the device; Press ON to tum on the device.
c. When the dial is in Photocell Control position.
Press ON to tum on the device. The device will tum off at dawn and turn on at dusk.
Press OFF to tum off the device. The device will turn on at dusk the next day.
d. When the dial is in 2H/4H/6H/8H.
- The program is running: press OFF to tum off the device.
The device will turn on at the next dusk. - The program is not running: press ON and the device will be on for 2/4/6/8 hours. The device will turn on at the next dusk.
HELPFUL TIPS
- This unit is weather-resistant and rated for outdoor use. This timer operates using a light-sensitive photocell that senses when the environment is getting dark (dusk) or light (dawn).
- Once programming activates at dusk in the 2hr, 4hr, 6hr or 8hr mode, the program cycle will complete before the timer resets.
- When set to ON, the unit will provide continual power to attached device until the timer is switched to OFF, or to any of the other operating modes.
- The POWER indicator will glow red when the timer programming is activated and power is being provided to attached device.
TROUBLESHOOTING
PROBLEM:
Devices do not tum on at dusk.
POSSIBLE CAUSE:
Timer is located in an area with too much ambient light for the photocell to sense darkness.
CORRECTIVE ACTION:
Move the timer to another location where there is no ambient light.
PROBLEM:
Lights are flashing (turning on and off).
POSSIBLE CAUSE:
Timer is in Dusk-to-Dawn mode and light from connected appliance is affecting the photocell.
CORRECTIVE ACTION:
Move the lights away from the timer, or reposition the timer so it does not face the lights directly.
PROBLEM:
Power indicator light is not on.
POSSIBLE CAUSE:
Timer is not fully plugged into the outlet. Circuit breaker connected to the outlet has tripped.
CORRECTIVE ACTION:
Make sure the timer is fully plugged into the outlet.
Check the circuit breaker connected to the outlet and reset it if needed.
PROBLEM:
The remote control is not working, or there is a delay in response to the timer.
POSSIBLE CAUSE:
The remote control batteries are dead or the remote control is not working.
CORRECTIVE ACTION:
Replace the remote control batteries or replace the remote control.
PROBLEM:
The timer is not turning off after 21416/8 HR mode
Please follow these instructions to troubleshoot the issue:
- Please plug the timer into the wall.
- Place a piece of BLACK electrical tape over the white photocell sensor on the front of the unit.
- Place the unit on a 2-hour function (Within 18 seconds of darkness your unit should activate).
- Come back to the timer in 2 hours and confirm if your appliance is off.
- If it is off, please place your timer in a dark location as ambient lighting (car lights, window lights, etc) may be affecting the sensor.
WARRANTY
30wDay Money Back Guarantee:
If you are not satisfied with your purchase, you can request a refund within 30 days.
12-Month Warranty:
The device must have been used under proper technical conditions.
Covers failures and defects not caused by human error.
Scan the QR code to activate your warranty and enjoy full customer support

CONTACT US
FOR ANY PROBLEMS DURING USE, PLEASE CONTACT US AT
support@bn-link.com
CENTURY PRODUCTS INC.
Customer Service Assistance: 1.909.592.1881
Email: support@bn-link.com
Web: www.bn-link.com
Hours: 9AM – 5PM PST, Mon – Fri
Designed in California, Made in China


Documents / Resources
 |
HBN U205R Sensing Countdown Timer Remote Control [pdf] Owner's Manual U205R Sensing Countdown Timer Remote Control, U205R, Sensing Countdown Timer Remote Control, Countdown Timer Remote Control, Timer Remote Control, Remote Control, Control |