GaryLine DIY Wheel Alignment Tool

Instruction For Use
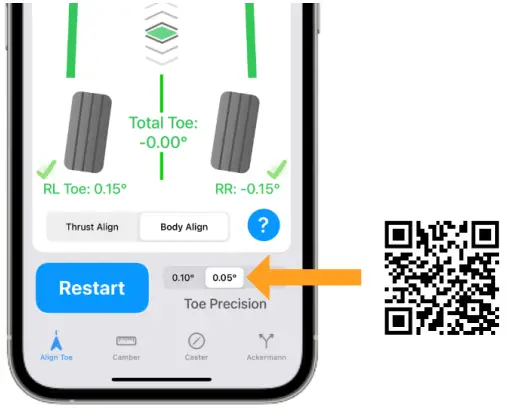
- Unlock 0.05° Accuracy Press the 0.05° and scan the QR Code included with your purchase.
- Use your Screw Knob to unscrew the tram bolt.
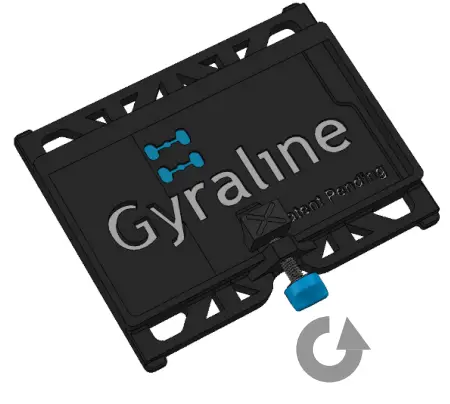
- Slide your device into the Gyraliner in the orientation shown.

- Screw in the Tram Bolt to lock in your phone.

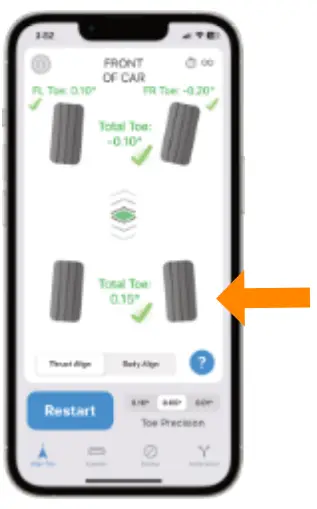
Thrust Alignment Guide
- Activate Thrust Alignment Mode

- Front Toe Reading
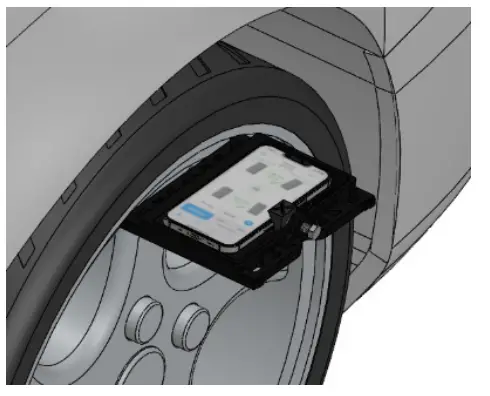
- Put your Gyraliner up against your wheel on the FRONT LEFT side of the car.
- Level the Gyraliner by riding along a lip on the wheel and using the indicator in the middle of the screen.
*keep the Gyraliner up against the lip of the wheel* - Once level press the FRONT LEFT wheel to take your first alignment measurement.

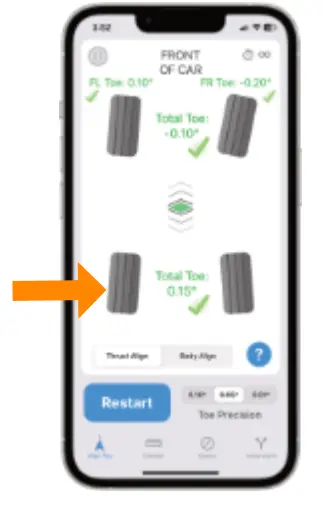
- Front Total Toe Reading
Repeat Step 2 for the FRONT RIGHT side to get your second measurement.
Repeat Step 2 for the FRONT LEFT side one last time to get your third measurement.
You now have your FRONT toe reading.
- Rear Total Toe Reading
Repeat Step 2 for the REAR LEFT side to get your first measurement.
Repeat Step 2 for the REAR RIGHT side to get your second measurement.
Repeat Step 2 for the REAR LEFT side one last time to get your third measurement.
You now have your REAR toe reading.
- Steering Offset Measurement
- After taking your FRONT AND REAR measurements you can now take a measurement from the REAR TO FRONT.
- Taking this measurement will display your steering offset angle.

Body Alignment Guide
- Activate Body Alignment Mode

- Choose a Body Reference Point
Choose a spot where you will take your body measurement calculation. We recommend using the lower back part of the front windows, the chassis, frame rails, or indents in the door jam. Any spot where the Gyraliner keys in best. Make sure its a spot you will remember, you will need to come back to this exact spot every time, and both sides of the vehicle need to have the same corresponding measurement spot. Think symmetry.

- First Body Measurement
- Put your Gyraliner up against your reference point on the LEFT side of the car.
- Tilt the Gyraliner level by using the indicator in the middle of the screen.
- Once level press the LEFT body reference bar to take your first body measurement.

- Take Your Second and Third Body Measurement
Repeat Step 3 for the RIGHT side to get your Second measurement.
Repeat Step 3 for the LEFT side to get your Third measurement.
Reminder: use the exact same spot on each side every time.

- Take a Wheel Measurement
- After taking your Body Reference point you can now move to the wheel on that SAME SIDE to get your measurement.
- To get a measurement on the opposite side you must update the reference point on that side.
- Make sure to get your rear wheel readings as well!

Once you take a body measurement you can take a wheel measurement for that same side.
The body reference bar will blink red after a while, this means you will have to update the body reference, one measurement is enough to update.

Camber Alignment Guide
Reminder: to use Camber Mode you must be on a flat surface to get the most accurate reading.
- Activate Camber Alignment Mode

- Choose a Wheel to Take a Measurement From
- Choose any wheel you would like to take a camber measurement. As an example, lets start with the LEFT SIDE.
- Your phone will switch to landscape mode and highlight the wheel you are taking a measurement on.

- Positioning the Phone and Taking Your Measurement
- Put your Gyraliner up against a flat machined spot on the rim of the wheel.
- Tilt the Gyraliner level by using the bar in the middle of the screen, making sure to keep the Gyraliner flat on the wheel.
- Once level you can move the slider from SPEED to ACCURACY to slow down the camber measurement movement.
- You can now take your camber measurement by pressing the SAVE button.

- Get Your Cross Camber Measurement
Repeat Step 3 for the RIGHT side to get your Cross Camber measurement.
Continue checking camber on all wheels until you have your front and rear cross camber measurement.

Caster Mode Alignment Guide
- Activate Caster Alignment Mode

- Choose a Wheel and Take Your First Toe Measurement
- Choose any wheel you would like to take a caster measurement on. As an example, let’s start with the LEFT SIDE.
- Garyline will direct you to steer straight. Use the horizontal bar to level the Gyraliner by riding along the lip of the wheel.
- Once level you can now take your toe measurement by pressing SET TOE.


- Take Camber Measurement
- While the steering is still straight, put your Gyraliner up against a flat machined spot on the rim of the wheel.
- Tilt the Gyraliner level by using the bar in the middle of the screen, making sure to keep the back of the Gyraliner flat against the wheel.
- Once level you can now take your camber measurement by pressing SET CAMBER.

- Take Your Steer Left Measurements
Gently set your Gyraliner on the ground facing forward and turn your wheel to the LEFT.
Repeat Step 2 with the wheel turned LEFT.
Repeat Step 3 with the wheel turned LEFT.

- Take Your Steer Right Measurements
Hint: Don’t turn or spin the Gyraliner too much or you will be prompted to start over
Gently set your Gyraliner on the ground facing
forward and turn your wheel to the RIGHT.
Repeat Step 2 with the wheel turned RIGHT.
Repeat Step 3 with the wheel turned LEFT.

Ackermann Guide
- Activate Ackermann Mode

- First Toe Measurement
- Steer your wheels straight and take a toe measurement on the FRONT LEFT wheel.
- Press Get Angle 1 to get your first measurement.

- Second Toe Measurement
- Steer your wheels to the RIGHT and take a toe measurement on the FRONT LEFT wheel.
- Press Get Angle 2 to get your second measurement.

- Final Toe Measurement
- Keep your wheels to the RIGHT and take a toe measurement on the FRONT RIGHT wheel.
- Press Get Angle 3 to get your third measurement.
- Your Ackermann specs will pop up after final measurement is taken.


Five Fast Tips For All Gyraline modes
- “Quick and Smooth”
Reduce how much the Gyraline is moved in between measurements., i.e. keep the Gyraline oriented in the same direction when walking around the vehicle and do not delay in taking subsequent measurements. - “Securely Situated”
Make sure the prongs of the Gyraliner are properly placed on the surface being measured. Sometimes lips and spokes of wheels can be deceiving. - “Same Spot”
Take extra care to make the Gyraliner is measuring the same exact spot every time you measure that location. - “Symmetrical Spots”
Measurements on each side of the vehicle (such as for Toe Body Align) should have the same corresponding measurement point on the other side of the vehicle. Think of “symmetry.” - “When in doubt, restart”
When in doubt, start over. If you drop the Gyraliner in between measurements, or are not sure you got a good reading, reset the measurement and start again. It only takes a minute or so!
Customer Support
Need help? Contact us
sales@gyraline.com
https://gyraline.com/pages/contact
Gyraline, including any Applications, website and Components are protected by numerous intellectual property protections including, but not limited to patents, copyrights, trademarks, and trade secrets in numerous jurisdictions, including the United States of America. Users may not modify, distribute, reproduce, or sell any part of the Application, its content, or related components without prior written consent from the Company.
Gyraline is protected under one or more pending U.S. Patents
Documents / Resources
 |
GyraLine DIY Wheel Alignment Tool [pdf] User Manual DIY Wheel Alignment Tool, DIY, Wheel Alignment Tool, Alignment Tool |


