Introdución
This manual provides essential instructions for the safe and effective operation, setup, and maintenance of your ZHDBD 8898 2-in-1 Soldering and Rework Station. This device integrates a hot air gun and a soldering iron, designed for precision electronic repair and soldering tasks.
Lea este manual detidamente antes de usar o produto e gárdeo para futuras consultas.
Precaucións de seguridade
- Always operate the station in a well-ventilated area to avoid inhaling fumes.
- Wear appropriate personal protective equipment, including safety glasses and heat-resistant gloves.
- The soldering iron tip and hot air nozzle reach very high temperatures. Avoid direct contact.
- Asegúrate de que o cable de alimentación estea intacto e debidamente conectado á terra.
- Do not use the station near flammable materials or gases.
- Unplug the unit from the power outlet when not in use or before cleaning/maintenance.
- Manter fóra do alcance dos nenos.
Compoñentes do produto
The ZHDBD 8898 Soldering and Rework Station typically includes the following components:
- Main Control Unit with Digital Displays
- Pistola de aire quente
- Soldador
- Soporte de Soldador
- Hot Air Nozzles (various sizes)
- Cable de alimentación
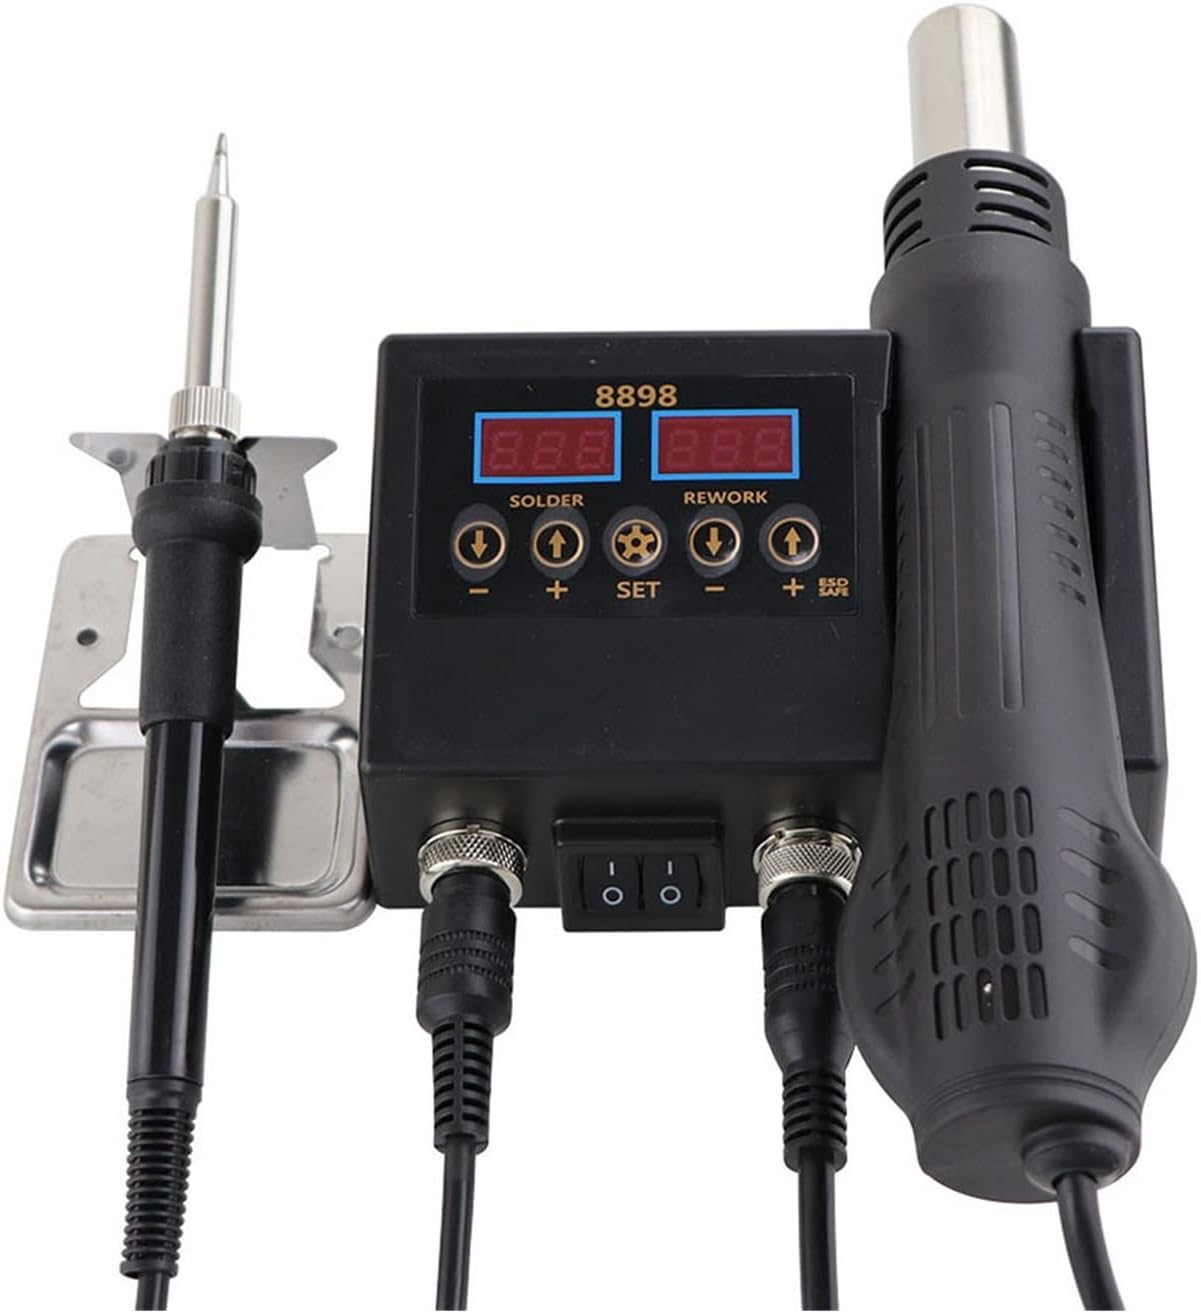
Image: The ZHDBD 8898 Soldering and Rework Station, showing the main control unit, soldering iron, and hot air gun connected. The digital displays for solder and rework temperatures are visible.

Image: The ZHDBD 8898 Soldering and Rework Station, including the main unit, soldering iron, hot air gun, and a set of three different sized hot air nozzles.
Instrucións de configuración
- Desembalaxe: Retire con coidado todos os compoñentes da embalaxe. Inspeccione se hai algún dano.
- Colocación: Place the main control unit on a stable, heat-resistant, and non-flammable surface. Ensure adequate clearance for ventilation.
- Conectar o soldador: Plug the soldering iron cable into the designated "SOLDER" port on the main unit. Place the soldering iron securely in its stand.
- Conectar a pistola de aire quente: Plug the hot air gun cable into the designated "REWORK" port on the main unit. Ensure the hot air gun is placed in its holder on the side of the unit.
- Attach Nozzle (Hot Air Gun): Select the appropriate hot air nozzle for your task and securely attach it to the hot air gun.
- Conexión de alimentación: Conecte o cable de alimentación á unidade principal e logo conécteo a unha toma de corrente con conexión a terra.
Instrucións de funcionamento
Operación Xeral
- Encendido: Flip the main power switch on the front of the unit to the "ON" position. The digital displays will illuminate.
- Axuste de temperatura:
- Para o Soldador: Use the "SOLDER" temperature adjustment buttons (+ e -) to set the desired temperature. The recommended temperature range is 180°C-500°C.
- Para o Pistola de aire quente: Use the "REWORK" temperature adjustment buttons (+ e -) to set the desired temperature. The recommended temperature range is 100°C-480°C.
- Air Flow Adjustment (Hot Air Gun): Use the "REWORK" air flow adjustment button (often labeled with a fan icon or "AIR") to control the air volume.
- Automatic Standby (Hot Air Gun): The hot air gun features a sensor switch in its handle. When the handle is placed in its holder, the system will automatically enter standby mode, cooling down the element and prolonging its life. When the handle is picked up, it will quickly return to the set operating temperature.
- Apagado: When finished, flip the main power switch to the "OFF" position. Allow the hot air gun to cool down completely in its holder before unplugging.
Soldering Iron Usage
- Preparación: Ensure the electronic components to be soldered are clean.
- Pre-tinning: Once the iron reaches the desired temperature (recommended 300-400°C), apply a small amount of solder to the heated iron tip. This prevents oxidation and helps transfer heat efficiently. Rub the tip to evenly spread the solder.
- Soldadura: Bring the heated, tinned iron tip into contact with both the component lead and the PCB pad simultaneously. Apply solder to the joint, not directly to the iron tip. Allow the solder to flow smoothly and form a shiny, conical joint. Remove the iron and allow the joint to cool without disturbance.
Hot Air Gun Usage (Rework)
- Eliminación de compoñentes: Select an appropriate nozzle. Set the desired temperature and airflow. Direct the hot air stream evenly over the component to be removed. Once the solder melts, carefully lift the component using tweezers.
- Instalación de compoñentes: Apply solder paste to the pads on the PCB. Carefully place the SMD component onto the solder paste. Direct the hot air stream evenly over the component and pads until the solder paste melts and reflows, forming solid connections.
- Enfriamento: After use, place the hot air gun back into its holder. The unit will automatically initiate a cooling cycle to protect the heating element.
Mantemento
- Soldering Iron Tip Cleaning: Regularly clean the soldering iron tip using a damp sponge or brass wool to remove excess solder and oxidation. Re-tin the tip after cleaning.
- Substitución da punta: Replace worn or damaged soldering iron tips to ensure optimal heat transfer and soldering performance.
- Limpeza da boquilla de aire quente: Ensure hot air nozzles are free from debris or blockages. Clean gently if necessary.
- Limpeza da unidade: Disconnect power before cleaning. Wipe the main unit with a soft, dry cloth. Do not use abrasive cleaners or solvents.
- Almacenamento: Garde a unidade nun ambiente seco e libre de po cando non a estea a usar.
Resolución de problemas
| Problema | Causa posible | Solución |
|---|---|---|
| O soldador non quenta. | Power switch off, loose connection, faulty heating element. | Check power switch. Ensure iron is securely plugged in. If problem persists, contact support. |
| Hot air gun not producing hot air. | Hot air gun not picked up from holder, loose connection, faulty heating element/fan. | Ensure hot air gun is picked up from its holder. Check connection. If problem persists, contact support. |
| Solder not melting properly. | Insufficient temperature, oxidized iron tip, incorrect solder. | Increase temperature. Clean and re-tin the iron tip. Use appropriate solder for electronics. |
| A unidade amosa un código de erro. | Fallo interno. | Refer to specific error code documentation (if available) or contact customer support. |
Especificacións técnicas
| Característica | Especificación |
|---|---|
| Modelo | 8898 |
| Vol. De entradatage | Not specified (typically 110V/220V AC, 50/60Hz) |
| Potencia de saída total | 750 W |
| Pistola de aire quente | |
| Potencia de saída | 500 W |
| Frecuencia | 50Hz/60Hz |
| Rango de temperatura | 100 °C - 480 °C |
| Estabilidade da temperatura | ± 2 °C |
| Fluxo de aire | 120 L/min (max) |
| Soldador | |
| Potencia de saída | 60 W |
| Frecuencia | 50Hz/60Hz |
| Rango de temperatura | 180 °C - 500 °C |
| Estabilidade da temperatura | ± 1 °C |
| Material do quentador | Cerámicas |
| Deseño | Seguro ESD |
Garantía e Soporte
For warranty information or technical support, please refer to the documentation provided with your purchase or contact the manufacturer directly. Keep your purchase receipt as proof of purchase.
Manufacturer: ZHDBD