1. Introduction
Thank you for choosing the Karinear 36L XXL Air Fryer Mini Oven. This appliance is designed to offer versatile cooking options, combining the functionalities of an air fryer, toaster, rotisserie, and oven in one compact unit. Please read this manual thoroughly before first use to ensure safe operation and optimal performance. Keep this manual for future reference.
2. Consignes de sécurité importantes
Lors de l'utilisation d'appareils électriques, des précautions de sécurité de base doivent toujours être respectées, notamment les suivantes :
- Lisez toutes les instructions avant d'utiliser l'appareil.
- Ne touchez pas les surfaces chaudes. Utilisez les poignées ou les boutons.
- Pour éviter tout risque d'électrocution, ne plongez pas le cordon, les fiches ou l'unité principale dans l'eau ou tout autre liquide.
- Une surveillance étroite est nécessaire lorsqu’un appareil est utilisé par ou à proximité d’enfants.
- Débranchez l'appareil de la prise lorsqu'il n'est pas utilisé et avant de le nettoyer. Laissez-le refroidir avant d'ajouter ou de retirer des pièces.
- N’utilisez pas d’appareil dont le cordon ou la fiche est endommagé, ou après un dysfonctionnement de l’appareil ou après qu’il a été endommagé de quelque manière que ce soit.
- L’utilisation d’accessoires non recommandés par le fabricant de l’appareil peut provoquer des blessures.
- Ne pas utiliser à l'extérieur.
- Ne laissez pas le cordon pendre du bord de la table ou du comptoir, ni toucher des surfaces chaudes.
- Ne pas placer sur ou à proximité d'un brûleur à gaz ou électrique chaud, ni dans un four chaud.
- Une extrême prudence doit être exercée lors du déplacement d’un appareil contenant de l’huile chaude ou d’autres liquides chauds.
- Branchez toujours d'abord la fiche à l'appareil, puis branchez le cordon à la prise murale. Pour débrancher, mettez la commande sur « arrêt », puis retirez la fiche de la prise murale.
- N'utilisez pas l'appareil à d'autres fins que celles prévues.
- Assurez une ventilation adéquate autour de l'appareil pendant son fonctionnement.
- The exterior surfaces of the appliance can become hot during use. Avoid direct contact.
3. Produit terminéview
3.1 unité principale

Figure 1 : Face avant view of the Karinear 36L XXL Air Fryer Mini Oven, showcasing its compact design and interior cooking space with food.
The Karinear 36L XXL Air Fryer Mini Oven is a versatile kitchen appliance designed for various cooking methods. It features a spacious interior, a transparent door for monitoring cooking progress, and intuitive rotary knob controls on the front panel.
3.2 Panneau de contrôle

Figure 2 : Détaillé view of the control panel, featuring three rotary knobs for temperature, function selection, and timer settings. A quick reference cooking guide is also visible.
The appliance is controlled via three rotary knobs:
- Bouton de température: Adjusts the cooking temperature (e.g., 100°C to 230°C).
- Bouton de fonction : Selects the desired cooking mode (e.g., Air Fry, Bake, Toast, Rotisserie).
- Bouton de minuterie : Sets the cooking duration (e.g., 0 to 60 minutes).
3.3 Accessoires inclus
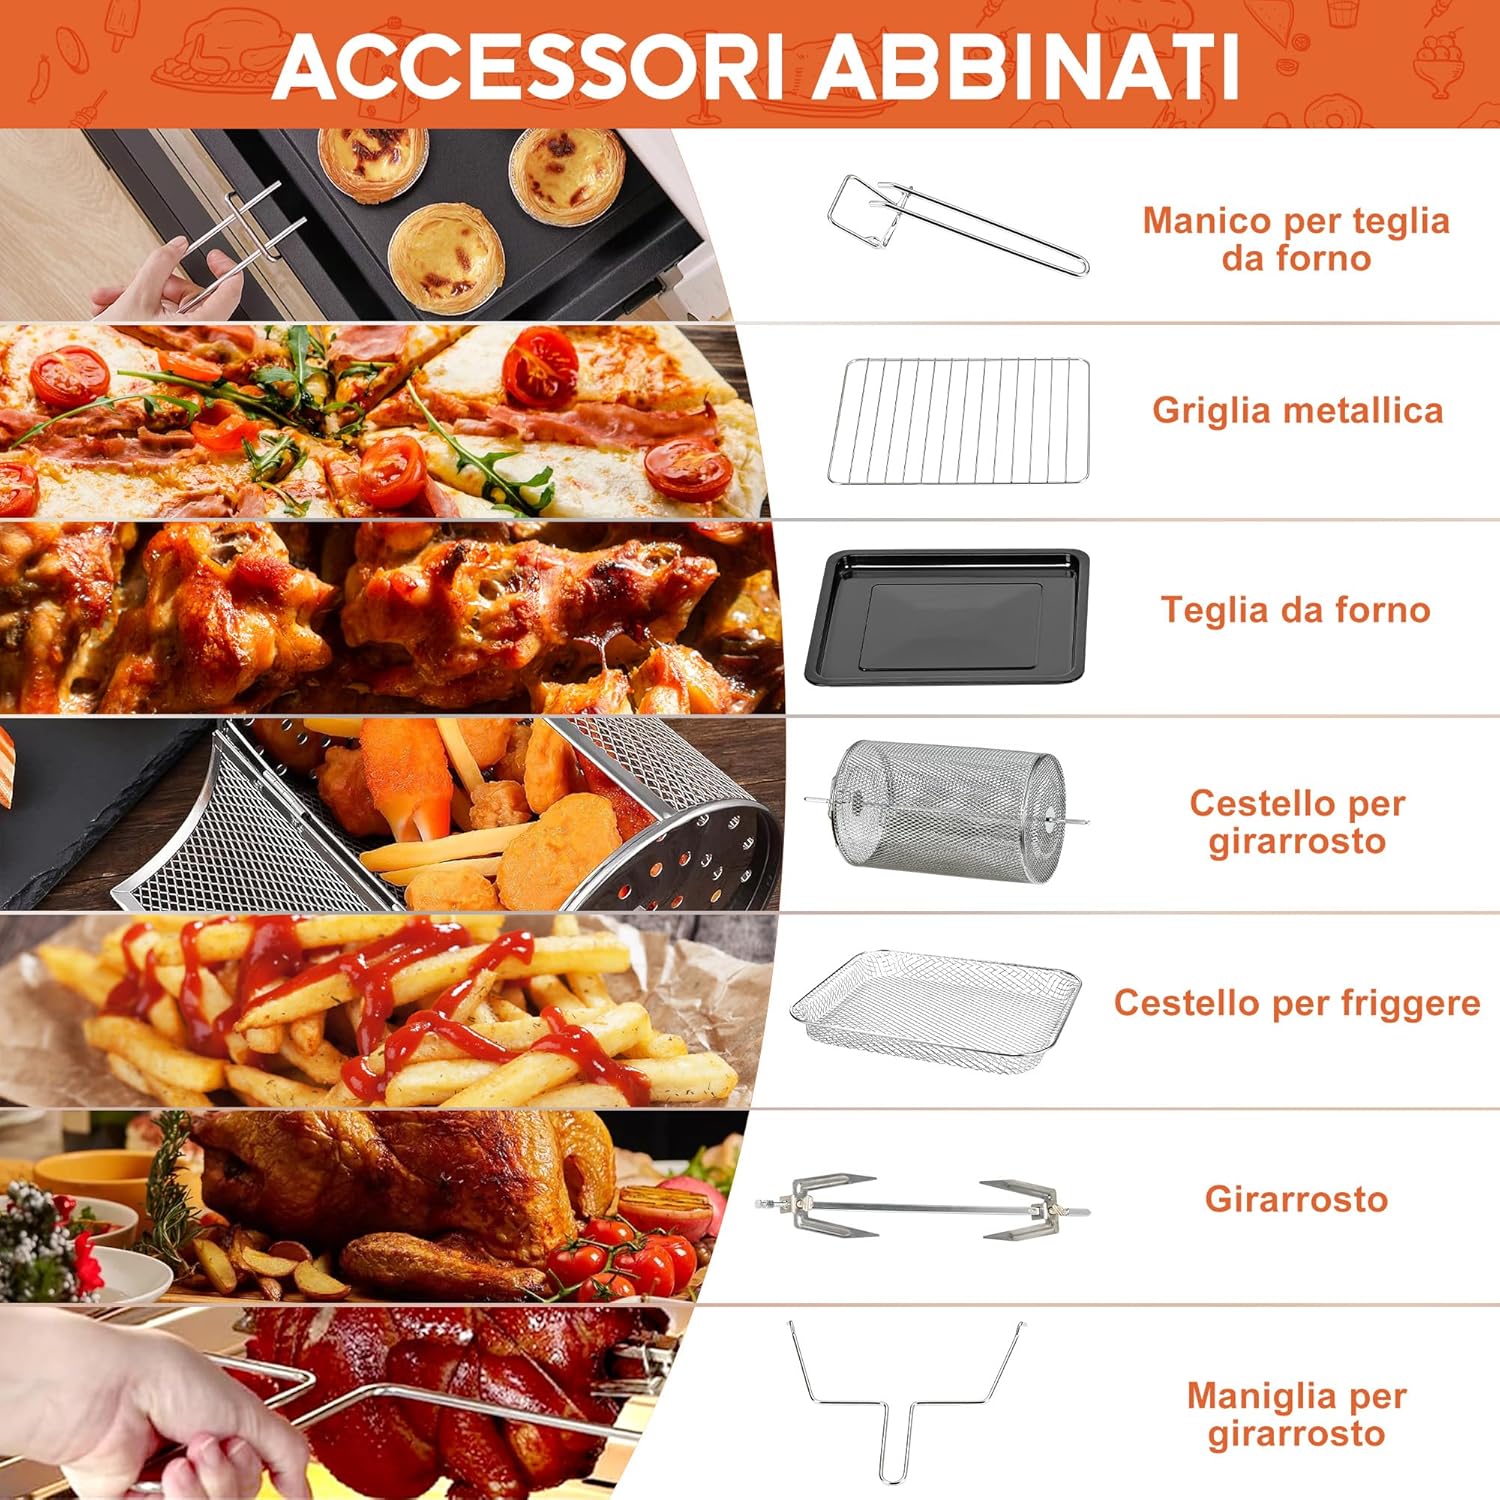
Figure 3: A visual guide to the various accessories provided with the oven, including a handle for the baking tray, metal grill, baking pan, rotisserie basket, air fry basket, rotisserie spit, and rotisserie handle.
The following accessories are typically included with your Karinear Air Fryer Mini Oven:
- Grille de four
- Moule à pâtisserie
- Panier à friture à air
- Broche de rôtisserie
- Poignée de rôtissoire
- Baking Pan Handle
4. Installation
4.1 Déballage et nettoyage initial
- Retirez soigneusement l'appareil et tous ses accessoires de leur emballage.
- Wash all removable parts (oven rack, baking pan, baskets, rotisserie accessories) with warm, soapy water. Rinse thoroughly and dry completely.
- Essuyez l'intérieur et l'extérieur de l'unité principale avec le produit.amp tissu. Ne plongez pas l’unité principale dans l’eau.
4.2 Préparation à la première utilisation
- Place the oven on a stable, heat-resistant surface with adequate clearance from walls and other appliances for proper ventilation.
- Branchez l'appareil sur une prise électrique mise à la terre.
- Before cooking food, operate the oven empty for 15-20 minutes at 230°C. This helps to burn off any manufacturing residues and eliminate initial odors. Some smoke and odor are normal during this process. Ensure the area is well-ventilated.
- Allow the appliance to cool down completely after this initial run.
5. Mode d'emploi
5.1 Understanding the 6-in-1 Functions
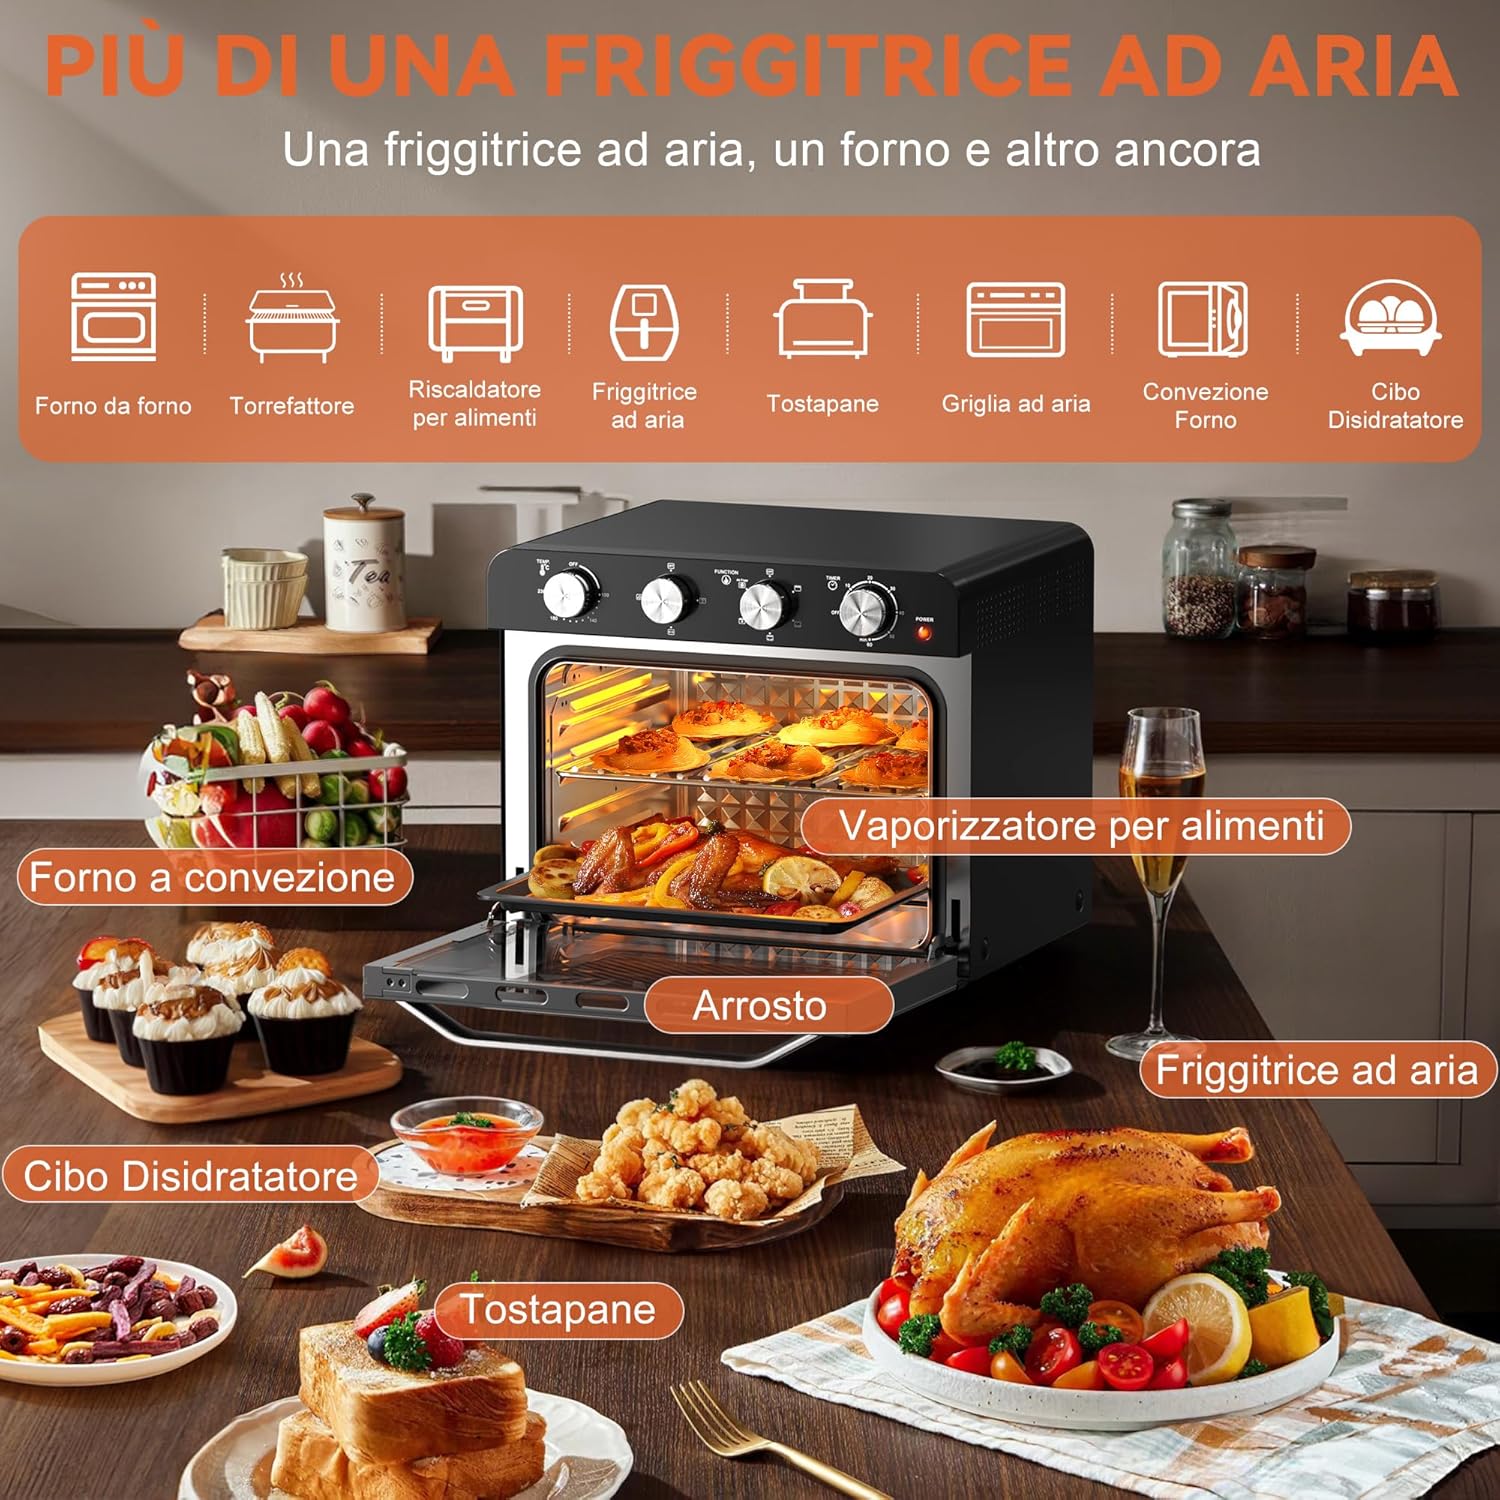
Figure 4: Visual representation of the multi-functional capabilities, including oven, food warmer, air fryer, toaster, air grill, convection oven, and food dehydrator.
Your Karinear Air Fryer Mini Oven offers six primary cooking functions:
- Frire à l'air : Utilizes 360-degree hot air circulation for crispy results with less oil. Ideal for fries, chicken wings, and other fried foods.
- Griller: Parfait pour le pain, les bagels et les pâtisseries.
- Cuisson au four : Pour la cuisson traditionnelle de gâteaux, biscuits et gratins.
- Rôtissoire: Allows for even roasting of whole chickens or larger cuts of meat using the rotisserie spit.
- Déshydrater: Low-temperature cooking for drying fruits, vegetables, and making jerky.
- Rester au chaud : Maintient les aliments à la température de service sans les faire trop cuire.
5.2 Étapes générales de fonctionnement
- Préparer la nourriture: Place your food on the appropriate accessory (oven rack, baking pan, air fry basket, or rotisserie spit).
- Insérer l'accessoire : Glissez délicatement l'accessoire contenant les aliments dans le four.
- Sélectionnez la fonction : Tournez le Bouton de fonction au mode de cuisson souhaité.
- Température réglée : Tournez le Bouton de température to the required temperature (up to 230°C).
- Régler la minuterie: Tournez le Bouton de minuterie Réglez la durée de cuisson souhaitée (jusqu'à 60 minutes). Le four commencera à chauffer.
- Surveiller la cuisson : The interior light allows you to monitor food without opening the door.
- Achèvement: The oven will automatically turn off and chime when the timer expires. Carefully remove food using oven mitts and the appropriate accessory handle.
Note on Preheating: This oven features rapid preheating, heating up to 75% faster than traditional ovens and cooking up to 30% faster. For best results, allow a few minutes for the oven to reach the set temperature before placing food inside, especially for baking or roasting.
5.3 Technologie de la vapeur
The integrated steam technology helps to lock in moisture, ensuring dishes are both crispy on the outside and juicy on the inside. This feature is particularly beneficial for roasting meats and gently cooking vegetables, enhancing flavor and texture.
6. Entretien et nettoyage
Un nettoyage régulier garantit la longévité et le fonctionnement optimal de votre appareil.
- Débranchez toujours Débranchez le four et laissez-le refroidir complètement avant de le nettoyer.
- Pièces amovibles : Wash the oven rack, baking pan, air fry basket, rotisserie spit, and other removable accessories with warm, soapy water. Rinse thoroughly and dry completely. These parts are Ne convient pas au lave-vaisselle.
- Intérieur: Essuyez les surfaces intérieures avec de la publicitéamp cloth and mild detergent. For stubborn food residues, a non-abrasive sponge can be used. Ensure the interior is dry before next use. The non-stick surfaces facilitate easier cleaning.
- Extérieur: Essuyez l'extérieur avec de la publicitéamp Utilisez un chiffon. N’utilisez pas de nettoyants abrasifs ni de tampons à récurer, car ils pourraient endommager la finition.
- Éléments chauffants : Do not attempt to clean the heating elements directly. Any food splatters on them will typically burn off during operation.
Important: Ne jamais immerger l'unité principale, le cordon d'alimentation ou la prise dans l'eau ou tout autre liquide.
7. Dépannage
| Problème | Cause possible | Solution |
|---|---|---|
| L'appareil ne s'allume pas. | Non branché ; prise électrique défectueuse ; minuterie non réglée. | Assurez-vous que le cordon d'alimentation est bien branché dans une prise fonctionnelle. Vérifiez que le minuteur est réglé sur la durée de cuisson souhaitée. |
| Food is not cooking evenly or taking too long. | Incorrect temperature/time settings; overcrowding the oven; heating elements not fully glowing. |
|
| Fumée ou odeur inhabituelle pendant le fonctionnement. | Résidus alimentaires sur les éléments chauffants ; combustion initiale ; aliments gras. |
|
| Interior rusting. | Improper cleaning or drying; exposure to moisture. | Ensure the interior is thoroughly dried after each cleaning. Avoid leaving moisture inside the oven for extended periods. Contact customer support if the issue persists despite proper maintenance. |
8. Spécifications
| Fonctionnalité | Détail |
|---|---|
| Marque | Karinéar |
| Numéro de modèle | KNI-GR36BRAL-K |
| Capacité | 33 Liters (approx. 36L XXL designation) |
| Pouvoir | 1800 watts |
| Voltage | 220 Volts (AC 220-240V, 50/60Hz) |
| Dimensions du produit (L x l x H) | 48.6 x 42.9 x 42.3 cm |
| Poids de l'article | 15.6 kilogrammes |
| Revêtement antiadhésif | Oui |
| Arrêt automatique | No (Timer function acts as shut-off) |
| Pièces lavables au lave-vaisselle | Non |
9. Garantie et assistance
For warranty information and customer support, please refer to the documentation provided at the time of purchase or contact Karinear customer service directly. Keep your proof of purchase for any warranty claims.


