
FiiO M15 Portable High Resolution Digital Audio Player User Manual

All the below illustrating pictures are for reference only
Foreword:
Thank you so much for purchasing FiiO’s portable high resolution lossless music player M15. We have prepared this complete user manual for you. We hope this manual will help you get to know the M15 and unleash its full potential.
Chapter 1 Introductions
Buttons and ports


Pictorial guide to status bar

Chapter 2 Working Modes
The M15 supports 4 working modes, consisting of Android Mode, Pure Music Mode, USB DAC
Mode and Bluetooth Receiving Mode. The default mode is Android Mode. Click Mode Choice in the drop-down list or go to the Settings menu can switch to other modes.
Android Mode
When it is working as Android Mode, third-party apps are all available. Click Mode Choice in the drop-down list or go to the Settings menu can switch to other modes.
Pure Music Mode
When it is working as Pure Music mode, third-party apps would be automatically turned off and FiiO Music would be turned on. Click Mode Choice in the drop-down list or go to the Settings menu can switch to other modes.
USB DAC Mode
When it is working as USB DAC mode, it can be connected with a computer as a DAC/Amp. You can switch to other modes in the Settings menu.
Notice: when the USB DAC mode is switched for the first time, the exclusive FiiO USB/DAC driver needs to be installed. You can go to FiiO Driver or fiio.com to download the corresponding driver, following the instruction to install it.
Bluetooth Receiving Mode
When it is working as Bluetooth Receiving Mode, it can be connected with Bluetooth transmitters like mobile phones. You can switch to other modes in the Settings menu.
Notice: the operation guide in Bluetooth Receiving Mode is as follows.

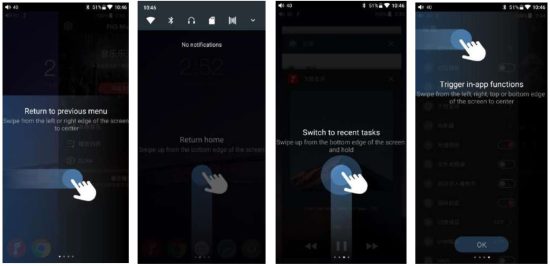
Chapter 3 Commonly-used Functions Gesture control
There are two operation modes:“Gesture operation” and “Bottom navigation bar”. When the M15 is first powered on, there will be a choice for you. In the General-> Navigation control menu, you can choose the operation way according to your habits.
Notice: here are the instructions for Gesture operation.
Connect M15 to the computer
When the M15 is first connected to a computer working as the storage mode, a corresponding driver is required. After connecting the M15 to the computer, you can choose the corresponding driver on FiiO Driver according to the computer system: Windows/MAC, following the instructions to install it and then the storage function can be used.
Firmware upgrade
Online upgrade
Every time the M15 is connected to WiFi, the firmware upgrade information will be detected automatically. Then a notification would show up in the status bar: New firmware detected, kindly go to Technical Support for upgrade. By clicking the notification you can enter into relating menu. Besides, you can go to Technical Support->Firmware Upgrade->Online Upgrade to see if there is a new version.
Local upgrade
For local upgrade, the following steps need to be followed.
1) Download the firmware from FiiO official website, such as “M15-ota-1.0.2.zip”, and copy this firmware file to micro SD card or Built-in storage. Note that the file should not be unzipped, and it is recommended not to modify the file name.
2) Press “Technical Support ->Firmware Update-> Local Upgrade” accordingly. Locate the firmware file in the “Local upgrade” interface, pressing it for upgrade.


3) After pressing the firmware file, any operation is not permitted. Wait for a while and then the M15 will start the firmware upgrade automatically.
4) Upon completion of firmware upgrade, the M15 will restart itself automatically. It can be used as usual after restarting.
Notice:
- Please ensure the battery power is sufficient before upgrading (at least up to 30%);
- If it fails, please check if the correct upgrade firmware is used;
- Do not manipulate the M15 during upgrade.
Screenshot
Swipe down the screen with three fingers to get a screenshot. Also, hold the Power and Previous track button together can also get a screenshot.
Languages & input
The first time to start up the M15, you can choose an appropriate language from the notice.
Afterwards, you can go to the Settings menu to switch to other languages. Here are the instructions.
- Click Settings->Languages & input-> Languages->Language preferences in sequence;
- In the Language preferences interface, press Add a language;
- Select a language;
- After selecting the language, you should press the “=” icon on the right side of the target language and drag the language to the head of the list so that it can be selected.


Force to reboot
If something wrong happened to the M15 (stuck in the Welcome page, no response etc.), you can hold the Power and the Play button together for 10 seconds to force to reboot.
Factory data reset
If there are some problems happened to the M15, to restore factory defaults would help. Go to Settings->Backup & Reset->Factory data reset to execute it.
Notice: “Factory data reset” will erase all data from your internal storage and restore to the original default settings. Please backup important files in advance.
Chapter 4 Wireless and Networks
WLAN
The M15 supports WiFi (2.4/5G). The connecting steps are as follows.
- Click“Wi-Fi”in the Settings menu as shown in the picture below;
- Slide the WiFi switch to the right (ON) and the M15 will automatically search for and display available WiFi connections;
- Tap the name of the WiFi network you wish to connect to and input the password if prompted, and then the M15 will connect to the network.

Bluetooth transmitting
When the M15 is used as a Bluetooth transmitter connecting with new Bluetooth devices such as Bluetooth earphones, Bluetooth speakers, it needs to be first paired with relating devices. The steps are as follows.
- Tap the Bluetooth in Settings;
- If the Bluetooth on the M15 is off, turn it on by flicking the switch on the upper right to the “On” position on the right;
- Available devices will be automatically displayed on the list;
- Tap the name of your Bluetooth device to pair with it. Successfully paired devices will appear under the “Paired devices” list.

Before connecting to Bluetooth, you can select the Bluetooth audio codec which you want to use as follows.
- Enter the Settings->Audio interface;
- Click the Wireless playback quality, selecting the one you want to use. Then disconnect the current connection and connect with your Bluetooth device again.

Notice:
- If you have already connected with one Bluetooth device and you want to switch to other Bluetooth codec, you have to disconnect the Bluetooth first.(Note that he switching between the three modes of LDAC can work in real time.)
- When you turn on the Bluetooth of the M15, it will be automatically connected to the latest available device.
Chapter 5 Audio
Output selection
In this menu, outputs of PO/LO/SPDIF can be switched.

SPDIF out
You can choose between DoP and D2P modes. In D2P mode, PCM will be output originally while DSD will be converted to PCM output. In DoP mode, it will originally output what you input (The amplifier should support DSD or there will be noise when you play DSD in DOP mode)

Gain
Set the Gain level of the headphone output to be either High (high volume) or
Low (low volume). Matching different headphones with High or Low will bring you excellent audios.

Over-ear headphone mode
If you use high-impedance earphones (over-the ear), you can choose the Over-ear headphone mode in the drop-down list to acquire ultimate experience.

Lowpass filter mode
There are 6 kinds of lowpass filter modes in the M15 which are the internal configuration of AK4499.
Any mode would be available for your preference.

Wireless playback quality
Its defaulted connection is from the highest Bluetooth codec to the lowest in turn when the M15 is as a Bluetooth transmitter. You can choose the top supported codec from this option.
Notice: if it is stuck or in an unsteady state, try to switch to lower Bluetooth codec to make it more stable.

Channel balance
If it is being biased, you can adjust the channel balance between the left and right channels. There are 10 settings available.

ALL To DSD
In ALL To DSD mode, PCM will be converted to DSD output with promoted sound quality.
Notice: The All To DSD mode would increase more heat for the M15, and the battery life would be relatively shortened a bit.

Adjustable volume at LO
This allows you to set whether the volume through Line Out can be controlled by adjusting the volume level or not. The maximum volume would be the default value without selecting the option.

AirPlay
The instructions to use AirPlay are shown as follows.
(1)To make both the M15 and your Apple device connect to the same WiFi first;


Chapter 6 Display
Display settings consist of Brightness level, Wallpaper, Indicator Light Control, Sleep, Screen saver, Font size, Display size and Display volume. The following is a detailed description of several common function items.
Indicator Light Control
The brightness level and working status of the indicator light can be chosen in this menu.
Brightness level
- There is a brightness bar on the list which can control the brightness of the pulsar light;
- When “Follow the volume” is chosen, the brightness of the pulsar light will be adjusted following the volume. The volume is higher, the indicator light is brighter.
Notice: the brightness bar would not be working when“Follow the volume” is chosen.

Indicator status
- Constantly on/Pulsing/Off options are available in both working and charging modes.
- When the M15 is in the working and charging modes simultaneously, the charging mode will be prior.

Sleep
Sleep means the screen will turn off if there is no operation. The time to enter sleep mode can be set.

Display volume
After selecting this option, the concrete volume value will be displayed in the status bar.

Chapter 7 General
Multifunction button
There is a multifunction button on the bottom left side of the M15. It is defaulted to add the current track on FiiO Music to my favorites. Go to Settings->General->Multifunction button to
switch to other functions, such as play next randomly, delete the current playing song, switch filters, switch equalizer, enter USB DAC mode, enter Bluetooth Receiving mode. More functions will be available in the coming time.
Short press the multifunction button
Execute the chosen function

Long press the multifunction button
Long press to enable the function menu and click to execute corresponding functions. This option is only valid for one time.

Notice: the multifunction button only works in Android/Pure Music Mode, and some functions are only applicable to the FiiO Music app.
Navigation control
The M15 has two ways of operation: gesture operation and virtual key operation. Go to Settings- >General->Navigation control to switch.
Power-off timer
Sleep
The device will automatically shut down when the time reaches to the set value, and this time can be set to any integer value between 0 and 120 minutes. Note that when the setting is OFF, the sleep shutdown function will not be working.
Idle power-off
When the device is not working and playing music and the timer reaches to the set value, the device will automatically turn off. Once with any operation, the timer would restart. The powerdown time can be set to any integer value between 0 and 50 minutes. Note that when the setting is OFF, the Idle power-off function will not be working.

HOLD switch setting
With the HOLD key on, all buttons are locked. Go to Settings->General->HOLD switch setting to set certain buttons on/off based on your habits.

Double tap to wakeup
Click the “Double tap to wakeup” option, the screen can be wake up by double-clicking in sleep status.

Disable charging
There is an charging prohibited function. It means when the M15 is connected with computers or chargers, it would not be charged in order to protect the battery. It also eases the heat dissipation caused by charging while working.
Notice: when the M15 is in low battery, the disable charging option would be automatically canceled so that the M15 would be charged.

In-vehicle mode
Under this option, connect the M15 with the in-vehicle USB by an USB cable. When the vehicle is on, the M15 would automatically turn on and enter FiiO Music exclusive in-vehicle interface. When the vehicle is off, the M15 would be off.
Notice: part of the in-vehicle USB would have noise wave. This may affect the music playing. It is suggested to collocate with the LA-UA1 which could help to isolate the interference and improve music quality.

Chapter 8 FiiO Music Homepage
FiiO Music will enter the guide page when first started. Swipe right to the last page and click immediately experience to enter the homepage. Instructions are shown below.


Playlist interface
Click the icon at the upper right of each track to pop up the hidden menu. Then tap the icon in that menu to execute corresponding operations;


Bulk management

Quick search
Slide the screen with your fingers in the letter bar at the right side. A quick search icon will show up in the middle of the screen. Slide to relating initials to skip to relating tracks.

One-tap to locate the current playing


Now playing interface

Switching area
Clicking in the middle of the album cover enables you to switch between album cover and lyrics;
sliding to the left or right enables you to play the next or previous track.
Slide to fast forward/rewind
Tap anywhere on the progress bar below the album cover area to jump to the corresponding part of the track now playing;
Notice: while in the lyrics display page, you can adjust the playback progress by sliding over the lyrics, adjust

Equalizer
FiiO Music has built in a graphic equalizer. One may choose between the preset genre directly, or from 20Hz to 20kHz, adjusting the ten frequency bands independently from -12 to +12 dB based on your personal listening needs.

Choose preset EQ: swipe up from the bottom of the screen to show the full list of EQ presets. Tap certain icon to switch equalizers.
Customized EQ: steps to customize an EQ setting.
a. Tap the button on the upper right to the right to activate the equalizer.
b. Choose the genre preset to be adjusted (e.g. “User Defined”);
c. Drag a vertical slider to adjust its corresponding frequency up and down. The EQ curve above changes to reflect your adjustments. Swipe left or right over the sliders to move between the low and high frequency sliders;
d. Tap the Back button at the upper left corner to exit and save changes;
Reset EQ: Tap the Reset button at the upper right corner to reset the present EQ preset to its original genre.
Notice: if a factory data reset is performed on the M15, all EQ settings will be reset to default.
MQA
MQA (Master Quality Authenticated)
M15 includes MQA technology, which enables you to play back MQA audio files and streams, delivering the sound of the original master recording.
The green or blue dot next to MQA logo indicates that the unit is decoding and playing an MQA stream or file, and denotes provenance to ensure that the sound is identical to that of the source material. It glows blue to indicate it is playing an MQA Studio file, which has either been approved in the studio by the artist/producer or has been verified by the copyright owner.

Visit mqa.co.uk for more information.
MQA and the Sound Wave Device are registered trade marks of MQA Limited.© 2016
Read More About This Manual & Download PDF:
Documents / Resources
 |
FiiO M15 Portable High Resolution Digital Audio Player [pdf] User Manual M15, M15 Portable High Resolution Digital Audio Player, M15, Portable High Resolution Digital Audio Player, High Resolution Digital Audio Player, Digital Audio Player, Audio Player, Player |


