1. مقدمه
Thank you for choosing the SMARTRO Digital Alarm Clock-03. This manual provides detailed instructions for setting up, operating, and maintaining your new alarm clock. Please read this manual thoroughly before use to ensure optimal performance and longevity of your device.
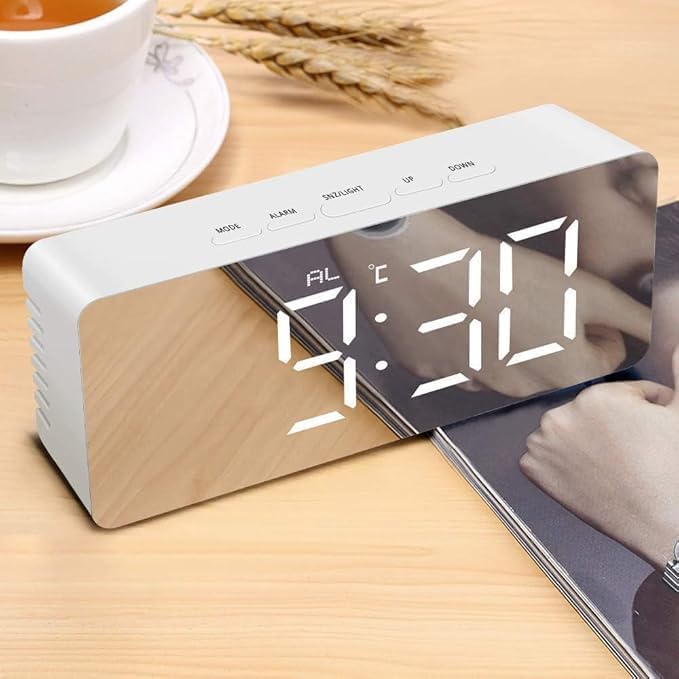
Image 1.1: The SMARTRO Digital Alarm Clock-03 showing the time 9:30 AM on its reflective display.
2. محتویات بسته
لطفاً بررسی کنید که تمام موارد ذکر شده در زیر در بسته شما موجود باشد:
- 1 x SMARTRO Digital Alarm Clock Unit
- 1 عدد کابل شارژ USB (نوع C)
- ۱ عدد دفترچه راهنمای کاربر (این سند)
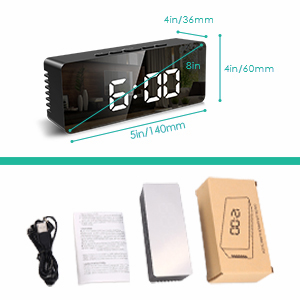
Image 2.1: Visual representation of the package contents, including the alarm clock, USB cable, and user manual.
3. راه اندازی
3.1 اتصال برق
Connect the provided USB Type-C cable to the clock's power input port and plug the other end into a USB power adapter (not included) or a powered USB port. The display will light up.
3.2 Battery Installation (Optional for Power Save Mode)
For power-saving mode and to retain settings during a power outage, install 3 AAA batteries (not included) into the battery compartment located on the back of the clock. Note that the display will only stay on continuously when powered via USB. In battery-only mode, the screen will turn off after 10 seconds of inactivity to conserve power.
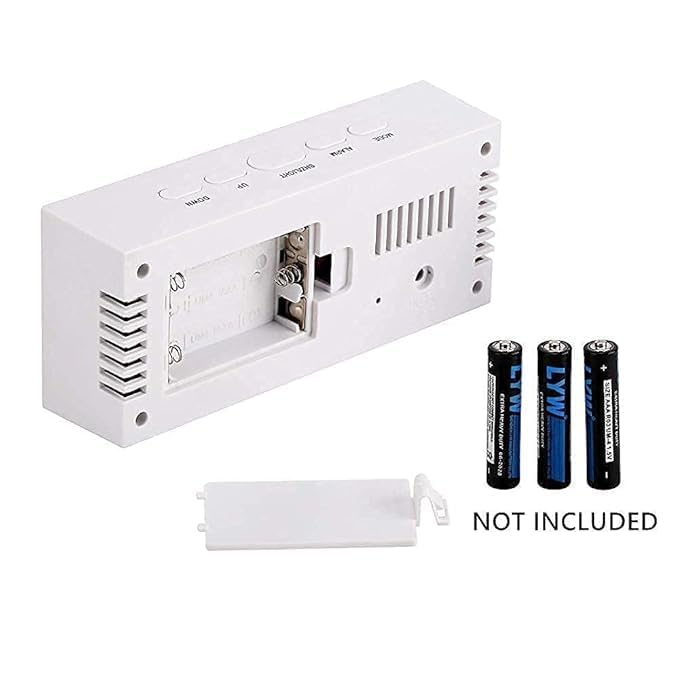
تصویر 3.1: عقب view of the alarm clock, illustrating the battery compartment for 3 AAA batteries (not included).
۳.۱ تنظیم اولیه زمان و تاریخ
- را فشار دهید حالت برای ورود به حالت تنظیم زمان، دکمه را فشار دهید. ارقام ساعت چشمک خواهند زد.
- استفاده کنید UP و پایین دکمه های تنظیم ساعت
- را فشار دهید حالت again to set the minutes, then repeat with UP و پایین.
- به فشار دادن ادامه دهید حالت to cycle through and set the year, month, and day.
- را فشار دهید حالت one more time to exit setting mode, or wait a few seconds for it to automatically save and exit.
- To switch between 12/24H format, press the UP button while in normal time display mode.
4. دستورالعمل های عملیاتی
۵.۲ تنظیم هشدارها
The clock supports two independent alarms. Follow these steps to set an alarm:
- را فشار دهید آلارم button to enter Alarm 1 setting mode. The alarm hour digits will flash.
- استفاده کنید UP و پایین دکمه های تنظیم ساعت زنگ.
- را فشار دهید آلارم again to set the alarm minutes, then adjust with UP و پایین.
- را فشار دهید آلارم a third time to select the alarm mode: دوشنبه - جمعه (1-5) MON-SAT (1-6) MON-SUN (1-7), or SAT-SUN. استفاده کنید UP و پایین را انتخاب کنید.
- را فشار دهید آلارم again to set the alarm volume (3 levels).
- Repeat the process for Alarm 2 by pressing آلارم until 'AL2' appears.
- برای فعال/غیرفعال کردن زنگ هشدار، دکمه آلارم button briefly while in normal time display mode to toggle between alarms. An alarm icon will appear on the display when active.
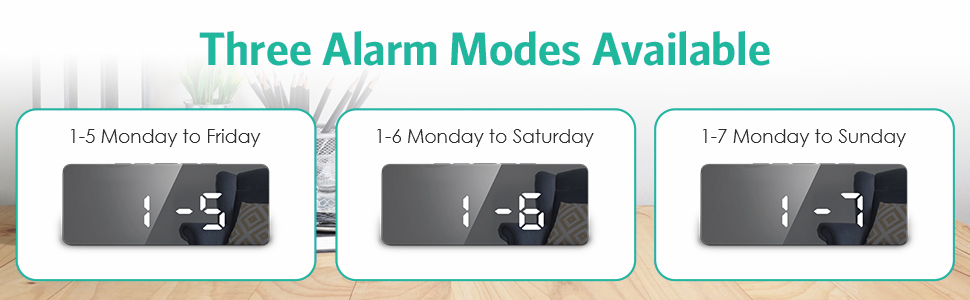
Image 4.1: Illustration of the three available alarm modes: Monday-Friday, Monday-Saturday, and Monday-Sunday.
4.2 عملکرد تعویق
وقتی زنگ هشدار به صدا در میآید، دکمه را فشار دهید SNZ/LIGHT button to activate the snooze function. The alarm will pause for 9 minutes and then sound again.
۴.۳ تنظیم روشنایی صفحه نمایش
The clock offers 5 levels of adjustable brightness (100%-60%-30%-3%-0%).
- در حالت نمایش زمان عادی، دکمه را فشار دهید SNZ/LIGHT button repeatedly to cycle through the brightness levels.
- The clock also features an automatic nighttime dimming mode.
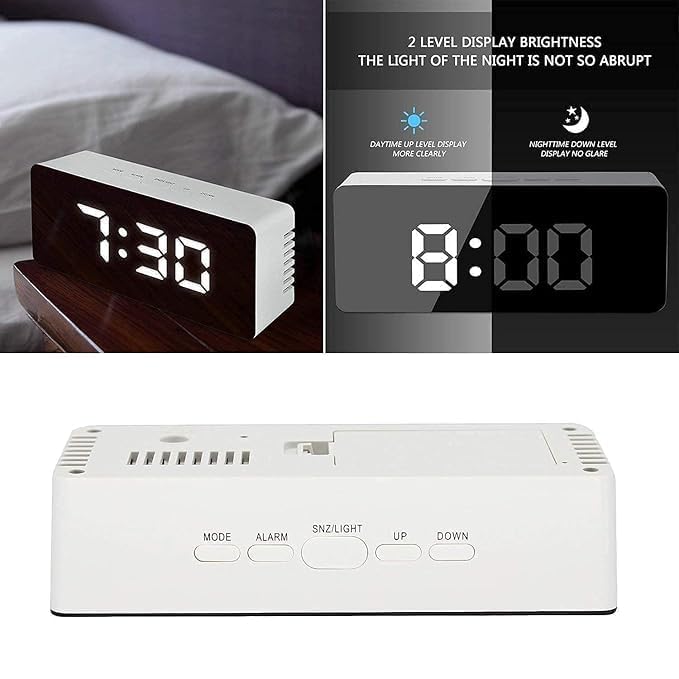
Image 4.2: Demonstrates the difference between daytime (brighter) and nighttime (dimmer) display levels for optimal visibility.
4.4 حالت شب
To activate the automatic nighttime dimming mode, press and hold the SNZ/LIGHT button for 3 seconds. In this mode, the display brightness will automatically dim between 7:00 PM and 7:00 AM.
4.5 پورت شارژ USB
The clock includes a separate USB port that allows you to charge compatible external devices. Connect your device's charging cable to this port.
5. تعمیر و نگهداری
- Clean the clock's surface with a soft, dry cloth. Avoid using abrasive cleaners or solvents, as they may damage the finish.
- If using batteries, replace them when the display becomes dim or functions become erratic. Ensure correct polarity when inserting new batteries.
- دستگاه را از دمای شدید، نور مستقیم خورشید و رطوبت زیاد دور نگه دارید.
6 عیب یابی
- Q: The display is not lighting up.
- A: Ensure the USB Type-C cable is securely connected to both the clock and a working power source. If using batteries, check if they are inserted correctly and have sufficient charge.
- Q: The alarm is not sounding.
- A: Verify that the alarm is activated (alarm icon visible on display) and that the alarm volume is set to an audible level. Check the alarm time and day settings.
- Q: The time resets every time the power is disconnected.
- A: This clock requires continuous USB power for the display to remain on. For settings retention during power interruptions, ensure 3 fresh AAA batteries are installed in the battery compartment.
- Q: Buttons are unresponsive.
- A: Disconnect the power cable and remove batteries for a few minutes, then reconnect to perform a soft reset. If the issue persists, contact customer support.
7. مشخصات
| ویژگی | جزئیات |
|---|---|
| مدل | Alarm Clock-03 |
| نوع نمایشگر | LED دیجیتال |
| ابعاد (L x H x D) | ۲۲ میلیمتر × ۲۲ میلیمتر × ۱۴ میلیمتر (تقریباً ۰.۸۶۶ × ۰.۸۶۶ × ۰.۵۵۱ اینچ) |
| وزن مورد | 199 گرم |
| منبع تغذیه | USB-C (mains power, adapter not included), 3x AAA Batteries (not included) for power-saving mode/memory backup |
| مواد | پلاستیک |
| ویژگی های خاص | Large Display, Dual Alarms, Snooze, Adjustable Brightness (5 levels), Automatic Night Mode, USB Charging Port, Date & Temperature Display, 12/24H Format, Daylight Saving Time mode |
تصویر ۹.۱: ابعاد بیش از حدview از ساعت زنگ دار.
8. گارانتی و پشتیبانی
For warranty information or technical support, please refer to the product packaging or contact SMARTRO customer service directly. You can often find contact details on the official SMARTRO webسایت یا از طریق فروشگاه شما.
For general inquiries or to explore other SMARTRO products, visit the SMARTRO Brand Store on Amazon.


