1. مقدمه
This manual provides detailed instructions for the installation, operation, and maintenance of your GIGABYTE GA-B760M D3HP WIFI6 motherboard. Designed for optimal performance and reliability, this motherboard supports Intel Core 14th, 13th, and 12th generation CPUs and features DDR5 memory support, PCIe 4.0 M.2 connectors, and Wi-Fi 6 connectivity. Please read this manual thoroughly before beginning installation to ensure proper setup and to maximize the lifespan of your product.
2. ویژگی های کلیدی
- پشتیبانی از CPU: Compatible with Intel Core 14th, 13th, and 12th generation processors.
- طراحی قدرت: Features a 4+1+1 phase hybrid digital VRM solution for stable power delivery.
- حافظه: Supports Dual Channel DDR5 memory with 4 DIMM slots and XMP memory module support.
- ذخیره سازی: Equipped with 2 PCIe 4.0 x4 M.2 connectors for high-speed storage.
- شبکه سازی: Includes GbE LAN and Wi-Fi 6 802.11ax for fast and reliable network connectivity.
3. راه اندازی و نصب
Before installing the motherboard, ensure your system is powered off and disconnected from the power source. Handle the motherboard by its edges to avoid static discharge.
3.1 طرح بندی مادربرد
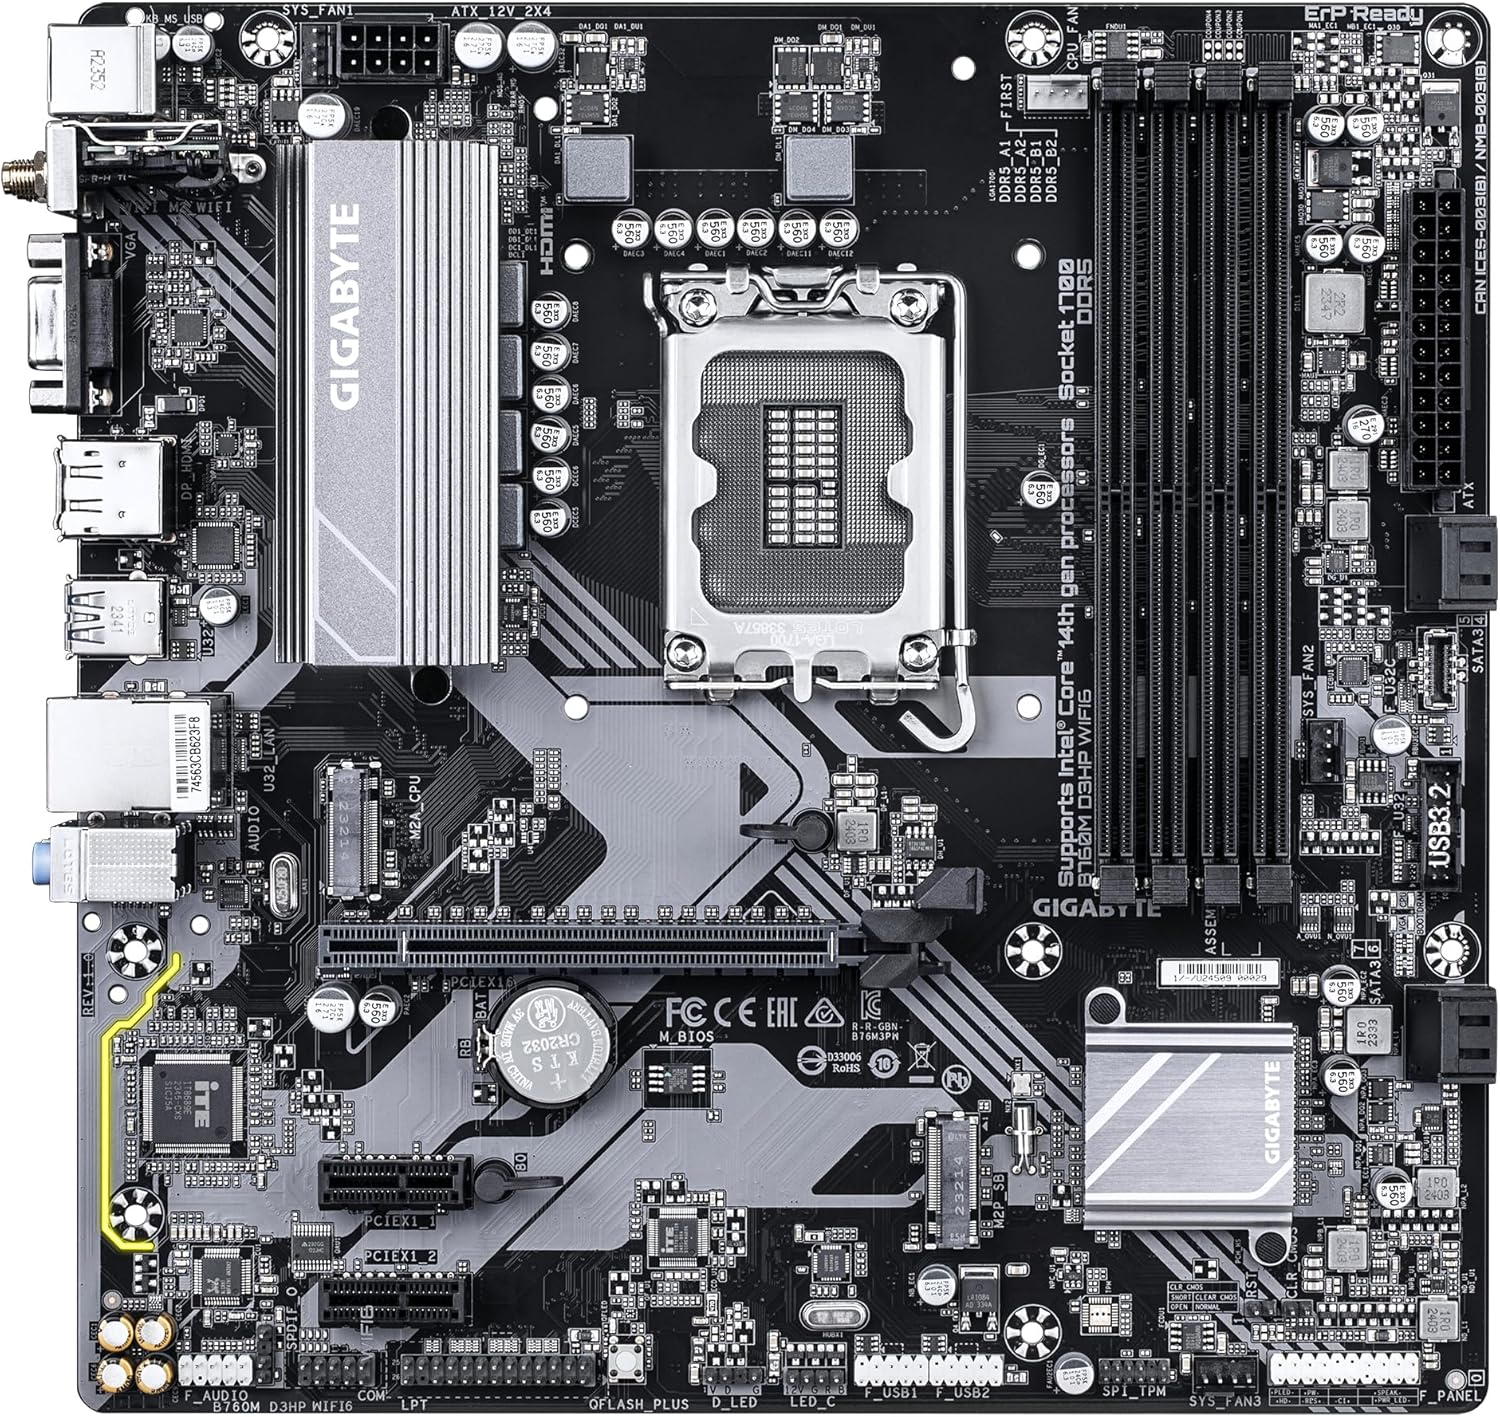
Familiarize yourself with the layout of the motherboard components before proceeding with installation.

شکل 1: بالا پایین view of the GIGABYTE GA-B760M D3HP WIFI6 motherboard, showing the CPU socket, DIMM slots, PCIe slots, and various headers.
شکل 2: زاویه دار view of the GIGABYTE GA-B760M D3HP WIFI6 motherboard, highlighting the heatsinks and overall component placement.
3.2 نصب CPU
- سوکت پردازنده LGA 1700 را روی مادربرد پیدا کنید.
- اهرم سوکت CPU را باز کنید و صفحه بارگذاری را بلند کنید.
- Carefully align the CPU with the socket, ensuring the triangular mark on the CPU matches the mark on the socket. Do not force the CPU into the socket.
- صفحه بار را پایین بیاورید و آن را با اهرم محکم کنید.
- خمیر حرارتی را روی CPU بمالید و خنککننده CPU را طبق دستورالعمل سازنده نصب کنید.
۵.۳ نصب حافظه (RAM)
- چهار اسلات DDR5 DIMM را پیدا کنید.
- گیرههای دو سر اسلات DIMM را باز کنید.
- بریدگی روی ماژول حافظه DDR5 را با کلید موجود در اسلات DIMM همتراز کنید.
- ماژول حافظه را محکم در شیار قرار دهید تا گیرهها در جای خود قرار گیرند. مطمئن شوید که هر دو گیره بسته هستند.
- برای پیکربندی دو کاناله، برای جفتسازی اسلاتهای پیشنهادی به دفترچه راهنمای مخصوص مادربرد مراجعه کنید.
۳.۴ نصب دستگاه ذخیرهسازی (درایوهای SSD M.2 و SATA)
- M.2 SSD: Locate the M.2 connectors. Remove the M.2 screw/standoff. Insert the M.2 SSD into the slot at a 30-degree angle. Push down the SSD and secure it with the screw/standoff.
- درایوهای SATA: Connect SATA data cables from your storage drives (HDDs/SSDs) to the SATA ports on the motherboard. Connect power cables from your power supply to the drives.
3.5 اتصالات برق
- کانکتور برق اصلی ATX 24 پین را از منبع تغذیه خود به پورت مربوطه روی مادربرد وصل کنید.
- Connect the 8-pin ATX 12V CPU power connector to the port near the CPU socket.
۲.۸ پنل جلویی و اتصالات جانبی
Connect your case's front panel connectors (power button, reset button, USB ports, audio jacks, LED indicators) to the corresponding headers on the motherboard. Refer to the motherboard's detailed manual for exact pin layouts.

شکل 3: Rear I/O panel of the GIGABYTE GA-B760M D3HP WIFI6 motherboard, showing USB ports, display outputs, audio jacks, Ethernet, and Wi-Fi antenna connectors.
4. دستورالعمل های عملیاتی
4.1 راه اندازی بایوس
Upon first boot, you may need to enter the BIOS (Basic Input/Output System) to configure settings such as boot order, date/time, and enable specific features. To enter BIOS, press the DEL key repeatedly during startup. The GIGABYTE UEFI BIOS provides an intuitive graphical interface for configuration.
4.2 نصب درایور
After installing your operating system, install the necessary drivers for the motherboard's components (chipset, audio, LAN, Wi-Fi, etc.). These drivers are typically provided on a support DVD or can be downloaded from the official GIGABYTE webسایتی برای مدل مادربرد خاص شما.
5. تعمیر و نگهداری
- تمیز کردن: مرتباً با استفاده از هوای فشرده، گرد و غبار را از روی مادربرد و فنهای کیس تمیز کنید. قبل از تمیز کردن، مطمئن شوید که سیستم خاموش و از برق کشیده شده است.
- بهروزرسانیهای بایوس: گیگابایت را به صورت دورهای بررسی کنید website for BIOS updates. BIOS updates can improve system stability, compatibility, and performance. Follow the instructions provided by GIGABYTE carefully when updating the BIOS.
- به روز رسانی درایور: درایورهای خود را بهروز نگه دارید تا از عملکرد بهینه و سازگاری با نرمافزارها و سختافزارهای جدید اطمینان حاصل شود.
6 عیب یابی
- بدون برق:
- تمام اتصالات برق (ATX 24 پین، CPU 8 پین) را بررسی کنید.
- از روشن بودن منبع تغذیه اطمینان حاصل کنید.
- منبع تغذیه را با یک سیستم دیگر یا تستر منبع تغذیه آزمایش کنید.
- بدون نمایش:
- Ensure the monitor is connected to the graphics card (or integrated graphics port if no discrete GPU is used).
- کارت گرافیک و ماژولهای حافظه را دوباره نصب کنید.
- سعی کنید فقط با یک رم بوت کنید.
- ناپایداری/خرابی سیستم:
- دمای CPU و GPU را بررسی کنید.
- Ensure all components are properly seated.
- ابزارهای تشخیص حافظه را برای بررسی خطاهای رم اجرا کنید.
- بایوس و درایورها را بهروزرسانی کنید.
- مشکلات اتصال به شبکه:
- For wired LAN, check the Ethernet cable and router connection.
- For Wi-Fi, ensure antennas are securely attached and drivers are installed.
- Verify network settings in the operating system.
7. مشخصات
| ویژگی | جزئیات |
|---|---|
| نام تجاری | گیگابایت |
| نام مدل | B760M D3HP WIFI6 |
| سوکت CPU | LGA 1700 |
| پردازندههای سازگار | Intel Core 14th Gen, Intel Core 13th Gen, Intel Core 12th Gen |
| نوع چیپست | اینتل B760 |
| فناوری حافظه رم | DDR5 |
| سرعت ساعت حافظه | 5600 مگاهرتز |
| دستگاه های سازگار | Personal Computer, Desktop Computer |
| پلت فرم | ویندوز 10 ، ویندوز 11 |
| ابعاد محصول | 9.61 x 9.61 x 1.38 اینچ |
| وزن مورد | 2.2 پوند |
8. گارانتی و پشتیبانی
برای اطلاعات گارانتی و پشتیبانی فنی، لطفاً به وبسایت رسمی گیگابایت مراجعه کنید. website or contact GIGABYTE customer service. Keep your proof of purchase for warranty claims.
رسمی گیگابایت Webسایت: www.gigabyte.com


